
User Manual
Page 5
... File 3-37 3.9 Exit menu 3-38 3.10 Updating BIOS 3-39 3.10.1 ASUS Update utility 3-40 3.10.2 ASUS EZ Flash 2 Utility 3-43 3.10.3 ASUS BIOS Updater 3-45 Chapter 4: Software support 4.1 Installing an operating system 4-1 4.2 Support DVD information 4-1 4.2.1 Running the support DVD 4-1 4.2.2 Drivers menu 4-2 4.2.3 Utilities menu 4-3 4.2.4 Make disk menu 4-4 4.2.5 Manual menu 4-4 4.2.6 Video menu 4-5 4.2.7 ASUS Contact information 4-5 4.2.8 Other information 4-6 4.3 Software information...
... File 3-37 3.9 Exit menu 3-38 3.10 Updating BIOS 3-39 3.10.1 ASUS Update utility 3-40 3.10.2 ASUS EZ Flash 2 Utility 3-43 3.10.3 ASUS BIOS Updater 3-45 Chapter 4: Software support 4.1 Installing an operating system 4-1 4.2 Support DVD information 4-1 4.2.1 Running the support DVD 4-1 4.2.2 Drivers menu 4-2 4.2.3 Utilities menu 4-3 4.2.4 Make disk menu 4-4 4.2.5 Manual menu 4-4 4.2.6 Video menu 4-5 4.2.7 ASUS Contact information 4-5 4.2.8 Other information 4-6 4.3 Software information...
User Manual
Page 16
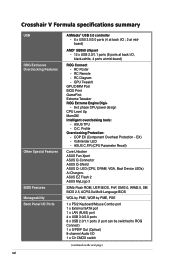
...! LED (CPU, DRAM, VGA, Boot Device LEDs) Ai Charger+ ASUS EZ Flash 2 ASUS MyLogo 3 32Mb Flash ROM, UEFI BIOS, PnP, DMI2.0, WfM2.0, SM BIOS 2.5, ACPI2.0a Multi-Language BIOS WOL by PME, WOR by PME, PXE 1 x PS/2 Keyboard/... 4 ports at mid-board) ROG Connect - Profile Overclocking Protection: - ASUS C.P.R.(CPU Parameter Recall) Core Unlocker ASUS Fan Xpert ASUS Q-Connector ASUS Q-Shield ASUS Q- Crosshair V Formula specifications summary USB ROG Exclusive Overclocking Features Other Special Features BIOS Features Manageability Back Panel I/O Ports xvi ASMedia® USB 3.0 controller - ...
...! LED (CPU, DRAM, VGA, Boot Device LEDs) Ai Charger+ ASUS EZ Flash 2 ASUS MyLogo 3 32Mb Flash ROM, UEFI BIOS, PnP, DMI2.0, WfM2.0, SM BIOS 2.5, ACPI2.0a Multi-Language BIOS WOL by PME, WOR by PME, PXE 1 x PS/2 Keyboard/... 4 ports at mid-board) ROG Connect - Profile Overclocking Protection: - ASUS C.P.R.(CPU Parameter Recall) Core Unlocker ASUS Fan Xpert ASUS Q-Connector ASUS Q-Shield ASUS Q- Crosshair V Formula specifications summary USB ROG Exclusive Overclocking Features Other Special Features BIOS Features Manageability Back Panel I/O Ports xvi ASMedia® USB 3.0 controller - ...
User Manual
Page 24
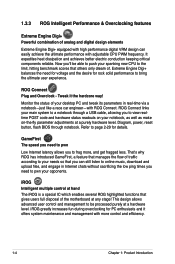
... at a hardware level. It expedites heat dissipation and achieves better electric conduction keeping critical components reliable. ROG Connect Plug and Overclock - Diagram, power, reset button, flash BIOS through a USB cable, allowing you to page 2-29 for details. That's why ROG has introduced GameFirst, a feature that gives users full disposal of analog and...
... at a hardware level. It expedites heat dissipation and achieves better electric conduction keeping critical components reliable. ROG Connect Plug and Overclock - Diagram, power, reset button, flash BIOS through a USB cable, allowing you to page 2-29 for details. That's why ROG has introduced GameFirst, a feature that gives users full disposal of analog and...
User Manual
Page 57
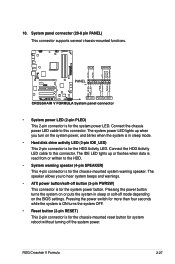
The speaker allows you turn on the BIOS settings. The IDE LED lights up when you to the HDD. • System ...the chassis-mounted reset button for the HDD Activity LED. Connect the chassis power LED cable to this connector. ROG Crosshair V Formula 2-27 Pressing the power switch for more than four seconds while the system is ON turns the system OFF. •...off button (2-pin PWRSW) This connector is for the system power LED. The system power LED lights up or flashes when data is read from or written to hear system beeps and warnings. • ATX power button/soft-off...
The speaker allows you turn on the BIOS settings. The IDE LED lights up when you to the HDD. • System ...the chassis-mounted reset button for the HDD Activity LED. Connect the chassis power LED cable to this connector. ROG Crosshair V Formula 2-27 Pressing the power switch for more than four seconds while the system is ON turns the system OFF. •...off button (2-pin PWRSW) This connector is for the system power LED. The system power LED lights up or flashes when data is read from or written to hear system beeps and warnings. • ATX power button/soft-off...

User Manual
Page 120
3.8.3 ASUS O.C. Profile This item allows you to the BIOS Flash. Add Your CMOS Profile Allows you to load. 3-36 Chapter 3: BIOS setup Press , and choose a profile to load the previous BIOS settings saved in the Save to Profile sub-item. Load CMOS Profiles Allows you to save your CMOS settings in the BIOS Flash. In the Label sub-item, type your profile name and press , and then choose a profile number to save the current BIOS file to store or load multiple BIOS settings.
3.8.3 ASUS O.C. Profile This item allows you to the BIOS Flash. Add Your CMOS Profile Allows you to load. 3-36 Chapter 3: BIOS setup Press , and choose a profile to load the previous BIOS settings saved in the Save to Profile sub-item. Load CMOS Profiles Allows you to save your CMOS settings in the BIOS Flash. In the Label sub-item, type your profile name and press , and then choose a profile number to save the current BIOS file to store or load multiple BIOS settings.
User Manual
Page 123
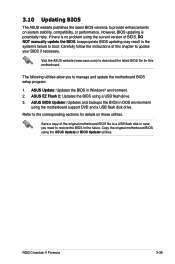
3.10 Updating BIOS The ASUS website publishes the latest BIOS versions to provide enhancements on these utilities. ASUS EZ Flash 2: Updates the BIOS using the ASUS Update or BIOS Updater utilities. ASUS BIOS Updater: Updates and backups the BIOS in the system's failure to boot. ROG Crosshair V Formula 3-39 Inappropriate BIOS updating may result in DOS environment using the current version of BIOS, DO NOT manually...
3.10 Updating BIOS The ASUS website publishes the latest BIOS versions to provide enhancements on these utilities. ASUS EZ Flash 2: Updates the BIOS using the ASUS Update or BIOS Updater utilities. ASUS BIOS Updater: Updates and backups the BIOS in the system's failure to boot. ROG Crosshair V Formula 3-39 Inappropriate BIOS updating may result in DOS environment using the current version of BIOS, DO NOT manually...
User Manual
Page 127
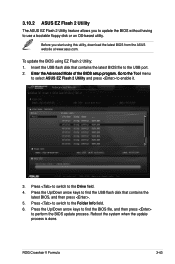
... when the update process is done. To update the BIOS using this utility, download the latest BIOS from the ASUS website at www.asus.com. 3.10.2 ASUS EZ Flash 2 Utility The ASUS EZ Flash 2 Utility feature allows you start using EZ Flash 2 Utility: 1. Press the Up/Down arrow keys to...ASUS EZ Flash 2 Utility and press to enable it. 3. Before you to update the BIOS without having to perform the BIOS update process. Press the Up/Down arrow keys to find the BIOS file, and then press � to use a bootable floppy disk or an OS‑based utility. ROG Crosshair V Formula...
... when the update process is done. To update the BIOS using this utility, download the latest BIOS from the ASUS website at www.asus.com. 3.10.2 ASUS EZ Flash 2 Utility The ASUS EZ Flash 2 Utility feature allows you start using EZ Flash 2 Utility: 1. Press the Up/Down arrow keys to...ASUS EZ Flash 2 Utility and press to enable it. 3. Before you to update the BIOS without having to perform the BIOS update process. Press the Up/Down arrow keys to find the BIOS file, and then press � to use a bootable floppy disk or an OS‑based utility. ROG Crosshair V Formula...
User Manual
Page 128
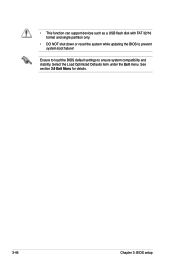
See section 3.9 Exit Menu for details. 3-44 Chapter 3: BIOS setup • This function can support devices such as a USB flash disk with FAT 32/16 format and single partition only. • DO NOT shut down or reset the system while updating the BIOS to ensure system compatibility and stability. Ensure to load the BIOS default settings to prevent system boot failure! Select the Load Optimized Defaults item under the Exit menu.
See section 3.9 Exit Menu for details. 3-44 Chapter 3: BIOS setup • This function can support devices such as a USB flash disk with FAT 32/16 format and single partition only. • DO NOT shut down or reset the system while updating the BIOS to ensure system compatibility and stability. Ensure to load the BIOS default settings to prevent system boot failure! Select the Load Optimized Defaults item under the Exit menu.
User Manual
Page 129
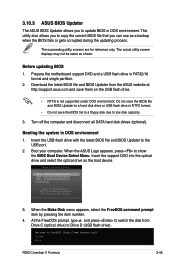
... utility screen displays may not be same as the boot device. When the ASUS Logo appears, press to the USB port. 2. C:\>d: D:\> ROG Crosshair V Formula 3-45 Download the latest BIOS file and BIOS Updater from Drive C (optical drive) to a hard disk drive or USB flash drive in DOS environment. The succeeding utility screens are for reference only...
... utility screen displays may not be same as the boot device. When the ASUS Logo appears, press to the USB port. 2. C:\>d: D:\> ROG Crosshair V Formula 3-45 Download the latest BIOS file and BIOS Updater from Drive C (optical drive) to a hard disk drive or USB flash drive in DOS environment. The succeeding utility screens are for reference only...
User Manual
Page 130
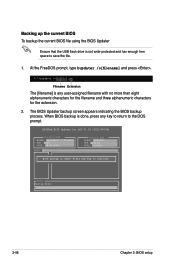
...18 [2011/04/08] Current ROM BOARD: Crosshair V Formula VER: 0239 DATE: 08/04/2011 Update ROM BOARD: Unknown VER: Unknown DATE: Unknown PATH: A:\ BIOS backup is done! Press any key to save the file. 1. Note Saving BIOS: 3-46 Chapter 3: BIOS setup At the FreeDOS prompt, type bupdater /o[...filename] and press . Backing up the current BIOS To backup the current BIOS file using the BIOS Updater Ensure that the USB flash drive is not write-protected and has enough ...
...18 [2011/04/08] Current ROM BOARD: Crosshair V Formula VER: 0239 DATE: 08/04/2011 Update ROM BOARD: Unknown VER: Unknown DATE: Unknown PATH: A:\ BIOS backup is done! Press any key to save the file. 1. Note Saving BIOS: 3-46 Chapter 3: BIOS setup At the FreeDOS prompt, type bupdater /o[...filename] and press . Backing up the current BIOS To backup the current BIOS file using the BIOS Updater Ensure that the USB flash drive is not write-protected and has enough ...
User Manual
Page 177
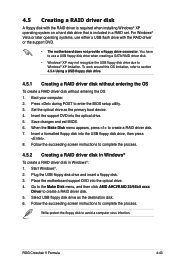
... RAID driver disk. 5. Boot your computer. 2. Follow the succeeding screen instructions to enter the BIOS setup utility. 3. Plug the USB floppy disk drive and insert a floppy disk. 3. To...driver disk without entering the OS To create a RAID driver disk without entering the OS 1. ROG Crosshair V Formula 4-43 Follow the succeeding screen instructions to create a RAID driver disk. 7. Set the optical ...The motherboard does not provide a floppy drive connector. You have to use either a USB flash drive with the RAID driver is required when installing Windows® XP operating system on ...
... RAID driver disk. 5. Boot your computer. 2. Follow the succeeding screen instructions to enter the BIOS setup utility. 3. Plug the USB floppy disk drive and insert a floppy disk. 3. To...driver disk without entering the OS To create a RAID driver disk without entering the OS 1. ROG Crosshair V Formula 4-43 Follow the succeeding screen instructions to create a RAID driver disk. 7. Set the optical ...The motherboard does not provide a floppy drive connector. You have to use either a USB flash drive with the RAID driver is required when installing Windows® XP operating system on ...


