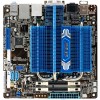
AT5IONT-I User's manual
Page 2
.... ASUS ASSUMES NO RESPONSIBILITY OR LIABILITY FOR ANY ERRORS OR INACCURACIES THAT MAY APPEAR IN THIS MANUAL, INCLUDING THE PRODUCTS AND SOFTWARE DESCRIBED IN IT. Offer to obtain the corresponding source code and your request please provide the name, model number and version, as stated in the About Box of the LGPL Software (with you. No part of Certain Software...
.... ASUS ASSUMES NO RESPONSIBILITY OR LIABILITY FOR ANY ERRORS OR INACCURACIES THAT MAY APPEAR IN THIS MANUAL, INCLUDING THE PRODUCTS AND SOFTWARE DESCRIBED IN IT. Offer to obtain the corresponding source code and your request please provide the name, model number and version, as stated in the About Box of the LGPL Software (with you. No part of Certain Software...
AT5IONT-I User's manual
Page 3
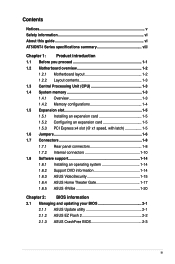
...1.4.2 Memory configurations 1-4 1.5 Expansion slot 1-5 1.5.1 Installing an expansion card 1-5 1.5.2 Configuring an expansion card 1-5 1.5.3 PCI Express x4 slot (@ x1 speed, with latch 1-5 1.6 Jumpers 1-6 1.7 Connectors 1-8 1.7.1 Rear panel connectors 1-8 1.7.2 Internal connectors 1-10 1.8 Software support 1-14 1.8.1 Installing an operating system 1-14 1.8.2 Support DVD information 1-14 1.8.3 ASUS VideoSecurity 1-15 1.8.4 ASUS Home Theater Gate 1-17 1.8.5 ASUS @Vibe 1-20 Chapter 2: BIOS information 2.1 Managing and updating your BIOS 2-1 2.1.1 ASUS Update utility 2-1 2.1.2 ASUS...
...1.4.2 Memory configurations 1-4 1.5 Expansion slot 1-5 1.5.1 Installing an expansion card 1-5 1.5.2 Configuring an expansion card 1-5 1.5.3 PCI Express x4 slot (@ x1 speed, with latch 1-5 1.6 Jumpers 1-6 1.7 Connectors 1-8 1.7.1 Rear panel connectors 1-8 1.7.2 Internal connectors 1-10 1.8 Software support 1-14 1.8.1 Installing an operating system 1-14 1.8.2 Support DVD information 1-14 1.8.3 ASUS VideoSecurity 1-15 1.8.4 ASUS Home Theater Gate 1-17 1.8.5 ASUS @Vibe 1-20 Chapter 2: BIOS information 2.1 Managing and updating your BIOS 2-1 2.1.1 ASUS Update utility 2-1 2.1.2 ASUS...
AT5IONT-I User's manual
Page 9
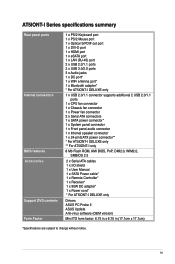
... 2 USB 2.0/1.1 ports 1 x CPU fan connector 1 x Chassis fan connector 1 x Power fan connector 2 x Serial ATA connectors 1 x SATA power connector* 1 x System panel connector 1 x Front panel audio connector 1 x Internal speaker connector 1 x 24-pin EATX power connector** * For AT5IONT-I DELUXE only ** For AT5IONT-I only 8 Mb Flash ROM, AMI BIOS, PnP, DMI2.0, WfM2.0, SMBIOS 2.5 2 x Serial ATA cables 1 x I/O shield 1 x User Manual 1 x SATA Power cable* 1 x Remote Controller* 1 x Receiver* 1 x 90W DC adapter* 1 x Power cord* * For AT5IONT-I DELUXE only Drivers ASUS PC Probe II ASUS Update Anti...
... 2 USB 2.0/1.1 ports 1 x CPU fan connector 1 x Chassis fan connector 1 x Power fan connector 2 x Serial ATA connectors 1 x SATA power connector* 1 x System panel connector 1 x Front panel audio connector 1 x Internal speaker connector 1 x 24-pin EATX power connector** * For AT5IONT-I DELUXE only ** For AT5IONT-I only 8 Mb Flash ROM, AMI BIOS, PnP, DMI2.0, WfM2.0, SMBIOS 2.5 2 x Serial ATA cables 1 x I/O shield 1 x User Manual 1 x SATA Power cable* 1 x Remote Controller* 1 x Receiver* 1 x 90W DC adapter* 1 x Power cord* * For AT5IONT-I DELUXE only Drivers ASUS PC Probe II ASUS Update Anti...
AT5IONT-I User's manual
Page 14
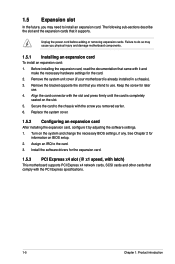
Replace the system cover. 1.5.2 Configuring an expansion card After installing the expansion card, configure it and make the necessary hardware settings for the expansion card. 1.5.3 PCI Express x4 slot (@ x1 speed, with latch) This motherboard supports PCI Express x4 network cards, SCSI cards and other cards that it supports. Install the software drivers for the card. 2. Secure the card to do so may need to the card. 3. See Chapter 2 for later use . Align the card connector with the PCI Express specifications. 1-5 Chapter 1: Product introduction...
Replace the system cover. 1.5.2 Configuring an expansion card After installing the expansion card, configure it and make the necessary hardware settings for the expansion card. 1.5.3 PCI Express x4 slot (@ x1 speed, with latch) This motherboard supports PCI Express x4 network cards, SCSI cards and other cards that it supports. Install the software drivers for the card. 2. Secure the card to do so may need to the card. 3. See Chapter 2 for later use . Align the card connector with the PCI Express specifications. 1-5 Chapter 1: Product introduction...
AT5IONT-I User's manual
Page 16
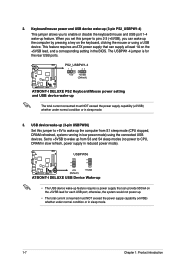
... S1 sleep mode (CPU stopped, DRAM refreshed, system running in low power mode) using a USB device. USB device wake-up the computer by pressing a key on the +5VSB lead, and a corresponding setting in sleep mode. 3. Set to +5VSB to enable or disable the keyboard/mouse and USB port 1-4 wake-up The total current consumed must NOT exceed the power supply capability (+5VSB) whether under normal condition or in the BIOS. This feature requires an ATX power supply that can supply...
... S1 sleep mode (CPU stopped, DRAM refreshed, system running in low power mode) using a USB device. USB device wake-up the computer by pressing a key on the +5VSB lead, and a corresponding setting in sleep mode. 3. Set to +5VSB to enable or disable the keyboard/mouse and USB port 1-4 wake-up The total current consumed must NOT exceed the power supply capability (+5VSB) whether under normal condition or in the BIOS. This feature requires an ATX power supply that can supply...
AT5IONT-I User's manual
Page 20
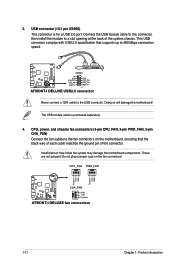
... the motherboard components. CPU, power, and chassis fan connectors (3-pin CPU_FAN, 3-pin PWR_FAN, 3-pin CHA_FAN) Connect the fan cables to the USB connector. The USB module cable is for a USB 2.0 port. USB56 AT5IONT-I DELUXE PIN 1 AT5IONT-I DELUXE fan connectors 1-11 Chapter 1: Product introduction CPU_FAN PWR_FAN Rotation +12V GND Rotation +12V GND CHA_FAN AT5IONT-I DELUXE GND +12V Rotation AT5IONT-I DELUXE USB2.0 connector Never connect a 1394 cable to the fan connectors on the fan connectors! This USB connector complys with USB 2.0 specification that the black wire...
... the motherboard components. CPU, power, and chassis fan connectors (3-pin CPU_FAN, 3-pin PWR_FAN, 3-pin CHA_FAN) Connect the fan cables to the USB connector. The USB module cable is for a USB 2.0 port. USB56 AT5IONT-I DELUXE PIN 1 AT5IONT-I DELUXE fan connectors 1-11 Chapter 1: Product introduction CPU_FAN PWR_FAN Rotation +12V GND Rotation +12V GND CHA_FAN AT5IONT-I DELUXE GND +12V Rotation AT5IONT-I DELUXE USB2.0 connector Never connect a 1394 cable to the fan connectors on the fan connectors! This USB connector complys with USB 2.0 specification that the black wire...
AT5IONT-I User's manual
Page 23
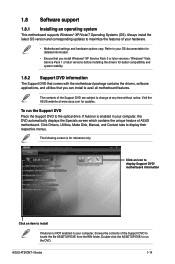
... contents of ASUS motherboard. Click Drivers, Utilities, Make Disk, Manual, and Contact tabs to avail all motherboard features. The following screen is enabled in your computer, the DVD automatically displays the Specials screen which contains the unique feature of the Support DVD to the optical drive. ASUS AT5IONT-I Series 1-14 1.8 Software support 1.8.1 Installing an operating system This motherboard supports Windows® XP/Vista/7 Operating Systems (OS). Refer to your hardware. • Motherboard settings and hardware options vary...
... contents of ASUS motherboard. Click Drivers, Utilities, Make Disk, Manual, and Contact tabs to avail all motherboard features. The following screen is enabled in your computer, the DVD automatically displays the Specials screen which contains the unique feature of the Support DVD to the optical drive. ASUS AT5IONT-I Series 1-14 1.8 Software support 1.8.1 Installing an operating system This motherboard supports Windows® XP/Vista/7 Operating Systems (OS). Refer to your hardware. • Motherboard settings and hardware options vary...
AT5IONT-I User's manual
Page 27
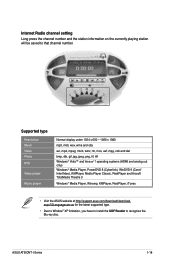
... • Visit the ASUS website at http://support.asus.com/download/download. Internet Radio channel setting Long press the channel number and the station information on the currently playing station will be saved to recognize the Blu-ray disc. aspx?SLanguage=en-us for the latest supported type. • Due to Window® XP limitation, you have to install the UDF Reader to...
... • Visit the ASUS website at http://support.asus.com/download/download. Internet Radio channel setting Long press the channel number and the station information on the currently playing station will be saved to recognize the Blu-ray disc. aspx?SLanguage=en-us for the latest supported type. • Due to Window® XP limitation, you have to install the UDF Reader to...
AT5IONT-I User's manual
Page 30
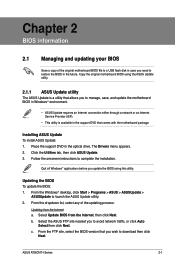
... original motherboard BIOS using this utility. From the dropdown list, select any of the original motherboard BIOS file to a USB flash disk in case you need to restore the BIOS in the support DVD that comes with the motherboard package. c. Chapter 2 BIOS information 2.1 Managing and updating your BIOS Save a copy of the updating process: Updating from the Internet, then click Next. From the Windows® desktop, click Start > Programs > ASUS > ASUSUpdate > ASUSUpdate to complete the installation...
... original motherboard BIOS using this utility. From the dropdown list, select any of the original motherboard BIOS file to a USB flash disk in case you need to restore the BIOS in the support DVD that comes with the motherboard package. c. Chapter 2 BIOS information 2.1 Managing and updating your BIOS Save a copy of the updating process: Updating from the Internet, then click Next. From the Windows® desktop, click Start > Programs > ASUS > ASUSUpdate > ASUSUpdate to complete the installation...
AT5IONT-I User's manual
Page 31
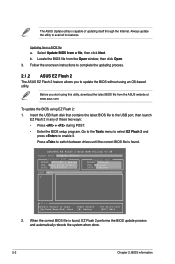
... Flash 2 The ASUS EZ Flash 2 feature allows you start using this utility, download the latest BIOS file from a file, then click Next. Locate the BIOS file from a BIOS file a. ASUSTek EZ Flash 2 BIOS ROM Utility V3.44 FLASH TYPE: WINBOND W25P80 Current ROM BOARD: AT5IONT-I Series VER: 0214 (H:01 B:07) DATE: 05/19/2010 Update ROM BOARD: Unknown VER: Unknown DATE: Unknown PATH: A:\ A: Note [Enter] Select or Load [Up/Down/Home/End] Move [Tab] Switch [B] Backup [V] Drive Info [ESC] Exit 2. Insert the USB flash disk...
... Flash 2 The ASUS EZ Flash 2 feature allows you start using this utility, download the latest BIOS file from a file, then click Next. Locate the BIOS file from a BIOS file a. ASUSTek EZ Flash 2 BIOS ROM Utility V3.44 FLASH TYPE: WINBOND W25P80 Current ROM BOARD: AT5IONT-I Series VER: 0214 (H:01 B:07) DATE: 05/19/2010 Update ROM BOARD: Unknown VER: Unknown DATE: Unknown PATH: A:\ A: Note [Enter] Select or Load [Up/Down/Home/End] Move [Tab] Switch [B] Backup [V] Drive Info [ESC] Exit 2. Insert the USB flash disk...
AT5IONT-I User's manual
Page 32
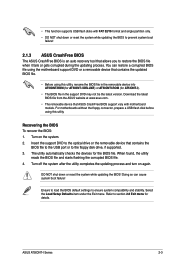
... starts flashing the corrupted BIOS file. 4. Turn off the system after the utility completes the updating process and turn on the system. 2. The utility automatically checks the devices for AT5IONT-I). • The BIOS file in the support DVD may not be the latest version. Doing so can restore a corrupted BIOS file using this utility, rename the BIOS file in the removable device into AT5IONT.ROM (for AT5IONT-I Series 2-3 • This function supports USB flash disks with motherboard models. Select the Load Setup Defaults item under the Exit menu...
... starts flashing the corrupted BIOS file. 4. Turn off the system after the utility completes the updating process and turn on the system. 2. The utility automatically checks the devices for AT5IONT-I). • The BIOS file in the support DVD may not be the latest version. Doing so can restore a corrupted BIOS file using this utility, rename the BIOS file in the removable device into AT5IONT.ROM (for AT5IONT-I Series 2-3 • This function supports USB flash disks with motherboard models. Select the Load Setup Defaults item under the Exit menu...

AT5IONT-I User's manual
Page 34
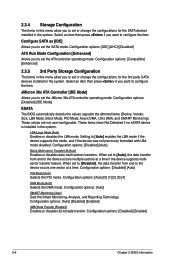
..., and SMART Monitoring). These items show Not Detected if no Serial ATA device is a separate sub-menu for each SATA device. Select CDROM if you to set the system date. 2.3.3 SATA 1~2 While entering Setup, the BIOS automatically detects the presence of SATA drive. Select ARMD (ATAPI Removable Media Device) if your device is either a ZIP, LS-120, or MO drive. Configuration options: [Not Installed] [Auto] [CDROM] [ARMD] LBA/Large Mode [Auto] Enables or disables the LBA mode. Configuration options: [Disabled] [Auto...
..., and SMART Monitoring). These items show Not Detected if no Serial ATA device is a separate sub-menu for each SATA device. Select CDROM if you to set the system date. 2.3.3 SATA 1~2 While entering Setup, the BIOS automatically detects the presence of SATA drive. Select ARMD (ATAPI Removable Media Device) if your device is either a ZIP, LS-120, or MO drive. Configuration options: [Not Installed] [Auto] [CDROM] [ARMD] LBA/Large Mode [Auto] Enables or disables the LBA mode. Configuration options: [Disabled] [Auto...
AT5IONT-I User's manual
Page 35
...: [IDE] [AHCI] [Disabled] ATA Run Mode Configuration [Enhanced] Allows you to set the SATA mode. Configuration options: [Disabled] [IDE Mode] ESATA The BIOS automatically detects the values opposite the dimmed items (Device, Vendor, Size, LBA Mode, Block Mode, PIO Mode, Async DMA, Ultra DMA, and SMART Monitoring). These values are not user-configurable. Configuration options: [Disabled] [Auto] PIO Mode [Auto] Selects the PIO mode. Configuration options: [Disabled] [Enabled] 2-6 Chapter 2: BIOS information Setting to [Auto] enables the LBA mode if the device supports this menu...
...: [IDE] [AHCI] [Disabled] ATA Run Mode Configuration [Enhanced] Allows you to set the SATA mode. Configuration options: [Disabled] [IDE Mode] ESATA The BIOS automatically detects the values opposite the dimmed items (Device, Vendor, Size, LBA Mode, Block Mode, PIO Mode, Async DMA, Ultra DMA, and SMART Monitoring). These values are not user-configurable. Configuration options: [Disabled] [Auto] PIO Mode [Auto] Selects the PIO mode. Configuration options: [Disabled] [Enabled] 2-6 Chapter 2: BIOS information Setting to [Auto] enables the LBA mode if the device supports this menu...
AT5IONT-I User's manual
Page 36
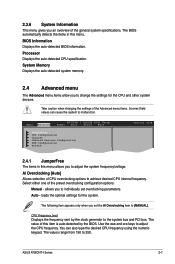
...CPU overclocking options to achieve desired CPU internal frequency. Auto - loads the optimal settings for the CPU and other system devices. System Memory Displays the auto-detected system memory. 2.4 Advanced menu The Advanced menu items allow you an overview of the general system specifications. The value of the Advanced menu items. Incorrect field values can also type the desired CPU frequency using the numeric keypad. ASUS AT5IONT-I DELUXE BIOS Setup Power Boot Tools Exit JumperFree CPU Configuration Chipset Onboard Devices Configuration USB Configuration PCIPnP Version...
...CPU overclocking options to achieve desired CPU internal frequency. Auto - loads the optimal settings for the CPU and other system devices. System Memory Displays the auto-detected system memory. 2.4 Advanced menu The Advanced menu items allow you an overview of the general system specifications. The value of the Advanced menu items. Incorrect field values can also type the desired CPU frequency using the numeric keypad. ASUS AT5IONT-I DELUXE BIOS Setup Power Boot Tools Exit JumperFree CPU Configuration Chipset Onboard Devices Configuration USB Configuration PCIPnP Version...
AT5IONT-I User's manual
Page 37
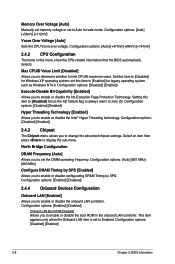
...voltage. Configuration options: [Disabled] [Enabled] Execute-Disable Bit Capability [Enabled] Allows you to set to enable or disable the boot ROM in this item to [Disabled] forces the XD feature flag to always return to change the advanced chipset settings. Configuration options: [Auto] [667 MHz] [800 MHz] Configure DRAM Timing by SPD [Enabled] Allows you to Enabled. Configuration options: [Enabled] [Disabled] Onboard LAN Boot ROM [Disabled] Allows you to display the sub-menu. This item appears only when the Onboard LAN item is set the DIMM operating frequency. Configuration...
...voltage. Configuration options: [Disabled] [Enabled] Execute-Disable Bit Capability [Enabled] Allows you to set to enable or disable the boot ROM in this item to [Disabled] forces the XD feature flag to always return to change the advanced chipset settings. Configuration options: [Auto] [667 MHz] [800 MHz] Configure DRAM Timing by SPD [Enabled] Allows you to Enabled. Configuration options: [Enabled] [Disabled] Onboard LAN Boot ROM [Disabled] Allows you to display the sub-menu. This item appears only when the Onboard LAN item is set the DIMM operating frequency. Configuration...
AT5IONT-I User's manual
Page 38
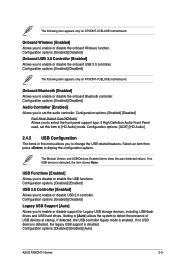
... USB devices at startup. Configuration options: [Enabled] [Disabled] Front Panel Support Type [HD Audio] Allows you to enable or disable USB 2.0 controller. If no USB device is detected, the legacy USB support is detected, the item shows None. If detected, the USB controller legacy mode is enabled. Configuration options: [Enabled] [Disabled] The following item appears only on AT5IONT-I DELUXE motherboard. Onboard Wireless [Enabled] Allows you to enable or disable support for Legacy USB storage devices, including USB flash drives and USB hard drives. Configuration options...
... USB devices at startup. Configuration options: [Enabled] [Disabled] Front Panel Support Type [HD Audio] Allows you to enable or disable USB 2.0 controller. If no USB device is detected, the legacy USB support is detected, the item shows None. If detected, the USB controller legacy mode is enabled. Configuration options: [Enabled] [Disabled] The following item appears only on AT5IONT-I DELUXE motherboard. Onboard Wireless [Enabled] Allows you to enable or disable support for Legacy USB storage devices, including USB flash drives and USB hard drives. Configuration options...
AT5IONT-I User's manual
Page 40
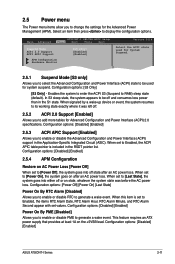
...[Disabled] [Enabled] ASUS AT5IONT-I DELUXE BIOS Setup Power Boot Tools Exit Suspend Mode [S3 only] ACPI 2.0 Support [Enabled] ACPI APIC Support [Enabled] APM Configuration Hardware Monitor Version 0214 Select the ACPI state used for System Suspend. 2.5.1 Suspend Mode [S3 only] Allows you to select the Advanced Configuration and Power Interface (ACPI) state to be off state after an AC power loss. Main Advanced AT5IONT-I Series 2-11 When this item is included in the Application-Specific Integrated Circuit (ASIC). Configuration options: [Disabled] [Enabled] 2.5.3 ACPI...
...[Disabled] [Enabled] ASUS AT5IONT-I DELUXE BIOS Setup Power Boot Tools Exit Suspend Mode [S3 only] ACPI 2.0 Support [Enabled] ACPI APIC Support [Enabled] APM Configuration Hardware Monitor Version 0214 Select the ACPI state used for System Suspend. 2.5.1 Suspend Mode [S3 only] Allows you to select the Advanced Configuration and Power Interface (ACPI) state to be off state after an AC power loss. Main Advanced AT5IONT-I Series 2-11 When this item is included in the Application-Specific Integrated Circuit (ASIC). Configuration options: [Disabled] [Enabled] 2.5.3 ACPI...
AT5IONT-I User's manual
Page 41
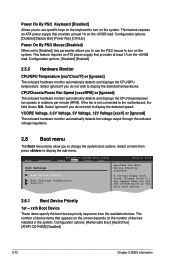
... wish to display the detected temperatures. A virtual floppy disk drive (Floppy Drive B:) may appear when you to use the PS/2 mouse to turn on the +5VSB lead. CPU/Chassis/Power Fan Speed [xxxxRPM] or [Ignored] The onboard hardware monitor automatically detects and displays the CPU/chassis/power fan speeds in the system. Select Ignored if you to use specific keys on the keyboard to turn on the +5VSB lead. Main Advanced AT5IONT-I DELUXE BIOS Setup Power Boot Tools Exit Boot Settings Boot Device Priority Boot Settings Configuration Security Version 0214 Specifies the Boot Device...
... wish to display the detected temperatures. A virtual floppy disk drive (Floppy Drive B:) may appear when you to use the PS/2 mouse to turn on the +5VSB lead. CPU/Chassis/Power Fan Speed [xxxxRPM] or [Ignored] The onboard hardware monitor automatically detects and displays the CPU/chassis/power fan speeds in the system. Select Ignored if you to use specific keys on the keyboard to turn on the +5VSB lead. Main Advanced AT5IONT-I DELUXE BIOS Setup Power Boot Tools Exit Boot Settings Boot Device Priority Boot Settings Configuration Security Version 0214 Specifies the Boot Device...
AT5IONT-I User's manual
Page 42
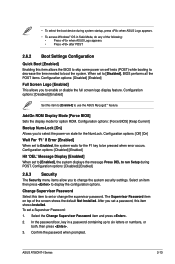
... Setup during system startup, press when ASUS Logo appears. • To access Windows® OS in a password containing up to select the power-on self tests (POST) while booting to decrease the time needed to change the supervisor password. Configuration options: [Off] [On] Wait For 'F1' If Error [Enabled] When set to use the ASUS MyLogo2™ feature. Select an item then press to enable or disable the full screen...
... Setup during system startup, press when ASUS Logo appears. • To access Windows® OS in a password containing up to select the power-on self tests (POST) while booting to decrease the time needed to change the supervisor password. Configuration options: [Off] [On] Wait For 'F1' If Error [Enabled] When set to use the ASUS MyLogo2™ feature. Select an item then press to enable or disable the full screen...
AT5IONT-I User's manual
Page 44
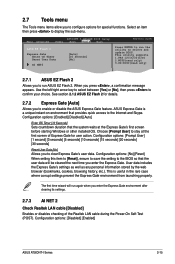
... update BIOS. See section 2.1.2 ASUS EZ Flash 2 for special functions. Configuration options: [Enabled] [Disabled] [Auto] Enter OS Timer [10 Seconds] Sets countdown duration that the system waits at the first screen of the Realtek LAN cable during the Power-On Self‑Test (POST). Configuration options: [Disabled] [Enabled] ASUS AT5IONT-I DELUXE BIOS Setup Power Boot Tools Exit ASUS EZ Flash 2 Express Gate Enter OS Timer Reset User Data AI NET2 [Auto] [10 Seconds] [No] Version 0214 Press ENTER to run ASUS EZ Flash 2. Use the left/right arrow key...
... update BIOS. See section 2.1.2 ASUS EZ Flash 2 for special functions. Configuration options: [Enabled] [Disabled] [Auto] Enter OS Timer [10 Seconds] Sets countdown duration that the system waits at the first screen of the Realtek LAN cable during the Power-On Self‑Test (POST). Configuration options: [Disabled] [Enabled] ASUS AT5IONT-I DELUXE BIOS Setup Power Boot Tools Exit ASUS EZ Flash 2 Express Gate Enter OS Timer Reset User Data AI NET2 [Auto] [10 Seconds] [No] Version 0214 Press ENTER to run ASUS EZ Flash 2. Use the left/right arrow key...


