
Owners Manual
Page 2
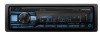
...of the unit becomes hot during use of optical instruments with this product will shut off completely and automatically in these sorts of the chassis. Alpine does not bear any responsibility in the set the AUTO OFF function (page 24). The unit will increase eye hazard. If you do ...by third parties may be sure to set time after the unit is located on the bottom of situations. 2-EN For details, see "Connection/Installation" (page 38). The nameplate indicating operating voltage, etc., is turned off . For safety, be changed, suspended, or terminated without prior notice.
...of the unit becomes hot during use of optical instruments with this product will shut off completely and automatically in these sorts of the chassis. Alpine does not bear any responsibility in the set the AUTO OFF function (page 24). The unit will increase eye hazard. If you do ...by third parties may be sure to set time after the unit is located on the bottom of situations. 2-EN For details, see "Connection/Installation" (page 38). The nameplate indicating operating voltage, etc., is turned off . For safety, be changed, suspended, or terminated without prior notice.
Owners Manual
Page 3
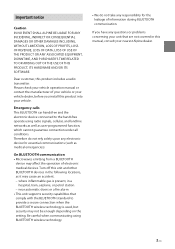
Important notice Caution IN NO EVENT SHALL ALPINE BE LIABLE FOR ANY INCIDENTAL, INDIRECT OR CONSEQUENTIAL DAMAGES OR OTHER DAMAGES INCLUDING, WITHOUT LIMITATION, LOSS OF PROFITS, LOSS OF REVENUE, LOSS OF DATA, LOSS ... that are not covered in this unit and other BLUETOOTH devices in a hospital, train, airplane, or petrol station - If you install this product includes a radio transmitter. Please check your nearest Alpine dealer. 3-EN On BLUETOOTH communication • Microwaves emitting from a BLUETOOTH device may affect the operation of your vehicle or your vehicle...
Important notice Caution IN NO EVENT SHALL ALPINE BE LIABLE FOR ANY INCIDENTAL, INDIRECT OR CONSEQUENTIAL DAMAGES OR OTHER DAMAGES INCLUDING, WITHOUT LIMITATION, LOSS OF PROFITS, LOSS OF REVENUE, LOSS OF DATA, LOSS ... that are not covered in this unit and other BLUETOOTH devices in a hospital, train, airplane, or petrol station - If you install this product includes a radio transmitter. Please check your nearest Alpine dealer. 3-EN On BLUETOOTH communication • Microwaves emitting from a BLUETOOTH device may affect the operation of your vehicle or your vehicle...
Owners Manual
Page 4
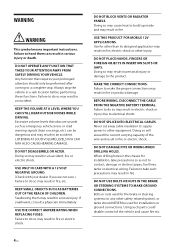
... accident, fire or electric shock. Failure to the product. When drilling holes in fire, etc. Failure to do so may result in the chassis for installations or ground connections. LISTENING AT LOUD VOLUME LEVELS IN A CAR MAY ALSO CAUSE HEARING DAMAGE. Swallowing them can be used for... installation, take such precautions may result in an accident. DO NOT OPERATE ANY FUNCTION THAT TAKES YOUR ATTENTION AWAY FROM SAFELY DRIVING YOUR VEHICLE. Failure to ...
... accident, fire or electric shock. Failure to the product. When drilling holes in fire, etc. Failure to do so may result in the chassis for installations or ground connections. LISTENING AT LOUD VOLUME LEVELS IN A CAR MAY ALSO CAUSE HEARING DAMAGE. Swallowing them can be used for... installation, take such precautions may result in an accident. DO NOT OPERATE ANY FUNCTION THAT TAKES YOUR ATTENTION AWAY FROM SAFELY DRIVING YOUR VEHICLE. Failure to ...

Owners Manual
Page 5
... edges. If wiring passes through a hole in place. CAUTION This symbol means important instructions. Failure to do so may not securely install the unit in metal, use only the specified accessory parts. Return it to have the work done. Use of this unit internally ...Alpine Service Center for repairing. To ensure safety, always contact the dealer where you purchased this unit may obstruct forward vision or hamper movement etc. ARRANGE THE WIRING SO IT IS NOT CRIMPED OR PINCHED BY A SHARP METAL EDGE. Doing so may result in serious accident. HAVE THE WIRING AND INSTALLATION...
... edges. If wiring passes through a hole in place. CAUTION This symbol means important instructions. Failure to do so may not securely install the unit in metal, use only the specified accessory parts. Return it to have the work done. Use of this unit internally ...Alpine Service Center for repairing. To ensure safety, always contact the dealer where you purchased this unit may obstruct forward vision or hamper movement etc. ARRANGE THE WIRING SO IT IS NOT CRIMPED OR PINCHED BY A SHARP METAL EDGE. Doing so may result in serious accident. HAVE THE WIRING AND INSTALLATION...
Owners Manual
Page 6
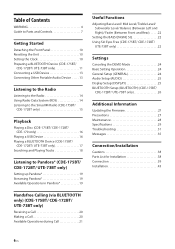
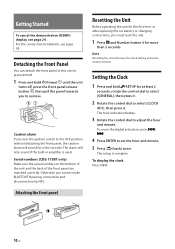
... Detaching the Front Panel 10 Resetting the Unit 10 Setting the Clock 10 Preparing a BLUETOOTH Device (CDE-175BT/ CDE-172BT/ UTE-73BT only 11 Connecting a USB Device 13 Connecting Other Portable Audio Device . . . . . 13 Listening to the Radio Listening...CDE-172BT/ UTE-73BT only 26 Additional Information Updating the Firmware 27 Precautions 27 Maintenance 28 Specifications 29 Troubleshooting 31 Messages 35 Connection/Installation Cautions 38 Parts List for Installation 38 Connection 39 Installation 43 Handsfree Calling (via BLUETOOTH only) (CDE-175BT/ CDE-172BT/ UTE-73BT only) ...
... Detaching the Front Panel 10 Resetting the Unit 10 Setting the Clock 10 Preparing a BLUETOOTH Device (CDE-175BT/ CDE-172BT/ UTE-73BT only 11 Connecting a USB Device 13 Connecting Other Portable Audio Device . . . . . 13 Listening to the Radio Listening...CDE-172BT/ UTE-73BT only 26 Additional Information Updating the Firmware 27 Precautions 27 Maintenance 28 Specifications 29 Troubleshooting 31 Messages 35 Connection/Installation Cautions 38 Parts List for Installation 38 Connection 39 Installation 43 Handsfree Calling (via BLUETOOTH only) (CDE-175BT/ CDE-172BT/ UTE-73BT only) ...
Owners Manual
Page 10
... dial to set the hour and minute. 5 Press (back) twice. The setup is used. To display the clock Press VIEW. 10-EN For the connection/installation, see page 24. The alarm will sound for at least 2 seconds, rotate the control dial to select [GENERAL], then press it. 2 Rotate the control dial...
... dial to set the hour and minute. 5 Press (back) twice. The setup is used. To display the clock Press VIEW. 10-EN For the connection/installation, see page 24. The alarm will sound for at least 2 seconds, rotate the control dial to select [GENERAL], then press it. 2 Rotate the control dial...
Owners Manual
Page 11
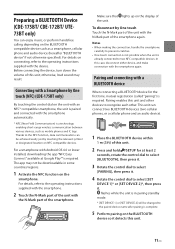
... (called "pairing") is already connected to the operating instructions supplied with the smartphone. 2 Touch the N-Mark part of the unit with Android OS 4.0 or lower installed, downloading the app "NFC Easy Connect" available at least 2 seconds, rotate the control dial to select [BLUETOOTH], then press it. 3 Rotate the control dial to...
... (called "pairing") is already connected to the operating instructions supplied with the smartphone. 2 Touch the N-Mark part of the unit with Android OS 4.0 or lower installed, downloading the app "NFC Easy Connect" available at least 2 seconds, rotate the control dial to select [BLUETOOTH], then press it. 3 Rotate the control dial to...
Owners Manual
Page 13
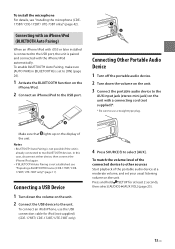
... the unit. Make sure that lights up on the unit. To connect an iPod/iPhone, use a straight type plug. To install the microphone For details, see "Preparing a BLUETOOTH Device (CDE-175BT/ CDE172BT/ UTE-73BT only)" (page 11). Connecting a USB Device 1 Turn down the volume on the unit. 3 Connect the portable audio device to...
... the unit. Make sure that lights up on the unit. To connect an iPod/iPhone, use a straight type plug. To install the microphone For details, see "Preparing a BLUETOOTH Device (CDE-175BT/ CDE172BT/ UTE-73BT only)" (page 11). Connecting a USB Device 1 Turn down the volume on the unit. 3 Connect the portable audio device to...

Owners Manual
Page 15
... to the SiriusXM Radio (CDE-175BT/ CDE-172BT only) Activating your SiriusXM Subscription Only SiriusXM® brings you more information, visit www.siriusxm.com After installing your SiriusXM Connect Vehicle Tuner and antenna, press SOURCE to select [SIRIUS XM]. Welcome to the world of what you can hear the preview channel...
... to the SiriusXM Radio (CDE-175BT/ CDE-172BT only) Activating your SiriusXM Subscription Only SiriusXM® brings you more information, visit www.siriusxm.com After installing your SiriusXM Connect Vehicle Tuner and antenna, press SOURCE to select [SIRIUS XM]. Welcome to the world of what you can hear the preview channel...

Owners Manual
Page 16
The initial passcode is installed. For details on the compatibility of your Android smartphone, consult your iPod, see "About iPod (CDE-175BT/ CDE-172BT/ UTE-73BT only)" (page 28). To unlock the channels, select [LOCK OFF]. Playing a USB Device In these Operating Instructions, "iPod"... Alpine dealer. Playback starts automatically. Some digital media players or Android smartphones may not fully support AOA 2.0 even if Android OS 4.1 or higher is [0000]. 4 After entering the passcode, press ENTER. The initial passcode is available on CDE-175BT/ CDE-172BT/ UTE-73BT only...
The initial passcode is installed. For details on the compatibility of your Android smartphone, consult your iPod, see "About iPod (CDE-175BT/ CDE-172BT/ UTE-73BT only)" (page 28). To unlock the channels, select [LOCK OFF]. Playing a USB Device In these Operating Instructions, "iPod"... Alpine dealer. Playback starts automatically. Some digital media players or Android smartphones may not fully support AOA 2.0 even if Android OS 4.1 or higher is [0000]. 4 After entering the passcode, press ENTER. The initial passcode is available on CDE-175BT/ CDE-172BT/ UTE-73BT only...
Owners Manual
Page 30
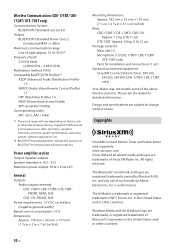
... related marks and logos are registered trademarks owned by Alpine Electronics, Inc. is a trademark or registered trademark of Microsoft Corporation in the United States and/ or other countries. Please ask the dealer for installation and connections (1 set) Optional accessories/equipment: SiriusXM... Ω - 8 Ω Maximum power output: 50 W × 4 (at 4 Ω) General Outputs: Audio outputs terminal: CDE-175BT/ CDE-172BT/ UTE-73BT : FRONT, REAR, SUB CDE-170: FRONT, SUB Power requirements: 12 V DC car battery (negative ground (earth)) Rated current consumption: 10 A Dimensions: Approx...
... related marks and logos are registered trademarks owned by Alpine Electronics, Inc. is a trademark or registered trademark of Microsoft Corporation in the United States and/ or other countries. Please ask the dealer for installation and connections (1 set) Optional accessories/equipment: SiriusXM... Ω - 8 Ω Maximum power output: 50 W × 4 (at 4 Ω) General Outputs: Audio outputs terminal: CDE-175BT/ CDE-172BT/ UTE-73BT : FRONT, REAR, SUB CDE-170: FRONT, SUB Power requirements: 12 V DC car battery (negative ground (earth)) Rated current consumption: 10 A Dimensions: Approx...
Owners Manual
Page 31
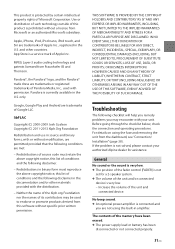
... the volume of this software without specific prior written permission. The contents of Apple Inc. and other materials provided with your authorized Alpine dealer for a 2-speaker system. App Store is connected and you may be used with or without a license from this product ...is not solved, please contact your unit. MPEG Layer-3 audio coding technology and patents licensed from the dashboard, see "Connection/ Installation" (page 38). Pandora®, the Pandora® logo, and the Pandora® trade dress are met: - only. libFLAC Copyright (C) 2000...
... the volume of this software without specific prior written permission. The contents of Apple Inc. and other materials provided with your authorized Alpine dealer for a 2-speaker system. App Store is connected and you may be used with or without a license from this product ...is not solved, please contact your unit. MPEG Layer-3 audio coding technology and patents licensed from the dashboard, see "Connection/ Installation" (page 38). Pandora®, the Pandora® logo, and the Pandora® trade dress are met: - only. libFLAC Copyright (C) 2000...
Owners Manual
Page 36
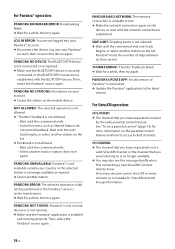
... on the list. For SiriusXM operation: CH LOCKED The channel that you have requested is no longer available. PANDORA NO DEVICE: The BLUETOOTH device is installed and running . Wait until the commercial ends. - Make sure the Pandora® application is not connected or recognized. Make the network connection again on the...
... on the list. For SiriusXM operation: CH LOCKED The channel that you have requested is no longer available. PANDORA NO DEVICE: The BLUETOOTH device is installed and running . Wait until the commercial ends. - Make sure the Pandora® application is not connected or recognized. Make the network connection again on the...

Owners Manual
Page 37
... UPDATED - Verify that the antenna cable is no longer included in your SiriusXM subscription status. - Consult the SiriusXM Connect Vehicle Tuner installation manual for more information on the outside of the sky. - Replace the antenna if the cable is damaged. If you have requested...cable for damage and kinks. - CHAN UNSUB The channel that you have questions about your vehicle is mounted on a metal surface on antenna installation. - Replace the antenna if the cable is damaged. Move the SiriusXM antenna away from any obstructions. - Press ENTER to this channel,...
... UPDATED - Verify that the antenna cable is no longer included in your SiriusXM subscription status. - Consult the SiriusXM Connect Vehicle Tuner installation manual for more information on the outside of the sky. - Replace the antenna if the cable is damaged. If you have requested...cable for damage and kinks. - CHAN UNSUB The channel that you have questions about your vehicle is mounted on a metal surface on antenna installation. - Replace the antenna if the cable is damaged. Move the SiriusXM antenna away from any obstructions. - Press ENTER to this channel,...
Owners Manual
Page 38
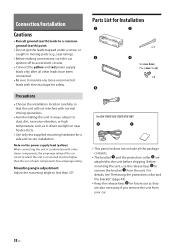
... collar and the bracket" (page 43). • Keep the release keys for Installation × 2 5 × max. 8 mm (7/32 × max. 5/16 in) × 4 For CDE-175BT/ CDE-172BT/ UTE-73BT • This parts list does not include all other stereo components, the amperage rating... of each component's fuse amperage rating. Connection/Installation Cautions • Run all ground (earth) leads to a common ground (earth) point. •...
... collar and the bracket" (page 43). • Keep the release keys for Installation × 2 5 × max. 8 mm (7/32 × max. 5/16 in) × 4 For CDE-175BT/ CDE-172BT/ UTE-73BT • This parts list does not include all other stereo components, the amperage rating... of each component's fuse amperage rating. Connection/Installation Cautions • Run all ground (earth) leads to a common ground (earth) point. •...
Owners Manual
Page 39
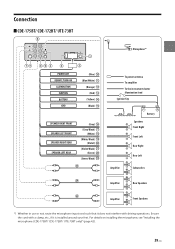
Connection CDE-175BT/ CDE-172BT/ UTE-73BT Microphone*1 (Blue) (Blue/White) (Orange) (Red) (Yellow) (Black) (Gray) (Gray/Black) (White) (White/Black) (Violet) (Violet/Black) (Green) (Green/Black) To power antenna To amplifier ... Front Speakers *1 Whether in use or not, route the microphone input cord such that it does not interfere with a clamp, etc., if it is installed around your feet. For details on installing the microphone, see "Installing the microphone (CDE-175BT/ CDE-172BT/ UTE-73BT only)" (page 42). 39-EN Secure the cord with driving operations.
Connection CDE-175BT/ CDE-172BT/ UTE-73BT Microphone*1 (Blue) (Blue/White) (Orange) (Red) (Yellow) (Black) (Gray) (Gray/Black) (White) (White/Black) (Violet) (Violet/Black) (Green) (Green/Black) To power antenna To amplifier ... Front Speakers *1 Whether in use or not, route the microphone input cord such that it does not interfere with a clamp, etc., if it is installed around your feet. For details on installing the microphone, see "Installing the microphone (CDE-175BT/ CDE-172BT/ UTE-73BT only)" (page 42). 39-EN Secure the cord with driving operations.
Owners Manual
Page 41
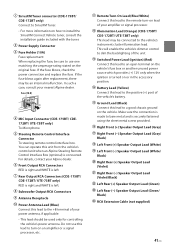
...-175BT/ CDE-172BT/ UTE-73BT only) This lead may be connected to the vehicle's instrument cluster illumination lead. If the fuse blows again after replacement, there may be an internal malfunction. In such a case, consult your Alpine dealer. For details, contact your nearest Alpine dealer. Subwoofer Output RCA...the vehicle's power antenna. Front Output RCA Connectors RED is right and WHITE is turned on how to install the SiriusXM Connect Vehicle tuner, consult the installation guide included with the tuner. Do not use one matching the amperage rating stated on lead of the ...
...-175BT/ CDE-172BT/ UTE-73BT only) This lead may be connected to the vehicle's instrument cluster illumination lead. If the fuse blows again after replacement, there may be an internal malfunction. In such a case, consult your Alpine dealer. For details, contact your nearest Alpine dealer. Subwoofer Output RCA...the vehicle's power antenna. Front Output RCA Connectors RED is right and WHITE is turned on how to install the SiriusXM Connect Vehicle tuner, consult the installation guide included with the tuner. Do not use one matching the amperage rating stated on lead of the ...
Owners Manual
Page 42
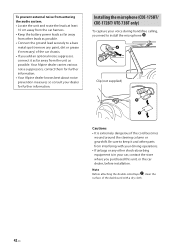
.../ UTE-73BT only) To capture your driving operations. • If airbags or any paint, dirt or grease if necessary) of the dashboard with your voice during handsfree calling, you purchased this unit, or the car dealer, before installation. Clip (not supplied) Cautions • It is in your dealer for further information. • Your Alpine...
.../ UTE-73BT only) To capture your driving operations. • If airbags or any paint, dirt or grease if necessary) of the dashboard with your voice during handsfree calling, you purchased this unit, or the car dealer, before installation. Clip (not supplied) Cautions • It is in your dealer for further information. • Your Alpine...
Owners Manual
Page 43
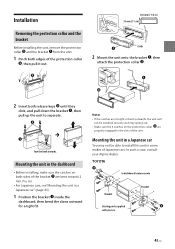
...pull down the bracket , then pull up the unit to separate. TOYOTA to install this unit in some makes of the unit. Face the hook inwards. Installation Removing the protection collar and the bracket Before installing the unit, remove the protection collar and the bracket from the unit. 1 ... or bent outwards, the unit will not be able to dashboard/center console Bracket Existing parts supplied with your Alpine dealer. Mounting the unit in the dashboard • Before installing, make sure the catches on the protection collar are bent inwards 2 mm (3/32 in). • For Japanese...
...pull down the bracket , then pull up the unit to separate. TOYOTA to install this unit in some makes of the unit. Face the hook inwards. Installation Removing the protection collar and the bracket Before installing the unit, remove the protection collar and the bracket from the unit. 1 ... or bent outwards, the unit will not be able to dashboard/center console Bracket Existing parts supplied with your Alpine dealer. Mounting the unit in the dashboard • Before installing, make sure the catches on the protection collar are bent inwards 2 mm (3/32 in). • For Japanese...

Owners Manual
Page 44
Detaching and attaching the front panel For details, see "Resetting the Unit" (page 10). 44-EN Resetting the unit For details, see "Detaching the Front Panel" (page 10). NISSAN to dashboard/center console Bracket Existing parts supplied with your car Bracket Note To prevent malfunction, install only with the supplied screws .
Detaching and attaching the front panel For details, see "Resetting the Unit" (page 10). 44-EN Resetting the unit For details, see "Detaching the Front Panel" (page 10). NISSAN to dashboard/center console Bracket Existing parts supplied with your car Bracket Note To prevent malfunction, install only with the supplied screws .


