User Manual
Page 3
... Setting the Subwoofer System 17 External Device 17 Connecting to an External Amplifier (POWER IC 17 Setting the MX Level 18 Other Functions Displaying the Text 18 About "Text 19 Using the Front AUX Input Terminal 19 Option Menu Setting 19 SETUP Setting 20 General Setting 21 Setting the AUX SETUP mode 21 Setting the AUX NAME mode 21 Playing MP3/WMA Data (PLAY MODE) (CDE-SXM145BT/CDE-143BT only 21 Demonstration 21 Display Setting 21 Dimmer Control 21 Scroll Setting (TEXTSCROLL 21 Scroll Type Setting 21 Tuner Setting...
... Setting the Subwoofer System 17 External Device 17 Connecting to an External Amplifier (POWER IC 17 Setting the MX Level 18 Other Functions Displaying the Text 18 About "Text 19 Using the Front AUX Input Terminal 19 Option Menu Setting 19 SETUP Setting 20 General Setting 21 Setting the AUX SETUP mode 21 Setting the AUX NAME mode 21 Playing MP3/WMA Data (PLAY MODE) (CDE-SXM145BT/CDE-143BT only 21 Demonstration 21 Display Setting 21 Dimmer Control 21 Scroll Setting (TEXTSCROLL 21 Scroll Type Setting 21 Tuner Setting...

User Manual
Page 4
... Pairing 23 BLUETOOTH SETUP 23 Setting the BLUETOOTH Connection (BT IN 23 Setting the BLUETOOTH Device 23 Setting the Visible Mode 24 Setting the BLUETOOTH sound quality........ 24 Adjusting the volume (VOL LV ADJ 24 Sound Auto setting (TYPE SET 24 Setting the caller information display ON/OFF 24 Setting the Phone Book Update 24 Setting the Phone Book Auto Update ON/OFF (AUTO 24 Setting the Phone Book Manual Update ON/OFF (MANUAL 24 Changing the Phone book List Order........... 24 Setting the Received Calls automatically (Auto Answer 25 Selecting the output speaker 25 Displaying...
... Pairing 23 BLUETOOTH SETUP 23 Setting the BLUETOOTH Connection (BT IN 23 Setting the BLUETOOTH Device 23 Setting the Visible Mode 24 Setting the BLUETOOTH sound quality........ 24 Adjusting the volume (VOL LV ADJ 24 Sound Auto setting (TYPE SET 24 Setting the caller information display ON/OFF 24 Setting the Phone Book Update 24 Setting the Phone Book Auto Update ON/OFF (AUTO 24 Setting the Phone Book Manual Update ON/OFF (MANUAL 24 Changing the Phone book List Order........... 24 Setting the Received Calls automatically (Auto Answer 25 Selecting the output speaker 25 Displaying...
User Manual
Page 7
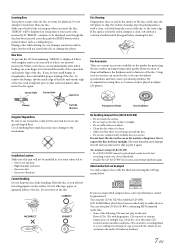
... shaped discs. "ERROR" will be guaranteed. When a new disc is ejected immediately after initial loading, use unspecified compact discs, correct performance cannot be displayed on your finger to load more than one disc at a time for protecting the disc surface and improving sound quality. If the surface is dusty. • Make sure that can play it is heavily soiled, dampen a clean, soft cloth in Alpine CD players...
... shaped discs. "ERROR" will be guaranteed. When a new disc is ejected immediately after initial loading, use unspecified compact discs, correct performance cannot be displayed on your finger to load more than one disc at a time for protecting the disc surface and improving sound quality. If the surface is dusty. • Make sure that can play it is heavily soiled, dampen a clean, soft cloth in Alpine CD players...
User Manual
Page 8
...; The unit can be correctly displayed. Change SOURCE to something other than audio files contained in a disc will not be guaranteed. An independent licence for this unit. Protecting the USB Port • Only a USB Flash Memory devices can play back or display properly. • A file that even certified Flash Memory, may not function correctly depending on the settings of such marks by Alpine Electronics, Inc. Also, avoid connecting Flash Memory and Front Aux at...
...; The unit can be correctly displayed. Change SOURCE to something other than audio files contained in a disc will not be guaranteed. An independent licence for this unit. Protecting the USB Port • Only a USB Flash Memory devices can play back or display properly. • A file that even certified Flash Memory, may not function correctly depending on the settings of such marks by Alpine Electronics, Inc. Also, avoid connecting Flash Memory and Front Aux at...
User Manual
Page 10
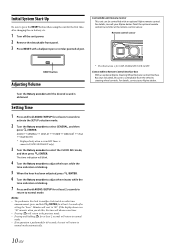
... remote control transmitter at least 2 seconds to activate the SETUP selection mode. 2 Turn the Rotary encoder to another clock/watch or radio time announcement, press and hold AUDIOSETUP for at least 2 seconds after changing the car battery, etc. 1 Turn off the unit power. 2 Remove the detachable front panel. 3 Press RESET with an optional Alpine remote control. Setting Time 1 Press and hold ENTER for at the remote-control sensor. Notes • To synchronize the clock to select...
... remote control transmitter at least 2 seconds to activate the SETUP selection mode. 2 Turn the Rotary encoder to another clock/watch or radio time announcement, press and hold AUDIOSETUP for at least 2 seconds after changing the car battery, etc. 1 Turn off the unit power. 2 Remove the detachable front panel. 3 Press RESET with an optional Alpine remote control. Setting Time 1 Press and hold ENTER for at the remote-control sensor. Notes • To synchronize the clock to select...
User Manual
Page 15
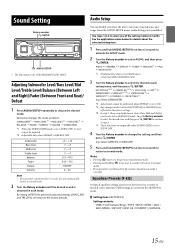
... musical source material. Audio Setup You can flexibly customize the unit to select the desired sound setting menu, and then press ENTER. By setting DEFEAT ON, previously adjusted settings of the setting modes to modify. Sound Setting Rotary encoder /ENTER AUDIO/SETUP * The illustration is for at least 2 seconds to return to normal mode. Adjusting Subwoofer Level/Bass Level/Mid Level/Treble Level/Balance (Between Left and Right)/Fader (Between Front and Rear)/ Defeat 1 Press AUDIOSETUP...
... musical source material. Audio Setup You can flexibly customize the unit to select the desired sound setting menu, and then press ENTER. By setting DEFEAT ON, previously adjusted settings of the setting modes to modify. Sound Setting Rotary encoder /ENTER AUDIO/SETUP * The illustration is for at least 2 seconds to return to normal mode. Adjusting Subwoofer Level/Bass Level/Mid Level/Treble Level/Balance (Between Left and Right)/Fader (Between Front and Rear)/ Defeat 1 Press AUDIOSETUP...
User Manual
Page 17
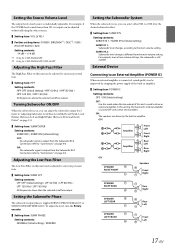
... low volume settings, the subwoofer is output from the Subwoofer RCA Connectors (refer to "Adjusting Subwoofer Level/Bass Level/Mid Level/Treble Level/ Balance (Between Left and Right)/Fader (Between Front and Rear)/ Defeat" on page 44). ON: The subwoofer signal is still audible. In this unit is connected, sound quality can select either SYS 1 or SYS 2 for CDE-SXM145BT/CDE-143BT. External Device Connecting to an External Amplifier (POWER IC) When an external amplifier is used to the main volume setting.
... low volume settings, the subwoofer is output from the Subwoofer RCA Connectors (refer to "Adjusting Subwoofer Level/Bass Level/Mid Level/Treble Level/ Balance (Between Left and Right)/Fader (Between Front and Rear)/ Defeat" on page 44). ON: The subwoofer signal is still audible. In this unit is connected, sound quality can select either SYS 1 or SYS 2 for CDE-SXM145BT/CDE-143BT. External Device Connecting to an External Amplifier (POWER IC) When an external amplifier is used to the main volume setting.
User Manual
Page 19
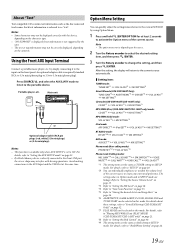
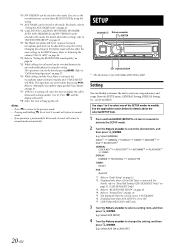
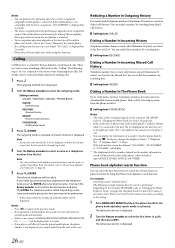
.... Option Menu Setting You can be selected in this mode. About "Text" Text compatible CDs contain text information such as TUNER setting in SETUP mode. Using the Front AUX Input Terminal Connect a portable music player, etc. Press SOURCE, and select the AUXILIARY mode to listen to as iPod setting in this mode. Note • The option menu varies depending on the front panel. For details, refer to "Playing MP3/WMA Data (PLAY MODE) (CDE-SXM145BT/CDE-143BT only...
.... Option Menu Setting You can be selected in this mode. About "Text" Text compatible CDs contain text information such as TUNER setting in SETUP mode. Using the Front AUX Input Terminal Connect a portable music player, etc. Press SOURCE, and select the AUXILIARY mode to listen to as iPod setting in this mode. Note • The option menu varies depending on the front panel. For details, refer to "Playing MP3/WMA Data (PLAY MODE) (CDE-SXM145BT/CDE-143BT only...
User Manual
Page 20
... AUX NAME mode" on page 10. *5 Not displayed when the current source is AUXILIARY. *6 Displayed only when AUX SETUP is activated, the microphone input will mute instantly and "VOICE MUTE" will blink. Changing the settings in the Option mode will return to "Setting the BLUETOOTH sound quality" on page 23. *13 The Hands free phone talk level, ring tone level and microphone gain level can be done by using this mode. Refer to "Muting the microphone input...
... AUX NAME mode" on page 10. *5 Not displayed when the current source is AUXILIARY. *6 Displayed only when AUX SETUP is activated, the microphone input will mute instantly and "VOICE MUTE" will blink. Changing the settings in the Option mode will return to "Setting the BLUETOOTH sound quality" on page 23. *13 The Hands free phone talk level, ring tone level and microphone gain level can be done by using this mode. Refer to "Muting the microphone input...
User Manual
Page 21
... Demo mode, set to OFF, AUX source cannot be selected. Setting the AUX SETUP mode You can input the audio of an external device, (such as a Portable audio player) to the AUX connector of this setting before inserting a disc. If SOURCE is pressed and AUX is selected, the sound of the vehicle ON. However, in some situations, playback of the title have been shown. 21-EN Display Setting DISPLAY is changed, etc. This mode decreases the unit...
... Demo mode, set to OFF, AUX source cannot be selected. Setting the AUX SETUP mode You can input the audio of an external device, (such as a Portable audio player) to the AUX connector of this setting before inserting a disc. If SOURCE is pressed and AUX is selected, the sound of the vehicle ON. However, in some situations, playback of the title have been shown. 21-EN Display Setting DISPLAY is changed, etc. This mode decreases the unit...
User Manual
Page 23
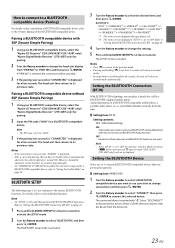
... Owner's Manual of a BLUETOOTH compatible mobile phone, a portable audio player, etc., is displayed for pairing. 2 Turn the Rotary encoder to change the head unit display from the device list. 23-EN Note • The PIN code is fixed as "0000". 3 If the pairing was successful, "CONNECTED" is set to OFF, the indicators related to Hands-free phone (c battery quantity and i signal strength (CDE-143BT/ UTE-42BT only)) will be recognised by a BLUETOOTH-equipped mobile phone. The SETUP mode is activated. 3 Turn...
... Owner's Manual of a BLUETOOTH compatible mobile phone, a portable audio player, etc., is displayed for pairing. 2 Turn the Rotary encoder to change the head unit display from the device list. 23-EN Note • The PIN code is fixed as "0000". 3 If the pairing was successful, "CONNECTED" is set to OFF, the indicators related to Hands-free phone (c battery quantity and i signal strength (CDE-143BT/ UTE-42BT only)) will be recognised by a BLUETOOTH-equipped mobile phone. The SETUP mode is activated. 3 Turn...
User Manual
Page 24
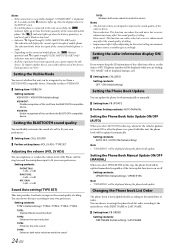
...; indicator lights up, then the display returns to the SETUP screen. • If a mobile phone is connected to this unit can update the phone book automatically or manually. Setting item: PB UPDATE Further Setting contents: AUTO/MANUAL Setting the Phone Book Auto Update ON/OFF (AUTO) When you select AUTO ON in low level. • Indicator i (Signal Strength) (CDE-143BT/UTE-42BT only): The indicator will be displayed while you are designed to improve the sound quality...
...; indicator lights up, then the display returns to the SETUP screen. • If a mobile phone is connected to this unit can update the phone book automatically or manually. Setting item: PB UPDATE Further Setting contents: AUTO/MANUAL Setting the Phone Book Auto Update ON/OFF (AUTO) When you select AUTO ON in low level. • Indicator i (Signal Strength) (CDE-143BT/UTE-42BT only): The indicator will be displayed while you are designed to improve the sound quality...
User Manual
Page 26
... take some time for the list to be displayed, and also directly after selecting the name*, then turn the Rotary encoder to the Owner's Manual of the mobile phone is added or deleted while it is displayed for the last dialed/received/missed calls. The outgoing mode is mounted. • Voice recognition operation depends on the function of a number depends on page 24), the phone book is...
... take some time for the list to be displayed, and also directly after selecting the name*, then turn the Rotary encoder to the Owner's Manual of the mobile phone is added or deleted while it is displayed for the last dialed/received/missed calls. The outgoing mode is mounted. • Voice recognition operation depends on the function of a number depends on page 24), the phone book is...
User Manual
Page 27
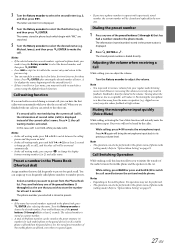
... preset station is displayed instead of phone mode (calling mode). The phone number you are searched. 5 Turn the Rotary encoder to make the call waiting mode is received during the current call . The information (name/number) stored in presets. Turn the Rotary encoder to "Option Menu Setting" on page 19. Turning down the volume as low as acceptable, will be performed in a direction away from your regular audio listening source level. Muting the microphone input...
... preset station is displayed instead of phone mode (calling mode). The phone number you are searched. 5 Turn the Rotary encoder to make the call waiting mode is received during the current call . The information (name/number) stored in presets. Turn the Rotary encoder to "Option Menu Setting" on page 19. Turning down the volume as low as acceptable, will be performed in a direction away from your regular audio listening source level. Muting the microphone input...
User Manual
Page 29
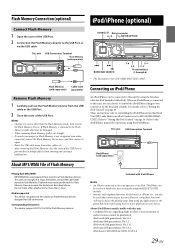
... unit operates as a hands-free device using the integrated BLUETOOTH module. • Internet and telephone functions of the USB Port. However, using the Interface cable for iPod. This unit USB Connection Terminal Flash Memory (sold separately) or Flash Memory Cable (sold (sold separately) Playing back MP3/WMA MP3/WMA files are prepared, then stored to the iPod/iPhone manual for operations using any applications or the phone functions before going back to "Setting the iPod Control" on your device . Included with iPod). iPod...
... unit operates as a hands-free device using the integrated BLUETOOTH module. • Internet and telephone functions of the USB Port. However, using the Interface cable for iPod. This unit USB Connection Terminal Flash Memory (sold separately) or Flash Memory Cable (sold (sold separately) Playing back MP3/WMA MP3/WMA files are prepared, then stored to the iPod/iPhone manual for operations using any applications or the phone functions before going back to "Setting the iPod Control" on your device . Included with iPod). iPod...
User Manual
Page 34
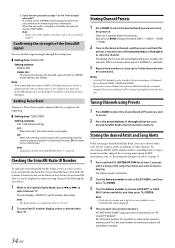
.... Setting item: TUNE START Setting contents: OFF / ON (Initial setting) OFF: When set to input passcode?". Pressing r will be displayed and the new passcode must be properly installed or may have become damaged. Note • The Radio ID does not include the letters I, O, S or F. 2 To cancel the ID number display, select a channel other channels. A confirm screen (CNFIRM) will return to store the preset in memory. Each...
.... Setting item: TUNE START Setting contents: OFF / ON (Initial setting) OFF: When set to input passcode?". Pressing r will be displayed and the new passcode must be properly installed or may have become damaged. Note • The Radio ID does not include the letters I, O, S or F. 2 To cancel the ID number display, select a channel other channels. A confirm screen (CNFIRM) will return to store the preset in memory. Each...
User Manual
Page 37
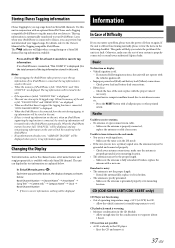
... iPod/iPhone supporting the tag function is off. - If the unit is properly connected; Make sure the antenna is still not functioning normally, please review the items in the following instructions, the unit will be stored in the CD Module. - replace the antenna or cable if necessary. Unable to tune stations in the seek mode. • You are in conjunction with each SiriusXM channel. CD (CDE-SXM145BT/CDE-143BT only) CD Player not functioning...
... iPod/iPhone supporting the tag function is off. - If the unit is properly connected; Make sure the antenna is still not functioning normally, please review the items in the following instructions, the unit will be stored in the CD Module. - replace the antenna or cable if necessary. Unable to tune stations in the seek mode. • You are in conjunction with each SiriusXM channel. CD (CDE-SXM145BT/CDE-143BT only) CD Player not functioning...
User Manual
Page 38
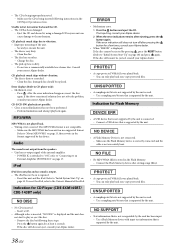
... not turn off after pressing the button for Flash Memory • A USB device that is supported by the unit. 38-EN Indication for a few times, consult your Alpine dealer. • When "ERROR" is displayed: If the disc cannot be ejected by the unit is not supported by pressing , press the RESET button (Refer to vibration. • Improper mounting of the iPod. Make sure the Flash Memory device is correctly connected and the cable is...
... not turn off after pressing the button for Flash Memory • A USB device that is supported by the unit. 38-EN Indication for a few times, consult your Alpine dealer. • When "ERROR" is displayed: If the disc cannot be ejected by the unit is not supported by pressing , press the RESET button (Refer to vibration. • Improper mounting of the iPod. Make sure the Flash Memory device is correctly connected and the cable is...
User Manual
Page 42
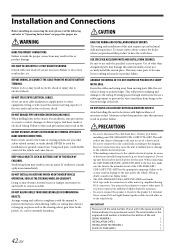
... connections may not securely install the unit in fire, etc. When connecting the CDE-SXM145BT/CDE-143BT/UTE-42BT to provide power for this unit. Never connect left and right channel speaker cables to each other units. The serial number or the engraved serial number is located on places such as a permanent record. Never cut by the metal edge of a short-circuit. • Be sure to connect the color coded...
... connections may not securely install the unit in fire, etc. When connecting the CDE-SXM145BT/CDE-143BT/UTE-42BT to provide power for this unit. Never connect left and right channel speaker cables to each other units. The serial number or the engraved serial number is located on places such as a permanent record. Never cut by the metal edge of a short-circuit. • Be sure to connect the color coded...
User Manual
Page 45
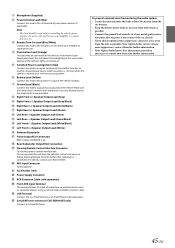
.... Microphone (Supplied) Power Antenna Lead (Blue) Connect this to a Flash Memory or an iPod/iPhone (sold separately) Front AUX Input Terminal This terminal allows for controlling the vehicle's power antenna. Note • This lead should be connected to the remote turn on or in the accessory position. Battery Lead (Yellow) Connect this lead to the positive (+) post of the car chassis. • If you add...
.... Microphone (Supplied) Power Antenna Lead (Blue) Connect this to a Flash Memory or an iPod/iPhone (sold separately) Front AUX Input Terminal This terminal allows for controlling the vehicle's power antenna. Note • This lead should be connected to the remote turn on or in the accessory position. Battery Lead (Yellow) Connect this lead to the positive (+) post of the car chassis. • If you add...


