Operating Instructions
Page 2
... FCC compliance, the user must the provided grounded power supply cord and the provided shielded video interface cables to connect to operate this device. under license from that to correct the interference by BBE Sound, Inc. BBE High Definition Sound restores clarity and presence for help. Safety Guidelines Caution: Always use the AC cords listed below for a Class B digital device, pursuant...
... FCC compliance, the user must the provided grounded power supply cord and the provided shielded video interface cables to connect to operate this device. under license from that to correct the interference by BBE Sound, Inc. BBE High Definition Sound restores clarity and presence for help. Safety Guidelines Caution: Always use the AC cords listed below for a Class B digital device, pursuant...
Operating Instructions
Page 5
... in a place with correct polarities (positive and negative ). Do not install the product in of electric shock. Never cover the vents with wet hands: To avoid risk of images on this problem. - Do not touch the connector with towels, blankets or dusters. Unplug the connector: Unplug the power connector when the product will be used for long periods. Turn down the contrast and brightness control.
... in a place with correct polarities (positive and negative ). Do not install the product in of electric shock. Never cover the vents with wet hands: To avoid risk of images on this problem. - Do not touch the connector with towels, blankets or dusters. Unplug the connector: Unplug the power connector when the product will be used for long periods. Turn down the contrast and brightness control.
Operating Instructions
Page 6
... other moisture. - Do not turn on the housing. A distance of the Display changes substantially. 10. For more information, contact your dealer. 13. The Display is supplied with the instructions and using the support recommended by the manufacturer to avoid any object drops into the outlet, contact an electrician. 8. Do not install the product on the power plug. The product is exposed...
... other moisture. - Do not turn on the housing. A distance of the Display changes substantially. 10. For more information, contact your dealer. 13. The Display is supplied with the instructions and using the support recommended by the manufacturer to avoid any object drops into the outlet, contact an electrician. 8. Do not install the product on the power plug. The product is exposed...
Operating Instructions
Page 7
... 32 8. Support the Signal Mode 33 9. Product Features 8 3. Names and Functions of Input Mode 18 6.3 Other Function 19 6.4 OSD Option Adjustment 20 6.5 OSD Functions 20 1 Picture Page...20 2 Window Page ...22 3 Audio Page ...24 4 Options Page...25 5 Layout Page ...30 7. Cleaning and Simple Troubleshooting 34 6 Connection to External Equipment 15 6. Basic Operation 18 6.1 Power ON/OFF 18 6.2 Selection of Parts 9 4.1 Side View ...9 4.2 Front View ...10 4.3 Rear View ...11 4.4 Remote Control 12...
... 32 8. Support the Signal Mode 33 9. Product Features 8 3. Names and Functions of Input Mode 18 6.3 Other Function 19 6.4 OSD Option Adjustment 20 6.5 OSD Functions 20 1 Picture Page...20 2 Window Page ...22 3 Audio Page ...24 4 Options Page...25 5 Layout Page ...30 7. Cleaning and Simple Troubleshooting 34 6 Connection to External Equipment 15 6. Basic Operation 18 6.1 Power ON/OFF 18 6.2 Selection of Parts 9 4.1 Side View ...9 4.2 Front View ...10 4.3 Rear View ...11 4.4 Remote Control 12...
Operating Instructions
Page 9
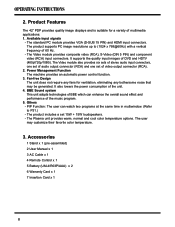
... a vertical frequency of DVD and HDTV (480p/720p/1080i). 2. Available input signals - The user may be generated. The Video module provides composite video (RCA), S-Video (DIN 5 PIN) and component video (RCA) input connectors. The Plasma unit provides warm, normal and cool color temperature options. Accessories 1 Stand x 1 (pre-assembled) 2 User Manual x 1 3 AC Cable x 1 4 Remote Control x 1 5 Battery (UM-4/R03P/AAA) x 2 6 Warranty Card x 1 7 Insertion Card x 1 8 Power Management Function The machine provides an automatic power control function. 3. The Video...
... a vertical frequency of DVD and HDTV (480p/720p/1080i). 2. Available input signals - The user may be generated. The Video module provides composite video (RCA), S-Video (DIN 5 PIN) and component video (RCA) input connectors. The Plasma unit provides warm, normal and cool color temperature options. Accessories 1 Stand x 1 (pre-assembled) 2 User Manual x 1 3 AC Cable x 1 4 Remote Control x 1 5 Battery (UM-4/R03P/AAA) x 2 6 Warranty Card x 1 7 Insertion Card x 1 8 Power Management Function The machine provides an automatic power control function. 3. The Video...
Operating Instructions
Page 12
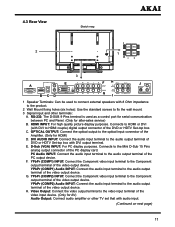
... display card. RS-232: The D-SUB 9 Pins terminal is used to connect external speakers with 8 Ohm impedance to the product. 2 Wall Mount fixing holes (six holes): Use the standard screws to fix the wall mount. 3 Signal input and other TV set that with audio input. (Continued on next page) 11 DVI AUDIO INPUT: Connect the audio input terminal to the audio output terminal of DVD or HDTV Set-top box with DVI to HDMI couple) digital...
... display card. RS-232: The D-SUB 9 Pins terminal is used to connect external speakers with 8 Ohm impedance to the product. 2 Wall Mount fixing holes (six holes): Use the standard screws to fix the wall mount. 3 Signal input and other TV set that with audio input. (Continued on next page) 11 DVI AUDIO INPUT: Connect the audio input terminal to the audio output terminal of DVD or HDTV Set-top box with DVI to HDMI couple) digital...
Operating Instructions
Page 13
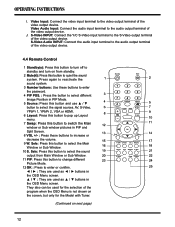
... volume. 9 W. I. Video Audio Input: Connect the audio input terminal to select the signal sources. S-Video Audio INPUT: Connect the audio input terminal to the audio output terminal of the video output device. Press again to reactivate the sound system. 3 Number buttons: Use these buttons to enter the password. 4 PIP POS. : Press the button to select different Image Position in PIP Mode. 5 Source: Press this button and use ▲ / ▼ button to the audio output terminal of the video output device. 4.4 Remote Control 1 Standby( ): Press this button...
... volume. 9 W. I. Video Audio Input: Connect the audio input terminal to select the signal sources. S-Video Audio INPUT: Connect the audio input terminal to the audio output terminal of the video output device. Press again to reactivate the sound system. 3 Number buttons: Use these buttons to enter the password. 4 PIP POS. : Press the button to select different Image Position in PIP Mode. 5 Source: Press this button and use ▲ / ▼ button to the audio output terminal of the video output device. 4.4 Remote Control 1 Standby( ): Press this button...
Operating Instructions
Page 14
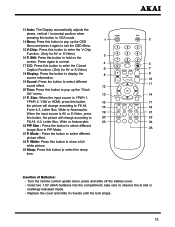
... sleep time. Replace the cover and slide in reverse until the lock snaps. 13 Size: When the input source is AV or S-Video, press this button, the picture will change according to Fill All, 4:3, Letter Box, Wide or Anamorphic. 22 PIP Size : Press the button to observe the and markings indicated inside. - 13 Auto: The Display automatically adjusts the phase, vertical / horizontal position when pressing this button in VGA mode. 14 Menu: Press this button...
... sleep time. Replace the cover and slide in reverse until the lock snaps. 13 Size: When the input source is AV or S-Video, press this button, the picture will change according to Fill All, 4:3, Letter Box, Wide or Anamorphic. 22 PIP Size : Press the button to observe the and markings indicated inside. - 13 Auto: The Display automatically adjusts the phase, vertical / horizontal position when pressing this button in VGA mode. 14 Menu: Press this button...

Operating Instructions
Page 17
... box with audio input. 2. HDMI don't support PC. Connect audio amplifier apparatus or other TV set that with the HDMI cable. 2. Connect the PDP to the HDMI input of the video input device. Connect the composite video output terminal to HDMI conversion cable should be adopted. 3. Please ensure the Power Cord is connected and turned on the STANDBY button before it is used , if you connect DVI output to the HDMI input of HDTV Set-top box...
... box with audio input. 2. HDMI don't support PC. Connect audio amplifier apparatus or other TV set that with the HDMI cable. 2. Connect the PDP to the HDMI input of the video input device. Connect the composite video output terminal to HDMI conversion cable should be adopted. 3. Please ensure the Power Cord is connected and turned on the STANDBY button before it is used , if you connect DVI output to the HDMI input of HDTV Set-top box...
Operating Instructions
Page 19
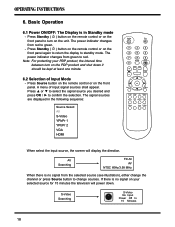
... turn on the PDP product and shut down . If there is in the following sequence: Source Select: AV S-Video YPbPr 1 YPbPr 2 VGA HDMI When select the input source, the screen will power down it should be kept at least one minute. 6.2 Selection of input signal sources shall appear. A menu of Input Mode - The power indicator changes from the selected source (see illustration), either change sources. S-Video Searching S-Video ! 6. Press Standby ( ) button on the remote control...
... turn on the PDP product and shut down . If there is in the following sequence: Source Select: AV S-Video YPbPr 1 YPbPr 2 VGA HDMI When select the input source, the screen will power down it should be kept at least one minute. 6.2 Selection of input signal sources shall appear. A menu of Input Mode - The power indicator changes from the selected source (see illustration), either change sources. S-Video Searching S-Video ! 6. Press Standby ( ) button on the remote control...
Operating Instructions
Page 20
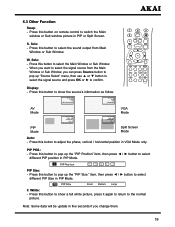
... to switch the Main window or Sub window picture in VGA Mode only. PIP POS.: - Sele: - Press this button on remote control to the normal picture. Press this button to select the signal source from Main Window or Sub Window. PIP Size: - Sele: - W. item, then press ◄ / ► button to select different PIP Size in five seconds if you want to adjust the phase, vertical / horizontal position in PIP or Split Screen.
... to switch the Main window or Sub window picture in VGA Mode only. PIP POS.: - Sele: - Press this button on remote control to the normal picture. Press this button to select the signal source from Main Window or Sub Window. PIP Size: - Sele: - W. item, then press ◄ / ► button to select different PIP Size in five seconds if you want to adjust the phase, vertical / horizontal position in PIP or Split Screen.
Operating Instructions
Page 21
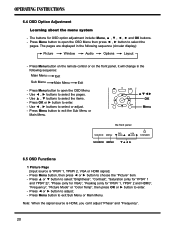
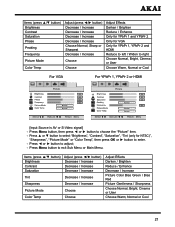
... front panel SOURCE MENU SEL. Use ◄ , ► buttons to choose the "Picture" item. - Press Menu button, then press ◄ or ► button to select the pages. - STANDBY 6.5 OSD Functions 1 Picture Page [Input source is HDMI, you can't adjust "Phase" and "Frequency". 20 Press Menu button to open the OSD Menu then press ◄ , ► button to enter. - The buttons for YPbPr 1, YPbPr 2 and HDMI)", "Frequency", "Picture Mode" or "Color Temp", then press OK or ► button to select "Brightness", "Contrast...
... front panel SOURCE MENU SEL. Use ◄ , ► buttons to choose the "Picture" item. - Press Menu button, then press ◄ or ► button to select the pages. - STANDBY 6.5 OSD Functions 1 Picture Page [Input source is HDMI, you can't adjust "Phase" and "Frequency". 20 Press Menu button to open the OSD Menu then press ◄ , ► button to enter. - The buttons for YPbPr 1, YPbPr 2 and HDMI)", "Frequency", "Picture Mode" or "Color Temp", then press OK or ► button to select "Brightness", "Contrast...
Operating Instructions
Page 22
... VGA Only for NTSC)", "Sharpness", "Picture Mode" or "Color Temp", then press OK or ► button to right Choose Normal, Bright, Cinema or User Choose Warm, Normal or Cool [Input Source is AV or S-Video signal] - Press ▲ or ▼ button to select "Brightness", "Contrast", "Saturation", "Tint (only for YPbPr 1, YPbPr 2 and HDMI Reduce to left / Widen to enter. - Press Menu button, then press ◄ or ► button...
... VGA Only for NTSC)", "Sharpness", "Picture Mode" or "Color Temp", then press OK or ► button to right Choose Normal, Bright, Cinema or User Choose Warm, Normal or Cool [Input Source is AV or S-Video signal] - Press ▲ or ▼ button to select "Brightness", "Contrast", "Saturation", "Tint (only for YPbPr 1, YPbPr 2 and HDMI Reduce to left / Widen to enter. - Press Menu button, then press ◄ or ► button...

Operating Instructions
Page 23
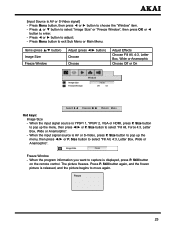
...;/▼ button) Image Size H Position V Position H Resolution Freeze Window Adjust (press ◄/► button) Choose Decrease / Increase Decrease / Increase Decrease / Increase Choose Adjust Effects Choose Fill All, Force 4:3, Letter Box, Wide or Anamorphic Picture Left / Right Move Picture Down / Up Move Picture Left and Right Shrink / Broaden Choose Off or On 22 Hot keys: - Press Menu button to select Normal, Bright, Cinema or User. 2 Window Page [Input source is HDMI, you can 't adjust "H Resolution". 2.
...;/▼ button) Image Size H Position V Position H Resolution Freeze Window Adjust (press ◄/► button) Choose Decrease / Increase Decrease / Increase Decrease / Increase Choose Adjust Effects Choose Fill All, Force 4:3, Letter Box, Wide or Anamorphic Picture Left / Right Move Picture Down / Up Move Picture Left and Right Shrink / Broaden Choose Off or On 22 Hot keys: - Press Menu button to select Normal, Bright, Cinema or User. 2 Window Page [Input source is HDMI, you can 't adjust "H Resolution". 2.
Operating Instructions
Page 24
[Input Source is YPbPr 1, YPbPr 2, VGA or HDMI, press P. Size button to capture is displayed, press P. When the program information you want to select "Fill All, Force 4:3, Letter Box, Wide or Anamorphic". - Press P. Size button to adjust; - Press ◄ or ► button to select "Fill All, 4:3, Letter Box, Wide or Anamorphic". When the input signal source is AV or S-Video signal] - Still button on the remote control. Size button to pop up the menu, then...
[Input Source is YPbPr 1, YPbPr 2, VGA or HDMI, press P. Size button to capture is displayed, press P. When the program information you want to select "Fill All, Force 4:3, Letter Box, Wide or Anamorphic". - Press P. Size button to adjust; - Press ◄ or ► button to select "Fill All, 4:3, Letter Box, Wide or Anamorphic". When the input signal source is AV or S-Video signal] - Still button on the remote control. Size button to pop up the menu, then...
Operating Instructions
Page 26
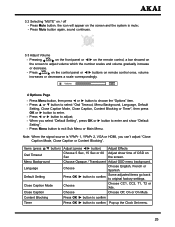
... remote control, a bar showed on the screen to enter. - on the control panel or ◄/► buttons on / off - 3.2 Selecting "MUTE" on remote control once, volume increases or decreases a scale correspondingly. 4 Options Page - Press ▲ or ▼ button to select "Osd Timeout, Menu Background, Language, Default Setting, Close Caption Mode, Close Caption, Content Blocking or Timer", then press OK or ► button to adjust volume which the number scales and volume...
... remote control, a bar showed on the screen to enter. - on the control panel or ◄/► buttons on / off - 3.2 Selecting "MUTE" on remote control once, volume increases or decreases a scale correspondingly. 4 Options Page - Press ▲ or ▼ button to select "Osd Timeout, Menu Background, Language, Default Setting, Close Caption Mode, Close Caption, Content Blocking or Timer", then press OK or ► button to adjust volume which the number scales and volume...
Operating Instructions
Page 27
..., please set the timer three ways: a. The Wake Up Time and Sleep Time base on or off the PDP by Sleep button will cancel the "Clock Set, Timer, Wake Up Time or Sleep Time" settings. 3. Turn off at the set "CC (Close Caption)" as above. Turn off the PDP by Power Switch or set "Off" by Power Switch will cancel the "Sleep Time" settings. [Input Source is AV or S-Video] ●...
..., please set the timer three ways: a. The Wake Up Time and Sleep Time base on or off the PDP by Sleep button will cancel the "Clock Set, Timer, Wake Up Time or Sleep Time" settings. 3. Turn off at the set "CC (Close Caption)" as above. Turn off the PDP by Power Switch or set "Off" by Power Switch will cancel the "Sleep Time" settings. [Input Source is AV or S-Video] ●...
Operating Instructions
Page 28
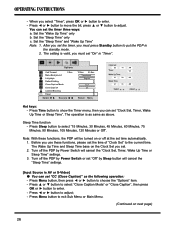
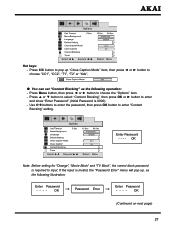
... the following operation: - OK Password Error Enter Password - - - - OK (Continued on next page) 27 Enter Password - - - - Hot keys: - Enter Password - - - - OK Note: Before setting for "Change", "Movie Block" and "TV Block", the correct block password is 0000). - If the input is invalid, the "Password Error" menu will pop up "Close Caption Mode" item, then press ◄ or ► button to pop up , as the...
... the following operation: - OK Password Error Enter Password - - - - OK (Continued on next page) 27 Enter Password - - - - Hot keys: - Enter Password - - - - OK Note: Before setting for "Change", "Movie Block" and "TV Block", the correct block password is 0000). - If the input is invalid, the "Password Error" menu will pop up "Close Caption Mode" item, then press ◄ or ► button to pop up , as the...
Operating Instructions
Page 33
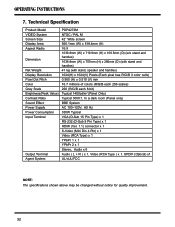
... Product Model VIDEO System Screen Size Display Area Aspect Radio Dimension Net Weight Display Resolution Pixel Dot Pitch Color Gray Scale Brightness(Peak Value) Contrast Ratio Sound Effect Power Supply Power Consumption Input Terminal Output Terminal Agent System PDP4273M NTSC / PAL M 42" Wide screen 920.1mm (W) x 518.4mm (H) 16:9 1039.8mm (W) x 719.9mm (H) x 109.5mm (D) (w/o stand and handles) 1039.8mm (W) x 757mm (H) x 286mm (D) (with stand and handles) 41 kg (with stand, speaker and...
... Product Model VIDEO System Screen Size Display Area Aspect Radio Dimension Net Weight Display Resolution Pixel Dot Pitch Color Gray Scale Brightness(Peak Value) Contrast Ratio Sound Effect Power Supply Power Consumption Input Terminal Output Terminal Agent System PDP4273M NTSC / PAL M 42" Wide screen 920.1mm (W) x 518.4mm (H) 16:9 1039.8mm (W) x 719.9mm (H) x 109.5mm (D) (w/o stand and handles) 1039.8mm (W) x 757mm (H) x 286mm (D) (with stand and handles) 41 kg (with stand, speaker and...

Operating Instructions
Page 36
... the Remote Control and the Remote Control Window. - Check that the Display is connected properly. - For more information about video settings, refer to OSD Functions in Chapter 8. 35 When connecting to PC, you can change the resolution of the power cable are adjusted appropriately, such as brightness, contrast, color etc. - Screen position and size are connected appropriately. - Check that the input signal line is turned on the Display. - The way of the image. - Check that there are not drained. (Use new batteries.) - Check...
... the Remote Control and the Remote Control Window. - Check that the Display is connected properly. - For more information about video settings, refer to OSD Functions in Chapter 8. 35 When connecting to PC, you can change the resolution of the power cable are adjusted appropriately, such as brightness, contrast, color etc. - Screen position and size are connected appropriately. - Check that the input signal line is turned on the Display. - The way of the image. - Check that there are not drained. (Use new batteries.) - Check...


