Operating Instructions
Page 7
Names and Functions of Input Mode 18 6.3 Other Function 19 6.4 OSD Option Adjustment 20 6.5 OSD Functions 20 1 Picture Page...20 2 Window Page ...22 3 Audio Page ...24 4 Options Page...25 5 Layout Page ...30 7. Basic Operation 18 6.1 Power ON/OFF 18 6.2 Selection of Parts 9 4.1 Side ...
Names and Functions of Input Mode 18 6.3 Other Function 19 6.4 OSD Option Adjustment 20 6.5 OSD Functions 20 1 Picture Page...20 2 Window Page ...22 3 Audio Page ...24 4 Options Page...25 5 Layout Page ...30 7. Basic Operation 18 6.1 Power ON/OFF 18 6.2 Selection of Parts 9 4.1 Side ...
Operating Instructions
Page 8
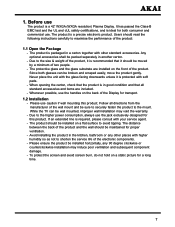
... people. - The product should read the following instructions carefully to the mount. To protect the screen and avoid screen burn, do not hold on a static picture for both glasses can be moved by a minimum of the product, it should be sure to securely fasten the product to maximise the performance of...
... people. - The product should read the following instructions carefully to the mount. To protect the screen and avoid screen burn, do not hold on a static picture for both glasses can be moved by a minimum of the product, it should be sure to securely fasten the product to maximise the performance of...
Operating Instructions
Page 12
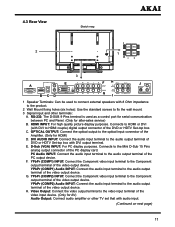
... Mount fixing holes (six holes): Use the standard screws to the video input terminal of the video output device. HDMI INPUT: For high quality picture display purposes. D-Sub (VGA) INPUT: For PC display purposes. F. Connects to the optical input connector of the PC display card. G. OPTICAL OUTPUT: Connect the optical...
... Mount fixing holes (six holes): Use the standard screws to the video input terminal of the video output device. HDMI INPUT: For high quality picture display purposes. D-Sub (VGA) INPUT: For PC display purposes. F. Connects to the optical input connector of the PC display card. G. OPTICAL OUTPUT: Connect the optical...
Operating Instructions
Page 13
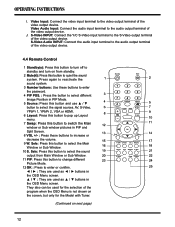
... of the video output device. They also can be used as ▲ / ▼ buttons in PIP Mode. 5 Source: Press this button to change different Picture Mode. 12 OK : Press to quiet the sound system. J. Sele: Press this button to select the sound output from standby. 2 Mute( ): Press this...screen, but only for the selection of the video output device. 4.4 Remote Control 1 Standby( ): Press this button to switch the Main window or Sub window pictures in PIP and Split Screen. 8 VOL +/- : Press these buttons to enter the password. 4 PIP POS. : Press the button to select different Image ...
... of the video output device. They also can be used as ▲ / ▼ buttons in PIP Mode. 5 Source: Press this button to change different Picture Mode. 12 OK : Press to quiet the sound system. J. Sele: Press this button to select the sound output from standby. 2 Mute( ): Press this...screen, but only for the selection of the video output device. 4.4 Remote Control 1 Standby( ): Press this button to switch the Main window or Sub window pictures in PIP and Split Screen. 8 VOL +/- : Press these buttons to enter the password. 4 PIP POS. : Press the button to select different Image ...
Operating Instructions
Page 14
..., take care to select different Image Size in PIP Mode. 23 P. When the input source is YPbPr 1, YPbPr 2, VGA or HDMI, press this button, the picture will change according to enter the V-Chip Function. (Only for AV or S-Video) 18 Display: Press the button to display the source information. 19 Sound... AV or S-Video) 16 P. Turn the remote control upside down, press and slide off the battery cover. - White: Press this button to show a full white picture. 25 Sleep: Press this button to select the sleep time. Still: Press this button to hold on the screen. Replace the cover and slide in...
..., take care to select different Image Size in PIP Mode. 23 P. When the input source is YPbPr 1, YPbPr 2, VGA or HDMI, press this button, the picture will change according to enter the V-Chip Function. (Only for AV or S-Video) 18 Display: Press the button to display the source information. 19 Sound... AV or S-Video) 16 P. Turn the remote control upside down, press and slide off the battery cover. - White: Press this button to show a full white picture. 25 Sleep: Press this button to select the sleep time. Still: Press this button to hold on the screen. Replace the cover and slide in...
Operating Instructions
Page 20
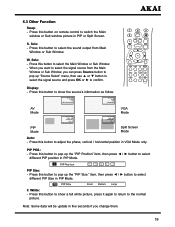
...Mode Split Screen Mode Auto: - Press this button to confirm. F. Press this button to show a full white picture, press it again to return to switch the Main window or Sub window picture in PIP or Split Screen. 6.3 Other Function Swap: - PIP POS.: - W. Press this button on remote control to... the normal picture. White: - Press this button to select the sound output from the Main Window or Sub Window, you change them. 19 Display: - Note: Some ...
...Mode Split Screen Mode Auto: - Press this button to confirm. F. Press this button to show a full white picture, press it again to return to switch the Main window or Sub window picture in PIP or Split Screen. 6.3 Other Function Swap: - PIP POS.: - W. Press this button on remote control to... the normal picture. White: - Press this button to select the sound output from the Main Window or Sub Window, you change them. 19 Display: - Note: Some ...
Operating Instructions
Page 21
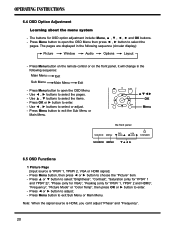
... panel, it will change in the following sequence: Main Menu Exit Sub Menu Main Menu Exit - Use ◄ , ► buttons to choose the "Picture" item. - Press Menu button, then press ◄ or ► button to select or adjust. - Use ◄ , ► buttons to exit...for YPbPr 1 and YPbPr 2)", "Phase (only for VGA)", "Peaking (only for OSD option adjustment include: Menu and OK buttons. - STANDBY 6.5 OSD Functions 1 Picture Page [Input source is HDMI, you can't adjust "Phase" and "Frequency". 20 Press ◄ or ► button to exit Sub Menu or Main Menu. ...
... panel, it will change in the following sequence: Main Menu Exit Sub Menu Main Menu Exit - Use ◄ , ► buttons to choose the "Picture" item. - Press Menu button, then press ◄ or ► button to select or adjust. - Use ◄ , ► buttons to exit...for YPbPr 1 and YPbPr 2)", "Phase (only for VGA)", "Peaking (only for OSD option adjustment include: Menu and OK buttons. - STANDBY 6.5 OSD Functions 1 Picture Page [Input source is HDMI, you can't adjust "Phase" and "Frequency". 20 Press ◄ or ► button to exit Sub Menu or Main Menu. ...
Operating Instructions
Page 22
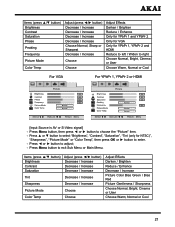
... is AV or S-Video signal] - Press Menu button to enter. - Items (press ▲/▼ button) Brightness Contrast Saturation Phase Peaking Frequency Picture Mode Color Temp Adjust (press ◄/► button) Decrease / Increase Decrease / Increase Decrease / Increase Decrease / Increase Choose Normal, Sharp or Sharpest... Choose Choose Adjust Effects Darken / Brighten Reduce / Enhance Only for YPbPr 1 and YPbPr 2 Only for VGA Only for NTSC)", "Sharpness", "Picture Mode" or "Color Temp", then press OK or ► button to exit Sub Menu or Main Menu. Items (press ▲/▼ button...
... is AV or S-Video signal] - Press Menu button to enter. - Items (press ▲/▼ button) Brightness Contrast Saturation Phase Peaking Frequency Picture Mode Color Temp Adjust (press ◄/► button) Decrease / Increase Decrease / Increase Decrease / Increase Decrease / Increase Choose Normal, Sharp or Sharpest... Choose Choose Adjust Effects Darken / Brighten Reduce / Enhance Only for YPbPr 1 and YPbPr 2 Only for VGA Only for NTSC)", "Sharpness", "Picture Mode" or "Color Temp", then press OK or ► button to exit Sub Menu or Main Menu. Items (press ▲/▼ button...

Operating Instructions
Page 23
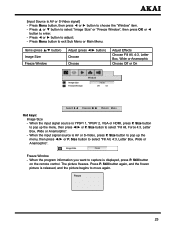
... ◄/► button) Choose Decrease / Increase Decrease / Increase Decrease / Increase Choose Adjust Effects Choose Fill All, Force 4:3, Letter Box, Wide or Anamorphic Picture Left / Right Move Picture Down / Up Move Picture Left and Right Shrink / Broaden Choose Off or On 22 Press P. Press ▲ or ▼ button to select "Image Size", "H Position", "V Position...
... ◄/► button) Choose Decrease / Increase Decrease / Increase Decrease / Increase Choose Adjust Effects Choose Fill All, Force 4:3, Letter Box, Wide or Anamorphic Picture Left / Right Move Picture Down / Up Move Picture Left and Right Shrink / Broaden Choose Off or On 22 Press P. Press ▲ or ▼ button to select "Image Size", "H Position", "V Position...
Operating Instructions
Page 24
...or Anamorphic Choose Off or On Hot keys: Image Size - Still button on the remote control. Still button again, and the frozen picture is released, and the picture begins to choose the "Window" item. - Press Menu button, then press ◄ or ► button to move again. Size ...P. When the program information you want to select "Fill All, 4:3, Letter Box, Wide or Anamorphic". Press ◄ or ► button to enter. - The picture freezes. [Input Source is YPbPr 1, YPbPr 2, VGA or HDMI, press P. Freeze 23 Size button to pop up the menu, then press ◄/► or ...
...or Anamorphic Choose Off or On Hot keys: Image Size - Still button on the remote control. Still button again, and the frozen picture is released, and the picture begins to choose the "Window" item. - Press Menu button, then press ◄ or ► button to move again. Size ...P. When the program information you want to select "Fill All, 4:3, Letter Box, Wide or Anamorphic". Press ◄ or ► button to enter. - The picture freezes. [Input Source is YPbPr 1, YPbPr 2, VGA or HDMI, press P. Freeze 23 Size button to pop up the menu, then press ◄/► or ...
Operating Instructions
Page 32
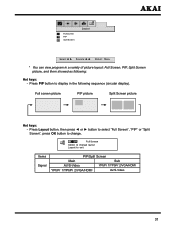
* You can view program in the following : Hot keys: - Items Signal PIP/Split Screen Main Sub AV/S-Video YPbPr 1/YPbPr 2/VGA/HDMI YPbPr 1/YPbPr 2/VGA/HDMI AV/S-Video 31 Press PIP button to change. Full screen picture PIP picture Split Screen picture Hot keys: - Press Layout button, then press ◄ or ► button to select "Full Screen", "PIP" or "Split Screen", press OK button to display in a variety of picture layout: Full Screen, PIP, Split Screen picture, and them showed as following sequence (circular display).
* You can view program in the following : Hot keys: - Items Signal PIP/Split Screen Main Sub AV/S-Video YPbPr 1/YPbPr 2/VGA/HDMI YPbPr 1/YPbPr 2/VGA/HDMI AV/S-Video 31 Press PIP button to change. Full screen picture PIP picture Split Screen picture Hot keys: - Press Layout button, then press ◄ or ► button to select "Full Screen", "PIP" or "Split Screen", press OK button to display in a variety of picture layout: Full Screen, PIP, Split Screen picture, and them showed as following sequence (circular display).