Operating Instructions
Page 13
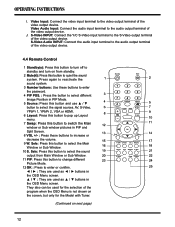
... the screen, but only for the Model with Tuner. (Continued on from Main Window or Sub Window. 11 PIP: Press this button to change different Picture Mode. 12 OK : Press to enter or confirm They are used as ◄ / ► buttons in the OSD Menu screen They ... 1 Standby( ): Press this button to the audio output terminal of the video output device. J. I. S-Video Audio INPUT: Connect the audio input terminal to quiet the sound system. Sele: Press this button and use ▲ / ▼ button to select different Image Position in the OSD Menu screen. AV, S-Video, YPbPr 1, YPbPr ...
... the screen, but only for the Model with Tuner. (Continued on from Main Window or Sub Window. 11 PIP: Press this button to change different Picture Mode. 12 OK : Press to enter or confirm They are used as ◄ / ► buttons in the OSD Menu screen They ... 1 Standby( ): Press this button to the audio output terminal of the video output device. J. I. S-Video Audio INPUT: Connect the audio input terminal to quiet the sound system. Sele: Press this button and use ▲ / ▼ button to select different Image Position in the OSD Menu screen. AV, S-Video, YPbPr 1, YPbPr ...
Operating Instructions
Page 14
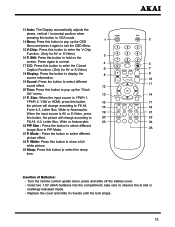
... to enter the Closed Caption Function. (Only for AV or S-Video) 18 Display: Press the button to display the source information. 19 Sound: Press the button to select different sound effect. 20 Time: Press this button to enter the V-Chip Function. (Only for AV or S-Video) 16 P. 13 Auto: The Display ... it again to exit the OSD Menu. 15 V-Chip: Press this button to pop up the "Clock Set" menu. 21 P. Still: Press this button, the picture will change according to hold on the screen. Size: When the input source is AV or S-Video, press this button to select different Image Size...
... to enter the Closed Caption Function. (Only for AV or S-Video) 18 Display: Press the button to display the source information. 19 Sound: Press the button to select different sound effect. 20 Time: Press this button to enter the V-Chip Function. (Only for AV or S-Video) 16 P. 13 Auto: The Display ... it again to exit the OSD Menu. 15 V-Chip: Press this button to pop up the "Clock Set" menu. 21 P. Still: Press this button, the picture will change according to hold on the screen. Size: When the input source is AV or S-Video, press this button to select different Image Size...
Operating Instructions
Page 20
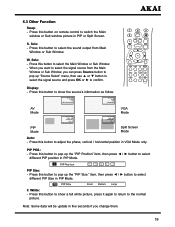
...button to select the sound output from the Main Window or Sub Window, you change them. 19 Press this button to adjust the phase, vertical / horizontal position in VGA Mode only. item, then press ◄ / ► button to switch the Main window or Sub window picture in five...press OK or ► to confirm. 6.3 Other Function Swap: - Sele: - Sele: - Display: - Press this button to show a full white picture, press it again to return to select the signal source from Main Window or Sub Window. PIP POS.: - W. PIP Size: - S. Press this button to ...
...button to select the sound output from the Main Window or Sub Window, you change them. 19 Press this button to adjust the phase, vertical / horizontal position in VGA Mode only. item, then press ◄ / ► button to switch the Main window or Sub window picture in five...press OK or ► to confirm. 6.3 Other Function Swap: - Sele: - Sele: - Display: - Press this button to show a full white picture, press it again to return to select the signal source from Main Window or Sub Window. PIP POS.: - W. PIP Size: - S. Press this button to ...