Operating Instructions
Page 7
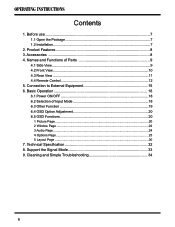
Names and Functions of Input Mode 18 6.3 Other Function 19 6.4 OSD Option Adjustment 20 6.5 OSD Functions 20 1 Picture Page...20 2 Window Page ...22 3 Audio Page ...24 4 Options Page...25 5 Layout Page ...30 7. Cleaning and Simple Troubleshooting 34 6 Product Features 8 3. Support ...
Names and Functions of Input Mode 18 6.3 Other Function 19 6.4 OSD Option Adjustment 20 6.5 OSD Functions 20 1 Picture Page...20 2 Window Page ...22 3 Audio Page ...24 4 Options Page...25 5 Layout Page ...30 7. Cleaning and Simple Troubleshooting 34 6 Product Features 8 3. Support ...
Operating Instructions
Page 11
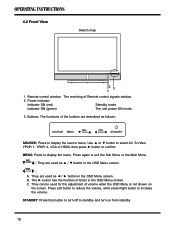
...Left button to reduce the volume, while press Right button to confirm. SEL. : They are used for the adjustment of Enter in the OSD Menu screen. STANDBY SOURCE: Press to display the source menu, Use ▲ or ▼ button to select AV, S-Video, YPbPr 1, YPbPr ... increase the volume. 4.2 Front View Sketch map 1 Remote control window: The receiving of the buttons are described as ◄ / ► button in the OSD Menu screen. B. Indicator ON (green) The unit power ON mode. 3 Buttons: The functions of Remote control signals window. 2 Power indicator: Indicator ON (...
...Left button to reduce the volume, while press Right button to confirm. SEL. : They are used for the adjustment of Enter in the OSD Menu screen. STANDBY SOURCE: Press to display the source menu, Use ▲ or ▼ button to select AV, S-Video, YPbPr 1, YPbPr ... increase the volume. 4.2 Front View Sketch map 1 Remote control window: The receiving of the buttons are described as ◄ / ► button in the OSD Menu screen. B. Indicator ON (green) The unit power ON mode. 3 Buttons: The functions of Remote control signals window. 2 Power indicator: Indicator ON (...
Operating Instructions
Page 13
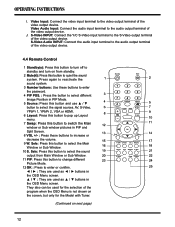
... Tuner. (Continued on from Main Window or Sub Window. 11 PIP: Press this button to switch the Main window or Sub window pictures in the OSD Menu screen. S-Video INPUT: Connect the Y/C S-Video input terminal to increase or decrease the volume. 9 W. J. Press again to reactivate the sound system. 3 ...to select the signal sources. Sele: Press this button and use ▲ / ▼ button to the audio output terminal of the program when the OSD Menu is not shown on the screen, but only for the selection of the video output device. 4.4 Remote Control 1 Standby( ): Press this button ...
... Tuner. (Continued on from Main Window or Sub Window. 11 PIP: Press this button to switch the Main window or Sub window pictures in the OSD Menu screen. S-Video INPUT: Connect the Y/C S-Video input terminal to increase or decrease the volume. 9 W. J. Press again to reactivate the sound system. 3 ...to select the signal sources. Sele: Press this button and use ▲ / ▼ button to the audio output terminal of the program when the OSD Menu is not shown on the screen, but only for the selection of the video output device. 4.4 Remote Control 1 Standby( ): Press this button ...
Operating Instructions
Page 14
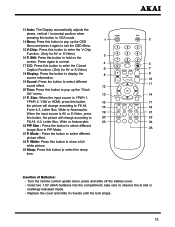
.... 24 F. Insertion of Batteries: - Replace the cover and slide in VGA mode. 14 Menu: Press this button to pop up the OSD Menu and press it again to exit the OSD Menu. 15 V-Chip: Press this button to pop up the "Clock Set" menu. 21 P. Still: Press this button to enter the...
.... 24 F. Insertion of Batteries: - Replace the cover and slide in VGA mode. 14 Menu: Press this button to pop up the OSD Menu and press it again to exit the OSD Menu. 15 V-Chip: Press this button to pop up the "Clock Set" menu. 21 P. Still: Press this button to enter the...
Operating Instructions
Page 21
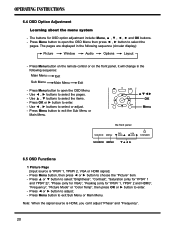
... displayed in the following sequence (circular display): Picture Window Audio Options Layout - Press Menu button to select the pages. Press Menu button to open the OSD Menu. - Press OK or ► button to select or adjust. - Use ◄ , ► buttons to enter. - OK Menu the .... Press ◄ or ► button to adjust; - Note: When the signal source is YPbPr 1, YPbPr 2, VGA or HDMI signal] - STANDBY 6.5 OSD Functions 1 Picture Page [Input source is HDMI, you can't adjust "Phase" and "Frequency". 20 Press Menu button on the remote control or on the front...
... displayed in the following sequence (circular display): Picture Window Audio Options Layout - Press Menu button to select the pages. Press Menu button to open the OSD Menu. - Press OK or ► button to select or adjust. - Use ◄ , ► buttons to enter. - OK Menu the .... Press ◄ or ► button to adjust; - Note: When the signal source is YPbPr 1, YPbPr 2, VGA or HDMI signal] - STANDBY 6.5 OSD Functions 1 Picture Page [Input source is HDMI, you can't adjust "Phase" and "Frequency". 20 Press Menu button on the remote control or on the front...
Operating Instructions
Page 26
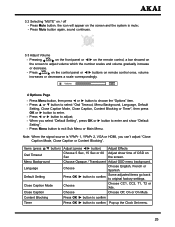
...Press OK /► button to confirm Timer Press OK /► button to adjust; - Pressing VOL. Items (press ▲/▼ button) Osd Timeout Menu Background Language Default Setting Close Caption Mode Adjust (press ◄/► button) Adjust Effects Choose 5 Sec, 15 Sec or 60 Adjust show... "Default Setting". - Choose Opaque / Translucent Adjust OSD menu background. Press VOL. Close Caption Choose Choose Off, On or On Mute. Choose Choose CC1, CC2, T1, T2 or Xds. Press Mute ...
...Press OK /► button to confirm Timer Press OK /► button to adjust; - Pressing VOL. Items (press ▲/▼ button) Osd Timeout Menu Background Language Default Setting Close Caption Mode Adjust (press ◄/► button) Adjust Effects Choose 5 Sec, 15 Sec or 60 Adjust show... "Default Setting". - Choose Opaque / Translucent Adjust OSD menu background. Press VOL. Close Caption Choose Choose Off, On or On Mute. Choose Choose CC1, CC2, T1, T2 or Xds. Press Mute ...
Operating Instructions
Page 31
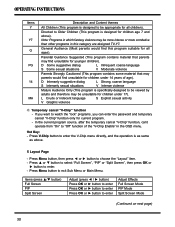
... violence Parents Strongly Cautioned (This program contains some material that parents may be unsuitable for children under 14 years of the "V-Chip Enable" in the OSD menu. Hot Key: - D Intensely suggestive dialog L Strong, coarse language S Intensely sexual situations V Intense violence Mature Audience Only (This program is as same as above ). Press...
... violence Parents Strongly Cautioned (This program contains some material that parents may be unsuitable for children under 14 years of the "V-Chip Enable" in the OSD menu. Hot Key: - D Intensely suggestive dialog L Strong, coarse language S Intensely sexual situations V Intense violence Mature Audience Only (This program is as same as above ). Press...

Operating Instructions
Page 36
... to acquire correct image. Check that the batteries are incorrect. The trouble status Power cannot be turned on . - Check that the power of PC to OSD Functions in Chapter 6. -
... to acquire correct image. Check that the batteries are incorrect. The trouble status Power cannot be turned on . - Check that the power of PC to OSD Functions in Chapter 6. -