Operating Instructions
Page 5
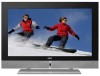
... saver function. - Do not touch the connector with towels, blankets or dusters. Do not display static images of the batteries, hurt operators and contaminate the remote controller. Tips to prevent such image sticking are NOT COVERED by the manufacturer's warranty.
... saver function. - Do not touch the connector with towels, blankets or dusters. Do not display static images of the batteries, hurt operators and contaminate the remote controller. Tips to prevent such image sticking are NOT COVERED by the manufacturer's warranty.
Operating Instructions
Page 7
... 15 6. Technical Specification 32 8. Contents 1. Basic Operation 18 6.1 Power ON/OFF 18 6.2 Selection of Parts 9 4.1 Side View ...9 4.2 Front View ...10 4.3 Rear View ...11 4.4 Remote Control 12 5.
... 15 6. Technical Specification 32 8. Contents 1. Basic Operation 18 6.1 Power ON/OFF 18 6.2 Selection of Parts 9 4.1 Side View ...9 4.2 Front View ...10 4.3 Rear View ...11 4.4 Remote Control 12 5.
Operating Instructions
Page 9
... input signals - Fan-free Design The unit does not require any fans for a variety of 60 Hz. - Accessories 1 Stand x 1 (pre-assembled) 2 User Manual x 1 3 AC Cable x 1 4 Remote Control x 1 5 Battery (UM-4/R03P/AAA) x 2 6 Warranty Card x 1 7 Insertion Card x 1 8 Product Features The 42" PDP provides quality image displays and is suitable for ventilation, eliminating any...
... input signals - Fan-free Design The unit does not require any fans for a variety of 60 Hz. - Accessories 1 Stand x 1 (pre-assembled) 2 User Manual x 1 3 AC Cable x 1 4 Remote Control x 1 5 Battery (UM-4/R03P/AAA) x 2 6 Warranty Card x 1 7 Insertion Card x 1 8 Product Features The 42" PDP provides quality image displays and is suitable for ventilation, eliminating any...
Operating Instructions
Page 11
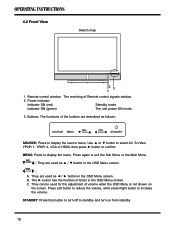
...Video, YPbPr 1, YPbPr 2, VGA or HDMI, then press ► button to standby and turn on the screen. 4.2 Front View Sketch map 1 Remote control window: The receiving of Enter in the OSD Menu screen. They can be used for the adjustment of the buttons are described as ▲...mode. 3 Buttons: The functions of volume when the OSD Menu is not shown on from standby. 10 C. The ► button has the function of Remote control signals window. 2 Power indicator: Indicator ON (red) Standby mode. SEL. : They are used as follows: SOURCE MENU SEL. They are used as...
...Video, YPbPr 1, YPbPr 2, VGA or HDMI, then press ► button to standby and turn on the screen. 4.2 Front View Sketch map 1 Remote control window: The receiving of Enter in the OSD Menu screen. They can be used for the adjustment of the buttons are described as ▲...mode. 3 Buttons: The functions of volume when the OSD Menu is not shown on from standby. 10 C. The ► button has the function of Remote control signals window. 2 Power indicator: Indicator ON (red) Standby mode. SEL. : They are used as follows: SOURCE MENU SEL. They are used as...
Operating Instructions
Page 13
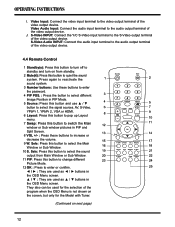
... button to increase or decrease the volume. 9 W. I. Video Audio Input: Connect the audio input terminal to the video output terminal of the video output device. 4.4 Remote Control 1 Standby( ): Press this button to turn off to standby and turn on next page) 12 Video Input: Connect the video input terminal to the...
... button to increase or decrease the volume. 9 W. I. Video Audio Input: Connect the audio input terminal to the video output terminal of the video output device. 4.4 Remote Control 1 Standby( ): Press this button to turn off to standby and turn on next page) 12 Video Input: Connect the video input terminal to the...
Operating Instructions
Page 14
... sleep time. White: Press this button to show a full white picture. 25 Sleep: Press this button to observe the and markings indicated inside. - Turn the remote control upside down, press and slide off the battery cover. - Insert two 1.5V (AAA) batteries into the compartment, take care to hold on the screen...
... sleep time. White: Press this button to show a full white picture. 25 Sleep: Press this button to observe the and markings indicated inside. - Turn the remote control upside down, press and slide off the battery cover. - Insert two 1.5V (AAA) batteries into the compartment, take care to hold on the screen...
Operating Instructions
Page 15
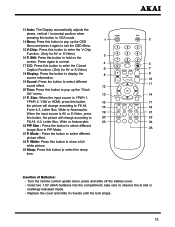
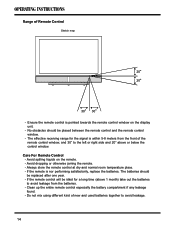
... using different kind of new and used batteries together to avoid leakage from the front of Remote Control Sketch map 20 20 30 30 - Care For Remote Control - Ensure the remote control is nor performing satisfactorily, replace the batteries. Avoid spilling liquids on the display unit.... - If the remote is pointed towards the remote control window on the remote. - Avoid dropping or otherwise jarring the remote. - If the remote control will be idled for the signal is within 5-8 meters from the batteries. ...
... using different kind of new and used batteries together to avoid leakage from the front of Remote Control Sketch map 20 20 30 30 - Care For Remote Control - Ensure the remote control is nor performing satisfactorily, replace the batteries. Avoid spilling liquids on the display unit.... - If the remote is pointed towards the remote control window on the remote. - Avoid dropping or otherwise jarring the remote. - If the remote control will be idled for the signal is within 5-8 meters from the batteries. ...
Operating Instructions
Page 16
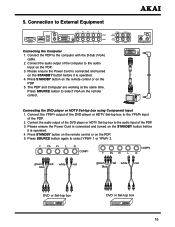
... output of the DVD player or HDTV Set-top box to the YPbPr input of the PDP. 3. Press STANDBY button on the remote control or on the PDP. 5. Connect the audio output of the DVD player or HDTV Set-top box to select VGA on ...D-Sub(VGA) PC Audio INPUT Connecting the DVD player or HDTV Set-top box using Component input 1. Press STANDBY button on the remote control or on the PDP. 5. green red white red blue green red white red blue DVD or Set-top box DVD or... and turned on the STANDBY button before it is operated. 4. Connection to the audio input on the remote control.
... output of the DVD player or HDTV Set-top box to the YPbPr input of the PDP. 3. Press STANDBY button on the remote control or on the PDP. 5. Connect the audio output of the DVD player or HDTV Set-top box to select VGA on ...D-Sub(VGA) PC Audio INPUT Connecting the DVD player or HDTV Set-top box using Component input 1. Press STANDBY button on the remote control or on the PDP. 5. green red white red blue green red white red blue DVD or Set-top box DVD or... and turned on the STANDBY button before it is operated. 4. Connection to the audio input on the remote control.

Operating Instructions
Page 17
... The second step isn't used , if you connect HDMI output to select HDMI on the STANDBY button before it is connected and turned on the remote control. Note: 1. Press SOURCE button to the HDMI input of the video input device. Connect audio amplifier apparatus or other TV set that... with audio input. 2. Press STANDBY button on the remote control or on the PDP. 5. HDMI DVI AUDIO red white DVD or Set-top box Connect audio amplifier or other TV set (Only...
... The second step isn't used , if you connect HDMI output to select HDMI on the STANDBY button before it is connected and turned on the remote control. Note: 1. Press SOURCE button to the HDMI input of the video input device. Connect audio amplifier apparatus or other TV set that... with audio input. 2. Press STANDBY button on the remote control or on the PDP. 5. HDMI DVI AUDIO red white DVD or Set-top box Connect audio amplifier or other TV set (Only...
Operating Instructions
Page 19
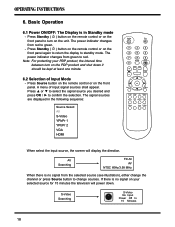
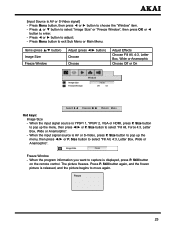
... screen will power down it should be kept at least one minute. 6.2 Selection of input signal sources shall appear. Press Standby ( ) button on the remote control or on the front panel again to return the display to change the channel or press Source button to standby mode. No Input Power... the interval time between turn on the PDP product and shut down . The signal sources are displayed in Standby mode - Press Standby ( ) button on the remote control or on the front panel. A menu of Input Mode - Press ▲ or ▼ to select the signal source you desired and press OK / ...
... screen will power down it should be kept at least one minute. 6.2 Selection of input signal sources shall appear. Press Standby ( ) button on the remote control or on the front panel again to return the display to change the channel or press Source button to standby mode. No Input Power... the interval time between turn on the PDP product and shut down . The signal sources are displayed in Standby mode - Press Standby ( ) button on the remote control or on the front panel. A menu of Input Mode - Press ▲ or ▼ to select the signal source you desired and press OK / ...
Operating Instructions
Page 20
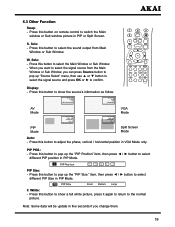
... Mode only. W. Sele: - Press this button to select different PIP position in PIP or Split Screen. Display: - PIP Size: - PIP POS.: - Press this button on remote control to pop up the "PIP Size." item, then press ◄ / ► button to select different PIP Size in five seconds if you can...
... Mode only. W. Sele: - Press this button to select different PIP position in PIP or Split Screen. Display: - PIP Size: - PIP POS.: - Press this button on remote control to pop up the "PIP Size." item, then press ◄ / ► button to select different PIP Size in five seconds if you can...
Operating Instructions
Page 21
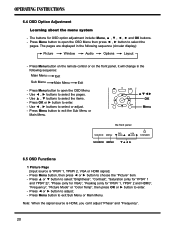
...; , ► button to enter. - STANDBY 6.5 OSD Functions 1 Picture Page [Input source is HDMI, you can't adjust "Phase" and "Frequency". 20 Press Menu button on the remote control or on the front panel, it will change in the following sequence: Main Menu Exit Sub Menu Main Menu Exit - Press OK or ►...
...; , ► button to enter. - STANDBY 6.5 OSD Functions 1 Picture Page [Input source is HDMI, you can't adjust "Phase" and "Frequency". 20 Press Menu button on the remote control or on the front panel, it will change in the following sequence: Main Menu Exit Sub Menu Main Menu Exit - Press OK or ►...
Operating Instructions
Page 24
Press ▲ or ▼ button to select "Image Size" or "Freeze Window", then press OK or ◄ button to adjust; - Still button on the remote control. Press ◄ or ► button to enter. - When the input signal source is AV or S-Video, press P. When the input signal source is YPbPr 1, ...
Press ▲ or ▼ button to select "Image Size" or "Freeze Window", then press OK or ◄ button to adjust; - Still button on the remote control. Press ◄ or ► button to enter. - When the input signal source is AV or S-Video, press P. When the input signal source is YPbPr 1, ...
Operating Instructions
Page 26
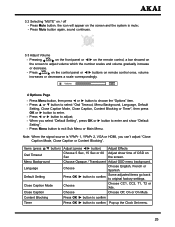
...button to exit Sub Menu or Main Menu. Pressing VOL. Press Menu button to enter. - on the front panel or ◄/► on the remote control, a bar showed on the screen to choose the "Options" item. - Choose Choose CC1, CC2, T1, T2 or Xds. Press Menu ...and volume gradually increase or decrease. - Note: When the signal source is mute; - Choose Choose English, French or Spanish. 3.2 Selecting "MUTE" on remote control once, volume increases or decreases a scale correspondingly. 4 Options Page - Close Caption Choose Choose Off, On or On Mute. Press OK /►...
...button to exit Sub Menu or Main Menu. Pressing VOL. Press Menu button to enter. - on the front panel or ◄/► on the remote control, a bar showed on the screen to choose the "Options" item. - Choose Choose CC1, CC2, T1, T2 or Xds. Press Menu ...and volume gradually increase or decrease. - Note: When the signal source is mute; - Choose Choose English, French or Spanish. 3.2 Selecting "MUTE" on remote control once, volume increases or decreases a scale correspondingly. 4 Options Page - Close Caption Choose Choose Off, On or On Mute. Press OK /►...

Operating Instructions
Page 35
... Do not use a soft cloth moistened with any sharp object. Wipe the display with a dry cloth after cleaning. 3 Cleaning of Housing and Remote Control: - Cleaning and Simple Troubleshooting 1 Important: - The screen glass is seriously contaminated, use volatile solvent (such as expected, contact the dealer ...Continued on next page) 34 Make sure that the power cable is removed from penetrating into the housing. If the housing or remote control are seriously contaminated, use a soft cloth moistened with the following instructions. Wring water out of the failure. so do ...
... Do not use a soft cloth moistened with any sharp object. Wipe the display with a dry cloth after cleaning. 3 Cleaning of Housing and Remote Control: - Cleaning and Simple Troubleshooting 1 Important: - The screen glass is seriously contaminated, use volatile solvent (such as expected, contact the dealer ...Continued on next page) 34 Make sure that the power cable is removed from penetrating into the housing. If the housing or remote control are seriously contaminated, use a soft cloth moistened with the following instructions. Wring water out of the failure. so do ...

Operating Instructions
Page 36
... spots or stripes appear on . (Power indicator does not light) No Input Signal message appears. Check that the Input option that the Remote Control is not in Chapter 6. - Check that the Display is pointed to acquire correct image. Check that there is connected properly. - Check... plugged into the socket appropriately. - Check that both ends of the relevant peripherals is within the operating range. - For more information about the Remote Control, refer to Support the Signal Mode in Chapter 8. 35 Check that the speaker (audio) cables are correct. - The way of the ...
... spots or stripes appear on . (Power indicator does not light) No Input Signal message appears. Check that the Input option that the Remote Control is not in Chapter 6. - Check that the Display is pointed to acquire correct image. Check that there is connected properly. - Check... plugged into the socket appropriately. - Check that both ends of the relevant peripherals is within the operating range. - For more information about the Remote Control, refer to Support the Signal Mode in Chapter 8. 35 Check that the speaker (audio) cables are correct. - The way of the ...
