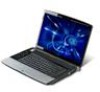
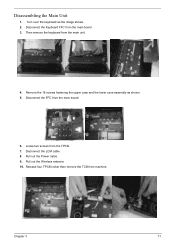
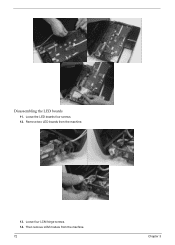
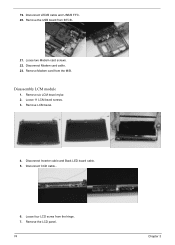
Acer Aspire 6920 Disassembly
Related Manual Pages

Similar Questions


Disassembling My Aspire 5742z
i would liuke to disassemble my laptop in order to clean it and to check the ventilator. i did not ...
i would liuke to disassemble my laptop in order to clean it and to check the ventilator. i did not ...
(Posted by davshvo 10 years ago)

How To Disassemble ?
I need to get to the AC power plug for repair. I need to know haw to disassemle , can you provide in...
I need to get to the AC power plug for repair. I need to know haw to disassemle , can you provide in...
(Posted by dkoennecke69 12 years ago)
Related Terms
The following terms were also used when searching for Acer Aspire 6920 Disassembly:- acer aspire 6920
- aspire 6920
- acer aspire 6920 drivers
- aspire 6920 drivers
- acer aspire 6920 laptop
- aspire 6920g
- aspire 6920 laptop
- acer aspire 6920 battery
- acer aspire 6920 lcd
- acer aspire 6920 price
- aspire 6920 battery
- aspire 6920 lcd
- acer aspire 6920g screen
- aspire 6920 price
- aspire 6920 hdmi
- acer aspire 6920 service manual
- aspire 6920 manual
- acer aspire 6920 review
- aspire 6920g screen
- acer aspire 6920 manual
- aspire 6920 review
- acer aspire 6920g ram
- acer aspire 6920 screen replacement
- aspire 6920 xp drivers
- aspire 6920 windows 7 drivers
- acer aspire 6920 specs
- aspire 6920 power adapter
- aspire 6920 service manual
- aspire 6920 specifications
- aspire 6920 video card
- aspire 6920g ram
- aspire 6920 parts
- aspire 6920 power cord
- aspire 6920 specs
- acer aspire 6920 xp drivers
- aspire 6920 ebay
- aspire 6920 high definition
- acer aspire 6920 ac adapter
- acer aspire 6920 audio drivers
- acer aspire 6920 battery charger
- acer aspire 6920 battery not charging
- acer aspire 6920 battery replacement
- acer aspire 6920 bios
- acer aspire 6920 bios update
- acer aspire 6920 black screen
- acer aspire 6920 bluetooth
- acer aspire 6920 charger
- acer aspire 6920 charging port
- acer aspire 6920 cmos battery
- acer aspire 6920 cmos battery location
- acer aspire 6920 cmos battery replacement
- acer aspire 6920 dc jack cable
- acer aspire 6920 disassembly
- acer aspire 6920 download
- acer aspire 6920 downloads
- acer aspire 6920 driver
- acer aspire 6920 driver updates
- acer aspire 6920 drivers download
- acer aspire 6920 drivers for windows 7
- acer aspire 6920 drivers for windows 7 32-bit
- acer aspire 6920 drivers vista
- acer aspire 6920 drivers windows 7
- acer aspire 6920 drivers xp
- acer aspire 6920 ebay
- acer aspire 6920 factory restore
- acer aspire 6920 for sale
- acer aspire 6920 freezes
- acer aspire 6920 hard drive
- acer aspire 6920 hard drive replacement
- acer aspire 6920 hardware
- acer aspire 6920 hdmi
- acer aspire 6920 hdmi port
- acer aspire 6920 high definition
- acer aspire 6920 keyboard
- acer aspire 6920 keyboard replacement
- acer aspire 6920 laptop screen
- acer aspire 6920 lcd removal
- acer aspire 6920 lcd replacement
- acer aspire 6920 lcd screen
- acer aspire 6920 microphone driver
- acer aspire 6920 microphone not working
- acer aspire 6920 motherboard
- acer aspire 6920 motherboard price
- acer aspire 6920 overheating
- acer aspire 6920 parts
- acer aspire 6920 power adapter
- acer aspire 6920 power cord
- acer aspire 6920 power jack
- acer aspire 6920 power jack replacement
- acer aspire 6920 processor upgrade
- acer aspire 6920 ram
- acer aspire 6920 reboots when on charge
- acer aspire 6920 recovery
- acer aspire 6920 recovery disc
- acer aspire 6920 recovery disk
- acer aspire 6920 recovery disk download
- acer aspire 6920 recovery partition
- acer aspire 6920 recovery tool not working
- acer aspire 6920 replace display
- acer aspire 6920 replacement screen
- acer aspire 6920 screen
- acer aspire 6920 screen problems
- acer aspire 6920 screen size
- acer aspire 6920 screen want display
- acer aspire 6920 series
- acer aspire 6920 specifications
- acer aspire 6920 startup disk
- acer aspire 6920 support
- acer aspire 6920 system restore
- acer aspire 6920 touchpad driver windows 7
- acer aspire 6920 video driver
- acer aspire 6920 video drivers
- acer aspire 6920 volume control not working
- acer aspire 6920 webcam driver windows 7
- acer aspire 6920 wifi button
- acer aspire 6920 windows 7 drivers
- acer aspire 6920 windows 8
- acer aspire 6920 windows xp drivers
- acer aspire 6920 wireless switch
- acer aspire 6920 wont boot up
- acer aspire 6920 wont turn on
- acer aspire 6920g
- acer aspire 6920g ebay
- acer aspire 6920g laptop
- acer aspire6920 laptop
- aspire 6920 8 cell
- aspire 6920 ac adapter
- aspire 6920 acer laptop specs
- aspire 6920 audio driver download
- aspire 6920 audio drivers
- aspire 6920 battery charger
- aspire 6920 battery not charging
- aspire 6920 battery replacement
- aspire 6920 bios
- aspire 6920 bios update
- aspire 6920 black screen
- aspire 6920 bluetooth
- aspire 6920 boot menu
- aspire 6920 charger
- aspire 6920 charging port
- aspire 6920 cmos battery
- aspire 6920 cmos battery location
- aspire 6920 cmos battery replacement
- aspire 6920 dc jack
- aspire 6920 dc jack cable
- aspire 6920 disassembly
- aspire 6920 download
- aspire 6920 downloads
- aspire 6920 driver
- aspire 6920 driver updates
- aspire 6920 drivers download
- aspire 6920 drivers for windows 7
- aspire 6920 drivers for windows 7 32-bit
- aspire 6920 drivers for windows xp
- aspire 6920 drivers vista
- aspire 6920 drivers win 7
- aspire 6920 drivers win7
- aspire 6920 drivers windows 7
- aspire 6920 drivers windows 8
- aspire 6920 drivers xp
- aspire 6920 factory reset
- aspire 6920 factory restore
- aspire 6920 fingerprint driver
- aspire 6920 for sale
- aspire 6920 freezes
- aspire 6920 g driver
- aspire 6920 hard drive
- aspire 6920 hard drive format
- aspire 6920 hard drive replacement
- aspire 6920 hardware
- aspire 6920 hdmi port
- aspire 6920 how to take apart screen
- aspire 6920 inverter
- aspire 6920 keyboard
- aspire 6920 keyboard replacement
- aspire 6920 laptop screen
- aspire 6920 lcd driver
- aspire 6920 lcd removal
- aspire 6920 lcd replacement
- aspire 6920 lcd screen
- aspire 6920 max ram
- aspire 6920 microphone driver
- aspire 6920 microphone not working
- aspire 6920 motherboard
- aspire 6920 motherboard drivers
- aspire 6920 motherboard price
- aspire 6920 no display how to fix
- aspire 6920 no display how to repair
- aspire 6920 overheating
- aspire 6920 power button
- aspire 6920 power jack
- aspire 6920 power jack replacement
- aspire 6920 power supply
- aspire 6920 processor upgrade
- aspire 6920 ram
- aspire 6920 reboots when on charge
- aspire 6920 recovery
- aspire 6920 recovery disc
- aspire 6920 recovery disk
- aspire 6920 recovery disk download
- aspire 6920 recovery partition
- aspire 6920 recovery tool not working
- aspire 6920 replace display
- aspire 6920 replacement screen
- aspire 6920 restore disk
- aspire 6920 reviews
- aspire 6920 screen
- aspire 6920 screen problems
- aspire 6920 screen replacement
- aspire 6920 screen size
- aspire 6920 screen want display
- aspire 6920 sd card reader
- aspire 6920 series
- aspire 6920 sound card
- aspire 6920 spec
- aspire 6920 startup disk
- aspire 6920 support
- aspire 6920 system restore
- aspire 6920 touchpad driver windows 7
- aspire 6920 video driver
- aspire 6920 video drivers
- aspire 6920 vista bluetooth not working
- aspire 6920 volume control
- aspire 6920 volume control not working
- aspire 6920 volume control problems
- aspire 6920 volume problems
- aspire 6920 webcam driver windows 7
- aspire 6920 wifi button
- aspire 6920 windows 7
- aspire 6920 windows 7 driver's
- aspire 6920 windows 8
- aspire 6920 windows xp drivers
- aspire 6920 wireless switch
- aspire 6920 wont boot up
- aspire 6920 wont turn on
- aspire 6920g ebay
- aspire 6920g laptop
- aspire-6920 specs
- aspire6920 no display how to fix