Acer Aspire 5810T, Aspire 5810TZ Notebook Series Start Guide
Page 5
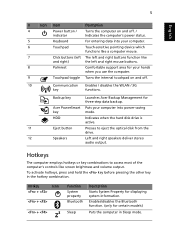
Acer PowerSmart Puts your computer into your hands when you use the computer. 9 Touchpad toggle Turns the internal touchpad on and off . / indicator Indicates the computer's power status. 5 Keyboard For entering data into power-saving key mode. HDD Indicates when the hard disk drive is active. 11... / disables the WLAN / 3G key functions. Hotkeys The computer employs hotkeys or key combinations to eject the optical disk from the drive. 12 Speakers Left and right speakers deliver stereo audio output. To activate hotkeys, press and hold the key before pressing the other ...
Acer PowerSmart Puts your computer into your hands when you use the computer. 9 Touchpad toggle Turns the internal touchpad on and off . / indicator Indicates the computer's power status. 5 Keyboard For entering data into power-saving key mode. HDD Indicates when the hard disk drive is active. 11... / disables the WLAN / 3G key functions. Hotkeys The computer employs hotkeys or key combinations to eject the optical disk from the drive. 12 Speakers Left and right speakers deliver stereo audio output. To activate hotkeys, press and hold the key before pressing the other ...

Acer Aspire 5810T, Aspire 5810TZ Notebook Series Start Guide
Page 11
... Link 5100* Intel® Pentium® mobile processor* Intel® Celeron® mobile processor* Mobile Intel® GS45 Express Chipset Intel® WiFi Link 1000* Acer InviLink™ Nplify™ 802.11b/g/Draft-N* Dual-Channel SDRAM support Up to 2 GB of DDR3 1066 MHz memory, upgradeable to 4 GB using two soDIMM...* ATI Mobility Radeon™ HD 4330* High-definition audio support S/PDIF (Sony/Philips Digital Interface) support for digital speakers MS-Sound compatible Built-in microphone 2.5" hard disk drive* / solid state drive* DVD-Super Multi double-layer...
... Link 5100* Intel® Pentium® mobile processor* Intel® Celeron® mobile processor* Mobile Intel® GS45 Express Chipset Intel® WiFi Link 1000* Acer InviLink™ Nplify™ 802.11b/g/Draft-N* Dual-Channel SDRAM support Up to 2 GB of DDR3 1066 MHz memory, upgradeable to 4 GB using two soDIMM...* ATI Mobility Radeon™ HD 4330* High-definition audio support S/PDIF (Sony/Philips Digital Interface) support for digital speakers MS-Sound compatible Built-in microphone 2.5" hard disk drive* / solid state drive* DVD-Super Multi double-layer...
Aspire 5810TZ Service Guide
Page 7
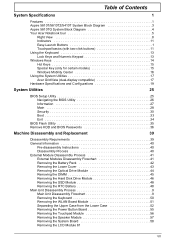
Table of Contents System Specifications 1 Features 1 Aspire 5810T/5810TZ/5410T System Block Diagram 3 Aspire 5810TG System Block Diagram 4 Your Acer Notebook tour 5 Right View 8 Indicators 11 Easy-Launch Buttons 1 Touchpad basics (with two-click buttons 11 Using the Keyboard 13 Lock ...41 External Modules Disassembly Flowchart 41 Removing the Battery Pack 42 Removing the Lower Cover 43 Removing the Optical Drive Module 44 Removing the DIMM 45 Removing the Hard Disk Drive Module 46 Removing the SSD Module 48 Removing the RTC Battery 48 Main Unit Disassembly Process 9 Main Unit...
Table of Contents System Specifications 1 Features 1 Aspire 5810T/5810TZ/5410T System Block Diagram 3 Aspire 5810TG System Block Diagram 4 Your Acer Notebook tour 5 Right View 8 Indicators 11 Easy-Launch Buttons 1 Touchpad basics (with two-click buttons 11 Using the Keyboard 13 Lock ...41 External Modules Disassembly Flowchart 41 Removing the Battery Pack 42 Removing the Lower Cover 43 Removing the Optical Drive Module 44 Removing the DIMM 45 Removing the Hard Disk Drive Module 46 Removing the SSD Module 48 Removing the RTC Battery 48 Main Unit Disassembly Process 9 Main Unit...

Aspire 5810TZ Service Guide
Page 9
...® Pentium® mobile processor* • Intel® Celeron® mobile processor* • Mobile Intel® GS45 Express Chipset • Acer InviLink™ Nplify™ 802.11b/g/Draft-N* System Memory • Dual-Channel SDRAM support • Up to 2 GB of DDR3 1066 MHz ...* Display and graphics • 16:9 aspect ratio • 15.6" HD 1366 x 768 Storage subsystem • 2.5" hard disk drive / solid state drive • DVD-Super Multi double-layer drive • 5-in-1 card reader Special keys and controls • 103-/104-/107-key keyboard • Touchpad pointing device...
...® Pentium® mobile processor* • Intel® Celeron® mobile processor* • Mobile Intel® GS45 Express Chipset • Acer InviLink™ Nplify™ 802.11b/g/Draft-N* System Memory • Dual-Channel SDRAM support • Up to 2 GB of DDR3 1066 MHz ...* Display and graphics • 16:9 aspect ratio • 15.6" HD 1366 x 768 Storage subsystem • 2.5" hard disk drive / solid state drive • DVD-Super Multi double-layer drive • 5-in-1 card reader Special keys and controls • 103-/104-/107-key keyboard • Touchpad pointing device...
Aspire 5810TZ Service Guide
Page 13
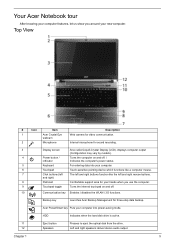
... for your hands when you around your new computer. HDD Indicates when the hard disk drive is active. 11 Eject button Presses to eject the optical disk from the drive. 12 Speakers Left and right speakers deliver stereo audio output. Acer PowerSmart key Puts your computer into your computer. 6 Touchpad Touch-sensitive pointing device...
... for your hands when you around your new computer. HDD Indicates when the hard disk drive is active. 11 Eject button Presses to eject the optical disk from the drive. 12 Speakers Left and right speakers deliver stereo audio output. Acer PowerSmart key Puts your computer into your computer. 6 Touchpad Touch-sensitive pointing device...
Aspire 5810TZ Service Guide
Page 19
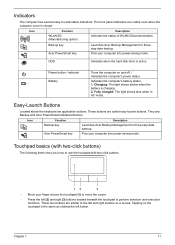
... Launches Acer Backup Management for threestep data backup. Chapter 1 11 Indicators The computer has several easy-to perform selection and execution functions. The front panel indicators are visible even when the computer cover is active. HDD Indicates when the hard disk drive is...and right (3) buttons located beneath the touchpad to -read status indicators. These two buttons are application buttons. Backup key Acer PowerSmart key Launches Acer Backup Management for three-step data backup. Tapping on and off. / Indicates the computer's power status. Icon Function ...
... Launches Acer Backup Management for threestep data backup. Chapter 1 11 Indicators The computer has several easy-to perform selection and execution functions. The front panel indicators are visible even when the computer cover is active. HDD Indicates when the hard disk drive is...and right (3) buttons located beneath the touchpad to -read status indicators. These two buttons are application buttons. Backup key Acer PowerSmart key Launches Acer Backup Management for three-step data backup. Tapping on and off. / Indicates the computer's power status. Icon Function ...
Aspire 5810TZ Service Guide
Page 29
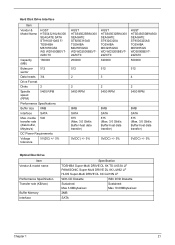
Hard Disk Drive Interface Item Vendor & Model Name HGST HTS543216L9A300 SEAGATE SATA ST9160310AS F/ TOSHIBA MK1655GSX WD WD1600BEVT22ZCT0 Capacity (MB) 160000 Bytes per 512 sector Data heads 3/4 Drive Format Disks 2 Spindle speed (RPM) 5400 RPM Performance Specifications Buffer size 8MB Interface SATA Max. media... Specification Transfer rate (KB/sec) Buffer Memory Interface Specification TOSHIBA Super-Multi DRIVE DL 8X TS-U633A LF PANASONIC Super-Multi DRIVE DL 8X UJ862 LF HLDS Super-Multi DRIVE DL 8X GU10N LF With CD Diskette With DVD Diskette Sustained: Max 3.6Mbytes...
Hard Disk Drive Interface Item Vendor & Model Name HGST HTS543216L9A300 SEAGATE SATA ST9160310AS F/ TOSHIBA MK1655GSX WD WD1600BEVT22ZCT0 Capacity (MB) 160000 Bytes per 512 sector Data heads 3/4 Drive Format Disks 2 Spindle speed (RPM) 5400 RPM Performance Specifications Buffer size 8MB Interface SATA Max. media... Specification Transfer rate (KB/sec) Buffer Memory Interface Specification TOSHIBA Super-Multi DRIVE DL 8X TS-U633A LF PANASONIC Super-Multi DRIVE DL 8X UJ862 LF HLDS Super-Multi DRIVE DL 8X GU10N LF With CD Diskette With DVD Diskette Sustained: Max 3.6Mbytes...

Aspire 5810TZ Service Guide
Page 37
Parameter Description Format/Option D2D Recovery Enables, disables D2D Recovery function. Option: AHCI or IDE NOTE: The sub-items under each device will not be shown if the device control is not allowed to control the settings in which the SATA controller should operate. The function allows the user to create a hidden partition on hard disc drive to store operation system and restore the system to disable or auto. This is because the user is set to factory defaults. Option: Enabled or Disabled SATA Mode Control the mode in these cases. Chapter 2 29
Parameter Description Format/Option D2D Recovery Enables, disables D2D Recovery function. Option: AHCI or IDE NOTE: The sub-items under each device will not be shown if the device control is not allowed to control the settings in which the SATA controller should operate. The function allows the user to create a hidden partition on hard disc drive to store operation system and restore the system to disable or auto. This is because the user is set to factory defaults. Option: Enabled or Disabled SATA Mode Control the mode in these cases. Chapter 2 29

Aspire 5810TZ Service Guide
Page 41
Chapter 2 33 Bootable devices includes the diskette drive in module bay, the onboard hard disk drive and the CD-ROM in module bay. Boot This menu allows the user to decide the order of boot devices to load the operating system.
Chapter 2 33 Bootable devices includes the diskette drive in module bay, the onboard hard disk drive and the CD-ROM in module bay. Boot This menu allows the user to decide the order of boot devices to load the operating system.
Aspire 5810TZ Service Guide
Page 49
... PACK Hx4 Captive Screwx4 LOWER COVER RTC BATTERY Screw List A C D H SSD MODULE Ax1 ODD MODULE DIMM MODULES HDD MODULE OPTICAL DISK DRIVE Dx1 OPTICAL LOCKER BRACKET Cx2 HARD DISK BRACKET HARD DISK DRIVE M2.5 x L6 M3 x L4 M2 x L3 M2.5 x L11 Black Silver Silver Black 86.00E69.736 86.9A524.4R0 86.9A552.3R0...
... PACK Hx4 Captive Screwx4 LOWER COVER RTC BATTERY Screw List A C D H SSD MODULE Ax1 ODD MODULE DIMM MODULES HDD MODULE OPTICAL DISK DRIVE Dx1 OPTICAL LOCKER BRACKET Cx2 HARD DISK BRACKET HARD DISK DRIVE M2.5 x L6 M3 x L4 M2 x L3 M2.5 x L11 Black Silver Silver Black 86.00E69.736 86.9A524.4R0 86.9A552.3R0...

Aspire 5810TZ Service Guide
Page 54
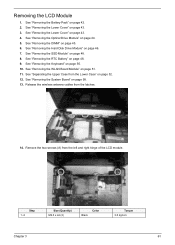
See "Removing the Lower Cover" on page 42. 2. Do the same to remove from the connector. 4. See "Removing the Battery Pack" on page 43. 3. Lift up the hard disk module to the other socket if there is any DIMM present. NOTE: To prevent damage to device, avoid pressing down on it or placing heavy objects on top of it. 46 Chapter 3 Using the plastic tab, slide the hard disk drive module away from the bay. 4. Removing the Hard Disk Drive Module 1.
See "Removing the Lower Cover" on page 42. 2. Do the same to remove from the connector. 4. See "Removing the Battery Pack" on page 43. 3. Lift up the hard disk module to the other socket if there is any DIMM present. NOTE: To prevent damage to device, avoid pressing down on it or placing heavy objects on top of it. 46 Chapter 3 Using the plastic tab, slide the hard disk drive module away from the bay. 4. Removing the Hard Disk Drive Module 1.

Aspire 5810TZ Service Guide
Page 60
See "Removing the Lower Cover" on page 44. 5. See "Removing the Optical Drive Module" on page 43. 3. See "Removing the SSD Module" on page 43. 4. Color Torque 1.6 kgf-cm NOTE: When attaching the antenna back to release the ...) M2 x L4 (1) Black 5. Remove the one screw (B) on the WLAN board to the WLAN board, make sure the cable are arranged properly. See "Removing the Hard Disk Drive Module" on page 42. 2.
See "Removing the Lower Cover" on page 44. 5. See "Removing the Optical Drive Module" on page 43. 3. See "Removing the SSD Module" on page 43. 4. Color Torque 1.6 kgf-cm NOTE: When attaching the antenna back to release the ...) M2 x L4 (1) Black 5. Remove the one screw (B) on the WLAN board to the WLAN board, make sure the cable are arranged properly. See "Removing the Hard Disk Drive Module" on page 42. 2.

Aspire 5810TZ Service Guide
Page 63
17. See "Removing the Lower Cover" on page 46. 7. See "Removing the Hard Disk Drive Module" on page 43. 3. Chapter 3 55 Disconnect the speaker cable from the SPK1 connector on page 50. 10. See "Removing the Keyboard" on the system ... Board Module" on page 43. 4. See "Removing the Lower Cover" on page 51. 11. See "Removing the DIMM" on page 44. 5. See "Removing the Optical Drive Module" on page 45. 6. See "Removing the SSD Module" on page 42. 2. See "Removing the Battery Pack" on page 48. 8. Removing the Power Button Board...
17. See "Removing the Lower Cover" on page 46. 7. See "Removing the Hard Disk Drive Module" on page 43. 3. Chapter 3 55 Disconnect the speaker cable from the SPK1 connector on page 50. 10. See "Removing the Keyboard" on the system ... Board Module" on page 43. 4. See "Removing the Lower Cover" on page 51. 11. See "Removing the DIMM" on page 44. 5. See "Removing the Optical Drive Module" on page 45. 6. See "Removing the SSD Module" on page 42. 2. See "Removing the Battery Pack" on page 48. 8. Removing the Power Button Board...

Aspire 5810TZ Service Guide
Page 64
See "Removing the Lower Cover" on page 43. 4. See "Removing the Lower Cover" on page 43. 3. See "Removing the Hard Disk Drive Module" on page 48. 8. See "Removing the SSD Module" on page 46. 7. See "Separating the Upper Case from the touchpad board. 56 Chapter 3 See "Removing ... button board from that latches and remove from the upper case. See "Removing the WLAN Board Module" on page 44. 5. 12. See "Removing the Optical Drive Module" on page 51. 11.
See "Removing the Lower Cover" on page 43. 4. See "Removing the Lower Cover" on page 43. 3. See "Removing the Hard Disk Drive Module" on page 48. 8. See "Removing the SSD Module" on page 46. 7. See "Separating the Upper Case from the touchpad board. 56 Chapter 3 See "Removing ... button board from that latches and remove from the upper case. See "Removing the WLAN Board Module" on page 44. 5. 12. See "Removing the Optical Drive Module" on page 51. 11.

Aspire 5810TZ Service Guide
Page 65
... cm² has been highlighted with the yellow rectangle as above image shows. See "Removing the Lower Cover" on page 50. 10. See "Removing the Hard Disk Drive Module" on page 48. 9. See "Removing the RTC Battery" on page 46. 7. See "Removing the WLAN Board Module" on page 43. 4. See ...Case from the Lower Case" on page 42. 2. Carefully pry loose and remove the touch pad board. Removing the Speaker Module 1. See "Removing the Optical Drive Module" on page 48. 8. See "Removing the SSD Module" on page 44. 5. Chapter 3 57 WARNING:The touchpad board is glued to the upper ...
... cm² has been highlighted with the yellow rectangle as above image shows. See "Removing the Lower Cover" on page 50. 10. See "Removing the Hard Disk Drive Module" on page 48. 9. See "Removing the RTC Battery" on page 46. 7. See "Removing the WLAN Board Module" on page 43. 4. See ...Case from the Lower Case" on page 42. 2. Carefully pry loose and remove the touch pad board. Removing the Speaker Module 1. See "Removing the Optical Drive Module" on page 48. 8. See "Removing the SSD Module" on page 44. 5. Chapter 3 57 WARNING:The touchpad board is glued to the upper ...

Aspire 5810TZ Service Guide
Page 66
See "Removing the Optical Drive Module" on page 50. 10. See "Removing the Keyboard" on page 44. 5. Disconnect the card reader board cable from the upper case. 12. See "Removing ... Module" on page 51. 11. See "Removing the WLAN Board Module" on page 48. 8. See "Removing the RTC Battery" on page 46. 7. See "Removing the Hard Disk Drive Module" on page 48. 9. See "Separating the Upper Case from the Lower Case" on page 43. 4. Step 1~2 Size (Quantity) M2 x L3 (2) Black Color Torque...
See "Removing the Optical Drive Module" on page 50. 10. See "Removing the Keyboard" on page 44. 5. Disconnect the card reader board cable from the upper case. 12. See "Removing ... Module" on page 51. 11. See "Removing the WLAN Board Module" on page 48. 8. See "Removing the RTC Battery" on page 46. 7. See "Removing the Hard Disk Drive Module" on page 48. 9. See "Separating the Upper Case from the Lower Case" on page 43. 4. Step 1~2 Size (Quantity) M2 x L3 (2) Black Color Torque...
Aspire 5810TZ Service Guide
Page 69
See "Removing the Hard Disk Drive Module" on page 48. 8. See "Removing the SSD Module" on page 46. 7. See "Removing the RTC Battery" on page 58. 13. See "Removing the System ... the Lower Cover" on page 44. 5. See "Separating the Upper Case from the left and right hinge of the LCD module. See "Removing the Optical Drive Module" on page 43. 3. Remove the two screws (A) from the Lower Case" on page 45. 6. Step 1~2 Size (Quantity) M2.5 x L6 (2) Black Color Torque 3.0 kgf-cm...
See "Removing the Hard Disk Drive Module" on page 48. 8. See "Removing the SSD Module" on page 46. 7. See "Removing the RTC Battery" on page 58. 13. See "Removing the System ... the Lower Cover" on page 44. 5. See "Separating the Upper Case from the left and right hinge of the LCD module. See "Removing the Optical Drive Module" on page 43. 3. Remove the two screws (A) from the Lower Case" on page 45. 6. Step 1~2 Size (Quantity) M2.5 x L6 (2) Black Color Torque 3.0 kgf-cm...
Aspire 5810TZ Service Guide
Page 70
.... See "Removing the WLAN Board Module" on page 48. 8. See "Removing the Lower Cover" on page 46. 7. See "Removing the Hard Disk Drive Module" on page 43. 4. See "Removing the Keyboard" on page 48. 9. See "Separating the Upper Case from the base unit. See... "Removing the RTC Battery" on page 50. 10. 15. See "Removing the Lower Cover" on page 45. 6. See "Removing the DIMM" on page 43. 3. The discrete version (for Aspire 5810T/5810TZ...
.... See "Removing the WLAN Board Module" on page 48. 8. See "Removing the Lower Cover" on page 46. 7. See "Removing the Hard Disk Drive Module" on page 43. 4. See "Removing the Keyboard" on page 48. 9. See "Separating the Upper Case from the base unit. See... "Removing the RTC Battery" on page 50. 10. 15. See "Removing the Lower Cover" on page 45. 6. See "Removing the DIMM" on page 43. 3. The discrete version (for Aspire 5810T/5810TZ...

Aspire 5810TZ Service Guide
Page 72
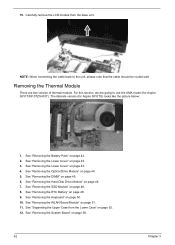
Carefully remove the theral module from the Lower Case" on page 48. 8. See "Removing the Optical Drive Module" on page 48. 9. See "Removing the RTC Battery" on page 44. 5. See "Removing the WLAN Board Module" on page 58. 13. See "Removing the ... 51. 11. Remove the one screw (B) securing the mini board to the system board. See "Removing the Lower Cover" on page 46. 7. See "Removing the Hard Disk Drive Module" on page 43. 3. See "Removing the Battery Pack" on page 43. 4. See "Removing the Lower Cover" on page 42. 2. See "Removing the Keyboard...
Carefully remove the theral module from the Lower Case" on page 48. 8. See "Removing the Optical Drive Module" on page 48. 9. See "Removing the RTC Battery" on page 44. 5. See "Removing the WLAN Board Module" on page 58. 13. See "Removing the ... 51. 11. Remove the one screw (B) securing the mini board to the system board. See "Removing the Lower Cover" on page 46. 7. See "Removing the Hard Disk Drive Module" on page 43. 3. See "Removing the Battery Pack" on page 43. 4. See "Removing the Lower Cover" on page 42. 2. See "Removing the Keyboard...
Aspire 5810TZ Service Guide
Page 93
... of Symptom-to execute "Load Setup Default Settings", then reboot system. Action in Sequence Power source (battery pack and power adapter). Battery pack Power adapter Hard drive & battery connection board System board Power source (battery pack and power adapter). See "Power System Check" on page 79. Keyboard (if contrast and brightness function...
... of Symptom-to execute "Load Setup Default Settings", then reboot system. Action in Sequence Power source (battery pack and power adapter). Battery pack Power adapter Hard drive & battery connection board System board Power source (battery pack and power adapter). See "Power System Check" on page 79. Keyboard (if contrast and brightness function...


