
Acer Aspire 5517 Notebook Series Quick Guide
Page 3
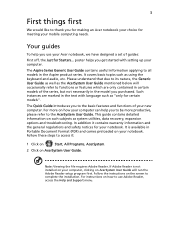
...PDF) and comes preloaded on how your computer can help you for making an Acer notebook your mobile computing needs. For instructions on AcerSystem User Guide. Note: Viewing... the file requires Adobe Reader. It covers basic topics such as system utilities, data recovery, expansion options and troubleshooting. In addition it : 1 Click on Start, All Programs, AcerSystem... Follow the instructions on such subjects as using the keyboard and audio, etc. The Aspire Series Generic User Guide contains useful information applying to thank you use Adobe Reader, access ...
...PDF) and comes preloaded on how your computer can help you for making an Acer notebook your mobile computing needs. For instructions on AcerSystem User Guide. Note: Viewing... the file requires Adobe Reader. It covers basic topics such as system utilities, data recovery, expansion options and troubleshooting. In addition it : 1 Click on Start, All Programs, AcerSystem... Follow the instructions on such subjects as using the keyboard and audio, etc. The Aspire Series Generic User Guide contains useful information applying to thank you use Adobe Reader, access ...
Acer Aspire 5517 Series Service Guide
Page 9
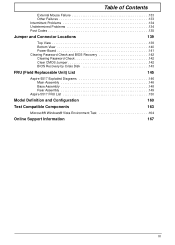
... 140 Power Board 141 Clearing Password Check and BIOS Recovery 142 Clearing Password Check 142 Clear CMOS Jumper 142 BIOS Recovery by Crisis Disk 143 FRU (Field Replaceable Unit) List 145 Aspire 5517 Exploded Diagrams 146 Main Assembly 146 Base Assembly 148 Rear Assembly 149 Aspire 5517 FRU List 150 Model Definition and Configuration 160 Test...
... 140 Power Board 141 Clearing Password Check and BIOS Recovery 142 Clearing Password Check 142 Clear CMOS Jumper 142 BIOS Recovery by Crisis Disk 143 FRU (Field Replaceable Unit) List 145 Aspire 5517 Exploded Diagrams 146 Main Assembly 146 Base Assembly 148 Rear Assembly 149 Aspire 5517 FRU List 150 Model Definition and Configuration 160 Test...
Acer Aspire 5517 Series Service Guide
Page 37
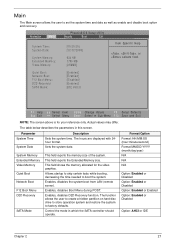
... , , or selects field. Parameter System Time System Date System Memory Extended Memory Video Memory Quiet Boot Network Boot F12 Boot Menu D2D Recovery SATA Mode Description Sets the system time. Enables, disables Boot Menu during POST. The hours are displayed with 24hour format. This field reports... Disabled Option: Enabled or Enabled Option: Enabled or Disabled Option: AHCI or IDE Chapter 2 27 Quiet Boot: Network Boot: F12 Boot Menu: D2D Recovery: SATA Mode: [Enabled] [Enabled] [Disabled] [Enabled] [IDE AHCI] F1 Help Esc Exit Select Item F5/F6 Change Values F9 Setup Defaults Select...
... , , or selects field. Parameter System Time System Date System Memory Extended Memory Video Memory Quiet Boot Network Boot F12 Boot Menu D2D Recovery SATA Mode Description Sets the system time. Enables, disables Boot Menu during POST. The hours are displayed with 24hour format. This field reports... Disabled Option: Enabled or Enabled Option: Enabled or Disabled Option: AHCI or IDE Chapter 2 27 Quiet Boot: Network Boot: F12 Boot Menu: D2D Recovery: SATA Mode: [Enabled] [Enabled] [Disabled] [Enabled] [IDE AHCI] F1 Help Esc Exit Select Item F5/F6 Change Values F9 Setup Defaults Select...
Acer Aspire 5517 Series Service Guide
Page 43
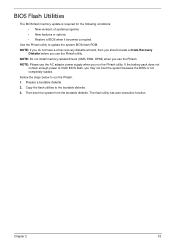
Use the Phlash utility to the bootable diskette. 3. NOTE: Please use the Phlash utility. NOTE: If you do not have a crisis recovery diskette at hand, then you should create a Crisis Recovery Diskette before you use the AC adaptor power supply when you run the Phlash. 1. Fellow the steps below to finish BIOS flash...
Use the Phlash utility to the bootable diskette. 3. NOTE: Please use the Phlash utility. NOTE: If you do not have a crisis recovery diskette at hand, then you should create a Crisis Recovery Diskette before you use the AC adaptor power supply when you run the Phlash. 1. Fellow the steps below to finish BIOS flash...

Acer Aspire 5517 Series Service Guide
Page 138
... an earlier time and date. 11. Remove any key to start to correct the problem. 1. Run the Windows Disk Defragmenter. Replace the HDD. The System Recovery Options screen displays. Ensure all external devices. 2. b. Select Startup Repair.
... an earlier time and date. 11. Remove any key to start to correct the problem. 1. Run the Windows Disk Defragmenter. Replace the HDD. The System Recovery Options screen displays. Ensure all external devices. 2. b. Select Startup Repair.

Acer Aspire 5517 Series Service Guide
Page 146
... Setup System Management Mode (SMM) area Display external L2 cache size Load custom defaults (optional) Display shadow-area message Display possible high address for UMB recovery Display error messages Check for configuration errors Check for keyboard errors Set up hardware interrupt vectors Initialize coprocessor if present Disable onboard Super I/O ports and...
... Setup System Management Mode (SMM) area Display external L2 cache size Load custom defaults (optional) Display shadow-area message Display possible high address for UMB recovery Display error messages Check for configuration errors Check for keyboard errors Set up hardware interrupt vectors Initialize coprocessor if present Disable onboard Super I/O ports and...

Acer Aspire 5517 Series Service Guide
Page 148
... Block in Flash ROM Initialize the chipset E1h Initialize the bridge E2h Initialize the CPU E3h Initialize system timer E4h Initialize system I/O E5h Check force recovery boot E6h Checksum BIOS ROM E7h Go to BIOS E8h Set Huge Segment E9h Initialize Multi Processor EAh Initialize OEM special code EBh Initialize PIC...
... Block in Flash ROM Initialize the chipset E1h Initialize the bridge E2h Initialize the CPU E3h Initialize system timer E4h Initialize system I/O E5h Check force recovery boot E6h Checksum BIOS ROM E7h Go to BIOS E8h Set Huge Segment E9h Initialize Multi Processor EAh Initialize OEM special code EBh Initialize PIC...
Acer Aspire 5517 Series Service Guide
Page 152
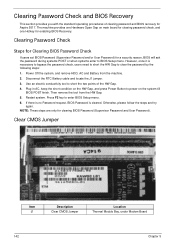
... to BIOS Setup menu. Disconnect the RTC Battery cable and locate the J1 jumper. 3. NOTE: These steps are only for enabling BIOS Recovery. Clear CMOS Jumper Item J1 Description Clear CMOS Jumper Location Thermal Module Bay, under Modem Board 142 Chapter 5 The machine provides one Hardware...Clearing Password Check Steps for Clearing BIOS Password Check If users set BIOS Password (Supervisor Password and/or User Password) for Aspire 5517. Restart system. Clearing Password Check and BIOS Recovery This section provides you with the standard operating procedures of the HW Gap. 4.
... to BIOS Setup menu. Disconnect the RTC Battery cable and locate the J1 jumper. 3. NOTE: These steps are only for enabling BIOS Recovery. Clear CMOS Jumper Item J1 Description Clear CMOS Jumper Location Thermal Module Bay, under Modem Board 142 Chapter 5 The machine provides one Hardware...Clearing Password Check Steps for Clearing BIOS Password Check If users set BIOS Password (Supervisor Password and/or User Password) for Aspire 5517. Restart system. Clearing Password Check and BIOS Recovery This section provides you with the standard operating procedures of the HW Gap. 4.
Acer Aspire 5517 Series Service Guide
Page 153
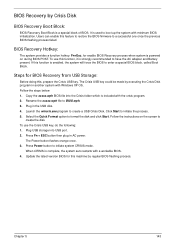
... into USB port. 2. Chapter 5 143 Launch the wincris.exe program to enter a special BIOS block, called Boot Block. Steps for BIOS Recovery from USB Storage: Before doing this machine by regular BIOS flashing process. Plug in the USB disk. 4. To use this function is strongly ...recommended to initiate system CRISIS mode. BIOS Recovery by Crisis Disk BIOS Recovery Boot Block: BIOS Recovery Boot Block is powered on the screen to format the disk and click Start. BIOS Recovery Hotkey: The system provides a function hotkey: Fn+Esc, for this , ...
... into USB port. 2. Chapter 5 143 Launch the wincris.exe program to enter a special BIOS block, called Boot Block. Steps for BIOS Recovery from USB Storage: Before doing this machine by regular BIOS flashing process. Plug in the USB disk. 4. To use this function is strongly ...recommended to initiate system CRISIS mode. BIOS Recovery by Crisis Disk BIOS Recovery Boot Block: BIOS Recovery Boot Block is powered on the screen to format the disk and click Start. BIOS Recovery Hotkey: The system provides a function hotkey: Fn+Esc, for this , ...


