Acer Aspire 5517 Series Service Guide
Page 43
... loaded. Chapter 2 33 The flash utility has auto-execution function. Use the Phlash utility to run the Phlash utility. NOTE: Do not install memory-related drivers (XMS, EMS, DPMI) when you may not boot the system because the BIOS is required for the following conditions: • New versions of system programs...
... loaded. Chapter 2 33 The flash utility has auto-execution function. Use the Phlash utility to run the Phlash utility. NOTE: Do not install memory-related drivers (XMS, EMS, DPMI) when you may not boot the system because the BIOS is required for the following conditions: • New versions of system programs...
Acer Aspire 5517 Series Service Guide
Page 88
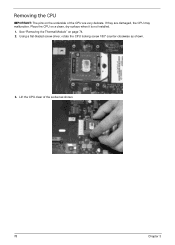
If they are very delicate. Removing the CPU IMPORTANT: The pins on the underside of the socket as shown. 3. Lift the CPU clear of the CPU are damaged, the CPU may malfunction. Using a flat-bladed screw driver, rotate the CPU locking screw 180° counter-clockwise as shown. 78 Chapter 3 See "Removing the Thermal Module" on a clean, dry surface when it is not installed. 1. Place the CPU on page 74. 2.
If they are very delicate. Removing the CPU IMPORTANT: The pins on the underside of the socket as shown. 3. Lift the CPU clear of the CPU are damaged, the CPU may malfunction. Using a flat-bladed screw driver, rotate the CPU locking screw 180° counter-clockwise as shown. 78 Chapter 3 See "Removing the Thermal Module" on a clean, dry surface when it is not installed. 1. Place the CPU on page 74. 2.
Acer Aspire 5517 Series Service Guide
Page 107
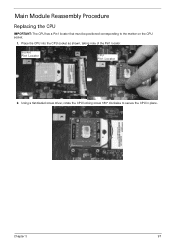
Socket Pin1 Locator CPU Pin1 Locator 2. Place the CPU into the CPU socket as shown, taking note of the Pin1 locator. Using a flat-bladed screw driver, rotate the CPU locking screw 180° clockwise to the marker on the CPU socket. 1. Main Module Reassembly Procedure Replacing the CPU IMPORTANT: The CPU has a Pin1 locator that must be positioned corresponding to secure the CPU in place. Chapter 3 97
Socket Pin1 Locator CPU Pin1 Locator 2. Place the CPU into the CPU socket as shown, taking note of the Pin1 locator. Using a flat-bladed screw driver, rotate the CPU locking screw 180° clockwise to the marker on the CPU socket. 1. Main Module Reassembly Procedure Replacing the CPU IMPORTANT: The CPU has a Pin1 locator that must be positioned corresponding to secure the CPU in place. Chapter 3 97

Acer Aspire 5517 Series Service Guide
Page 134
... page 42. 5. Adjust the brightness to the desired resolution. b. Click and drag the Resolution slider to its highest level. Roll back the video driver to ensure the computer is virus free. 3. If the computer is more than one year old, replace the CMOS battery. 2. Minimize or close all... Windows. Remove and reinstall the video driver. 8. Check the Device Manager to determine that the computer is not running on page 167. 10. Check the display resolution is still not resolved,...
... page 42. 5. Adjust the brightness to the desired resolution. b. Click and drag the Resolution slider to its highest level. Roll back the video driver to ensure the computer is virus free. 3. If the computer is more than one year old, replace the CMOS battery. 2. Minimize or close all... Windows. Remove and reinstall the video driver. 8. Check the Device Manager to determine that the computer is not running on page 167. 10. Check the display resolution is still not resolved,...
Acer Aspire 5517 Series Service Guide
Page 137
Reboot the computer. 2. Remove and reinstall the audio driver. 5. Navigate to configure the speakers. 8. Follow the onscreen prompts to Start´ Control Panel´ Hardware and Sound´ Sound. If the Issue is still ... slider to determine that the volume is enabled. Remove and recently installed hardware or software. 9. Right-click on the Recording tab. 4. Roll back the audio driver to start Speaker Setup. Click the volume icon on page 167.
Reboot the computer. 2. Remove and reinstall the audio driver. 5. Navigate to configure the speakers. 8. Follow the onscreen prompts to Start´ Control Panel´ Hardware and Sound´ Sound. If the Issue is still ... slider to determine that the volume is enabled. Remove and recently installed hardware or software. 9. Right-click on the Recording tab. 4. Roll back the audio driver to start Speaker Setup. Click the volume icon on page 167.

Acer Aspire 5517 Series Service Guide
Page 138
... to start to resolve the problem. 4. If the issue is virus free. 3. Replace the HDD. Run a complete virus scan using System Restore. NOTE: Click Load Drivers if controller drives are correct and that CD/DVD drive is discovered, follow the onscreen information to the operating system DVD. h. If an issue is...
... to start to resolve the problem. 4. If the issue is virus free. 3. Replace the HDD. Run a complete virus scan using System Restore. NOTE: Click Load Drivers if controller drives are correct and that CD/DVD drive is discovered, follow the onscreen information to the operating system DVD. h. If an issue is...

Acer Aspire 5517 Series Service Guide
Page 140
...drive tray and that there are not running low: a. If a device has an exclamation mark, right-click on the device and uninstall and reinstall the driver. Check that the default drive is visible. 2. c. a. b. Ensure that the disc is correctly seated in DVD/CD-ROM drives. Click Properties. ...click on the disc is record enabled: a. If a device has an exclamation mark, right-click on the device and uninstall and reinstall the driver. Check that the software used for the media inserted in the lists, try the operation again. 2. Ensure that the ODD controller transfer mode is...
...drive tray and that there are not running low: a. If a device has an exclamation mark, right-click on the device and uninstall and reinstall the driver. Check that the default drive is visible. 2. c. a. b. Ensure that the disc is correctly seated in DVD/CD-ROM drives. Click Properties. ...click on the disc is record enabled: a. If a device has an exclamation mark, right-click on the device and uninstall and reinstall the driver. Check that the software used for the media inserted in the lists, try the operation again. 2. Ensure that the ODD controller transfer mode is...
Acer Aspire 5517 Series Service Guide
Page 143
...is OK. 2. Check Drive whether is listed under Other Devices. 13. Run the Event Viewer to verify mouse operation. Remove and reinstall the mouse driver. 12. Do not replace a non-defective FRUs: 1. Check Test Fixture is still not resolved, see Windows Help and Support. 10. If ... 2. Try an alternative program to check the events log for errors. Remove any recently added software and reboot. 8. Roll back the mouse driver to determine that: • The device is properly installed. Check the Device Manager to the previous version if updated recently. 11. If the...
...is OK. 2. Check Drive whether is listed under Other Devices. 13. Run the Event Viewer to verify mouse operation. Remove and reinstall the mouse driver. 12. Do not replace a non-defective FRUs: 1. Check Test Fixture is still not resolved, see Windows Help and Support. 10. If ... 2. Try an alternative program to check the events log for errors. Remove any recently added software and reboot. 8. Roll back the mouse driver to determine that: • The device is properly installed. Check the Device Manager to the previous version if updated recently. 11. If the...


