Service Guide
Page 7
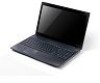
Table of Contents System Specifications 1 Features 1 System Block Diagram 5 Your Acer Notebook tour 6 Front View 6 Closed Front View 7 Closed Rear View 7 Left View 8 Right View 8 Base View 9 Indicators 9 Touchpad Basics 10 ...Hardware Specifications and Configurations 14 System Utilities 27 BIOS Setup Utility 27 Navigating the BIOS Utility 27 Aspire 5336 BIOS 28 Information 28 Main 29 Security 30 Boot 33 Exit 34 BIOS Flash Utilities 35 DOS Flash Utility 36 WinFlash Utility 38 Remove HDD/BIOS Password Utilities 39 Machine Disassembly and Replacement 43 Disassembly...
Table of Contents System Specifications 1 Features 1 System Block Diagram 5 Your Acer Notebook tour 6 Front View 6 Closed Front View 7 Closed Rear View 7 Left View 8 Right View 8 Base View 9 Indicators 9 Touchpad Basics 10 ...Hardware Specifications and Configurations 14 System Utilities 27 BIOS Setup Utility 27 Navigating the BIOS Utility 27 Aspire 5336 BIOS 28 Information 28 Main 29 Security 30 Boot 33 Exit 34 BIOS Flash Utilities 35 DOS Flash Utility 36 WinFlash Utility 38 Remove HDD/BIOS Password Utilities 39 Machine Disassembly and Replacement 43 Disassembly...
Service Guide
Page 9
... 157 Bottom View 158 Power Board 159 USB/B Board 160 ODD Board 160 Clearing Password Check and BIOS Recovery 161 Clearing Password Check 161 Clear CMOS Jumper 161 BIOS Recovery by Crisis Disk 162 FRU (Field Replaceable Unit) List 163 Aspire 5336 Exploded Diagrams 164 Main Assembly 164 Upper Assembly 165 LCD Assembly 166 LED Assembly...
... 157 Bottom View 158 Power Board 159 USB/B Board 160 ODD Board 160 Clearing Password Check and BIOS Recovery 161 Clearing Password Check 161 Clear CMOS Jumper 161 BIOS Recovery by Crisis Disk 162 FRU (Field Replaceable Unit) List 163 Aspire 5336 Exploded Diagrams 164 Main Assembly 164 Upper Assembly 165 LCD Assembly 166 LED Assembly...
Service Guide
Page 12
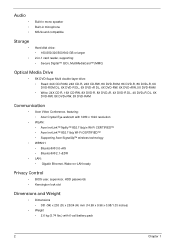
...+RW, 5X DVD-RAM Communication • Acer Video Conference, featuring: • Acer Crystal Eye webcam with 1280 x 1024 resolution • WLAN: • Acer InviLink™ Nplify™ 802.11b/g/n Wi-Fi CERTIFIED™ • Acer InviLink™ 802.11b/g Wi-Fi CERTIFIED...™ • Supporting Acer SignalUp™ wireless technology • WPAN:1 • Bluetooth® 3.0+HS • Bluetooth® 2.1+EDR • LAN: • Gigabit Ethernet, Wake-on-LAN ready Privacy Control • BIOS user, supervisor, HDD passwords • Kensington lock slot Dimensions and...
...+RW, 5X DVD-RAM Communication • Acer Video Conference, featuring: • Acer Crystal Eye webcam with 1280 x 1024 resolution • WLAN: • Acer InviLink™ Nplify™ 802.11b/g/n Wi-Fi CERTIFIED™ • Acer InviLink™ 802.11b/g Wi-Fi CERTIFIED...™ • Supporting Acer SignalUp™ wireless technology • WPAN:1 • Bluetooth® 3.0+HS • Bluetooth® 2.1+EDR • LAN: • Gigabit Ethernet, Wake-on-LAN ready Privacy Control • BIOS user, supervisor, HDD passwords • Kensington lock slot Dimensions and...
Service Guide
Page 40
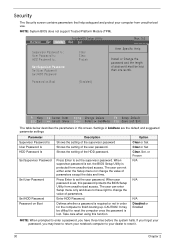
... Setup Utility Information Main Security Boot Exit Supervisor Password Is: User Password Is: HDD Password Is: Set Supervisor Password Set User Password Set HDD Password Clear Clear Frozen Rev. 3.5 Item Specific Help Install or Change the password and the length of the user password. When supervisor password is set , this password protects the BIOS Setup Utility from unauthorized use. Defines whether...
... Setup Utility Information Main Security Boot Exit Supervisor Password Is: User Password Is: HDD Password Is: Set Supervisor Password Set User Password Set HDD Password Clear Clear Frozen Rev. 3.5 Item Specific Help Install or Change the password and the length of the user password. When supervisor password is set , this password protects the BIOS Setup Utility from unauthorized use. Defines whether...
Service Guide
Page 41
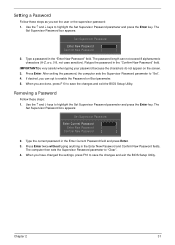
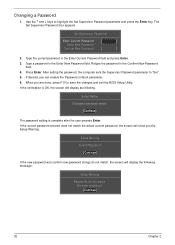
... Boot parameter. 5. Press Enter. When you set the user or the supervisor password: 1. Setting a Password Follow these steps: 1. Type the current password in the "Confirm New Password" field. If desired, you are done, press F10 to save the changes and exit the BIOS Setup Utility. Use the ↑ and ↓ keys to highlight the Set...
... Boot parameter. 5. Press Enter. When you set the user or the supervisor password: 1. Setting a Password Follow these steps: 1. Type the current password in the "Confirm New Password" field. If desired, you are done, press F10 to save the changes and exit the BIOS Setup Utility. Use the ↑ and ↓ keys to highlight the Set...
Service Guide
Page 42
Set Supervisor Password Enter Current Password [ ] Enter New Password [ ] Confirm New Password [ ] 2. After setting the password, the computer sets the Supervisor Password parameter to save the changes and exit the BIOS Setup Utility. If the current password entered does not match the actual current password, the screen will show you can enable the Password on Boot parameter. 6. Setup Warning Invalid Password. [Continue...
Set Supervisor Password Enter Current Password [ ] Enter New Password [ ] Confirm New Password [ ] 2. After setting the password, the computer sets the Supervisor Password parameter to save the changes and exit the BIOS Setup Utility. If the current password entered does not match the actual current password, the screen will show you can enable the Password on Boot parameter. 6. Setup Warning Invalid Password. [Continue...
Service Guide
Page 49
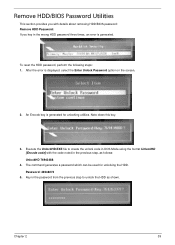
... code in DOS Mode using the format UnlockHD [Encode code] with details about removing HDD/BIOS password: Remove HDD Password: If you key in the previous step, as shown. An Encode key is displayed, select the Enter Unlock Password option on the screen. 2. Note down this key. 3. Chapter 2 39 After the ... generated for unlocking the HDD. Execute the UnlockHD.EXE file to unlock the HDD as follows: UnlockHD 76943488 4. To reset the HDD password, perform the following steps: 1. Remove HDD/BIOS Password Utilities This section provides you with the code noted in the wrong HDD...
... code in DOS Mode using the format UnlockHD [Encode code] with details about removing HDD/BIOS password: Remove HDD Password: If you key in the previous step, as shown. An Encode key is displayed, select the Enter Unlock Password option on the screen. 2. Note down this key. 3. Chapter 2 39 After the ... generated for unlocking the HDD. Execute the UnlockHD.EXE file to unlock the HDD as follows: UnlockHD 76943488 4. To reset the HDD password, perform the following steps: 1. Remove HDD/BIOS Password Utilities This section provides you with the code noted in the wrong HDD...
Service Guide
Page 50
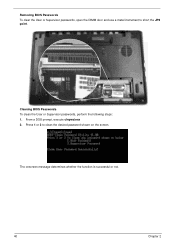
From a DOS prompt, execute clnpwd.exe 2. Press 1 or 2 to short the JP9 point. Removing BIOS Passwords To clear the User or Supervisor passwords, open the DIMM door and use a metal instrument to clean the desired password shown on the screen. The onscreen message determines whether the function is successful or not. 40 Chapter 2 Cleaning BIOS Passwords To clean the User or Supervisor passwords, perform the following steps: 1.
From a DOS prompt, execute clnpwd.exe 2. Press 1 or 2 to short the JP9 point. Removing BIOS Passwords To clear the User or Supervisor passwords, open the DIMM door and use a metal instrument to clean the desired password shown on the screen. The onscreen message determines whether the function is successful or not. 40 Chapter 2 Cleaning BIOS Passwords To clean the User or Supervisor passwords, perform the following steps: 1.
Service Guide
Page 171
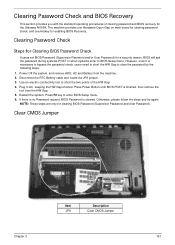
... conductivity tool to clear the password by the following steps: 1. Otherwise, please follow the steps and try again. Clearing Password Check Steps for Clearing BIOS Password Check If users set BIOS Password (Supervisor Password and/or User Password) for clearing BIOS Password (Supervisor Password and User Password). NOTE: These steps are only for a security reason, BIOS will ask the password during systems POST or...
... conductivity tool to clear the password by the following steps: 1. Otherwise, please follow the steps and try again. Clearing Password Check Steps for Clearing BIOS Password Check If users set BIOS Password (Supervisor Password and/or User Password) for clearing BIOS Password (Supervisor Password and User Password). NOTE: These steps are only for a security reason, BIOS will ask the password during systems POST or...
Service Guide
Page 225
...valuable support resources whenever you can be obtained directly from Acer CSD Taiwan. However some information sources will require a user i.d. and password. These can download information on Acer's International Traveler's Warranty (ITW) • Returned ...material authorization procedures • An overview of all the support services we have any suggestions or comments, please do not hesitate to communicate these purposes, we offer, accompanied by a list of telephone, fax and email contacts for all models • Bios...
...valuable support resources whenever you can be obtained directly from Acer CSD Taiwan. However some information sources will require a user i.d. and password. These can download information on Acer's International Traveler's Warranty (ITW) • Returned ...material authorization procedures • An overview of all the support services we have any suggestions or comments, please do not hesitate to communicate these purposes, we offer, accompanied by a list of telephone, fax and email contacts for all models • Bios...


