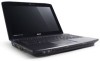
Aspire 2930 / 2930Z / 2430 Service Guide
Page 7
...numeric keypad 11 Windows Keys 12 Hot Keys 13 Special Key (only for certain models 13 Using the System Utilities 14 Acer GridVista (dual-display compatible 14 Hardware Specifications and Configurations 16 System Utilities 23 BIOS Setup Utility 23 Navigating the BIOS ...43 External Modules Disassembly Flowchart 43 Removing the Battery Pack 44 Removing the ExpressCard dummy card 45 Removing the SD dummy card 46 Removing the Lower Covers 47 Removing the WLAN Module 48 Removing the Hard Disk Drive Module 50 Removing the Optical Drive Module 52 Removing the DIMM Modules 54 Main ...
...numeric keypad 11 Windows Keys 12 Hot Keys 13 Special Key (only for certain models 13 Using the System Utilities 14 Acer GridVista (dual-display compatible 14 Hardware Specifications and Configurations 16 System Utilities 23 BIOS Setup Utility 23 Navigating the BIOS ...43 External Modules Disassembly Flowchart 43 Removing the Battery Pack 44 Removing the ExpressCard dummy card 45 Removing the SD dummy card 46 Removing the Lower Covers 47 Removing the WLAN Module 48 Removing the Hard Disk Drive Module 50 Removing the Optical Drive Module 52 Removing the DIMM Modules 54 Main ...
Aspire 2930 / 2930Z / 2430 Service Guide
Page 8
...Removing the Keyboard 59 Removing the Speaker Module 60 Removing the Antenna 62 Removing the LED Board 64 Removing the Power Board 65 Removing the LCD Module 66 Removing the Upper Cover 68 Removing the Finger Print Reader 71 Removing the TouchPad Bracket 72 Removing the Launch Board 74 Removing the USB Board 75 Removing the I/O Board 76 Removing the Bluetooth Module 77 Removing...118 Replacing the Switch Cover 119 Replacing the WLAN Module 119 Replacing the Hard Disk Drive Module 120 Replacing the DIMM Modules 121 Replacing the ODD Module 122 Replacing the Lower Covers 122 VIII
...Removing the Keyboard 59 Removing the Speaker Module 60 Removing the Antenna 62 Removing the LED Board 64 Removing the Power Board 65 Removing the LCD Module 66 Removing the Upper Cover 68 Removing the Finger Print Reader 71 Removing the TouchPad Bracket 72 Removing the Launch Board 74 Removing the USB Board 75 Removing the I/O Board 76 Removing the Bluetooth Module 77 Removing...118 Replacing the Switch Cover 119 Replacing the WLAN Module 119 Replacing the Hard Disk Drive Module 120 Replacing the DIMM Modules 121 Replacing the ODD Module 122 Replacing the Lower Covers 122 VIII
Aspire 2930 / 2930Z / 2430 Service Guide
Page 60
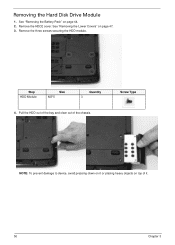
See "Removing the Battery Pack" on page 47. 3. Step HDD Module Size M3*5 Quantity 3 4. See "Removing the Lower Covers" on page 44. 2. Remove the three screws securing the HDD module. Removing the Hard Disk Drive Module 1. Pull the HDD out of the bay and clear out of it or placing heavy objects on it . 50 Chapter 3 Remove the HDD2 cover. Screw Type NOTE: To prevent damage to device, avoid pressing down on top of the chassis.
See "Removing the Battery Pack" on page 47. 3. Step HDD Module Size M3*5 Quantity 3 4. See "Removing the Lower Covers" on page 44. 2. Remove the three screws securing the HDD module. Removing the Hard Disk Drive Module 1. Pull the HDD out of the bay and clear out of it or placing heavy objects on it . 50 Chapter 3 Remove the HDD2 cover. Screw Type NOTE: To prevent damage to device, avoid pressing down on top of the chassis.
Aspire 2930 / 2930Z / 2430 Service Guide
Page 152
...the time of the failure is detected, do with a hardware defect, such as: cosmic radiation, electrostatic discharge, or software errors. Remove or disconnect all attached devices are found, replace the FRU. 3. FRU replacement should be caused by the computer. Follow these procedures ... devices: • Non-Acer devices • Printer, mouse, and other external devices • Battery pack • Hard disk drive • DIMM • CD-ROM/Diskette drive Module • PC Cards 4. Power-on page 126.): 1. If the problem does not recur, reconnect the removed devices one at a time...
...the time of the failure is detected, do with a hardware defect, such as: cosmic radiation, electrostatic discharge, or software errors. Remove or disconnect all attached devices are found, replace the FRU. 3. FRU replacement should be caused by the computer. Follow these procedures ... devices: • Non-Acer devices • Printer, mouse, and other external devices • Battery pack • Hard disk drive • DIMM • CD-ROM/Diskette drive Module • PC Cards 4. Power-on page 126.): 1. If the problem does not recur, reconnect the removed devices one at a time...


