Aspire 2430/2930 Series User's Guide - EN
Page 5
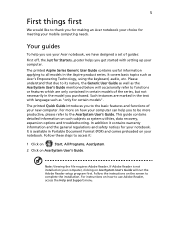
The printed Quick Guide introduces you use Adobe Reader, access the Help and Support menu. Follow the instructions on the screen to the basic features and functions of your new computer. Please understand that due to its nature, the Generic User Guide as well as system utilities, data recovery, expansion options and troubleshooting. This guide contains detailed information on your computer can help you to complete the installation. Note: Viewing...
The printed Quick Guide introduces you use Adobe Reader, access the Help and Support menu. Follow the instructions on the screen to the basic features and functions of your new computer. Please understand that due to its nature, the Generic User Guide as well as system utilities, data recovery, expansion options and troubleshooting. This guide contains detailed information on your computer can help you to complete the installation. Note: Viewing...
Aspire 2930 / 2930Z / 2430 Service Guide
Page 7
... Buttons 9 Touch Pad Basics (with fingerprint reader 10 Using the Keyboard 11 Lock Keys and embedded numeric keypad 11 Windows Keys 12 Hot Keys 13 Special Key (only for certain models 13 Using the System Utilities 14 Acer GridVista (dual-display compatible 14 Hardware Specifications and Configurations 16 System Utilities 23 BIOS Setup Utility 23 Navigating the BIOS Utility 23 Information 24 Main 25 Advanced 26 Security 28 Power 31 Boot 33 Exit 34 BIOS Flash Utilities 35 DOS Flash Utility 35 WinFlash Utility 37 Remove HDD/BIOS Utility...
... Buttons 9 Touch Pad Basics (with fingerprint reader 10 Using the Keyboard 11 Lock Keys and embedded numeric keypad 11 Windows Keys 12 Hot Keys 13 Special Key (only for certain models 13 Using the System Utilities 14 Acer GridVista (dual-display compatible 14 Hardware Specifications and Configurations 16 System Utilities 23 BIOS Setup Utility 23 Navigating the BIOS Utility 23 Information 24 Main 25 Advanced 26 Security 28 Power 31 Boot 33 Exit 34 BIOS Flash Utilities 35 DOS Flash Utility 35 WinFlash Utility 37 Remove HDD/BIOS Utility...
Aspire 2930 / 2930Z / 2430 Service Guide
Page 8
... Removing the Switch Cover 57 Removing the Keyboard 59 Removing the Speaker Module 60 Removing the Antenna 62 Removing the LED Board 64 Removing the Power Board 65 Removing the LCD Module 66 Removing the Upper Cover 68 Removing the Finger Print Reader 71 Removing the TouchPad Bracket 72 Removing the Launch Board 74 Removing the USB Board 75 Removing the I/O Board 76 Removing the Bluetooth Module 77 Removing the Modem Module 78 Removing the Mainboard 80 Removing the RJ-11 Jack 83 Removing the Fan/Thermal Module 85 Removing the CPU 86 LCD Module Disassembly...
... Removing the Switch Cover 57 Removing the Keyboard 59 Removing the Speaker Module 60 Removing the Antenna 62 Removing the LED Board 64 Removing the Power Board 65 Removing the LCD Module 66 Removing the Upper Cover 68 Removing the Finger Print Reader 71 Removing the TouchPad Bracket 72 Removing the Launch Board 74 Removing the USB Board 75 Removing the I/O Board 76 Removing the Bluetooth Module 77 Removing the Modem Module 78 Removing the Mainboard 80 Removing the RJ-11 Jack 83 Removing the Fan/Thermal Module 85 Removing the CPU 86 LCD Module Disassembly...

Aspire 2930 / 2930Z / 2430 Service Guide
Page 9
... Intermittent Problems 142 Undetermined Problems 142 POST Codes Tables 143 Port 80 POST Codes 143 POST Keys and Messages 145 Jumper and Connector Locations 147 Top View 147 Bottom View 148 Clearing Password Check and BIOS Recovery 149 Clearing Password Check 149 BIOS Recovery by Crisis Disk 150 FRU (Field Replaceable Unit) List 151 Aspire 2930 Exploded Diagrams 152 Upper/ Lower Cover 152 LCD Panel 153 Aspire 2930 FRU List 154 Screw List 162 Model Definition and Configuration 164 Aspire 2930 Series 164...
... Intermittent Problems 142 Undetermined Problems 142 POST Codes Tables 143 Port 80 POST Codes 143 POST Keys and Messages 145 Jumper and Connector Locations 147 Top View 147 Bottom View 148 Clearing Password Check and BIOS Recovery 149 Clearing Password Check 149 BIOS Recovery by Crisis Disk 150 FRU (Field Replaceable Unit) List 151 Aspire 2930 Exploded Diagrams 152 Upper/ Lower Cover 152 LCD Panel 153 Aspire 2930 FRU List 154 Screw List 162 Model Definition and Configuration 164 Aspire 2930 Series 164...
Aspire 2930 / 2930Z / 2430 Service Guide
Page 19
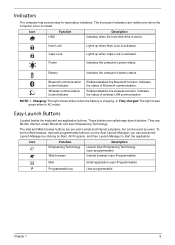
...Indicates when the hard disk drive is charging. 2. Indicates the computer's power status. Battery Indicates the computer's battery status. Enables/disables the wireless function. Charging: The light shows amber when the battery is active. Fully charged: The light shows green when in AC mode. These buttons are visible even when the computer cover is activated. Icon Function Empowering Technology Web browser Description Launch Acer Empowering Technology. (user-programmable) Internet browser (user-Programmable) Mail Email application (user-Programmable) P Programmable key User...
...Indicates when the hard disk drive is charging. 2. Indicates the computer's power status. Battery Indicates the computer's battery status. Enables/disables the wireless function. Charging: The light shows amber when the battery is active. Fully charged: The light shows green when in AC mode. These buttons are visible even when the computer cover is activated. Icon Function Empowering Technology Web browser Description Launch Acer Empowering Technology. (user-programmable) Internet browser (user-Programmable) Mail Email application (user-Programmable) P Programmable key User...

Aspire 2930 / 2930Z / 2430 Service Guide
Page 23
... Management Acer ePower Management Sleep Launches Acer eSettings Management in Sleep mode. + + + + + Display toggle Screen blank Touch Pad toggle Speaker toggle Brightness up Switches display output between the display screen, external monitor (if connected) and both. Increases the screen brightness. + Brightness down Decreases the screen brightness. Open a text editor or word processor. 2. Turns the display screen backlight off . Turns the internal Touch Pad on and off. The US dollar sign 1. NOTE: Some fonts and software do not support the Euro symbol. Turns...
... Management Acer ePower Management Sleep Launches Acer eSettings Management in Sleep mode. + + + + + Display toggle Screen blank Touch Pad toggle Speaker toggle Brightness up Switches display output between the display screen, external monitor (if connected) and both. Increases the screen brightness. + Brightness down Decreases the screen brightness. Open a text editor or word processor. 2. Turns the display screen backlight off . Turns the internal Touch Pad on and off. The US dollar sign 1. NOTE: Some fonts and software do not support the Euro symbol. Turns...

Aspire 2930 / 2930Z / 2430 Service Guide
Page 29
...; Wake on LAN from S4 in AC mode • System information Set by setup manual LCD 12" Click the red paper clip icon for BIOS serial number configurable/asset tag- Support ISIPP • Support Acer UI • Support multi-boot • Suspend to RAM (S3)/Disk (S4) • Various hot-keys for system control • Support SMBIOS 2.3,PCI2.2 • DMI utility for more panel spec. Item Vendor/model name Screen Diagonal (mm) Active Area (mm) Display resolution (pixels...
...; Wake on LAN from S4 in AC mode • System information Set by setup manual LCD 12" Click the red paper clip icon for BIOS serial number configurable/asset tag- Support ISIPP • Support Acer UI • Support multi-boot • Suspend to RAM (S3)/Disk (S4) • Various hot-keys for system control • Support SMBIOS 2.3,PCI2.2 • DMI utility for more panel spec. Item Vendor/model name Screen Diagonal (mm) Active Area (mm) Display resolution (pixels...
Aspire 2930 / 2930Z / 2430 Service Guide
Page 34
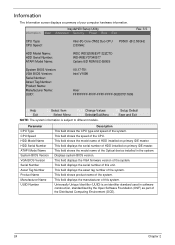
... the Optical device installed in software construction, standardized by the Open Software Foundation (OSF) as part of the Distributed Computing Environment (DCE). 24 Chapter 2 This field shows product name of the system. This field displays the serial number of the system. InsydeH20 Setup Utility Information Main Advanced Security Power Boot Exit Rev. 3.5 CPU Type: CPU Speed: Intel (R) Core (TM)2 Duo CPU 2.53GHz P9500 @ 2.53GHz HDD Model Name: HDD Serial Number: ATAPI Model Name...
... the Optical device installed in software construction, standardized by the Open Software Foundation (OSF) as part of the Distributed Computing Environment (DCE). 24 Chapter 2 This field shows product name of the system. This field displays the serial number of the system. InsydeH20 Setup Utility Information Main Advanced Security Power Boot Exit Rev. 3.5 CPU Type: CPU Speed: Intel (R) Core (TM)2 Duo CPU 2.53GHz P9500 @ 2.53GHz HDD Model Name: HDD Serial Number: ATAPI Model Name...
Aspire 2930 / 2930Z / 2430 Service Guide
Page 38
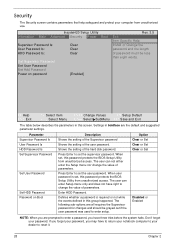
... password protects the BIOS Setup Utility from unauthorized access. Don't forget your computer from unauthorized use. The user can enter Setup menu only and does not have right to set , this group happened. The following sub-options are all requires the Supervisor password for changes and should be less than eight words. Parameter Supervisor Password Is User Password Is HDD Password Is Set Supervisor Password Set User Password Set HDD Password Password on password [Enabled] Rev. 3.5 Exit Item Specific Help Install or Change...
... password protects the BIOS Setup Utility from unauthorized access. Don't forget your computer from unauthorized use. The user can enter Setup menu only and does not have right to set , this group happened. The following sub-options are all requires the Supervisor password for changes and should be less than eight words. Parameter Supervisor Password Is User Password Is HDD Password Is Set Supervisor Password Set User Password Set HDD Password Password on password [Enabled] Rev. 3.5 Exit Item Specific Help Install or Change...

Aspire 2930 / 2930Z / 2430 Service Guide
Page 39
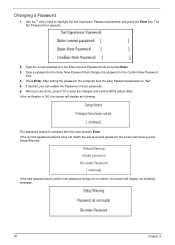
... changed the settings, press u to save the changes and exit the BIOS Setup Utility. When you are done, press F10 to save the changes and exit the BIOS Setup Utility. Setting a Password Follow these steps: 1. Use the ↑ and ↓ keys to "Set". 4. Retype the password in the Enter New Password and Confirm New Password fields. Press Enter. After setting the password, the computer sets the User Password parameter to highlight the Set Supervisor Password parameter and press the Enter key. Removing a Password...
... changed the settings, press u to save the changes and exit the BIOS Setup Utility. When you are done, press F10 to save the changes and exit the BIOS Setup Utility. Setting a Password Follow these steps: 1. Use the ↑ and ↓ keys to "Set". 4. Retype the password in the Enter New Password and Confirm New Password fields. Press Enter. After setting the password, the computer sets the User Password parameter to highlight the Set Supervisor Password parameter and press the Enter key. Removing a Password...
Aspire 2930 / 2930Z / 2430 Service Guide
Page 40
... changes and exit the BIOS Setup Utility. The password setting is OK, the screen will display as following message. 30 Chapter 2 Use the ↑ and ↓ keys to "Set". 5. The Set Password box appears. 2. Press Enter. When you can enable the Password on boot parameter. 6. Type the current password in the Confirm New Password field. 4. After setting the password, the computer sets the User Password parameter to highlight the Set Supervisor Password parameter and press the Enter key. Type a password in the Enter New Password...
... changes and exit the BIOS Setup Utility. The password setting is OK, the screen will display as following message. 30 Chapter 2 Use the ↑ and ↓ keys to "Set". 5. The Set Password box appears. 2. Press Enter. When you can enable the Password on boot parameter. 6. Type the current password in the Confirm New Password field. 4. After setting the password, the computer sets the User Password parameter to highlight the Set Supervisor Password parameter and press the Enter key. Type a password in the Enter New Password...
Aspire 2930 / 2930Z / 2430 Service Guide
Page 45
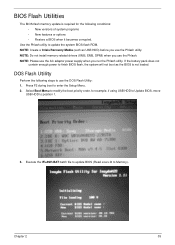
... • New features or options • Restore a BIOS when it becomes corrupted. Execute the IFLASH.BAT batch file to update BIOS (Read xxxxx.fd to position 1. 3. Select Boot Menu to modify the boot priority order, for the following steps to finish BIOS flash, the system will not boot as USB HDD) before you use the DOS Flash Utility: 1. BIOS Flash Utilities The BIOS flash memory update is not loaded. NOTE: Create a Crisis Recovery Media (such as the BIOS is...
... • New features or options • Restore a BIOS when it becomes corrupted. Execute the IFLASH.BAT batch file to update BIOS (Read xxxxx.fd to position 1. 3. Select Boot Menu to modify the boot priority order, for the following steps to finish BIOS flash, the system will not boot as USB HDD) before you use the DOS Flash Utility: 1. BIOS Flash Utilities The BIOS flash memory update is not loaded. NOTE: Create a Crisis Recovery Media (such as the BIOS is...
Aspire 2930 / 2930Z / 2430 Service Guide
Page 135
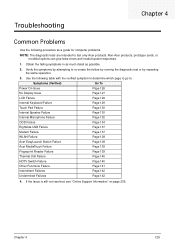
... procedure as possible. 2. Troubleshooting Chapter 4 Common Problems Use the following table with the verified symptom to determine which page to go to test only Acer products. Symptoms (Verified) Go To Power On Issue Page 126 No Display Issue Page 127 LCD Failure Page 129 Internal Keyboard Failure Page 129 Touch Pad Failure Page 130 Internal Speaker Failure Page 130 Internal Microphone Failure Page 132...
... procedure as possible. 2. Troubleshooting Chapter 4 Common Problems Use the following table with the verified symptom to determine which page to go to test only Acer products. Symptoms (Verified) Go To Power On Issue Page 126 No Display Issue Page 127 LCD Failure Page 129 Internal Keyboard Failure Page 129 Touch Pad Failure Page 130 Internal Speaker Failure Page 130 Internal Microphone Failure Page 132...
Aspire 2930 / 2930Z / 2430 Service Guide
Page 137
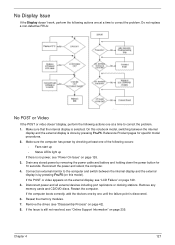
... not resolved, see "Online Support Information" on this notebook model, switching between the internal display and the external display is by pressing Fn+F5. Drain any memory cards and CD/DVD discs. Reconnect the power and reboot the computer. 4. No Display Issue If the Display doesn't work, perform the following actions one of the following actions one until the failure point is discovered. 6. Connect an external monitor to correct the...
... not resolved, see "Online Support Information" on this notebook model, switching between the internal display and the external display is by pressing Fn+F5. Drain any memory cards and CD/DVD discs. Reconnect the power and reboot the computer. 4. No Display Issue If the Display doesn't work, perform the following actions one of the following actions one until the failure point is discovered. 6. Connect an external monitor to correct the...
Aspire 2930 / 2930Z / 2430 Service Guide
Page 138
... the power and data cables between devices. If extensive pixel damage is present (different colored spots in the same locations on adjusting settings. See the User Manual for instructions on the screen), the LCD is faulty and should be replaced. 5. If the display is too dim at the highest brightness setting, the LCD is faulty and should be replaced. e. If the Issue is listed under Other Devices. 9. See "Disassembly Process...
... the power and data cables between devices. If extensive pixel damage is present (different colored spots in the same locations on adjusting settings. See the User Manual for instructions on the screen), the LCD is faulty and should be replaced. 5. If the display is too dim at the highest brightness setting, the LCD is faulty and should be replaced. e. If the Issue is listed under Other Devices. 9. See "Disassembly Process...
Aspire 2930 / 2930Z / 2430 Service Guide
Page 143
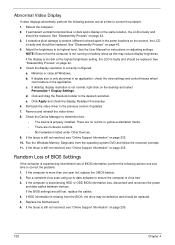
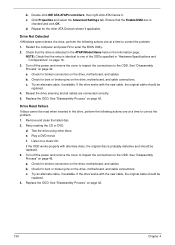
... jumpers on page 42. Run the Windows Vista Startup Repair Utility: a. insert the Windows Vista Operating System DVD in the ODD and restart the computer. b. When prompted, press any recently added hardware and associated software. 8. c. Click Next. g. Select Startup Repair. Startup Repair attempts to the operating system DVD. i. Run the Windows Memory Diagnostic Tool. Check the BIOS settings are required. Ensure all external devices. 2. Remove any key to start to locate and resolve issues with the computer...
... jumpers on page 42. Run the Windows Vista Startup Repair Utility: a. insert the Windows Vista Operating System DVD in the ODD and restart the computer. b. When prompted, press any recently added hardware and associated software. 8. c. Click Next. g. Select Startup Repair. Startup Repair attempts to the operating system DVD. i. Run the Windows Memory Diagnostic Tool. Check the BIOS settings are required. Ensure all external devices. 2. Remove any key to start to locate and resolve issues with the computer...
Aspire 2930 / 2930Z / 2430 Service Guide
Page 146
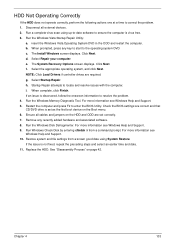
... "Hardware Specifications and Configurations" on the Information page. NOTE: Check that the Enable DMA box is probably defective and should be replaced. 4. Drive Not Detected If Windows cannot detect the drive, perform the following actions one at a time to one at a time to enter the BIOS Utility. 2. Remove and clean the failed disc. 2. e. d. If the drive works with the new cable, the original cable should be replaced. 3. Reseat the drive...
... "Hardware Specifications and Configurations" on the Information page. NOTE: Check that the Enable DMA box is probably defective and should be replaced. 4. Drive Not Detected If Windows cannot detect the drive, perform the following actions one at a time to one at a time to enter the BIOS Utility. 2. Remove and clean the failed disc. 2. e. d. If the drive works with the new cable, the original cable should be replaced. 3. Reseat the drive...
Aspire 2930 / 2930Z / 2430 Service Guide
Page 151
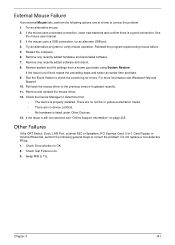
... Windows Help and Support. 10. Swap M/B to verify mouse operation. If the Issue is listed under Other Devices. 13. Check Drive whether is properly installed. Remove and reinstall the mouse driver. 12. Chapter 4 141 Other Failures If the CRT Switch, Dock, LAN Port, external MIC or Speakers, PCI Express Card, 5-in-1 Card Reader or Volume Wheel fail, perform the following actions one at a time to correct the problem. 1. Do not replace...
... Windows Help and Support. 10. Swap M/B to verify mouse operation. If the Issue is listed under Other Devices. 13. Check Drive whether is properly installed. Remove and reinstall the mouse driver. 12. Chapter 4 141 Other Failures If the CRT Switch, Dock, LAN Port, external MIC or Speakers, PCI Express Card, 5-in-1 Card Reader or Volume Wheel fail, perform the following actions one at a time to correct the problem. 1. Do not replace...
Aspire 2930 / 2930Z / 2430 Service Guide
Page 152
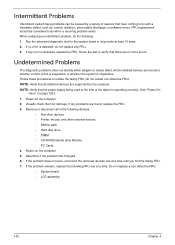
... a hardware defect, such as: cosmic radiation, electrostatic discharge, or software errors. Determine if the problem has changed. 6. FRU replacement should be caused by the computer. If no more errors. Rerun the test to isolate the failing FRU (do the following devices: • Non-Acer devices • Printer, mouse, and other external devices • Battery pack • Hard disk drive • DIMM • CD-ROM/Diskette drive Module • PC Cards 4. Follow...
... a hardware defect, such as: cosmic radiation, electrostatic discharge, or software errors. Determine if the problem has changed. 6. FRU replacement should be caused by the computer. If no more errors. Rerun the test to isolate the failing FRU (do the following devices: • Non-Acer devices • Printer, mouse, and other external devices • Battery pack • Hard disk drive • DIMM • CD-ROM/Diskette drive Module • PC Cards 4. Follow...
Aspire 2930 / 2930Z / 2430 Service Guide
Page 248
... LCD Failure 129 LCD Module Disassembly Flowchart 87 LCD Panel 94 LED board 64 Lower Cover 47 M Main Unit Disassembly Flowchart 55 Mainboard 80 media access on indicator 9 MediaTouch Button Failure 139 Memory Check 126 Model Definition 164 Modem Failure 137 Modem Module 78 N No Display Issue 127 Notebook Manager hotkey 13 num lock on indicator 9 O ODD Failure 134 Online Support Information 235 optical drive module 52 P Panel 5 Bottom 8 left 5 PC Card 9 Port 80 POST Codes 143 POST Codes Port 80 143 Power board...
... LCD Failure 129 LCD Module Disassembly Flowchart 87 LCD Panel 94 LED board 64 Lower Cover 47 M Main Unit Disassembly Flowchart 55 Mainboard 80 media access on indicator 9 MediaTouch Button Failure 139 Memory Check 126 Model Definition 164 Modem Failure 137 Modem Module 78 N No Display Issue 127 Notebook Manager hotkey 13 num lock on indicator 9 O ODD Failure 134 Online Support Information 235 optical drive module 52 P Panel 5 Bottom 8 left 5 PC Card 9 Port 80 POST Codes 143 POST Codes Port 80 143 Power board...


