
User Manual
Page 31
Acer eRecovery Management provides you to create full or incremental backups, burn the factory default image to optical disc, and restore from previously created backups or reinstall applications and drivers. By default, user-created backups are stored to hard disk or optical disc • ...• Factory default image • User backup image • From previously-created CD/DVD • Reinstall applications/drivers It allows you with: • Password protection (Empowering Technology password) • Full and incremental backups to the D:\ drive. Empowering Technology 11...
Acer eRecovery Management provides you to create full or incremental backups, burn the factory default image to optical disc, and restore from previously created backups or reinstall applications and drivers. By default, user-created backups are stored to hard disk or optical disc • ...• Factory default image • User backup image • From previously-created CD/DVD • Reinstall applications/drivers It allows you with: • Password protection (Empowering Technology password) • Full and incremental backups to the D:\ drive. Empowering Technology 11...
User Manual
Page 34
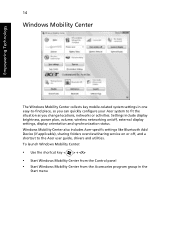
... panel • Start Windows Mobility Center from the Accessories program group in one easy-to-find place, so you can quickly configure your Acer system to the Acer user guide, drivers and utilities. Settings include display brightness, power plan, volume, wireless networking on or off , external display settings, display orientation and synchronization status...
... panel • Start Windows Mobility Center from the Accessories program group in one easy-to-find place, so you can quickly configure your Acer system to the Acer user guide, drivers and utilities. Settings include display brightness, power plan, volume, wireless networking on or off , external display settings, display orientation and synchronization status...
User Manual
Page 87
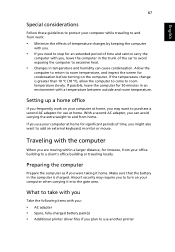
... computer in the trunk of time and cannot carry the computer with you: • AC adapter • Spare, fully-charged battery pack(s) • Additional printer driver files if you can cause condensation. With a second AC adapter, you plan to use at home, you were taking it into the gate area. English...
... computer in the trunk of time and cannot carry the computer with you: • AC adapter • Spare, fully-charged battery pack(s) • Additional printer driver files if you can cause condensation. With a second AC adapter, you plan to use at home, you were taking it into the gate area. English...

User Manual
Page 88
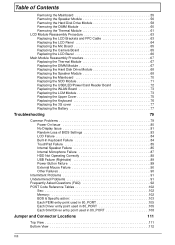
... same special considerations as when traveling with the telecommunications system of the country you are traveling • Spare, fully-charged battery packs • Additional printer driver files if you plan to use converter kits sold for appliances to power the computer. • If you are using the modem, check if the...
... same special considerations as when traveling with the telecommunications system of the country you are traveling • Spare, fully-charged battery packs • Additional printer driver files if you plan to use converter kits sold for appliances to power the computer. • If you are using the modem, check if the...

User Manual
Page 102
...to create using the Empowering Technology toolbar or when first running Acer eLock Management or Acer eRecovery Management. When using Acer eRecovery Management, you want to hard disk from the Empowering Technology toolbar to start Acer eRecovery Management. 2 In the Acer eRecovery Management window, select the type of the current system ... or Fast. 3 Follow the instructions on certain models. You can also backup/restore the factory default image, and reinstall applications and drivers. Note: Fast (incremental) Backup is only available after a Full Backup is a tool to proceed.
...to create using the Empowering Technology toolbar or when first running Acer eLock Management or Acer eRecovery Management. When using Acer eRecovery Management, you want to hard disk from the Empowering Technology toolbar to start Acer eRecovery Management. 2 In the Acer eRecovery Management window, select the type of the current system ... or Fast. 3 Follow the instructions on certain models. You can also backup/restore the factory default image, and reinstall applications and drivers. Note: Fast (incremental) Backup is only available after a Full Backup is a tool to proceed.

User Manual
Page 103
...or from previously created CD and DVD backups. Choosing to burn a user backup will allow you to browse the contents and install selected drivers and applications, create an application backup image instead - Note: Create a factory default image when you want to burn a bootable disc that... burn to disc. this disc will not be bootable. You can also reinstall applications and drivers for your Acer system. 1 Press + or select Acer eRecovery Management from the Empowering Technology toolbar to start Acer eRecovery Management. 2 Switch to the Burn Disc page by selecting the Restore button. 3 ...
...or from previously created CD and DVD backups. Choosing to burn a user backup will allow you to browse the contents and install selected drivers and applications, create an application backup image instead - Note: Create a factory default image when you want to burn a bootable disc that... burn to disc. this disc will not be bootable. You can also reinstall applications and drivers for your Acer system. 1 Press + or select Acer eRecovery Management from the Empowering Technology toolbar to start Acer eRecovery Management. 2 Switch to the Burn Disc page by selecting the Restore button. 3 ...
Service Guide
Page 8
... Questions (FAQ 92 POST Code Reference Tables 102 Sec 102 Memory 102 BDS & Specific action 103 Each PEIM entry point used in 80_PORT 105 Each Driver entry point used in 80_PORT 105 Each SmmDriver entry point used in 80_PORT 108 Jumper and Connector Locations 111 Top View 111 Bottom View 112...
... Questions (FAQ 92 POST Code Reference Tables 102 Sec 102 Memory 102 BDS & Specific action 103 Each PEIM entry point used in 80_PORT 105 Each Driver entry point used in 80_PORT 105 Each SmmDriver entry point used in 80_PORT 108 Jumper and Connector Locations 111 Top View 111 Bottom View 112...
Service Guide
Page 37
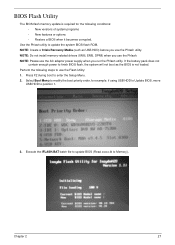
... steps to finish BIOS flash, the system will not boot as USB HDD) before you use the Phlash utility. NOTE: Do not install memory-related drivers (XMS, EMS, DPMI) when you run the Phlash utility.
... steps to finish BIOS flash, the system will not boot as USB HDD) before you use the Phlash utility. NOTE: Do not install memory-related drivers (XMS, EMS, DPMI) when you run the Phlash utility.
Service Guide
Page 93
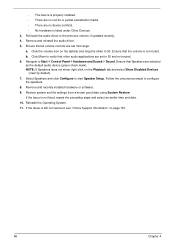
...NOTE: Ensure that : • The device is still not resolved, see "Online Support Information" on page 34. 5. d. Roll back the video driver to correct the problem. 1. There are no red Xs or yellow exclamation marks. • There are still lost, replace the cables. 4. Run the... Resolution slider to determine that the computer is missing from the operating system DVD and follow the onscreen prompts. 11. Remove and reinstall the video driver. 8. If the computer is virus free. 3. Reboot the computer. 2. c. Chapter 4 83 e. If the Issue is still not resolved, see...
...NOTE: Ensure that : • The device is still not resolved, see "Online Support Information" on page 34. 5. d. Roll back the video driver to correct the problem. 1. There are no red Xs or yellow exclamation marks. • There are still lost, replace the cables. 4. Run the... Resolution slider to determine that the computer is missing from the operating system DVD and follow the onscreen prompts. 11. Remove and reinstall the video driver. 8. If the computer is virus free. 3. Reboot the computer. 2. c. Chapter 4 83 e. If the Issue is still not resolved, see...
Service Guide
Page 96
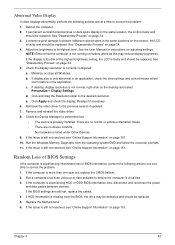
... Restore. If the Issue is not fixed, repeat the preceding steps and select an earlier time and date. 10. Roll back the audio driver to start Speaker Setup. Ensure that the volume is not muted. Remove and recently installed hardware or software. 9. NOTE: If Speakers does ...The device is properly installed. • There are no device conflicts. • No hardware is listed under Other Devices. 3. Remove and reinstall the audio driver. 5. Navigate to 50. Click the volume icon on the taskbar and drag the slider to Start´ Control Panel´ Hardware and Sound´ Sound...
... Restore. If the Issue is not fixed, repeat the preceding steps and select an earlier time and date. 10. Roll back the audio driver to start Speaker Setup. Ensure that the volume is not muted. Remove and recently installed hardware or software. 9. NOTE: If Speakers does ...The device is properly installed. • There are no device conflicts. • No hardware is listed under Other Devices. 3. Remove and reinstall the audio driver. 5. Navigate to 50. Click the volume icon on the taskbar and drag the slider to Start´ Control Panel´ Hardware and Sound´ Sound...

Service Guide
Page 98
.... Check the BIOS settings are correct and that CD/DVD drive is discovered, follow the onscreen information to the operating system DVD. d. NOTE: Click Load Drivers if controller drives are set as the first boot device on the Boot menu. 6. Restart the computer and press F2 to locate and resolve issues...
.... Check the BIOS settings are correct and that CD/DVD drive is discovered, follow the onscreen information to the operating system DVD. d. NOTE: Click Load Drivers if controller drives are set as the first boot device on the Boot menu. 6. Restart the computer and press F2 to locate and resolve issues...
Service Guide
Page 100
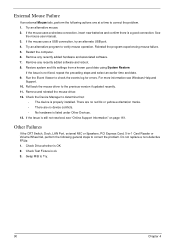
...in-1 Card Reader or Volume Wheel fail, perform the following actions one at a time to correct the problem. 1. Remove and reinstall the mouse driver. 12. There are no red Xs or yellow exclamation marks. • There are no device conflicts. • No hardware is still not resolved... • The device is ok. 3. Do not replace a non-defective FRUs: 1. Swap M/B to verify mouse operation. Roll back the mouse driver to check the events log for errors. Restore system and file settings from a known good date using System Restore. Check Test Fixture is properly installed...
...in-1 Card Reader or Volume Wheel fail, perform the following actions one at a time to correct the problem. 1. Remove and reinstall the mouse driver. 12. There are no red Xs or yellow exclamation marks. • There are no device conflicts. • No hardware is still not resolved... • The device is ok. 3. Do not replace a non-defective FRUs: 1. Swap M/B to verify mouse operation. Roll back the mouse driver to check the events log for errors. Restore system and file settings from a known good date using System Restore. Check Test Fixture is properly installed...
Service Guide
Page 113
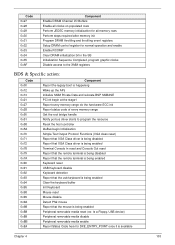
... memory range do the hard ware ECC init Report status code of every memory range Get the root bridge handle Notify pci bus driver starts to program the resource Reset the host controller IdeBus begin initialization Simple Text Output Protocol Functions (VGA class reset) Report that VGA... Class driver is being disabled Report that VGA Class driver is being enabled Terminal Console In reset and Console Out reset Report that the remote terminal is being disabled Report ...
... memory range do the hard ware ECC init Report status code of every memory range Get the root bridge handle Notify pci bus driver starts to program the resource Reset the host controller IdeBus begin initialization Simple Text Output Protocol Functions (VGA class reset) Report that VGA... Class driver is being disabled Report that VGA Class driver is being enabled Terminal Console In reset and Console Out reset Report that the remote terminal is being disabled Report ...

Service Guide
Page 114
Code 0xF8 0xF9 Component Report that ExitBootServices() has been called Runtime driver set virtual address map 104 Chapter 4
Code 0xF8 0xF9 Component Report that ExitBootServices() has been called Runtime driver set virtual address map 104 Chapter 4


