
User Manual
Page 2
... photocopy, recording or otherwise, without obligation to the contents hereof and specifically disclaims the implied warranties of purchase Acer and the Acer logo are used herein for a particular purpose. Aspire 7520/7220 Series Notebook PC Model number Serial number Date of purchase Place of merchantability or fitness for identification purposes only and belong...
... photocopy, recording or otherwise, without obligation to the contents hereof and specifically disclaims the implied warranties of purchase Acer and the Acer logo are used herein for a particular purpose. Aspire 7520/7220 Series Notebook PC Model number Serial number Date of purchase Place of merchantability or fitness for identification purposes only and belong...
User Manual
Page 5
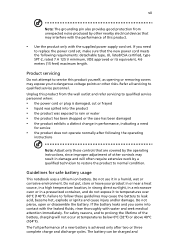
If you need for safe battery usage This notebook uses a Lithium-ion battery. Guidelines for service • the product does not operate normally after two or three complete charge and discharge cycles. For safety ...
If you need for safe battery usage This notebook uses a Lithium-ion battery. Guidelines for service • the product does not operate normally after two or three complete charge and discharge cycles. For safety ...
User Manual
Page 6
... atmosphere and obey all signs and instructions. Always try to interference from children. Areas with your vehicle engine. Do not switch the notebook on boats, chemical transfer or storage facilities, vehicles using liquefied petroleum gas (such as propane or butane), and areas where the air...look like metal strips on the use of radio equipment in temperatures well below deck on when wireless phone use any area with Acer approved chargers designated for its intended purpose. They include below freezing. Do not dispose of batteries in fire. Dispose of used batteries...
... atmosphere and obey all signs and instructions. Always try to interference from children. Areas with your vehicle engine. Do not switch the notebook on boats, chemical transfer or storage facilities, vehicles using liquefied petroleum gas (such as propane or butane), and areas where the air...look like metal strips on the use of radio equipment in temperatures well below deck on when wireless phone use any area with Acer approved chargers designated for its intended purpose. They include below freezing. Do not dispose of batteries in fire. Dispose of used batteries...
User Manual
Page 13
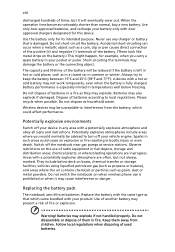
... helps you to be more productive, please refer to use your Acer notebook, we have designed a set of guides: First off To turn... clicking on page 15 for Starters... Your guides To help you get started with setting up your notebook. This guide contains detailed information on your computer. If Adobe Reader is available in Portable Document Format ...these steps to access it contains warranty information and the general regulations and safety notices for meeting your notebook. For instructions on AcerSystem User's Guide. The printed User's Guide introduces you to thank you use ...
... helps you to be more productive, please refer to use your Acer notebook, we have designed a set of guides: First off To turn... clicking on page 15 for Starters... Your guides To help you get started with setting up your notebook. This guide contains detailed information on your computer. If Adobe Reader is available in Portable Document Format ...these steps to access it contains warranty information and the general regulations and safety notices for meeting your notebook. For instructions on AcerSystem User's Guide. The printed User's Guide introduces you to thank you use ...
User Manual
Page 16
... Taking care of your battery pack xvii Cleaning and servicing xvii Acer Empowering Technology 1 Empowering Technology password 1 Acer eNet Management 2 Acer ePower Management 4 Acer eAudio Management 6 Acer ePresentation Management 7 Acer eDataSecurity Management 8 Acer eLock Management 9 Acer eRecovery Management 11 Acer eSettings Management 13 Windows Mobility Center 14 Your Acer notebook tour 15 Top view 15 Closed front view 17 Left view...
... Taking care of your battery pack xvii Cleaning and servicing xvii Acer Empowering Technology 1 Empowering Technology password 1 Acer eNet Management 2 Acer ePower Management 4 Acer eAudio Management 6 Acer ePresentation Management 7 Acer eDataSecurity Management 8 Acer eLock Management 9 Acer eRecovery Management 11 Acer eSettings Management 13 Windows Mobility Center 14 Your Acer notebook tour 15 Top view 15 Closed front view 17 Left view...
User Manual
Page 18
...57 Program guide 57 Find program 57 TV settings 57 Using TeleText functions 58 Acer Arcade Deluxe (for selected models) 60 60 Remote control (for selected models) 61 Remote functions 62 Starting Acer Arcade Deluxe 63 VideoMagician 63 TV Joy (selected models only) 63 SportsCap (...selected models only) 63 DV Wizard 64 DVDivine 64 Taking your notebook PC with you 65 Disconnecting from the desktop 65 Moving around...
...57 Program guide 57 Find program 57 TV settings 57 Using TeleText functions 58 Acer Arcade Deluxe (for selected models) 60 60 Remote control (for selected models) 61 Remote functions 62 Starting Acer Arcade Deluxe 63 VideoMagician 63 TV Joy (selected models only) 63 SportsCap (...selected models only) 63 DV Wizard 64 DVDivine 64 Taking your notebook PC with you 65 Disconnecting from the desktop 65 Moving around...
User Manual
Page 35
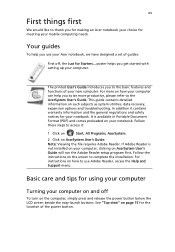
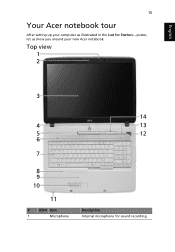
Top view 1 2 3 14 4 13 5 12 6 6 7 8 9 10 11 # ICON Item 1 Microphone Description Internal microphone for Starters... English 15 Your Acer notebook tour After setting up your new Acer notebook. poster, let us show you around your computer as illustrated in the Just for sound recording.
Top view 1 2 3 14 4 13 5 12 6 6 7 8 9 10 11 # ICON Item 1 Microphone Description Internal microphone for Starters... English 15 Your Acer notebook tour After setting up your new Acer notebook. poster, let us show you around your computer as illustrated in the Just for sound recording.

User Manual
Page 53
English 33 Ejecting the optical (CD or DVD) drive tray Press the drive eject button to secure the lock. Wrap the computer security lock cable around an immovable object such as a table or handle of a locked drawer. Some keyless models are also available. Insert the lock into the notch and turn the key to eject the optical drive tray when the computer is off. Insert a paper clip to the emergency eject hole to eject the optical drive tray when the computer is on. Using a computer security lock The notebook comes with a Kensington-compatible security slot for a security lock.
English 33 Ejecting the optical (CD or DVD) drive tray Press the drive eject button to secure the lock. Wrap the computer security lock cable around an immovable object such as a table or handle of a locked drawer. Some keyless models are also available. Insert the lock into the notch and turn the key to eject the optical drive tray when the computer is off. Insert a paper clip to the emergency eject hole to eject the optical drive tray when the computer is on. Using a computer security lock The notebook comes with a Kensington-compatible security slot for a security lock.
User Manual
Page 55
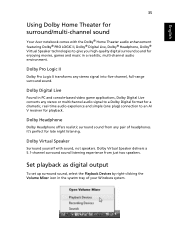
... sound for enjoying movies, games and music in the sysetm tray of headphones. English 35 Using Dolby Home Theater for surround/multi-channel sound Your Acer notebook comes with sound, not speakers. Dolby Virtual Speaker delivers a 5.1-channel surround sound listening experience from any pair of your Windows system. Set playback as digital...
... sound for enjoying movies, games and music in the sysetm tray of headphones. English 35 Using Dolby Home Theater for surround/multi-channel sound Your Acer notebook comes with sound, not speakers. Dolby Virtual Speaker delivers a 5.1-channel surround sound listening experience from any pair of your Windows system. Set playback as digital...

User Manual
Page 57
... the four display settings indicated below: 12 2 13 1 3 2 13 2 4 Double (vertical), Triple (primary at left), Triple (primary at right), or Quad Acer Gridvista is simple to Start, All Programs and click on certain models. Finally, click Apply to confirm the new settings and click OK to be... partitioned independently. You may choose any one of your notebook, first ensure that offers four pre-defined display settings so you can view multiple windows on the same screen. Select the secondary monitor (2)...
... the four display settings indicated below: 12 2 13 1 3 2 13 2 4 Double (vertical), Triple (primary at left), Triple (primary at right), or Quad Acer Gridvista is simple to Start, All Programs and click on certain models. Finally, click Apply to confirm the new settings and click OK to be... partitioned independently. You may choose any one of your notebook, first ensure that offers four pre-defined display settings so you can view multiple windows on the same screen. Select the secondary monitor (2)...
User Manual
Page 61
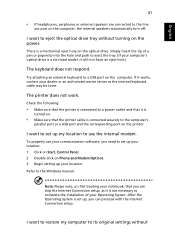
... 41 • If headphones, earphones or external speakers are connected to the Windows manual. I want to restore my computer to eject the tray. (If your notebook, that you can skip the Internet Connection setup, as the internal keyboard cable may be loose. out port on the computer.
... 41 • If headphones, earphones or external speakers are connected to the Windows manual. I want to restore my computer to eject the tray. (If your notebook, that you can skip the Internet Connection setup, as the internal keyboard cable may be loose. out port on the computer.
User Manual
Page 62
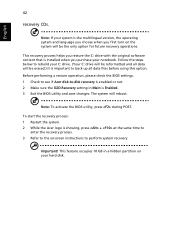
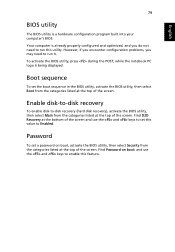
Note: If your system is the multilingual version, the operating system and language you choose when you purchase your notebook. Note: To activate the BIOS utility, press during POST. This recovery process helps you restore the C: drive with the original software content ...the recovery process. 3 Refer to the onscreen instructions to rebuild your hard disk. To start the recovery process: 1 Restart the system. 2 While the Acer logo is Enabled. 3 Exit the BIOS utility and save changes. Follow the steps below to perform system recovery. Important! English 42 recovery CDs. The ...
Note: If your system is the multilingual version, the operating system and language you choose when you purchase your notebook. Note: To activate the BIOS utility, press during POST. This recovery process helps you restore the C: drive with the original software content ...the recovery process. 3 Refer to the onscreen instructions to rebuild your hard disk. To start the recovery process: 1 Restart the system. 2 While the Acer logo is Enabled. 3 Exit the BIOS utility and save changes. Follow the steps below to perform system recovery. Important! English 42 recovery CDs. The ...
User Manual
Page 85
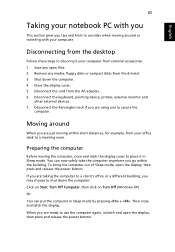
... within the building. Moving around When you tips and hints to secure the computer. then press and release the power button. English 65 Taking your notebook PC with your computer. To bring the computer out of Sleep mode, open files. 2 Remove any open the display; then press and release the power...
... within the building. Moving around When you tips and hints to secure the computer. then press and release the power button. English 65 Taking your notebook PC with your computer. To bring the computer out of Sleep mode, open files. 2 Remove any open the display; then press and release the power...
User Manual
Page 89
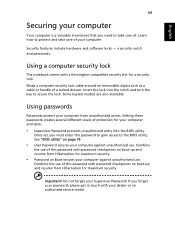
... your computer from Hibernation for maximum security. • Password on page 79. • User Password secures your Supervisor Password! Important! Using a computer security lock The notebook comes with password checkpoints on boot-up and resume from unauthorized access. Setting these passwords creates several different levels of a locked drawer.
... your computer from Hibernation for maximum security. • Password on page 79. • User Password secures your Supervisor Password! Important! Using a computer security lock The notebook comes with password checkpoints on boot-up and resume from unauthorized access. Setting these passwords creates several different levels of a locked drawer.
User Manual
Page 91
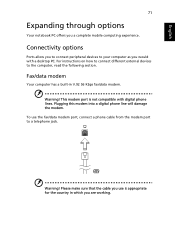
... to connect different external devices to a telephone jack. Plugging this modem into a digital phone line will damage the modem. English 71 Expanding through options Your notebook PC offers you are working. Warning! Connectivity options Ports allow you to connect peripheral devices to your computer as you would with digital phone lines...
... to connect different external devices to a telephone jack. Plugging this modem into a digital phone line will damage the modem. English 71 Expanding through options Your notebook PC offers you are working. Warning! Connectivity options Ports allow you to connect peripheral devices to your computer as you would with digital phone lines...

User Manual
Page 96
... your region before attempting to your TV antenna cable, using the NTSC converter if necessary. Acer DVB-T digital antenna To connect the antenna: Plug the antenna cable into your notebook's RF-in jack of your Acer notebook. PAL/SECAM and NTSC systems 1 Plug the PAL/SECAM cable's RF plug into the... RF-in jack. 2 Connect the other end to connect the antenna cable. Notebook PAL/SECAM or NTSC RF Converter Home antenna ...
... your region before attempting to your TV antenna cable, using the NTSC converter if necessary. Acer DVB-T digital antenna To connect the antenna: Plug the antenna cable into your notebook's RF-in jack of your Acer notebook. PAL/SECAM and NTSC systems 1 Plug the PAL/SECAM cable's RF plug into the... RF-in jack. 2 Connect the other end to connect the antenna cable. Notebook PAL/SECAM or NTSC RF Converter Home antenna ...

User Manual
Page 97
... compatible with DVB-T digital TV systems. A magnet located on top of the reception. Do not place the magnet near the hard disk drive of your notebook display using the special clip, as shown below. 4 Extend the antenna to the antenna body. 1 2 3 3 To ensure good reception, the antenna can be positioned on...
... compatible with DVB-T digital TV systems. A magnet located on top of the reception. Do not place the magnet near the hard disk drive of your notebook display using the special clip, as shown below. 4 Extend the antenna to the antenna body. 1 2 3 3 To ensure good reception, the antenna can be positioned on...

User Manual
Page 98
For more details on how to capture TV or video clips please refer to the S-video or composite audio/video jacks on your notebook. 2 Connect the other compatible device. English S RWY S RWY S RWY Audio Video R L 78 AV-in cable The AV-in port of your VHS player, camcorder or other ends to the help file. Notebook AV-in AV-in Camcorder VHS Note: Extension cables may not be used to connect your notebook to a VHS player or camcorder for viewing, capturing and recording video clips. 1 Plug the single end of the cable into the AV-in cable can be necessary.
For more details on how to capture TV or video clips please refer to the S-video or composite audio/video jacks on your notebook. 2 Connect the other compatible device. English S RWY S RWY S RWY Audio Video R L 78 AV-in cable The AV-in port of your VHS player, camcorder or other ends to the help file. Notebook AV-in AV-in Camcorder VHS Note: Extension cables may not be used to connect your notebook to a VHS player or camcorder for viewing, capturing and recording video clips. 1 Plug the single end of the cable into the AV-in cable can be necessary.
User Manual
Page 99
while the notebook PC logo is already properly configured and optimized, and you may need to Enabled. Find Password on boot, activate the BIOS utility, then select Security ...
while the notebook PC logo is already properly configured and optimized, and you may need to Enabled. Find Password on boot, activate the BIOS utility, then select Security ...
User Manual
Page 104
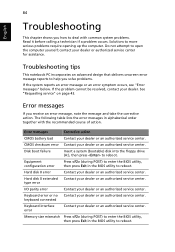
Troubleshooting tips This notebook PC incorporates an advanced design that delivers onscreen error message reports to help you receive an error message, note the message and take the corrective ...
Troubleshooting tips This notebook PC incorporates an advanced design that delivers onscreen error message reports to help you receive an error message, note the message and take the corrective ...


