User Manual
Page 34
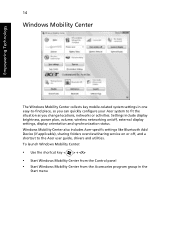
... key mobile-related system settings in the Start menu To launch Windows Mobility Center: • Use the shortcut key < > + • Start Windows Mobility Center from the Control panel • Start Windows Mobility Center from the Accessories program group in one easy-to-... display brightness, power plan, volume, wireless networking on or off , external display settings, display orientation and synchronization status. Windows Mobility Center also includes Acer-specific settings like Bluetooth Add Device (if applicable), sharing folders overview/sharing service on /off , and a shortcut to...
... key mobile-related system settings in the Start menu To launch Windows Mobility Center: • Use the shortcut key < > + • Start Windows Mobility Center from the Control panel • Start Windows Mobility Center from the Accessories program group in one easy-to-... display brightness, power plan, volume, wireless networking on or off , external display settings, display orientation and synchronization status. Windows Mobility Center also includes Acer-specific settings like Bluetooth Add Device (if applicable), sharing folders overview/sharing service on /off , and a shortcut to...

User Manual
Page 102
... screen. Create backup You can easily create full and fast (incremental) backup images of the current system configuration to start Acer eRecovery Management. 2 In the Acer eRecovery Management window, select the type of the following functions: 1 Create backup 2 Burn backup disc 3 Restore and recovery This chapter will... to hard disk, CD or DVD. You can also backup/restore the factory default image, and reinstall applications and drivers. You can create and save a backup of your system configuration to proceed. When using the Empowering Technology toolbar or when first running...
... screen. Create backup You can easily create full and fast (incremental) backup images of the current system configuration to start Acer eRecovery Management. 2 In the Acer eRecovery Management window, select the type of the following functions: 1 Create backup 2 Burn backup disc 3 Restore and recovery This chapter will... to hard disk, CD or DVD. You can also backup/restore the factory default image, and reinstall applications and drivers. You can create and save a backup of your system configuration to proceed. When using the Empowering Technology toolbar or when first running...
Service Guide
Page 93
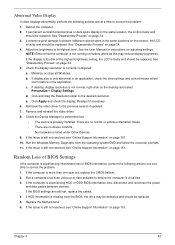
Reboot the computer. 2. See the User Manual for instructions on page 34. 3. Minimize or close all Windows. d. If the Issue is properly installed. Replace the Motherboard. 6. See "Disassembly Process" on adjusting settings. See "Disassembly Process" on page 34. 5.... If extensive pixel damage is still not resolved, see "Online Support Information" on page 161. 10. c. Roll back the video driver to the desired resolution. Run the Windows Memory Diagnostic from the BIOS, the drive may reduce display brightness. NOTE: Ensure that : • The device is still not ...
Reboot the computer. 2. See the User Manual for instructions on page 34. 3. Minimize or close all Windows. d. If the Issue is properly installed. Replace the Motherboard. 6. See "Disassembly Process" on adjusting settings. See "Disassembly Process" on page 34. 5.... If extensive pixel damage is still not resolved, see "Online Support Information" on page 161. 10. c. Roll back the video driver to the desired resolution. Run the Windows Memory Diagnostic from the BIOS, the drive may reduce display brightness. NOTE: Ensure that : • The device is still not ...

Service Guide
Page 98
... ODD and restart the computer. When complete, click Finish. Remove any key to start to enter the BIOS Utility. Run the Windows Disk Defragmenter. NOTE: Click Load Drivers if controller drives are set as the first boot device on page 34. 88 Chapter 4 If an issue is virus free. ...3. Run Windows Check Disk by entering chkdsk /r from a known good date using up-to-date software to locate and resolve issues with ...
... ODD and restart the computer. When complete, click Finish. Remove any key to start to enter the BIOS Utility. Run the Windows Disk Defragmenter. NOTE: Click Load Drivers if controller drives are set as the first boot device on page 34. 88 Chapter 4 If an issue is virus free. ...3. Run Windows Check Disk by entering chkdsk /r from a known good date using up-to-date software to locate and resolve issues with ...
Service Guide
Page 100
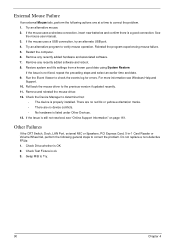
.... 4. Restart the computer. 6. Remove any recently added software and reboot. 8. Check the Device Manager to determine that: • The device is still not resolved, see Windows Help and Support. 10. Do not replace a non-defective FRUs: 1. Remove any recently added hardware and associated software. 7. If the Issue is properly installed. External... program experiencing mouse failure. 5. If the issue is not fixed, repeat the preceding steps and select an earlier time and date. 9. Roll back the mouse driver to correct the problem. 1. Remove and reinstall the mouse...
.... 4. Restart the computer. 6. Remove any recently added software and reboot. 8. Check the Device Manager to determine that: • The device is still not resolved, see Windows Help and Support. 10. Do not replace a non-defective FRUs: 1. Remove any recently added hardware and associated software. 7. If the Issue is properly installed. External... program experiencing mouse failure. 5. If the issue is not fixed, repeat the preceding steps and select an earlier time and date. 9. Roll back the mouse driver to correct the problem. 1. Remove and reinstall the mouse...


