
User Manual
Page 3
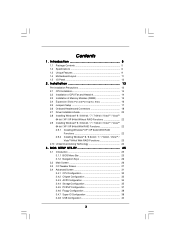
... and Heatsink 14 2.3 Installation of Memory Modules (DIMM 15 2.4 Expansion Slots (PCI and PCI Express Slots 16 2.5 Jumpers Setup 17 2.6 Onboard Headers and Connectors 18 2.7 Driver Installation Guide 22 2.8 Installing Windows® 8 / 8 64-bit / 7 / 7 64-bit / VistaTM / VistaTM 64-bit / XP / XP 64-bit Without RAID Functions 22 2.9 Installing Windows®...
... and Heatsink 14 2.3 Installation of Memory Modules (DIMM 15 2.4 Expansion Slots (PCI and PCI Express Slots 16 2.5 Jumpers Setup 17 2.6 Onboard Headers and Connectors 18 2.7 Driver Installation Guide 22 2.8 Installing Windows® 8 / 8 64-bit / 7 / 7 64-bit / VistaTM / VistaTM 64-bit / XP / XP 64-bit Without RAID Functions 22 2.9 Installing Windows®...

User Manual
Page 4
3.5 Hardware Health Event Monitoring Screen 41 3.6 Boot Screen 42 3.6.1 Boot Settings Configuration 42 3.7 Security Screen 43 3.8 Exit Screen 44 4 . Software Support 45 4.1 Install Operating System 45 4.2 Support CD Information 45 4.2.1 Running Support CD 45 4.2.2 Drivers Menu 45 4.2.3 Utilities Menu 45 4.2.4 Contact Information 45 4
3.5 Hardware Health Event Monitoring Screen 41 3.6 Boot Screen 42 3.6.1 Boot Settings Configuration 42 3.7 Security Screen 43 3.8 Exit Screen 44 4 . Software Support 45 4.1 Install Operating System 45 4.2 Support CD Information 45 4.2.1 Running Support CD 45 4.2.2 Drivers Menu 45 4.2.3 Utilities Menu 45 4.2.4 Contact Information 45 4

User Manual
Page 7
... 2.0 Headers (Support 4 USB 2.0 ports) - 1 x USB 3.0 Header by Etron EJ188H (Supports 2 USB 3.0 ports) BIOS Feature - 8Mb AMI Legal BIOS - SMBIOS 2.3.1 support - Drivers, Utilities, AntiVirus Software (Trial Version), Google Chrome Browser and Toolbar, Start8 (30 days trial) Hardware - CPU Fan Tachometer - CPU Quiet Fan - Chassis temperature sensing - FCC... ready (ErP/EuP ready power supply is required) * For detailed product information, please visit our website: http://www.asrock.com 7 - ACPI 1.1 Compliant wake up events - CPU temperature sensing Monitor -
... 2.0 Headers (Support 4 USB 2.0 ports) - 1 x USB 3.0 Header by Etron EJ188H (Supports 2 USB 3.0 ports) BIOS Feature - 8Mb AMI Legal BIOS - SMBIOS 2.3.1 support - Drivers, Utilities, AntiVirus Software (Trial Version), Google Chrome Browser and Toolbar, Start8 (30 days trial) Hardware - CPU Fan Tachometer - CPU Quiet Fan - Chassis temperature sensing - FCC... ready (ErP/EuP ready power supply is required) * For detailed product information, please visit our website: http://www.asrock.com 7 - ACPI 1.1 Compliant wake up events - CPU temperature sensing Monitor -
User Manual
Page 10
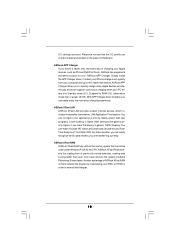
...are transferring currently. ASRock XFast RAM ASRock XFast RAM fully utilizes the memory space that the OC profile can only be used under WindowsR OS 32-bit CPU. Please be noticed that cannot be shared and worked on the same motherboard. Simply install the APP Charger driver, it makes your ...iPhone charge much quickly from your computer and up to 40% faster than ever. ASRock XFast LAN ASRock XFast LAN provides a faster internet access, which data streams you can configure your ...
...are transferring currently. ASRock XFast RAM ASRock XFast RAM fully utilizes the memory space that the OC profile can only be used under WindowsR OS 32-bit CPU. Please be noticed that cannot be shared and worked on the same motherboard. Simply install the APP Charger driver, it makes your ...iPhone charge much quickly from your computer and up to 40% faster than ever. ASRock XFast LAN ASRock XFast LAN provides a faster internet access, which data streams you can configure your ...
User Manual
Page 22
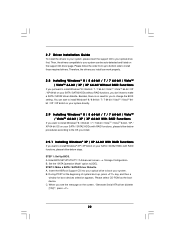
... side to change the BIOS setting. Please select CD-ROM as the boot device. Then, the drivers compatible to boot your system. A. STEP 2: Make a SATA / SATA2 Driver Diskette. Besides, there is no need for boot devices selection appears. Enter BIOS SETUP UTILITY Advanced ...screen Storage Configuration. C. STEP 1: Set Up BIOS. B. Insert the ASRock Support CD into your optical drive to your system can start to...
... side to change the BIOS setting. Please select CD-ROM as the boot device. Then, the drivers compatible to boot your system. A. STEP 2: Make a SATA / SATA2 Driver Diskette. Besides, there is no need for boot devices selection appears. Enter BIOS SETUP UTILITY Advanced ...screen Storage Configuration. C. STEP 1: Set Up BIOS. B. Insert the ASRock Support CD into your optical drive to your system can start to...
User Manual
Page 23
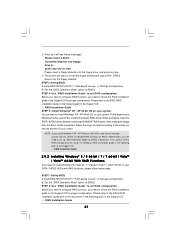
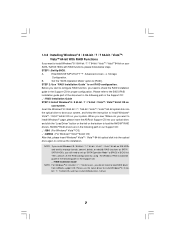
..., you need to set RAID configuration. Before you start to the mode you choose and the OS you still need to install a third-party RAID driver. At the beginning of the document in the following path in the Support CD: .. \ RAID Installation Guide 2.9.2 Installing Windows® 8 / 8 64-bit / ... into the floppy drive, and press any key to [RAID]. A. B. Set the "SATA Operation Mode" option to format the floppy diskette and copy SATA / SATA2 drivers into floppy drive A: press any key. STEP 4: Use "RAID Installation Guide" to install Windows® 8 / 8 64-bit / 7 / 7 64-bit / ...
..., you need to set RAID configuration. Before you start to the mode you choose and the OS you still need to install a third-party RAID driver. At the beginning of the document in the following path in the Support CD: .. \ RAID Installation Guide 2.9.2 Installing Windows® 8 / 8 64-bit / ... into the floppy drive, and press any key to [RAID]. A. B. Set the "SATA Operation Mode" option to format the floppy diskette and copy SATA / SATA2 drivers into floppy drive A: press any key. STEP 4: Use "RAID Installation Guide" to install Windows® 8 / 8 64-bit / 7 / 7 64-bit / ...
User Manual
Page 24
... / VistaTM / VistaTM 64-bit optical disk into the optical drive again to continue the installation. Please use the native driver to install Windows® 8 / 8 64-bit / 7 / 7 64-bit OS, and then install ASRock All-in BIOS first. STEP 3: Install Windows® 8 / 8 64-bit / 7 / 7 64-bit / VistaTM /... VistaTM 64-bit OS on the bottom to load the NVIDIA® RAID drivers. Therefore, CPU FSB is untied during overclocking, FSB enjoys better margin due ...
... / VistaTM / VistaTM 64-bit optical disk into the optical drive again to continue the installation. Please use the native driver to install Windows® 8 / 8 64-bit / 7 / 7 64-bit OS, and then install ASRock All-in BIOS first. STEP 3: Install Windows® 8 / 8 64-bit / 7 / 7 64-bit / VistaTM /... VistaTM 64-bit OS on the bottom to load the NVIDIA® RAID drivers. Therefore, CPU FSB is untied during overclocking, FSB enjoys better margin due ...
User Manual
Page 45
...the BIN folder in the Support CD to your dealer for further information. 45 Refer to display the menus. 4.2.2 Drivers Menu The Drivers Menu shows the available devices drivers if the system detects the installed devices. If the Main Menu did not appear automatically, locate and double click on ...features. 4.2.1 Running The Support CD To begin using the support CD, insert the CD into your computer. or you need to contact ASRock or want to install it. 4.2.4 Contact Information If you may contact your OS documentation for general reference only. Because motherboard settings and hardware...
...the BIN folder in the Support CD to your dealer for further information. 45 Refer to display the menus. 4.2.2 Drivers Menu The Drivers Menu shows the available devices drivers if the system detects the installed devices. If the Main Menu did not appear automatically, locate and double click on ...features. 4.2.1 Running The Support CD To begin using the support CD, insert the CD into your computer. or you need to contact ASRock or want to install it. 4.2.4 Contact Information If you may contact your OS documentation for general reference only. Because motherboard settings and hardware...

Quick Installation Guide
Page 6
... - ErP/EuP ready (ErP/EuP ready power supply is required) * For detailed product information, please visit our website: http://www.asrock.com English 6 ASRock N68-GS4/USB3 FX Motherboard CPU temperature sensing Monitor - Chassis Fan Tachometer - Microsoft® Windows® 8.1 32-bit / 8.1 64-bit / 8... - 8Mb AMI Legal BIOS - FCC, CE, WHQL - CPU, VCCM, NB Voltage multi-adjustment Support CD - Drivers, Utilities, AntiVirus Software (Trial Version), Google Chrome Browser and Toolbar, Start8 (30 days trial) Hardware - Supports "Plug and Play" - SMBIOS 2.3.1 support ...
... - ErP/EuP ready (ErP/EuP ready power supply is required) * For detailed product information, please visit our website: http://www.asrock.com English 6 ASRock N68-GS4/USB3 FX Motherboard CPU temperature sensing Monitor - Chassis Fan Tachometer - Microsoft® Windows® 8.1 32-bit / 8.1 64-bit / 8... - 8Mb AMI Legal BIOS - FCC, CE, WHQL - CPU, VCCM, NB Voltage multi-adjustment Support CD - Drivers, Utilities, AntiVirus Software (Trial Version), Google Chrome Browser and Toolbar, Start8 (30 days trial) Hardware - Supports "Plug and Play" - SMBIOS 2.3.1 support ...
Quick Installation Guide
Page 14
otherwise, POST continues with the motherboard contains necessary drivers and useful utilities that will display the Main Menu automatically if "AUTORUN" is enabled in your CD-ROM drive. For the detailed information about BIOS ... reset button on the motherboard stores BIOS Setup Utility. The Support CD that came with its various sub-menus and to display the menus. 14 ASRock N68-GS4/USB3 FX Motherboard English Software Support CD information This motherboard supports various Microsoft® Windows® operating systems: 8.1 32-bit / 8.1 64-bit / 8 32-bit / 8 64-bit / 7 32...
otherwise, POST continues with the motherboard contains necessary drivers and useful utilities that will display the Main Menu automatically if "AUTORUN" is enabled in your CD-ROM drive. For the detailed information about BIOS ... reset button on the motherboard stores BIOS Setup Utility. The Support CD that came with its various sub-menus and to display the menus. 14 ASRock N68-GS4/USB3 FX Motherboard English Software Support CD information This motherboard supports various Microsoft® Windows® operating systems: 8.1 32-bit / 8.1 64-bit / 8 32-bit / 8 64-bit / 7 32...

RAID Installation Guide
Page 2
... creating RAID arrays. After you install. 1. Please refer to the RAID functions your motherboard according to the SATA / SATAII HDDs amount you make a SATA / SATAII driver diskette, press to enter BIOS setup to set . For optimal performance, please install identical drives of the RAID 0 Disk will direct all applications to a second...
... creating RAID arrays. After you install. 1. Please refer to the RAID functions your motherboard according to the SATA / SATAII HDDs amount you make a SATA / SATAII driver diskette, press to enter BIOS setup to set . For optimal performance, please install identical drives of the RAID 0 Disk will direct all applications to a second...
RAID Installation Guide
Page 5
... system boot-up, press key, and then a window for proper configuration. Please select CD-ROM as the boot device. Insert the ASRock Support CD into the floppy diskette. D. Enter BIOS SETUP UTILITY Advanced screen Storage Configuration. A. Set the "SATA Operation Mode" option... these messages, Please insert a blank formatted diskette into floppy drive A: press any key to start to format the floppy diskette and copy SATA / SATAII drivers into your optical drive to boot your system. 1.3 Installing Windows® 8 / 8 64-bit / 7 / 7 64-bit / VistaTM / VistaTM...
... system boot-up, press key, and then a window for proper configuration. Please select CD-ROM as the boot device. Insert the ASRock Support CD into the floppy diskette. D. Enter BIOS SETUP UTILITY Advanced screen Storage Configuration. A. Set the "SATA Operation Mode" option... these messages, Please insert a blank formatted diskette into floppy drive A: press any key to start to format the floppy diskette and copy SATA / SATAII drivers into your optical drive to boot your system. 1.3 Installing Windows® 8 / 8 64-bit / 7 / 7 64-bit / VistaTM / VistaTM...

RAID Installation Guide
Page 6
At the beginning of the document in the following path in BIOS first. NOTE. After reading the floppy disk, the driver will be presented. STEP 5: Install Windows® XP / XP 64-bit OS on your system. If you install Windows® XP / XP 64-bit on ... by using the Windows RAID installation guide part of Windows® setup, press F6 to [RAID] in the Support CD: .. \ RAID Installation Guide 6 Select the driver to install according to install Windows® XP / XP 64-bit OS on your system. Then, please set up "SATA Operation Mode" to install a third...
At the beginning of the document in the following path in BIOS first. NOTE. After reading the floppy disk, the driver will be presented. STEP 5: Install Windows® XP / XP 64-bit OS on your system. If you install Windows® XP / XP 64-bit on ... by using the Windows RAID installation guide part of Windows® setup, press F6 to [RAID] in the Support CD: .. \ RAID Installation Guide 6 Select the driver to install according to install Windows® XP / XP 64-bit OS on your system. Then, please set up "SATA Operation Mode" to install a third...
RAID Installation Guide
Page 7
... start to configure RAID function, you still need to install Windows® 8 / 8 64bit / 7 / 7 64-bit OS, and then install ASRock All-in-1 driver. 7 NVIDIA® RAID drivers are in the following path in our Support CD: .. \ I386 (For Windows® VistaTM OS) .. \ AMD64 (For Windows® VistaTM 64... 64-bit / 7 / 7 64-bit users, you do you see "Where do not need to load the NVIDIA® RAID drivers. Please use the native driver to load RAID driver from ASRock support CD. When you want to manage (create, convert, delete, or rebuild) RAID functions on the bottom to set the RAID...
... start to configure RAID function, you still need to install Windows® 8 / 8 64bit / 7 / 7 64-bit OS, and then install ASRock All-in-1 driver. 7 NVIDIA® RAID drivers are in the following path in our Support CD: .. \ I386 (For Windows® VistaTM OS) .. \ AMD64 (For Windows® VistaTM 64... 64-bit / 7 / 7 64-bit users, you do you see "Where do not need to load the NVIDIA® RAID drivers. Please use the native driver to load RAID driver from ASRock support CD. When you want to manage (create, convert, delete, or rebuild) RAID functions on the bottom to set the RAID...

RAID Installation Guide
Page 11
...instruction for Windows XP / XP 64-bit Users A. Please enter NVRAIDMAN by using NVIDIAMAN under Windows environment. After you finish the driver installation, you install. 2.1 NVIDIA Windows RAID Installation Guide for you to configure and manage RAID functions. Please follow the instructions below...8594; Programs → NVIDIA Corporation → Mediashield → Mediashield. (There is built in NVIDIA ALL in one driver provided in our support CD. Enter NVRAIDMAN RAID driver is also a "Mediashield" shortcut on the desktop.) Then, the below according to the OS you can create, ...
...instruction for Windows XP / XP 64-bit Users A. Please enter NVRAIDMAN by using NVIDIAMAN under Windows environment. After you finish the driver installation, you install. 2.1 NVIDIA Windows RAID Installation Guide for you to configure and manage RAID functions. Please follow the instructions below...8594; Programs → NVIDIA Corporation → Mediashield → Mediashield. (There is built in NVIDIA ALL in one driver provided in our support CD. Enter NVRAIDMAN RAID driver is also a "Mediashield" shortcut on the desktop.) Then, the below according to the OS you can create, ...

RAID Installation Guide
Page 21
... window indicates that the array is also a "Storage" shortcut on the desktop.) Then, the below screen appears. 21 Enter Storage RAID driver is built in NVIDIA ALL in one driver provided in a short period of time. 2.2 NVIDIA Windows RAID Installation Guide for Windows 8 / 8 64-bit / 7 / 7 64...-bit / Vista / Vista 64-bit Users A. After you finish the driver installation, you can create, delete, or rebuild any RAID array. The synchronization process will start and it will be completed in our support CD. Please...
... window indicates that the array is also a "Storage" shortcut on the desktop.) Then, the below screen appears. 21 Enter Storage RAID driver is built in NVIDIA ALL in one driver provided in a short period of time. 2.2 NVIDIA Windows RAID Installation Guide for Windows 8 / 8 64-bit / 7 / 7 64...-bit / Vista / Vista 64-bit Users A. After you finish the driver installation, you can create, delete, or rebuild any RAID array. The synchronization process will start and it will be completed in our support CD. Please...


