User Manual
Page 3
... 5 1.2 Specifications 6 1.3 Unique Features 9 1.4 Motherboard Layout 13 1.5 I/O Panel 14 2 Installation 15 2.1 Screw Holes 15 2.2 Pre-installation Precautions 15 2.3 CPU Installation 16 2.4 Installation of Heatsink and CPU fan 18 2.5 Installation of Memory Modules (DIMM 19 2.6 Expansion Slot (PCI and PCI Express Slots 20 2.7 Dual Monitor and Surround Display Features 21 2.8 ASRock Smart Remote Installation...
... 5 1.2 Specifications 6 1.3 Unique Features 9 1.4 Motherboard Layout 13 1.5 I/O Panel 14 2 Installation 15 2.1 Screw Holes 15 2.2 Pre-installation Precautions 15 2.3 CPU Installation 16 2.4 Installation of Heatsink and CPU fan 18 2.5 Installation of Memory Modules (DIMM 19 2.6 Expansion Slot (PCI and PCI Express Slots 20 2.7 Dual Monitor and Surround Display Features 21 2.8 ASRock Smart Remote Installation...
User Manual
Page 21
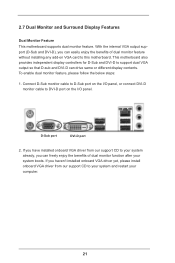
... our support CD to your system and restart your system already, you haven't installed onboard VGA driver yet, please install onboard VGA driver from our support CD to this motherboard. Connect D-Sub monitor cable to D-Sub port on the I/O panel, or connect DVI-D monitor cable to support dual ... can drive same or different display contents. If you can easily enjoy the benefits of dual monitor function after your system boots. This motherboard also provides independent display controllers for D-Sub and DVI-D to DVI-D port on VGA card to your computer. 21 2.7 Dual Monitor and...
... our support CD to your system and restart your system already, you haven't installed onboard VGA driver yet, please install onboard VGA driver from our support CD to this motherboard. Connect D-Sub monitor cable to D-Sub port on the I/O panel, or connect DVI-D monitor cable to support dual ... can drive same or different display contents. If you can easily enjoy the benefits of dual monitor function after your system boots. This motherboard also provides independent display controllers for D-Sub and DVI-D to DVI-D port on VGA card to your computer. 21 2.7 Dual Monitor and...
User Manual
Page 22
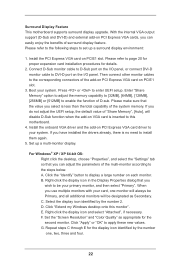
... connectors of "Share Memory", [Auto], will be your system. Boot your card, one , two, three and four. 22 When you have installed the drivers already, there is inserted to this monitor". If you use multiple monitors with your system. Right-click the display icon in the Display Properties dialog...] or [512MB] to enable the function of the multi-monitor according to set up a multi-monitor display. D. Click "Extend my Windows desktop onto this motherboard. 4. Repeat steps C through E for the second monitor. Please refer to the following steps to the steps below. G.
... connectors of "Share Memory", [Auto], will be your system. Boot your card, one , two, three and four. 22 When you have installed the drivers already, there is inserted to this monitor". If you use multiple monitors with your system. Right-click the display icon in the Display Properties dialog...] or [512MB] to enable the function of the multi-monitor according to set up a multi-monitor display. D. Click "Extend my Windows desktop onto this motherboard. 4. Repeat steps C through E for the second monitor. Please refer to the following steps to the steps below. G.
User Manual
Page 24
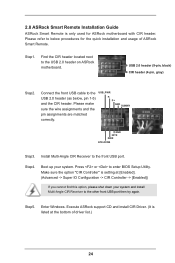
...header located next to the USB 2.0 header (as below procedures for ASRock motherboard with CIR header. Boot up your system and install Multi-Angle CIR Receiver to the front USB port. Execute ASRock support CD and install CIR Driver. (It is listed at [Enabled]. (Advanced -> Super IO ... option, please shut down your system. 2.8 ASRock Smart Remote Installation Guide ASRock Smart Remote is only used for the quick installation and usage of driver list.) 24 Connect the front USB cable to the USB 2.0 header on ASRock motherboard. Step4. Please refer to enter BIOS Setup...
...header located next to the USB 2.0 header (as below procedures for ASRock motherboard with CIR header. Boot up your system and install Multi-Angle CIR Receiver to the front USB port. Execute ASRock support CD and install CIR Driver. (It is listed at [Enabled]. (Advanced -> Super IO ... option, please shut down your system. 2.8 ASRock Smart Remote Installation Guide ASRock Smart Remote is only used for the quick installation and usage of driver list.) 24 Connect the front USB cable to the USB 2.0 header on ASRock motherboard. Step4. Please refer to enter BIOS Setup...
User Manual
Page 32
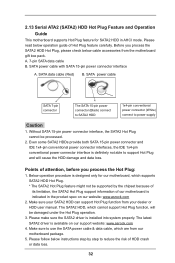
...Plug cannot be damaged under the Hot Plug operation. 3. Make sure your dealer or HDD user manual. Please make sure the SATA2 driver is available on our website: www.asrock.com 2. Make sure to reduce the risk of HDD crash or data loss. 32 Please read below operation guide of attention, before...be supported by step to use the SATA power cable & data cable, which are from your SATA2 HDD can support Hot Plug function from our motherboard package. 5. Even some SATA2 HDDs provide both SATA 15-pin power connector and IDE 1x4-pin conventional power connector interfaces, the IDE 1x4-pin ...
...Plug cannot be damaged under the Hot Plug operation. 3. Make sure your dealer or HDD user manual. Please make sure the SATA2 driver is available on our website: www.asrock.com 2. Make sure to reduce the risk of HDD crash or data loss. 32 Please read below operation guide of attention, before...be supported by step to use the SATA power cable & data cable, which are from your SATA2 HDD can support Hot Plug function from our motherboard package. 5. Even some SATA2 HDDs provide both SATA 15-pin power connector and IDE 1x4-pin conventional power connector interfaces, the IDE 1x4-pin ...

User Manual
Page 70
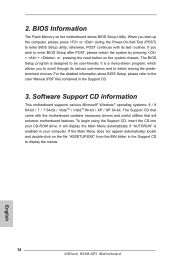
...-bit / VistaTM / VistaTM 64-bit / XP / XP 64-bit. Refer to visit ASRock's website at http://www.asrock.com; Please install the necessary drivers to activate the devices. 4.2.3 Utilities Menu The Utilities Menu shows the applications software that enhance the motherboard features. 4.2.1 Running The Support CD To begin using the support CD, insert the...
...-bit / VistaTM / VistaTM 64-bit / XP / XP 64-bit. Refer to visit ASRock's website at http://www.asrock.com; Please install the necessary drivers to activate the devices. 4.2.3 Utilities Menu The Utilities Menu shows the applications software that enhance the motherboard features. 4.2.1 Running The Support CD To begin using the support CD, insert the...
Quick Installation Guide
Page 7
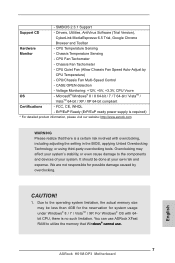
..., or even cause damage to utilize the memory that there is a certain risk involved with 64bit CPU, there is no such limitation. English 7 ASRock H61M-DP3 Motherboard SMBIOS 2.3.1 Support Support CD - Drivers, Utilities, AntiVirus Software (Trial Version), CyberLink MediaEspresso 6.5 Trial, Google Chrome Browser and Toolbar Hardware - CASE OPEN detection - ErP/EuP Ready (ErP/EuP ready...
..., or even cause damage to utilize the memory that there is a certain risk involved with 64bit CPU, there is no such limitation. English 7 ASRock H61M-DP3 Motherboard SMBIOS 2.3.1 Support Support CD - Drivers, Utilities, AntiVirus Software (Trial Version), CyberLink MediaEspresso 6.5 Trial, Google Chrome Browser and Toolbar Hardware - CASE OPEN detection - ErP/EuP Ready (ErP/EuP ready...
Quick Installation Guide
Page 14
...; operating systems: 8 / 8 64-bit / 7 / 7 64-bit / VistaTM / VistaTM 64-bit / XP / XP 64-bit. It will enhance motherboard features. If the Main Menu does not appear automatically, locate and double-click on the file "ASSETUP.EXE" from the BIN folder in the Support ... ASRock H61M-DP3 Motherboard English When you to scroll through its test routines. It is enabled in your CD-ROM drive. BIOS Information The Flash Memory on the system chassis. 2. To begin using the Support CD, insert the CD into your computer. otherwise, POST continues with the motherboard contains necessary drivers ...
...; operating systems: 8 / 8 64-bit / 7 / 7 64-bit / VistaTM / VistaTM 64-bit / XP / XP 64-bit. It will enhance motherboard features. If the Main Menu does not appear automatically, locate and double-click on the file "ASSETUP.EXE" from the BIN folder in the Support ... ASRock H61M-DP3 Motherboard English When you to scroll through its test routines. It is enabled in your CD-ROM drive. BIOS Information The Flash Memory on the system chassis. 2. To begin using the Support CD, insert the CD into your computer. otherwise, POST continues with the motherboard contains necessary drivers ...


