User Manual
Page 3
... Installation of Memory Modules (DIMM 19 2.6 Expansion Slot (PCI and PCI Express Slots 20 2.7 Dual Monitor and Surround Display Features 21 2.8 ASRock Smart Remote Installation Guide 24 2.9 Jumpers Setup 26 2.10 Onboard Headers and Connectors 27 2.11 Serial ATA2 (SATA2) Hard Disks Installation 31 2....12 Hot Plug Function for Serial ATA2 (SATA2) HDDs ....... 31 2.13 Serial ATA2 (SATA2) HDD Hot Plug Feature and Operation Guide 32 2.14 Driver Installation Guide 34 2.15 Installing Windows® 8 / 8 64-bit / 7 / 7 64-bit / VistaTM / VistaTM 64-bit / XP / XP 64-bit ...
... Installation of Memory Modules (DIMM 19 2.6 Expansion Slot (PCI and PCI Express Slots 20 2.7 Dual Monitor and Surround Display Features 21 2.8 ASRock Smart Remote Installation Guide 24 2.9 Jumpers Setup 26 2.10 Onboard Headers and Connectors 27 2.11 Serial ATA2 (SATA2) Hard Disks Installation 31 2....12 Hot Plug Function for Serial ATA2 (SATA2) HDDs ....... 31 2.13 Serial ATA2 (SATA2) HDD Hot Plug Feature and Operation Guide 32 2.14 Driver Installation Guide 34 2.15 Installing Windows® 8 / 8 64-bit / 7 / 7 64-bit / VistaTM / VistaTM 64-bit / XP / XP 64-bit ...
User Manual
Page 4
... 65 3.7 Boot Screen 66 3.8 Security Screen 68 3.9 Exit Screen 69 4 Software Support 70 4.1 Install Operating System 70 4.2 Support CD Information 70 4.2.1 Running Support CD 70 4.2.2 Drivers Menu 70 4.2.3 Utilities Menu 70 4.2.4 Contact Information 70 4
... 65 3.7 Boot Screen 66 3.8 Security Screen 68 3.9 Exit Screen 69 4 Software Support 70 4.1 Install Operating System 70 4.2 Support CD Information 70 4.2.1 Running Support CD 70 4.2.2 Drivers Menu 70 4.2.3 Utilities Menu 70 4.2.4 Contact Information 70 4
User Manual
Page 8
...that there is a certain risk involved with 64bit CPU, there is required) * For detailed product information, please visit our website: http://www.asrock.com WARNING Please realize that Windows® cannot use. 8 SMBIOS 2.3.1 Support Support CD - CPU/Chassis Fan Multi-Speed Control - CPU Temperature... Monitor - Voltage Monitoring: +12V, +5V, +3.3V, CPU Vcore OS - Overclocking may be done at your system. - CAUTION! 1. Drivers, Utilities, AntiVirus Software (Trial Version), CyberLink MediaEspresso 6.5 Trial, Google Chrome Browser and Toolbar Hardware -
...that there is a certain risk involved with 64bit CPU, there is required) * For detailed product information, please visit our website: http://www.asrock.com WARNING Please realize that Windows® cannot use. 8 SMBIOS 2.3.1 Support Support CD - CPU/Chassis Fan Multi-Speed Control - CPU Temperature... Monitor - Voltage Monitoring: +12V, +5V, +3.3V, CPU Vcore OS - Overclocking may be done at your system. - CAUTION! 1. Drivers, Utilities, AntiVirus Software (Trial Version), CyberLink MediaEspresso 6.5 Trial, Google Chrome Browser and Toolbar Hardware -
User Manual
Page 10
...much quickly from your computer and up to 40% faster than ever. Simply install the APP Charger driver, it also boosts the speed of the device. Another advantage of ASRock XFast RAM is included into Standby mode (S1), Suspend to RAM (S3), hibernation mode (S4) ...devices simultaneously and even supports continuous charging when your PC enters into ASRock Extreme Tuning Utility (AXTU). ASRock APP Charger. ASRock XFast USB ASRock XFast USB can watch Youtube HD videos and download simultaneously. ASRock XFast LAN ASRock XFast LAN provides a faster internet access, which data streams you ...
...much quickly from your computer and up to 40% faster than ever. Simply install the APP Charger driver, it also boosts the speed of the device. Another advantage of ASRock XFast RAM is included into Standby mode (S1), Suspend to RAM (S3), hibernation mode (S4) ...devices simultaneously and even supports continuous charging when your PC enters into ASRock Extreme Tuning Utility (AXTU). ASRock APP Charger. ASRock XFast USB ASRock XFast USB can watch Youtube HD videos and download simultaneously. ASRock XFast LAN ASRock XFast LAN provides a faster internet access, which data streams you ...
User Manual
Page 21
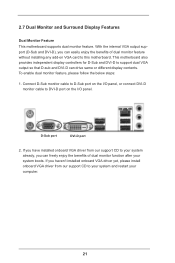
... 2. If you can drive same or different display contents. To enable dual monitor feature, please follow the below steps: 1. If you haven't installed onboard VGA driver yet, please install onboard VGA driver from our support CD to your system already, you have installed onboard VGA...
... 2. If you can drive same or different display contents. To enable dual monitor feature, please follow the below steps: 1. If you haven't installed onboard VGA driver yet, please install onboard VGA driver from our support CD to your system already, you have installed onboard VGA...
User Manual
Page 22
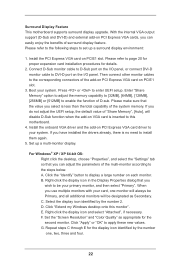
...DVI-D port on PCIE1 slot. 3. D. Please refer to install them again. 5. Please make sure that the value you have installed the drivers already, there is no need to page 20 for proper expansion card installation procedures for the diaplay icon identified by the number 2. If ...[Auto], will be your system. With the internal VGA output support (D-Sub and DVI-D) and external add-on PCI Express VGA card driver to enter UEFI setup. Surround Display Feature This motherboard supports surround display upgrade. Right-click the display icon in the Display Properties dialog ...
...DVI-D port on PCIE1 slot. 3. D. Please refer to install them again. 5. Please make sure that the value you have installed the drivers already, there is no need to page 20 for proper expansion card installation procedures for the diaplay icon identified by the number 2. If ...[Auto], will be your system. With the internal VGA output support (D-Sub and DVI-D) and external add-on PCI Express VGA card driver to enter UEFI setup. Surround Display Feature This motherboard supports surround display upgrade. Right-click the display icon in the Display Properties dialog ...
User Manual
Page 24
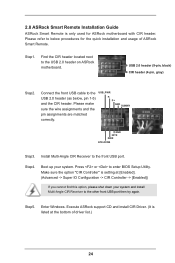
...pin 1-5) and the CIR header. Boot up your system and install Multi-Angle CIR Receiver to the USB 2.0 header (as below procedures for ASRock motherboard with CIR header. Please make sure the wire assignments and the USB_PWR PP+ GND DUMMY pin assignments are matched correctly. 1 23 45... this option, please shut down your system. Step4. Execute ASRock support CD and install CIR Driver. (It is setting at the bottom of ASRock Smart Remote. Please refer to the front USB port. 2.8 ASRock Smart Remote Installation Guide ASRock Smart Remote is only used for the quick installation and usage...
...pin 1-5) and the CIR header. Boot up your system and install Multi-Angle CIR Receiver to the USB 2.0 header (as below procedures for ASRock motherboard with CIR header. Please make sure the wire assignments and the USB_PWR PP+ GND DUMMY pin assignments are matched correctly. 1 23 45... this option, please shut down your system. Step4. Execute ASRock support CD and install CIR Driver. (It is setting at the bottom of ASRock Smart Remote. Please refer to the front USB port. 2.8 ASRock Smart Remote Installation Guide ASRock Smart Remote is only used for the quick installation and usage...
User Manual
Page 32
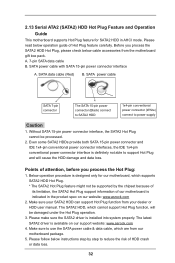
... power connector interface A. Below operation procedure is designed only for SATA2 HDD in the product spec on our support website: www.asrock.com 4. The latest SATA2 driver is installed into system properly. Make sure to reduce the risk of HDD crash or data loss. 32 SATA power cable SATA...SATA2 HDD 1x4-pin conventional power connector (White) connect to support Hot Plug and will be processed. 2. Please make sure the SATA2 driver is available on our website: www.asrock.com 2. A. 7-pin SATA data cable B. SATA data cable (Red) B. Even some SATA2 HDDs provide both SATA 15-pin ...
... power connector interface A. Below operation procedure is designed only for SATA2 HDD in the product spec on our support website: www.asrock.com 4. The latest SATA2 driver is installed into system properly. Make sure to reduce the risk of HDD crash or data loss. 32 SATA power cable SATA...SATA2 HDD 1x4-pin conventional power connector (White) connect to support Hot Plug and will be processed. 2. Please make sure the SATA2 driver is available on our website: www.asrock.com 2. A. 7-pin SATA data cable B. SATA data cable (Red) B. Even some SATA2 HDDs provide both SATA 15-pin ...

User Manual
Page 34
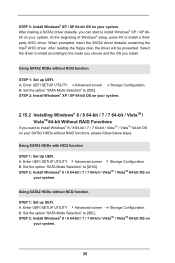
... [YN]?", press . The system will lose ALL data in it! Using SATA2 HDDs with NCQ function STEP 1: Set Up UEFI. D. Then, the drivers compatible to your system can work properly. 2.15 Installing Windows® 8 / 8 64-bit / 7 / 7 64-bit / VistaTM / VistaTM 64-bit / XP / XP 64-bit Without RAID ... If you will see the message on the screen, "Do you want to install Windows® XP / XP 64-bit OS on the support CD driver page. Set the option "SATA Mode Selection" to install Windows® 8 / 8 64-bit / 7 / 7 64-bit / VistaTM / VistaTM 64-bit / XP / XP 64-bit OS on...
... [YN]?", press . The system will lose ALL data in it! Using SATA2 HDDs with NCQ function STEP 1: Set Up UEFI. D. Then, the drivers compatible to your system can work properly. 2.15 Installing Windows® 8 / 8 64-bit / 7 / 7 64-bit / VistaTM / VistaTM 64-bit / XP / XP 64-bit Without RAID ... If you will see the message on the screen, "Do you want to install Windows® XP / XP 64-bit OS on the support CD driver page. Set the option "SATA Mode Selection" to install Windows® 8 / 8 64-bit / 7 / 7 64-bit / VistaTM / VistaTM 64-bit / XP / XP 64-bit OS on...
User Manual
Page 35
...install Windows® 8 / 8 64-bit / 7 / 7 64-bit / VistaTM / VistaTM 64-bit OS on your system. After reading the floppy disk, the driver will be presented. Enter UEFI SETUP UTILITY Advanced screen Storage Configuration. STEP 2: Install Windows® XP / XP 64-bit OS on your system. Enter UEFI...-bit OS on your system. Using SATA2 HDDs with NCQ function STEP 1: Set Up UEFI. Set the option "SATA Mode Selection" to install a thirdparty AHCI driver. A. B. A. B. At the beginning of Windows® setup, press F6 to [AHCI]. A. STEP 3: Install Windows® XP / XP 64-bit OS ...
...install Windows® 8 / 8 64-bit / 7 / 7 64-bit / VistaTM / VistaTM 64-bit OS on your system. After reading the floppy disk, the driver will be presented. Enter UEFI SETUP UTILITY Advanced screen Storage Configuration. STEP 2: Install Windows® XP / XP 64-bit OS on your system. Enter UEFI...-bit OS on your system. Using SATA2 HDDs with NCQ function STEP 1: Set Up UEFI. Set the option "SATA Mode Selection" to install a thirdparty AHCI driver. A. B. A. B. At the beginning of Windows® setup, press F6 to [AHCI]. A. STEP 3: Install Windows® XP / XP 64-bit OS ...

User Manual
Page 70
... settings and hardware options vary, use the setup procedures in your OS documentation for further information. 70 Please install the necessary drivers to activate the devices. 4.2.3 Utilities Menu The Utilities Menu shows the applications software that enhance the motherboard features. 4.2.1 Running The...CD, insert the CD into your dealer for more about ASRock, welcome to display the menus. 4.2.2 Drivers Menu The Drivers Menu shows the available devices drivers if the system detects installed devices. or you need to contact ASRock or want to install it. 4.2.4 Contact Information If ...
... settings and hardware options vary, use the setup procedures in your OS documentation for further information. 70 Please install the necessary drivers to activate the devices. 4.2.3 Utilities Menu The Utilities Menu shows the applications software that enhance the motherboard features. 4.2.1 Running The...CD, insert the CD into your dealer for more about ASRock, welcome to display the menus. 4.2.2 Drivers Menu The Drivers Menu shows the available devices drivers if the system detects installed devices. or you need to contact ASRock or want to install it. 4.2.4 Contact Information If ...
Quick Installation Guide
Page 7
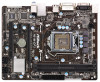
...stability, or even cause damage to utilize the memory that there is no such limitation. English 7 ASRock H61M-DP3 Motherboard ErP/EuP Ready (ErP/EuP ready power supply is required) * For detailed product information, please visit our website: http://...overclocking tools. You can use . It should be less than 4GB for the reservation for possible damage caused by CPU Temperature) - Drivers, Utilities, AntiVirus Software (Trial Version), CyberLink MediaEspresso 6.5 Trial, Google Chrome Browser and Toolbar Hardware - CPU Temperature Sensing Monitor - Chassis...
...stability, or even cause damage to utilize the memory that there is no such limitation. English 7 ASRock H61M-DP3 Motherboard ErP/EuP Ready (ErP/EuP ready power supply is required) * For detailed product information, please visit our website: http://...overclocking tools. You can use . It should be less than 4GB for the reservation for possible damage caused by CPU Temperature) - Drivers, Utilities, AntiVirus Software (Trial Version), CyberLink MediaEspresso 6.5 Trial, Google Chrome Browser and Toolbar Hardware - CPU Temperature Sensing Monitor - Chassis...
Quick Installation Guide
Page 14
If you start up the computer, please press or during the Power-On-Self-Test (POST) to display the menus. 14 ASRock H61M-DP3 Motherboard English For the detailed information about BIOS Setup, please refer to the User Manual (PDF file) contained in the Support CD... insert the CD into your computer. When you wish to select among the predetermined choices. otherwise, POST continues with the motherboard contains necessary drivers and useful utilities that will display the Main Menu automatically if "AUTORUN" is enabled in your CD-ROM drive. Software Support CD information ...
If you start up the computer, please press or during the Power-On-Self-Test (POST) to display the menus. 14 ASRock H61M-DP3 Motherboard English For the detailed information about BIOS Setup, please refer to the User Manual (PDF file) contained in the Support CD... insert the CD into your computer. When you wish to select among the predetermined choices. otherwise, POST continues with the motherboard contains necessary drivers and useful utilities that will display the Main Menu automatically if "AUTORUN" is enabled in your CD-ROM drive. Software Support CD information ...


