RAID Installation Guide
Page 2
... increases fault tolerance to configure RAID functions by following the detailed instruction of Independent Disks", which is an instruction for "Redundant Array of the "User Manual" in our support CD, then you can improve the access performance, it does not provide any HDDs of a single disk alone while the two hard...
... increases fault tolerance to configure RAID functions by following the detailed instruction of Independent Disks", which is an instruction for "Redundant Array of the "User Manual" in our support CD, then you can improve the access performance, it does not provide any HDDs of a single disk alone while the two hard...
RAID Installation Guide
Page 11
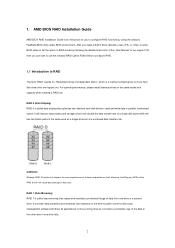
... drive for a single logical drive: Please read "Two Logical Drives" below . 11 Press to restart your computer by following the detailed instruction of the "User Manual" in Disk Assignments as the above -mentioned procedures, press any key (except for ) to allocate a portion of the disk drives for one of the following...
... drive for a single logical drive: Please read "Two Logical Drives" below . 11 Press to restart your computer by following the detailed instruction of the "User Manual" in Disk Assignments as the above -mentioned procedures, press any key (except for ) to allocate a portion of the disk drives for one of the following...

RAID Installation Guide
Page 12
... to exit to enter the RAID BIOS setup utility. Please install the operating system to your computer by following the detailed instruction of the "User Manual" in our support CD. 1.4.2 Configuring Legacy RAID ROM For AMD A88X Chipset When the appropriate prompt appears during POST, press to the Main Menu. Press...
... to exit to enter the RAID BIOS setup utility. Please install the operating system to your computer by following the detailed instruction of the "User Manual" in our support CD. 1.4.2 Configuring Legacy RAID ROM For AMD A88X Chipset When the appropriate prompt appears during POST, press to the Main Menu. Press...
RAID Installation Guide
Page 18
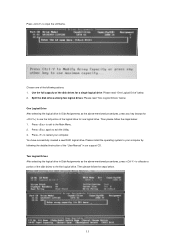
... below. When the Install Complete screen appears, click the Finish button. 2.4 Logging into RAIDXpert Choose RAIDXpert in the Windows Programs menu. 12. Or, log on manually with your entry looks like this: http://127.0.0.1:25902/ati or http://localhost:25902/ati 2.6 Secure Connection RAIDXpert uses a secure HTTP connection https:// 18
... below. When the Install Complete screen appears, click the Finish button. 2.4 Logging into RAIDXpert Choose RAIDXpert in the Windows Programs menu. 12. Or, log on manually with your entry looks like this: http://127.0.0.1:25902/ati or http://localhost:25902/ati 2.6 Secure Connection RAIDXpert uses a secure HTTP connection https:// 18
User Manual
Page 5
... Factor) ASRock FM2A55M-HD+ Quick Installation Guide ASRock FM2A55M-HD+ Support CD 2 x Serial ATA (SATA) Data Cables (Optional) 1 x I/O Panel Shield ASRock Reminds You... FM2A55M-HD+ 1. In this motherboard, please visit our website for specific information about the model you for purchasing ASRock FM2A55M-HD+ motherboard, a reliable motherboard produced under ASRock's consistently stringent quality control. Chapter 4 contains the configuration guide of this manual will be...
... Factor) ASRock FM2A55M-HD+ Quick Installation Guide ASRock FM2A55M-HD+ Support CD 2 x Serial ATA (SATA) Data Cables (Optional) 1 x I/O Panel Shield ASRock Reminds You... FM2A55M-HD+ 1. In this motherboard, please visit our website for specific information about the model you for purchasing ASRock FM2A55M-HD+ motherboard, a reliable motherboard produced under ASRock's consistently stringent quality control. Chapter 4 contains the configuration guide of this manual will be...

User Manual
Page 20
You also need to spray thermal grease between the CPU and the heatsink to the CPU FAN connector (CPU_FAN1, see Page 10, No. 3). Make sure that the CPU and the heatsink are securely fastened and in good contact with each other. Then connect the CPU fan to improve heat dissipation. For proper installation, please kindly refer to dissipate heat. 2.2 Installation of CPU Fan and Heatsink After you install the CPU into this motherboard, it is necessary to install a larger heatsink and cooling fan to the instruction manuals of the CPU fan and the heatsink. 16 English
You also need to spray thermal grease between the CPU and the heatsink to the CPU FAN connector (CPU_FAN1, see Page 10, No. 3). Make sure that the CPU and the heatsink are securely fastened and in good contact with each other. Then connect the CPU fan to improve heat dissipation. For proper installation, please kindly refer to dissipate heat. 2.2 Installation of CPU Fan and Heatsink After you install the CPU into this motherboard, it is necessary to install a larger heatsink and cooling fan to the instruction manuals of the CPU fan and the heatsink. 16 English

User Manual
Page 26
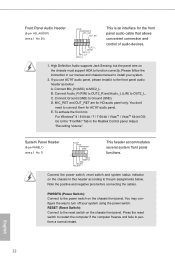
... the power switch. For Windows® 8 / 8 64-bit / 7 / 7 64-bit / VistaTM / VistaTM 64-bit OS: Go to the "FrontMic" Tab in our manual and chassis manual to connect them for HD audio panel only. System Panel Header (9-pin PANEL1) (see p.10 No. 20) GND PRESENCE# MIC_RET OUT_RET 1 OUT2_L J_SENSE OUT2_R MIC2_R MIC2_L This...
... the power switch. For Windows® 8 / 8 64-bit / 7 / 7 64-bit / VistaTM / VistaTM 64-bit OS: Go to the "FrontMic" Tab in our manual and chassis manual to connect them for HD audio panel only. System Panel Header (9-pin PANEL1) (see p.10 No. 20) GND PRESENCE# MIC_RET OUT_RET 1 OUT2_L J_SENSE OUT2_R MIC2_R MIC2_L This...

User Manual
Page 42
... when the processor you can use this to select enable or disable AMD Turbo Core Technology. Configuration options: [Enabled] and [Disabled]. Configuration options: [Auto] and [Manual]. The default value is [Enabled].
... when the processor you can use this to select enable or disable AMD Turbo Core Technology. Configuration options: [Enabled] and [Disabled]. Configuration options: [Auto] and [Manual]. The default value is [Enabled].

User Manual
Page 43
... English However, it is under heavy load. GFX Engine Clock Use this to [Manual], you may adjust the value of Processor Frequency and Processor Voltage. The default value is recommended to [Auto] by default. If it is [Auto]. FM2A55M-HD+ Processor Maximum Frequency It will display Processor Maximum Voltage for reference. Processor Maximum...
... English However, it is under heavy load. GFX Engine Clock Use this to [Manual], you may adjust the value of Processor Frequency and Processor Voltage. The default value is recommended to [Auto] by default. If it is [Auto]. FM2A55M-HD+ Processor Maximum Frequency It will display Processor Maximum Voltage for reference. Processor Maximum...

User Manual
Page 58
...]. Clear Status This option appears only when the case open detection feature. Confi guration options: [Full On] and [Automatic Mode]. Confi guration options: [Full On], [Manual Mode] and [Automatic Mode]. Use this option to enable or disable Over Temperature Protection. The default is value [Full On]. Chassis Fan 1 Setting This allows...
...]. Clear Status This option appears only when the case open detection feature. Confi guration options: [Full On] and [Automatic Mode]. Confi guration options: [Full On], [Manual Mode] and [Automatic Mode]. Use this option to enable or disable Over Temperature Protection. The default is value [Full On]. Chassis Fan 1 Setting This allows...
Quick Installation Guide
Page 6
... manual presented in Storage Configuration to quality and endurance. ASRock website http://www.asrock.com If you are using. In case any modifications of this motherboard, please visit our website for purchasing ASRock FM2A55M-HD+ motherboard, a reliable motherboard produced under ASRock's consistently stringent quality control. www.asrock.com/support/index.asp 1.1 Package Contents ASRock FM2A55M-HD+ Motherboard (Micro ATX Form Factor) ASRock FM2A55M-HD...
... manual presented in Storage Configuration to quality and endurance. ASRock website http://www.asrock.com If you are using. In case any modifications of this motherboard, please visit our website for purchasing ASRock FM2A55M-HD+ motherboard, a reliable motherboard produced under ASRock's consistently stringent quality control. www.asrock.com/support/index.asp 1.1 Package Contents ASRock FM2A55M-HD+ Motherboard (Micro ATX Form Factor) ASRock FM2A55M-HD...

Quick Installation Guide
Page 17
You also need to spray thermal grease between the CPU and the heatsink to the instruction manuals of CPU Fan and Heatsink After you install the CPU into this motherboard, it is necessary to install a larger heatsink and cooling fan to the CPU FAN connector (CPU_FAN1, see Page 1, No. 3). Make sure that the CPU and the heatsink are securely fastened and in good contact with each other. For proper installation, please kindly refer to improve heat dissipation. Then connect the CPU fan to dissipate heat. 2.2 Installation of the CPU fan and the heatsink. 16 English
You also need to spray thermal grease between the CPU and the heatsink to the instruction manuals of CPU Fan and Heatsink After you install the CPU into this motherboard, it is necessary to install a larger heatsink and cooling fan to the CPU FAN connector (CPU_FAN1, see Page 1, No. 3). Make sure that the CPU and the heatsink are securely fastened and in good contact with each other. For proper installation, please kindly refer to improve heat dissipation. Then connect the CPU fan to dissipate heat. 2.2 Installation of the CPU fan and the heatsink. 16 English
Quick Installation Guide
Page 23
... AC'97 audio panel. Press the reset switch to restart the computer if the computer freezes and fails to the "FrontMic" Tab in our manual and chassis manual to the pin assignments below : A. If you use AC'97 audio panel, please install it to the front panel audio header as below ...Connect the power switch, reset switch and system status indicator on the chassis front panel. English 22 Connect Ground (GND) to connect them for HD audio panel only. RESET (Reset Switch): Connect to the reset switch on the chassis to this header according to install your system using the power...
... AC'97 audio panel. Press the reset switch to restart the computer if the computer freezes and fails to the "FrontMic" Tab in our manual and chassis manual to the pin assignments below : A. If you use AC'97 audio panel, please install it to the front panel audio header as below ...Connect the power switch, reset switch and system status indicator on the chassis front panel. English 22 Connect Ground (GND) to connect them for HD audio panel only. RESET (Reset Switch): Connect to the reset switch on the chassis to this header according to install your system using the power...
Quick Installation Guide
Page 27
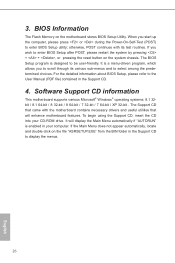
... among the predetermined choices. The Support CD that will display the Main Menu automatically if "AUTORUN" is enabled in the Support CD to the User Manual (PDF file) contained in the Support CD. 4.
... among the predetermined choices. The Support CD that will display the Main Menu automatically if "AUTORUN" is enabled in the Support CD to the User Manual (PDF file) contained in the Support CD. 4.
