Optoma TH1060P Support Question
Optoma TH1060P Support Question
Find answers below for this question about Optoma TH1060P.Need a Optoma TH1060P manual? We have 3 online manuals for this item!
Question posted by ashokambati on October 13th, 2012
Osd Main Menu Has Image And Display Options Greyed Out.
The person who posted this question about this Optoma product did not include a detailed explanation. Please use the "Request More Information" button to the right if more details would help you to answer this question.
Current Answers
Related Optoma TH1060P Manual Pages
Brochure - Page 1

... Zoom AV Mute Video
Menu
AC Power RJ-45
Stereo
Stereo
Audio-Out
Audio-In
IR
RS-232
Stereo
RCA
Audio-In
Kensington Lock
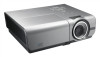
The Optoma TH1060P, a native 1080p high-definition DLP projector, delivers clear widescreen images to ensure that your audience experiences the full impact of analog and digital connectivity options for your message...
Brochure - Page 2

...: Dimensions (W x H x D): Operating Temperature:
Displayable Colors: Projection Method: Uniformity: Security: I/O Connectors:
Standard Accessories:
Optional Accessories:
Warranty: UPC:
Single 0.65" DC2 DMD..., Auto-Switching 380 Watts Max (Bright), 320 Watts (STD) TH1060P | HD 1080p Projector
Projection Distance/Image Size
Projection Distance (Feet)
Maximum Diagonal (Inches)
Minimum Diagonal (...
User's Manual - Page 1
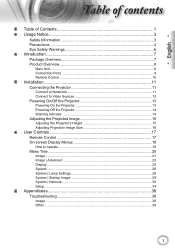
... Powering On/Off the Projector 13 Powering On the Projector 13 Powering off the projector 14 Warning Indicator 14 Adjusting the Projected Image 15 Adjusting the Projector's Height 15 Adjusting Projection Image Size 16
User Controls 17 Remote Control 17 On-screen Display Menus 19
How to operate ...19 Menu Tree...20
Image...21 Image | Advanced 23 Display...24 System...26...
User's Manual - Page 4
Noottee
▀■ Warning- Do not look into the projector's lens when the lamp is on -screen display "System|Lamp Setting" menu after replacing the lamp module (refer to page 28).
Please do not expose this projector to change the lamp when it shows warning messages. This projector will show on until the lamp module has...
User's Manual - Page 18
....
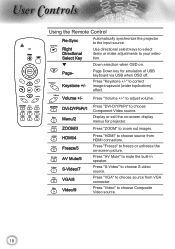
Press "S-Video" to choose Component Video source. q
Down selection when OSD on -screen display menus for emulation of USB keyboard via USB when OSD off. Page Down key for projector. Press "Keystone +/-" to freeze or unfreeze the on-screen picture. Press "Freeze" to correct image-trapezoid (wider top/bottom) effect. Press "AV Mute" to choose...
User's Manual - Page 19

... the main menu. English
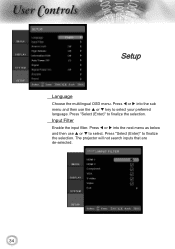
User Controls
On-screen Display Menus
The Projector has multilingual On-screen Display menus that allow you to select any item in the sub menu and adjust as described above.
5. Press " " key on the Remote Control or "Enter" on the Remote Control or Control Panel.
2 When OSD is displayed, use p q keys to make image adjustments...
User's Manual - Page 21

...Image
Display Mode
There are many factory presets optimized for various types of this mode for blackboard usage. User 1: User's own settings. User 2: User's own settings. The initial default settings of images...future use. Any further adjustments by the user in User1/2 will be saved in the image.
Press the t to decrease the contrast. Press the u to increase the ...
User's Manual - Page 22

... image.
Press the t to darken image. Press the u to lighten the image. Advanced
Use this option to increase the color saturation in the image. User Controls
Brightness
Adjust the brightness of the image.... increase the amount of green in the image. Press the u to increase the amount of red in the image. Color
Adjust a video image from black and white to fully saturated ...
User's Manual - Page 23
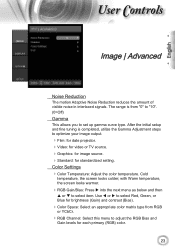
... the initial setup and fine tuning is from RGB
or YCbCr.
RGB Channel: Select this menu to optimize your image output.
Film: for date projector. Video: for video or TV source. Graphics: for image source. Standard: for brightness (Gain) and contrast (Bias).
Color Space: Select an appropriate color...
User's Manual - Page 26
Background Color
Use this menu to display a "Dark Blue", "Gray", or "Black" screen when no signal is projected straight on the display screen.
The image is available.
User Controls
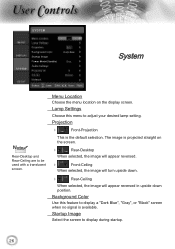
System
Noottee
Rear-Desktop and Rear-Ceiling are to display during startup.
26 Startup Image
Select the screen to be used with a translucent screen. Lamp Settings
Choose this...
User's Manual - Page 27
... English
User Controls
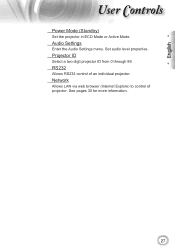
Power Mode (Standby)
Set the projector in ECO Mode or Active Mode.
Network
Allows LAN via web browser (Internet Explore) to control of an individual projector. Set audio level properties. RS232
Allows RS232 control of projector. Audio Settings
Enter the Audio Settings menu.
Projector ID
Select a two digit projector ID from 0 through 99.
User's Manual - Page 29

Image Capture
Capture a displayed screen to display during startup.
Default - Display the desired screen on the projector. 2. the supplied default startup screen. User - Select Image Capture from the Advanced menu. 3. Select OK. Screen capture in the Image menu.
29
The captured screen is saved as the startup screen. 1. customized screen capture using the Image ...
User's Manual - Page 32
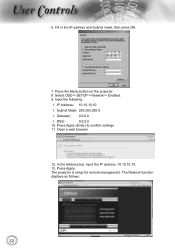
Select OSD-> SETUP-> Network-> Enabled. 9. Fill in the IP address and Subnet mask, then press OK.
7. Press the Menu button on the projector. 8. Press Apply. The Network function displays as follows.
32 Press Apply (Enter) to confirm settings.
11. Input the following:
4 IP Address: 10.10.10.10
4 Subnet Mask: 255.255.255.0
4 Gateway:
0.0.0.0
4 ...
User's Manual - Page 34
... filter. Press "Select (Enter)" to finalize the selection.
Press t or u into the sub menu and then use p or q to select your preferred language. The projector will not search inputs that are de-selected.
34 Press t or u into the next menu as below and then use the p or q key to select. Press "Select (Enter...
User's Manual - Page 38

... a problem with your local reseller or service center.
See pages 16. T he image is stretched when displaying 16:9 DVD title When you play anamorphic DVD or 16:9 DVD, the projector will
show the best image in 16: 9 format on . Image
No image appears on-screen Ensure all the cables and power connections are correctly...
User's Manual - Page 39
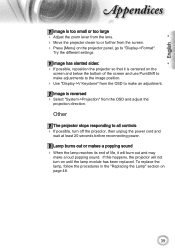
... turn off the projector, then unplug the power cord and
wait at least 20 seconds before reconnecting power. Lamp burns out or makes a popping sound
When the lamp reaches its end of the screen and use PureShift to make adjustments to the image position.
Use "Display->V Keystone" from the OSD to "Display->Format".
User's Manual - Page 48
... n=20 n=21 n=22 n=23 n=24 n=25 n=26 n=27
ASCII
Pass
Fail
P
F
P
F
P
F
P
F
P
F
P
F
P
F
P
F
P
F
P
F
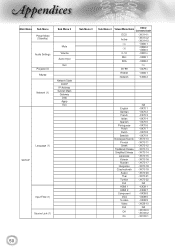
OSD/Image/Display/Setup Main Menu Sub Menu
Sub Menu 2
Display Mode (1)
Contrast (1) Brightness (1)
Color (1) Tint (1) Sharpness (1) ADVANCED (1)
Noise Reduction (2)
IMAGE
Gamma (2)
Color Settings (2)
Sub Menu 3
Film (9a) Video (9a) Graphics (9a) Standard (9a) Color Temp...
User's Manual - Page 49
English
Appendices
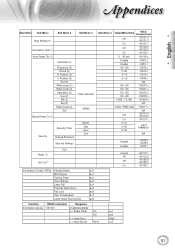
Main Menu Sub Menu
Sub Menu 2
Sub Menu 3
Color Space
Format (1)
DISPLAY
Digital Zoom (1) V Image Shift (1) V Keystone (1)
Closed Captioning
Exit (2)
RGB Channel Exit
Menu Location (1)
Lamp Hours (2) Lamp Reminder (2)
Lamp Settings (1) Brightness Mode (2)
SYSTEM
Lamp Reset (2) Exit (2)
Projection (1)
Background Color (1)
Startup Image
Image Image Capture
Sub ...
User's Manual - Page 50
Appendices
Main Menu Sub Menu Power Mode (Standby)
Audio Settings
Projector ID RS232
Network (1)
Sub Menu 2
Mute Volume Audio Input
Exit
Network State DHCP
IP Address Subnet Mask
Gateway DNS Apply Exit
Language (1) SETUP
Input Filter (1) Source Lock (1)
Sub Menu 3
Sub Menu 4
Values\Menu Items
RS232 Command Code
ECO Active
On Off 0~10
~XX114 1
~XX114 2 ~XX114 0
~XX80 1
~XX80 2 ~XX80...
User's Manual - Page 51
... Running Out
a=8
Function
RS232 command
Information display ~XX150 1
ʳ
ʳ
ʳ
ʳ
ʳ
ʳ
ʳ
ʳ
Response Okabbbbccdddde a = Power State ʳ
b = Lamp Hour c = Input Source
ʳ On Off ʳʳ
None
ʳ a=1 a=0
bbbb c=0
51 Appendices
English
Main Menu Sub Menu
Sub Menu 2
Sub Menu 3 Sub Menu 4
ʳʳ
ʳ
ʳ
High Altitude...
Similar Questions

Optoma Ml500 Firmware Downgrade
I downloaded a firmware from a post here on the site on my old ML500. The firmware took away the med...
I downloaded a firmware from a post here on the site on my old ML500. The firmware took away the med...
(Posted by mikedmaseker 3 years ago)


Settings Problem
Hi i lost from main menu in my settings colour option - and I dont know how this is happen Please he...
Hi i lost from main menu in my settings colour option - and I dont know how this is happen Please he...
(Posted by dziczek117 7 years ago)

Yellowish Image
We have two Optoma PRO360W projectors which we use to project images from a laptop computer. Until r...
We have two Optoma PRO360W projectors which we use to project images from a laptop computer. Until r...
(Posted by jstewart28007 8 years ago)

Flickering Bars Across Screen Of Input Screen
Hi, I have just purchased a Pico PK120 and am experiencing problems with the "input" screen, that i...
Hi, I have just purchased a Pico PK120 and am experiencing problems with the "input" screen, that i...
(Posted by rkpl45 12 years ago)