
User Guide
Page 8
... Support 5 Table of Contents ...7 List of Figures ...11 List of Tables ...13 Preface ...15 Chapter 1 Getting to Know Your Prestige 17 1.1 Introduction ...17 1.2 Software Features 17 1.3 Hardware Features 18 1.4 Internet Access Application 18 Chapter 2 Hardware Overview 19 2.1 Hardware Connection 19 2.2 Front Panel LEDs 19 2.3 Rear Panel ...20 2.3.1 VDSL Port 20 2.3.2 PHONE Port 20 2.3.3 LAN Ports 20 2.3.4 Console Port 20 2.3.5 POWER Port 21 Chapter 3 The Web Configurator 23 3.1 Introduction ...23 3.2 System Login 23 3.3 The Status...
... Support 5 Table of Contents ...7 List of Figures ...11 List of Tables ...13 Preface ...15 Chapter 1 Getting to Know Your Prestige 17 1.1 Introduction ...17 1.2 Software Features 17 1.3 Hardware Features 18 1.4 Internet Access Application 18 Chapter 2 Hardware Overview 19 2.1 Hardware Connection 19 2.2 Front Panel LEDs 19 2.3 Rear Panel ...20 2.3.1 VDSL Port 20 2.3.2 PHONE Port 20 2.3.3 LAN Ports 20 2.3.4 Console Port 20 2.3.5 POWER Port 21 Chapter 3 The Web Configurator 23 3.1 Introduction ...23 3.2 System Login 23 3.3 The Status...
User Guide
Page 9
P-871H Series User's Guide 3.3.1 Change Your Password 26 3.4 Prestige Lockout 26 3.5 Resetting the Prestige 27 3.5.1 Reload the Configuration File 27 3.6 Logging Out of the Web Configurator 28 3.7 Help ...28 Chapter 4 System Status and Port Statistics 29 4.1 Overview ...29 4.2 Port Status Summary 29 4.2.1 Status: VDSL Port Details 30 4.2.2 Status: Port Details 32 Chapter 5 Basic Setting ...35 5.1 Overview ...35 5.2 System Information 35 5.3 Introduction to VLANs 36 5.4 IGMP Snooping 37 5.5 Switch Setup Screen 37 5.6 IP Setup ...39 5.7 Port Setup ...40 5.8 Login Setup 41 Chapter 6...
P-871H Series User's Guide 3.3.1 Change Your Password 26 3.4 Prestige Lockout 26 3.5 Resetting the Prestige 27 3.5.1 Reload the Configuration File 27 3.6 Logging Out of the Web Configurator 28 3.7 Help ...28 Chapter 4 System Status and Port Statistics 29 4.1 Overview ...29 4.2 Port Status Summary 29 4.2.1 Status: VDSL Port Details 30 4.2.2 Status: Port Details 32 Chapter 5 Basic Setting ...35 5.1 Overview ...35 5.2 System Information 35 5.3 Introduction to VLANs 36 5.4 IGMP Snooping 37 5.5 Switch Setup Screen 37 5.6 IP Setup ...39 5.7 Port Setup ...40 5.8 Login Setup 41 Chapter 6...
User Guide
Page 12
P-871H Series User's Guide List of Figures Figure 1 Internet Access Application 18 Figure 2 Front Panel 19 Figure 3 Rear Panel 20 Figure 4 Web Configurator: Login 23 Figure 5 Web Configurator Home Screen (Status 24 Figure 6 Change Password 26 Figure 7 Resetting the Prestige: Via the Console Port 28 Figure 8 Web Configurator: Logout Screen 28 Figure 9 Status ...29 Figure 10 Status: Port Details (VDSL 31 Figure 11 Status Port Details (Ethernet 32 Figure 12 System Info 35 Figure 13 Switch Setup 38 Figure...
P-871H Series User's Guide List of Figures Figure 1 Internet Access Application 18 Figure 2 Front Panel 19 Figure 3 Rear Panel 20 Figure 4 Web Configurator: Login 23 Figure 5 Web Configurator Home Screen (Status 24 Figure 6 Change Password 26 Figure 7 Resetting the Prestige: Via the Console Port 28 Figure 8 Web Configurator: Logout Screen 28 Figure 9 Status ...29 Figure 10 Status: Port Details (VDSL 31 Figure 11 Status Port Details (Ethernet 32 Figure 12 System Info 35 Figure 13 Switch Setup 38 Figure...
User Guide
Page 13
... vlan1q status Command Example 69 Figure 48 WIndows 95/98/Me: Network: Configuration 72 Figure 49 Windows 95/98/Me: TCP/IP Properties: IP Address 73 Figure 50 Windows 95/98/Me: TCP/IP Properties: DNS Configuration 74 Figure 51 Windows XP: Start Menu 75 Figure 52 Windows XP: Control Panel 75 Figure 53 Windows XP: Control Panel: Network Connections: Properties 76 Figure 54 Windows XP: Local Area Connection Properties 76 Figure 55 Windows XP: Internet...
... vlan1q status Command Example 69 Figure 48 WIndows 95/98/Me: Network: Configuration 72 Figure 49 Windows 95/98/Me: TCP/IP Properties: IP Address 73 Figure 50 Windows 95/98/Me: TCP/IP Properties: DNS Configuration 74 Figure 51 Windows XP: Start Menu 75 Figure 52 Windows XP: Control Panel 75 Figure 53 Windows XP: Control Panel: Network Connections: Properties 76 Figure 54 Windows XP: Local Area Connection Properties 76 Figure 55 Windows XP: Internet...
User Guide
Page 24
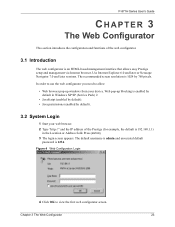
The default username is admin and associated default password is 1024 by default). 3.2 System Login 1 Start your device. Use Internet Explorer 6.0 and later or Netscape Navigator 7.0 and later versions. In order to use the web configurator you need to view the first web configurator screen. Web pop-up windows from your web browser. 2 Type "http://" and the IP address of the web configurator. 3.1 Introduction The web configurator is enabled by default in the Location or Address field. Chapter 3 The Web Configurator 23 The...
The default username is admin and associated default password is 1024 by default). 3.2 System Login 1 Start your device. Use Internet Explorer 6.0 and later or Netscape Navigator 7.0 and later versions. In order to use the web configurator you need to view the first web configurator screen. Web pop-up windows from your web browser. 2 Type "http://" and the IP address of the web configurator. 3.1 Introduction The web configurator is enabled by default in the Location or Address field. Chapter 3 The Web Configurator 23 The...
User Guide
Page 26
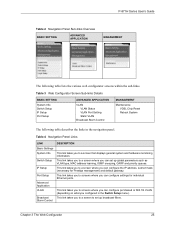
... system and hardware monitoring information. Table 3 Web Configurator Screen Sub-links Details BASIC SETTING System Info Switch Setup IP Setup Port Setup ADVANCED APPLICATION VLAN VLAN Status VLAN Port Setting Static VLAN Broadcast Storm Control MANAGEMENT Maintenance VDSL Chip Reset Reboot System The following table lists the various web configurator screens within the sub-links. This link takes you to a screen where you can set up global parameters such as VLAN type, MAC address learning, IGMP snooping, GARP and priority queues. P-871H Series User's Guide Table 2 Navigation...
... system and hardware monitoring information. Table 3 Web Configurator Screen Sub-links Details BASIC SETTING System Info Switch Setup IP Setup Port Setup ADVANCED APPLICATION VLAN VLAN Status VLAN Port Setting Static VLAN Broadcast Storm Control MANAGEMENT Maintenance VDSL Chip Reset Reboot System The following table lists the various web configurator screens within the sub-links. This link takes you to a screen where you can set up global parameters such as VLAN type, MAC address learning, IGMP snooping, GARP and priority queues. P-871H Series User's Guide Table 2 Navigation...
User Guide
Page 27
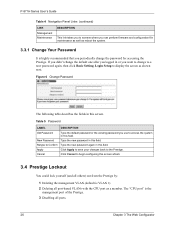
... VLAN 1). 2 Deleting all ports. 26 Chapter 3 The Web Configurator Table 5 Password LABEL DESCRIPTION Old Password New Password Retype to Confirm Apply Cancel Type the default password or the existing password you use to the Prestige. If you didn't change the default one after you logged in this field. Click Apply to save your changes back to access the system in this field. Type the new password in this field. P-871H Series User's Guide...
... VLAN 1). 2 Deleting all ports. 26 Chapter 3 The Web Configurator Table 5 Password LABEL DESCRIPTION Old Password New Password Retype to Confirm Apply Cancel Type the default password or the existing password you use to the Prestige. If you didn't change the default one after you logged in this field. Click Apply to save your changes back to access the system in this field. Type the new password in this field. P-871H Series User's Guide...
User Guide
Page 29
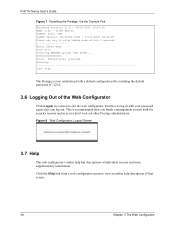
... your password again after you finish a management session both for security reasons and so as you log out. P-871H Series User's Guide Figure 7 Resetting the Prestige: Via the Console Port Bootbase Version: V1.0 | 04/25/2003 10:01:06 RAM: Size = 32768 Kbytes FLASH: Intel 32M ZyNOS Version: V3.50(DU.0)b6 | 07/11/2003 18:00:29 Press any key to view an online help...
... your password again after you finish a management session both for security reasons and so as you log out. P-871H Series User's Guide Figure 7 Resetting the Prestige: Via the Console Port Bootbase Version: V1.0 | 04/25/2003 10:01:06 RAM: Size = 32768 Kbytes FLASH: Intel 32M ZyNOS Version: V3.50(DU.0)b6 | 07/11/2003 18:00:29 Press any key to view an online help...
User Guide
Page 36
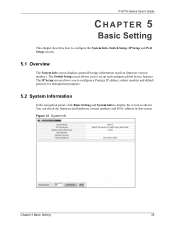
You can check the firmware and hardware version numbers and MAC address in this screen. Figure 12 System Info Chapter 5 Basic Setting 35 The IP Setup screen allows you to set up and configure global device features. The Switch Setup screen allows you to configure a Prestige IP address, subnet mask(s) and default gateway for management purposes. 5.2 System Information In the navigation panel, click Basic Setting and System Info to display the screen as firmware version number). P-871H Series User's Guide CHAPTER 5 Basic...
You can check the firmware and hardware version numbers and MAC address in this screen. Figure 12 System Info Chapter 5 Basic Setting 35 The IP Setup screen allows you to set up and configure global device features. The Switch Setup screen allows you to configure a Prestige IP address, subnet mask(s) and default gateway for management purposes. 5.2 System Information In the navigation panel, click Basic Setting and System Info to display the screen as firmware version number). P-871H Series User's Guide CHAPTER 5 Basic...

User Guide
Page 39
... other applications and users. IGMP Snooping Select the Active checkbox to enable IGMP snooping have group multicast traffic only forwarded to ports that are allowed but that contains bits to -physical queue mapping. See Chapter 6 on page 43 for controlled load, latency-sensitive traffic such as router configuration messages. The VLAN Setup screen changes depending on IGMP snooping. 38 Chapter 5 Basic Setting Use the next two...
... other applications and users. IGMP Snooping Select the Active checkbox to enable IGMP snooping have group multicast traffic only forwarded to ports that are allowed but that contains bits to -physical queue mapping. See Chapter 6 on page 43 for controlled load, latency-sensitive traffic such as router configuration messages. The VLAN Setup screen changes depending on IGMP snooping. 38 Chapter 5 Basic Setting Use the next two...
User Guide
Page 41
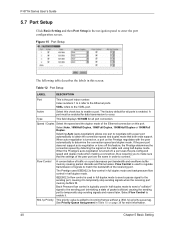
... Ethernet connection on this feature, the Prestige determines the connection speed by detecting the signal on the cable and using half duplex mode. Selecting Auto (auto-negotiation) allows one port to negotiate with the peer automatically to enter the port configuration screen. Back Pressure flow control is turned on, a port on a port decreases port bandwidth and overflows buffer memory causing packet discards and frame losses. P-871H Series User's Guide 5.7 Port Setup Click Basic Setting...
... Ethernet connection on this feature, the Prestige determines the connection speed by detecting the signal on the cable and using half duplex mode. Selecting Auto (auto-negotiation) allows one port to negotiate with the peer automatically to enter the port configuration screen. Back Pressure flow control is turned on, a port on a port decreases port bandwidth and overflows buffer memory causing packet discards and frame losses. P-871H Series User's Guide 5.7 Port Setup Click Basic Setting...
User Guide
Page 44
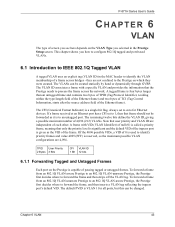
... first decides where to forward the frame, and then inserts a VLAN tag reflecting the ingress port's default VID. P-871H Series User's Guide CHAPTER 6 VLAN The type of screen you see here depends on the VLAN Type you how to configure 802.1Q tagged and port-based VLANs. 6.1 Introduction to IEEE 802.1Q Tagged VLAN A tagged VLAN uses an explicit tag (VLAN ID) in the Prestige Setup screen. A tagged frame is...
... first decides where to forward the frame, and then inserts a VLAN tag reflecting the ingress port's default VID. P-871H Series User's Guide CHAPTER 6 VLAN The type of screen you see here depends on the VLAN Type you how to configure 802.1Q tagged and port-based VLANs. 6.1 Introduction to IEEE 802.1Q Tagged VLAN A tagged VLAN uses an explicit tag (VLAN ID) in the Prestige Setup screen. A tagged frame is...
User Guide
Page 56
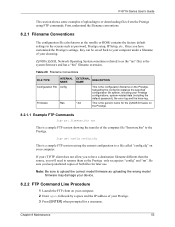
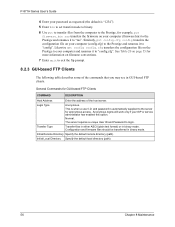
... Conventions FILE TYPE INTERNAL NAME EXTERNAL NAME DESCRIPTION Configuration File config Firmware Ras *.bin This is a sample FTP session saving the current configuration to the Prestige. This is the system firmware and has a "bin" filename extension. Be sure you will need to as uploading the wrong model firmware may damage your device. 8.2.2 FTP Command Line Procedure 1 Launch the FTP client on your computer. 2 Enter open, followed by a space and the IP address...
... Conventions FILE TYPE INTERNAL NAME EXTERNAL NAME DESCRIPTION Configuration File config Firmware Ras *.bin This is a sample FTP session saving the current configuration to the Prestige. This is the system firmware and has a "bin" filename extension. Be sure you will need to as uploading the wrong model firmware may damage your device. 8.2.2 FTP Command Line Procedure 1 Launch the FTP client on your computer. 2 Enter open, followed by a space and the IP address...
User Guide
Page 57
... Local Directory Specify the default local directory (path). 56 Chapter 8 Maintenance Initial Remote Directory Specify the default remote directory (path). P-871H Series User's Guide 4 Enter your password as requested (the default is "1234"). 5 Enter bin to set transfer mode to binary. 6 Use put to transfer files from the computer to the Prestige, for example, put config.cfg config transfers the configuration file on your ISP or service administrator has enabled this option. Configuration and firmware files...
... Local Directory Specify the default local directory (path). 56 Chapter 8 Maintenance Initial Remote Directory Specify the default remote directory (path). P-871H Series User's Guide 4 Enter your password as requested (the default is "1234"). 5 Enter bin to set transfer mode to binary. 6 Use put to transfer files from the computer to the Prestige, for example, put config.cfg config transfers the configuration file on your ISP or service administrator has enabled this option. Configuration and firmware files...
User Guide
Page 60
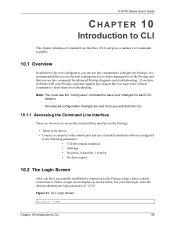
... use the web configurator for everyday management of the Prestige and that you have problems with your Prestige, customer support may request that you can use line commands to configure the Prestige. All unsaved configuration changes are lost once you exit from the CLI. 10.1.1 Accessing the Command Line Interface There are two ways to access the command line interface on the Prestige: • Telnet to the device • Connect a computer to the console port...
... use the web configurator for everyday management of the Prestige and that you have problems with your Prestige, customer support may request that you can use line commands to configure the Prestige. All unsaved configuration changes are lost once you exit from the CLI. 10.1.1 Accessing the Command Line Interface There are two ways to access the command line interface on the Prestige: • Telnet to the device • Connect a computer to the console port...
User Guide
Page 62
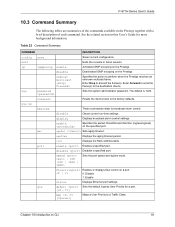
... Prestige. Enter Forward to send the frame(s) to the factory defaults. Resets the device back to the destination device. ageSet Sets aging timeout. speed Sets the port speed and duplex mode. Chapter 10 Introduction to broadcast storm control. Table 22 Command Summary COMMAND DESCRIPTION config exit ip sys save igmpsnoop enable disable unknowmulticast password romreset Saves current configuration. sys sw bmstorm mac These commands relate to CLI 61 list Displays the MAC address table. enable Enables a specified port. disable Clears current run-time settings...
... Prestige. Enter Forward to send the frame(s) to the factory defaults. Resets the device back to the destination device. ageSet Sets aging timeout. speed Sets the port speed and duplex mode. Chapter 10 Introduction to broadcast storm control. Table 22 Command Summary COMMAND DESCRIPTION config exit ip sys save igmpsnoop enable disable unknowmulticast password romreset Saves current configuration. sys sw bmstorm mac These commands relate to CLI 61 list Displays the MAC address table. enable Enables a specified port. disable Clears current run-time settings...
User Guide
Page 66
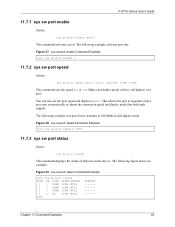
... port status This command displays the status of a port. The following figure shows an example. You can also set the port speed and duplex to obtain the connection speed and duplex mode that both ends support. The following example sets port four to transmit at 100 Mpbs in full-duplex mode. P-871H Series User's Guide 11.7.1 sys sw port enable Syntax: sys sw port enable This command activates a port. Figure 39 sys sw port status Command Example ras> sys sw port status PORT EN LINK SPEED...
... port status This command displays the status of a port. The following figure shows an example. You can also set the port speed and duplex to obtain the connection speed and duplex mode that both ends support. The following example sets port four to transmit at 100 Mpbs in full-duplex mode. P-871H Series User's Guide 11.7.1 sys sw port enable Syntax: sys sw port enable This command activates a port. Figure 39 sys sw port status Command Example ras> sys sw port status PORT EN LINK SPEED...
User Guide
Page 82
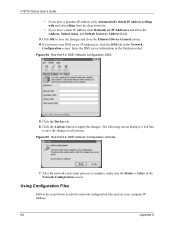
... configuration. 7 Turn on your Prestige and restart your TCP/IP properties in the TCP/IP Control Panel window. Appendix A 81 Verifying Settings Check your computer (if prompted). P-871H Series User's Guide 4 For statically assigned settings, do the following: • From the Configure box, select Manually. • Type your IP address in the IP Address box. • Type your subnet mask in the Subnet mask box. • Type the IP address of your Prestige in the Router address...
... configuration. 7 Turn on your Prestige and restart your TCP/IP properties in the TCP/IP Control Panel window. Appendix A 81 Verifying Settings Check your computer (if prompted). P-871H Series User's Guide 4 For statically assigned settings, do the following: • From the Configure box, select Manually. • Type your IP address in the IP Address box. • Type your subnet mask in the Subnet mask box. • Type the IP address of your Prestige in the Router address...
User Guide
Page 85
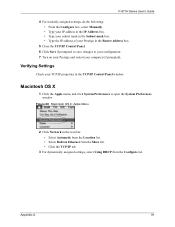
... Ethernet Device General screen. 4 If you have a static IP address click Statically set your DNS server IP address(es), click the DNS tab in the Network Configuration screen. P-871H Series User's Guide • If you have a dynamic IP address click Automatically obtain IP address settings with and select dhcp from the drop down list. • If you know your computer IP address. 84 Appendix A Using Configuration Files Follow the steps below to apply the changes. Figure 65 Red Hat 9.0: KDE: Network Configuration: Activate 7 After the network card...
... Ethernet Device General screen. 4 If you have a static IP address click Statically set your DNS server IP address(es), click the DNS tab in the Network Configuration screen. P-871H Series User's Guide • If you have a dynamic IP address click Automatically obtain IP address settings with and select dhcp from the drop down list. • If you know your computer IP address. 84 Appendix A Using Configuration Files Follow the steps below to apply the changes. Figure 65 Red Hat 9.0: KDE: Network Configuration: Activate 7 After the network card...
User Guide
Page 100
... Antenna 2 Regular Mail 5 Related Documentation 15 Relocate 2 Removing 3 Reorient 2 Repair 3 Reset 27 Reset to factory default settings 53 Restore configuration 27 Risk 3 Risks 3 Index P-871H Series User's Guide S Safety Warnings 3 Separation Between Equipment and Receiver 2 Service 3, 4 Service Personnel 3 Shock, Electric 3 Spain, Contact Information 5 Static VLAN 46 Control 47 Tagging 47 Status 24, 29 Port 29 VDSL Port details 30, 32 VLAN 46 Subnet Masks 88 Subnetting 88 Supply Voltage 3 Support E-mail 5 Sweden, Contact Information 5 Swimming Pool 3 Switch setup...
... Antenna 2 Regular Mail 5 Related Documentation 15 Relocate 2 Removing 3 Reorient 2 Repair 3 Reset 27 Reset to factory default settings 53 Restore configuration 27 Risk 3 Risks 3 Index P-871H Series User's Guide S Safety Warnings 3 Separation Between Equipment and Receiver 2 Service 3, 4 Service Personnel 3 Shock, Electric 3 Spain, Contact Information 5 Static VLAN 46 Control 47 Tagging 47 Status 24, 29 Port 29 VDSL Port details 30, 32 VLAN 46 Subnet Masks 88 Subnetting 88 Supply Voltage 3 Support E-mail 5 Sweden, Contact Information 5 Swimming Pool 3 Switch setup...


