
Owner's Manual
Page 1
UAB YSP-1100 Digital Sound Projector OWNER'S MANUAL
UAB YSP-1100 Digital Sound Projector OWNER'S MANUAL

Owner's Manual
Page 3
... environment will not result in harmful interference with FCC regulations does not guarantee that interference will not occur in the users manual, may void your sensitive hearing. ii En This product, when installed as indicated in the instructions contained in this type...INSTRUCTIONS FCC INFORMATION (for Class "B" digital devices. Modifications not expressly approved by the FCC, to use the product. 2. Utilize power outlets that lets the sound come through loud and clear without affecting your authority, granted by YAMAHA may cause interference harmful to the instructions...
... environment will not result in harmful interference with FCC regulations does not guarantee that interference will not occur in the users manual, may void your sensitive hearing. ii En This product, when installed as indicated in the instructions contained in this type...INSTRUCTIONS FCC INFORMATION (for Class "B" digital devices. Modifications not expressly approved by the FCC, to use the product. 2. Utilize power outlets that lets the sound come through loud and clear without affecting your authority, granted by YAMAHA may cause interference harmful to the instructions...
Owner's Manual
Page 4
... adjustments or performance of explosion if battery is called the standby mode. Contact qualified YAMAHA service personnel when any service is located on switches, knobs and/or cords. 10... prevent electric shock, match wide blade of space above (or below . This Class B digital apparatus complies with a humidifier) to sudden temperature changes from the wall outlet, grasp the plug...motors, or transformers to avoid humming sounds. 4 Do not expose this unit to prevent condensation inside this unit rises, it in the mains lead of this manual carefully. On the top of ...
... adjustments or performance of explosion if battery is called the standby mode. Contact qualified YAMAHA service personnel when any service is located on switches, knobs and/or cords. 10... prevent electric shock, match wide blade of space above (or below . This Class B digital apparatus complies with a humidifier) to sudden temperature changes from the wall outlet, grasp the plug...motors, or transformers to avoid humming sounds. 4 Do not expose this unit to prevent condensation inside this unit rises, it in the mains lead of this manual carefully. On the top of ...
Owner's Manual
Page 5
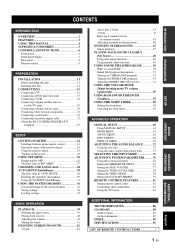
...this unit 11 CONNECTIONS 15 Connecting a TV 16 Connecting a DVD player/recorder 17 Connecting a VCR 18 Connecting a digital satellite tuner or a cable TV tuner 19 Connecting a digital airwave tuner 20 Connecting other external components 21 Connecting a subwoofer 22 Connecting the power supply cable 23 About the RS... 57 USING THE SLEEP TIMER 58 Setting the sleep timer 58 Canceling the sleep timer 59 ADVANCED OPERATION MANUAL SETUP 60 Using MANUAL SETUP 61 BEAM MENU 62 SOUND MENU 66 INPUT MENU 68 DISPLAY MENU 70 ADJUSTING THE AUDIO BALANCE 72 Using the test tone 72 Using...
...this unit 11 CONNECTIONS 15 Connecting a TV 16 Connecting a DVD player/recorder 17 Connecting a VCR 18 Connecting a digital satellite tuner or a cable TV tuner 19 Connecting a digital airwave tuner 20 Connecting other external components 21 Connecting a subwoofer 22 Connecting the power supply cable 23 About the RS... 57 USING THE SLEEP TIMER 58 Setting the sleep timer 58 Canceling the sleep timer 59 ADVANCED OPERATION MANUAL SETUP 60 Using MANUAL SETUP 61 BEAM MENU 62 SOUND MENU 66 INPUT MENU 68 DISPLAY MENU 70 ADJUSTING THE AUDIO BALANCE 72 Using the test tone 72 Using...
Owner's Manual
Page 7
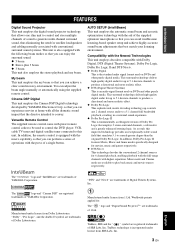
...YAMAHA Corporation. Manufactured under license from 1 Ltd. Worldwide patents applied for 6 channel playback, enabling playback with the full-range channels with the following beam modes so that you can avoid troublesome listening-based speaker setup and achieve highly accurate sound beam adjustments that best match your listening environment. The " " logo and "Digital Sound Projector...other purely digital media. Versatile Remote Control The supplied remote control come with the press of the supplied optimizer microphone so that you can adjust the beam angle manually or ...
...YAMAHA Corporation. Manufactured under license from 1 Ltd. Worldwide patents applied for 6 channel playback, enabling playback with the full-range channels with the following beam modes so that you can avoid troublesome listening-based speaker setup and achieve highly accurate sound beam adjustments that best match your listening environment. The " " logo and "Digital Sound Projector...other purely digital media. Versatile Remote Control The supplied remote control come with the press of the supplied optimizer microphone so that you can adjust the beam angle manually or ...

Owner's Manual
Page 8
... THIS MANUAL Notes • This manual describes how to connect and operate this unit to your TV and other external components. See "GETTING STARTED" on page 42. See "ENJOYING SURROUND SOUND" on page 24. 4 Run AUTO SETUP. In such cases, the operation is described using either the buttons on the ...main unit or on the power of this unit in part as a result of external components, refer to the supplied owner's manual for the component. •...
... THIS MANUAL Notes • This manual describes how to connect and operate this unit to your TV and other external components. See "GETTING STARTED" on page 42. See "ENJOYING SURROUND SOUND" on page 24. 4 Run AUTO SETUP. In such cases, the operation is described using either the buttons on the ...main unit or on the power of this unit in part as a result of external components, refer to the supplied owner's manual for the component. •...
Owner's Manual
Page 11
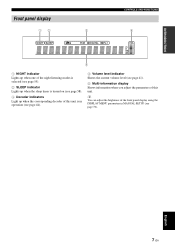
English 7 En y You can adjust the brightness of this unit. INTRODUCTION Front panel display 12 3 CONTROLS AND FUNCTIONS 4 NIGHT SLEEP PCM DIGITAL PL VOL m ft mS dB 5 1 NIGHT indicator Lights up when one of the night listening modes is selected (see page 55). 2 SLEEP indicator Lights up ... level (see page 41). 5 Multi-information display Shows information when you adjust the parameters of the front panel display using the DISPLAY MENU parameters in MANUAL SETUP (see page 70).
English 7 En y You can adjust the brightness of this unit. INTRODUCTION Front panel display 12 3 CONTROLS AND FUNCTIONS 4 NIGHT SLEEP PCM DIGITAL PL VOL m ft mS dB 5 1 NIGHT indicator Lights up when one of the night listening modes is selected (see page 55). 2 SLEEP indicator Lights up ... level (see page 41). 5 Multi-information display Shows information when you adjust the parameters of the front panel display using the DISPLAY MENU parameters in MANUAL SETUP (see page 70).
Owner's Manual
Page 17
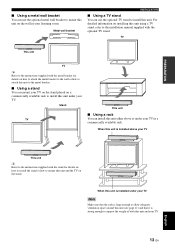
... You can use the optional TV stand to install this unit. For detailed information on installing this unit using a TV stand, refer to the installation manual supplied with the stand for details on the wall in your TV in a commercially available rack.
... You can use the optional TV stand to install this unit. For detailed information on installing this unit using a TV stand, refer to the installation manual supplied with the stand for details on the wall in your TV in a commercially available rack.

Owner's Manual
Page 21
... page 21). PREPARATION CONNECTIONS Connecting a DVD player/recorder Connect a DVD player/recorder and enjoy DVDs. ■ Audio connections Connect the optical digital output jack of your DVD player/recorder to the DVD/AUX VIDEO IN jack of this unit. COMPONENT COMPONENT COMPONENT DVD COAXIAL AUX TV/STB...(Green) (Blue) (Red) Component video pin cable (Green) (Blue) (Red) English 17 En In case you connect this unit to the operation manual supplied with better resolution. If not, adjust the system settings of your DVD player/recorder is made, you can only make an optical...
... page 21). PREPARATION CONNECTIONS Connecting a DVD player/recorder Connect a DVD player/recorder and enjoy DVDs. ■ Audio connections Connect the optical digital output jack of your DVD player/recorder to the DVD/AUX VIDEO IN jack of this unit. COMPONENT COMPONENT COMPONENT DVD COAXIAL AUX TV/STB...(Green) (Blue) (Red) Component video pin cable (Green) (Blue) (Red) English 17 En In case you connect this unit to the operation manual supplied with better resolution. If not, adjust the system settings of your DVD player/recorder is made, you can only make an optical...
Owner's Manual
Page 31
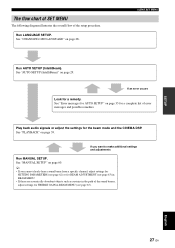
See "Error messages for AUTO SETUP" on page 35 for a remedy. See "MANUAL SETUP" on page 28. SETUP The flow chart of SET MENU The following diagram illustrates the overall flow of the sound beams, adjust settings for the beam mode and the CINEMA DSP. Run LANGUAGE SETUP. USING SET...and possible remedies. See "AUTO SETUP (IntelliBeam)" on page 39. English 27 En See "PLAYBACK" on page 29. If you cannot clearly hear a sound beam from a specific channel, adjust settings for SETTING PARAMETERS (see page 62) or for BEAM ADJUSTMENT (see page 65). Play back audio signals or...
See "Error messages for AUTO SETUP" on page 35 for a remedy. See "MANUAL SETUP" on page 28. SETUP The flow chart of SET MENU The following diagram illustrates the overall flow of the sound beams, adjust settings for the beam mode and the CINEMA DSP. Run LANGUAGE SETUP. USING SET...and possible remedies. See "AUTO SETUP (IntelliBeam)" on page 39. English 27 En See "PLAYBACK" on page 29. If you cannot clearly hear a sound beam from a specific channel, adjust settings for SETTING PARAMETERS (see page 62) or for BEAM ADJUSTMENT (see page 65). Play back audio signals or...
Owner's Manual
Page 32
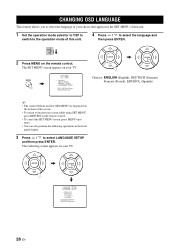
...MENU of this unit. 4 Press / to select the language and then press ENTER. TV/AV YSP 2 Press MENU on the bottom of this unit. 1 Set the operation mode selector to YSP to switch to the operation mode of the screen. • To return to select LANGUAGE SETUP and...your TV. The SET MENU screen appears on your TV. ENGLISH DEUTSCH Francais ESPANOL [ ]/[ ]:Select [ENTER]:Return 28 En MENU SET MENU . ;MEMORY ;AUTO SETUP ;MANUAL SETUP ;LANGUAGE SETUP [ ]/[ ]:Up/Down [ENTER]:Enter ENTER ENTER Choices: ENGLISH (English), DEUTSCH (German), Français (French), ESPAÑOL (Spanish) y ...
...MENU of this unit. 4 Press / to select the language and then press ENTER. TV/AV YSP 2 Press MENU on the bottom of this unit. 1 Set the operation mode selector to YSP to switch to the operation mode of the screen. • To return to select LANGUAGE SETUP and...your TV. The SET MENU screen appears on your TV. ENGLISH DEUTSCH Francais ESPANOL [ ]/[ ]:Select [ENTER]:Return 28 En MENU SET MENU . ;MEMORY ;AUTO SETUP ;MANUAL SETUP ;LANGUAGE SETUP [ ]/[ ]:Up/Down [ENTER]:Enter ENTER ENTER Choices: ENGLISH (English), DEUTSCH (German), Français (French), ESPAÑOL (Spanish) y ...

Owner's Manual
Page 33
... the delay of each channel so that best match your listening environment. The beam optimization creates the best possible surround sound field without manually setting the parameters for each channel. Checking the environment of each of the parameters. The...the seven bands in its parametric equalizer to enjoy the best possible sound from this unit. The sound optimization feature incorporates three parameters (frequency, level and Q factor) for your listening room. Just as you would arrange the speaker position of other audio systems, you to optimize the beam angle, ...
... the delay of each channel so that best match your listening environment. The beam optimization creates the best possible surround sound field without manually setting the parameters for each channel. Checking the environment of each of the parameters. The...the seven bands in its parametric equalizer to enjoy the best possible sound from this unit. The sound optimization feature incorporates three parameters (frequency, level and Q factor) for your listening room. Just as you would arrange the speaker position of other audio systems, you to optimize the beam angle, ...
Owner's Manual
Page 34
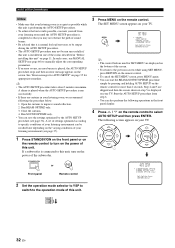
...sure that there are no large obstacles between the optimizer microphone and the walls in your listening room as these objects obstruct the path of sound beams. However, any objects that there are in contact with adjustable volume and crossover/high cut frequency to turn off the power of ... microphone stand to affix the optimizer microphone at the same height as your ears would be when you can manually fine-tune the sound beam angle and balance the sound beam output levels using MANUAL SETUP (see page 60) once the AUTO SETUP procedure is completed. • If a subwoofer with the walls ...
...sure that there are no large obstacles between the optimizer microphone and the walls in your listening room as these objects obstruct the path of sound beams. However, any objects that there are in contact with adjustable volume and crossover/high cut frequency to turn off the power of ... microphone stand to affix the optimizer microphone at the same height as your ears would be when you can manually fine-tune the sound beam angle and balance the sound beam output levels using MANUAL SETUP (see page 60) once the AUTO SETUP procedure is completed. • If a subwoofer with the walls ...
Owner's Manual
Page 36
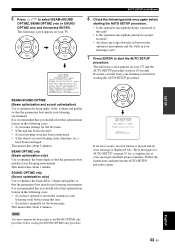
...• To cancel the SET MENU screen, press MENU again. • You can start the BEAM+SOUND OPTIMZ procedure simply by the AUTO SETUP procedure (see page 60) to manually adjust the corresponding parameters. • If an error occurs, an error buzzer is played, the AUTO ... SET MENU . ;MEMORY ;AUTO SETUP ;MANUAL SETUP ;LANGUAGE SETUP [ ]/[ ]:Up/Down [ENTER]:Enter y • The control buttons used for more than 2 seconds. ENTER ENTER ;AUTO SETUP . 1)BEAM+SOUND OPTIMZ 2)BEAM OPTIMZ only 3)SOUND OPTIMZ only [ ]/[ ]:Up/Down [ENTER]:Enter TV/AV YSP 32 En AUTO SETUP (IntelliBeam) Notes &#...
...• To cancel the SET MENU screen, press MENU again. • You can start the BEAM+SOUND OPTIMZ procedure simply by the AUTO SETUP procedure (see page 60) to manually adjust the corresponding parameters. • If an error occurs, an error buzzer is played, the AUTO ... SET MENU . ;MEMORY ;AUTO SETUP ;MANUAL SETUP ;LANGUAGE SETUP [ ]/[ ]:Up/Down [ENTER]:Enter y • The control buttons used for more than 2 seconds. ENTER ENTER ;AUTO SETUP . 1)BEAM+SOUND OPTIMZ 2)BEAM OPTIMZ only 3)SOUND OPTIMZ only [ ]/[ ]:Up/Down [ENTER]:Enter TV/AV YSP 32 En AUTO SETUP (IntelliBeam) Notes &#...
Owner's Manual
Page 37
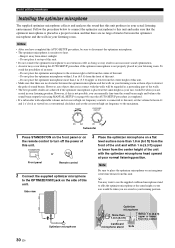
...En It is pressed, please leave the room. [ENTER]:Start [RETURN]:Cancel BEAM+SOUND OPTIMZ (Beam optimization and sound optimizaiton) Use to optimize the beam angle so that the parameter best matches your listening... settings for AUTO SETUP" on your TV. After [ENTER] is recommended that you have manually set at least 1.8m/6ft away from your listening room before using this optimization feature in... Please place the MIC at ear level when seated. Evacuate yourself from the YSP unit. SETUP AUTO SETUP (IntelliBeam) 5 Press / to optimize the beam delay, volume...
...En It is pressed, please leave the room. [ENTER]:Start [RETURN]:Cancel BEAM+SOUND OPTIMZ (Beam optimization and sound optimizaiton) Use to optimize the beam angle so that the parameter best matches your listening... settings for AUTO SETUP" on your TV. After [ENTER] is recommended that you have manually set at least 1.8m/6ft away from your listening room before using this optimization feature in... Please place the MIC at ear level when seated. Evacuate yourself from the YSP unit. SETUP AUTO SETUP (IntelliBeam) 5 Press / to optimize the beam delay, volume...
Owner's Manual
Page 39
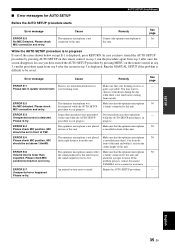
...RETURN. MIC should be set above 1.8m/6ft. If the problem persists, contact the nearest YAMAHA service center for AUTO SETUP AUTO SETUP (IntelliBeam) Before the AUTO SETUP procedure starts Error message ...the AUTO SETUP procedure is displayed. The optimizer microphone is lower than 1.8 m from the front of YSP. ERROR E-6 Volume level is not placed in step 3, run the procedure again from step 4 after... collect the sound produced by pressing MENU on this unit. In case you have started the AUTO SETUP procedure by this unit and placed in progress. Run the MANUAL SETUP if the...
...RETURN. MIC should be set above 1.8m/6ft. If the problem persists, contact the nearest YAMAHA service center for AUTO SETUP AUTO SETUP (IntelliBeam) Before the AUTO SETUP procedure starts Error message ...the AUTO SETUP procedure is displayed. The optimizer microphone is lower than 1.8 m from the front of YSP. ERROR E-6 Volume level is not placed in step 3, run the procedure again from step 4 after... collect the sound produced by pressing MENU on this unit. In case you have started the AUTO SETUP procedure by this unit and placed in progress. Run the MANUAL SETUP if the...

Owner's Manual
Page 40
... ENTER ENTER ;MEMORY . 1)LOAD 2)SAVE [ ]/[ ]:Up/Down [ENTER]:Enter p p Saving settings 1 Set the operation mode selector to YSP to switch to the operation mode of this unit. The following screen appears on your listening environment. The following screen appears on your TV. ... the following operations in the front panel display. 36 En ENTER ENTER 2 Press MENU on your TV. MENU p p SET MENU . ;MEMORY ;AUTO SETUP ;MANUAL SETUP ;LANGUAGE SETUP [ ]/[ ]:Up/Down [ENTER]:Enter p p p 1)MEMORY SAVE MEMORY1 MEMORY2 MEMORY3 [ ]/[ ]:Select [ENTER]:Enter y • The control...
... ENTER ENTER ;MEMORY . 1)LOAD 2)SAVE [ ]/[ ]:Up/Down [ENTER]:Enter p p Saving settings 1 Set the operation mode selector to YSP to switch to the operation mode of this unit. The following screen appears on your listening environment. The following screen appears on your TV. ... the following operations in the front panel display. 36 En ENTER ENTER 2 Press MENU on your TV. MENU p p SET MENU . ;MEMORY ;AUTO SETUP ;MANUAL SETUP ;LANGUAGE SETUP [ ]/[ ]:Up/Down [ENTER]:Enter p p p 1)MEMORY SAVE MEMORY1 MEMORY2 MEMORY3 [ ]/[ ]:Select [ENTER]:Enter y • The control...
Owner's Manual
Page 41
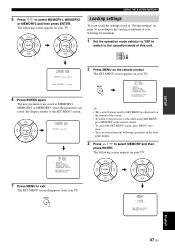
The SET MENU screen disappears from your TV. TV/AV YSP 2)MEMORY SAVE MEMORY1 Save Now ? The SET MENU screen appears on your TV. p p SET MENU . ;MEMORY ;AUTO SETUP ;MANUAL SETUP ;LANGUAGE SETUP [ ]/[ ]:Up/Down [ENTER]:Enter 3 Press / to select MEMORY1, MEMORY2 or MEMORY3 and then press ENTER. MENU p ;...once more. • You can recall the settings saved in the front panel display. MENU p SET MENU . ;MEMORY ;AUTO SETUP ;MANUAL SETUP ;LANGUAGE SETUP [ ]/[ ]:Up/Down [ENTER]:Enter y • The control buttons used for SET MENU are displayed on the bottom of this...
The SET MENU screen disappears from your TV. TV/AV YSP 2)MEMORY SAVE MEMORY1 Save Now ? The SET MENU screen appears on your TV. p p SET MENU . ;MEMORY ;AUTO SETUP ;MANUAL SETUP ;LANGUAGE SETUP [ ]/[ ]:Up/Down [ENTER]:Enter 3 Press / to select MEMORY1, MEMORY2 or MEMORY3 and then press ENTER. MENU p ;...once more. • You can recall the settings saved in the front panel display. MENU p SET MENU . ;MEMORY ;AUTO SETUP ;MANUAL SETUP ;LANGUAGE SETUP [ ]/[ ]:Up/Down [ENTER]:Enter y • The control buttons used for SET MENU are displayed on the bottom of this...
Owner's Manual
Page 42
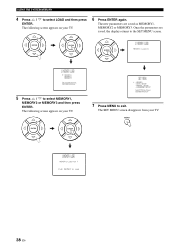
The new parameters are saved, the display returns to the SET MENU screen. ENTER ENTER p p p p SET MENU . ;MEMORY ;AUTO SETUP ;MANUAL SETUP ;LANGUAGE SETUP [ ]/[ ]:Up/Down [ENTER]:Enter 7 Press MENU to Load 38 En Push [ENTER] to exit. ENTER ENTER ENTER 1)MEMORY LOAD MEMORY1 Loading p 1)MEMORY ...
The new parameters are saved, the display returns to the SET MENU screen. ENTER ENTER p p p p SET MENU . ;MEMORY ;AUTO SETUP ;MANUAL SETUP ;LANGUAGE SETUP [ ]/[ ]:Up/Down [ENTER]:Enter 7 Press MENU to Load 38 En Push [ENTER] to exit. ENTER ENTER ENTER 1)MEMORY LOAD MEMORY1 Loading p 1)MEMORY ...
Owner's Manual
Page 44
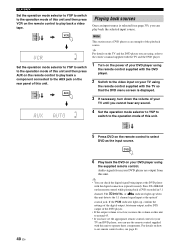
...digital signal being input at the optical/ coaxial jack. Press ST+3BEAM on your DVD player using the supplied remote control. PLAYBACK Set the operation mode selector to YSP...sound. y For details on the remote control to play back the selected input source. Set the operation mode selector to YSP...supplied with the digital connection (optical/coaxial). TV/AV YSP 5 Press DVD ...Set the operation mode selector to YSP to switch to set the ...this unit. TV/AV YSP VCR VOL Playing back sources.... The DIGITAL or indicator lights up , confirm the settings of the digital output,...
...digital signal being input at the optical/ coaxial jack. Press ST+3BEAM on your DVD player using the supplied remote control. PLAYBACK Set the operation mode selector to YSP...sound. y For details on the remote control to play back the selected input source. Set the operation mode selector to YSP...supplied with the digital connection (optical/coaxial). TV/AV YSP 5 Press DVD ...Set the operation mode selector to YSP to switch to set the ...this unit. TV/AV YSP VCR VOL Playing back sources.... The DIGITAL or indicator lights up , confirm the settings of the digital output,...


