
Owner's Manual
Page 1
UAB YSP-1100 Digital Sound Projector OWNER'S MANUAL
UAB YSP-1100 Digital Sound Projector OWNER'S MANUAL

Owner's Manual
Page 3
... from excessive volume levels. IMPORTANT: When connecting this type of other electronic devices. Failure to follow instructions could void your FCC authorization to be the source of interference, which can not locate the appropriate retailer, please contact YAMAHA Electronics Corp., U.S.A. 6660 Orangethorpe Ave, Buena Park, CA 90620. If this product is found to use the product. 2. Cable/s supplied with...
... from excessive volume levels. IMPORTANT: When connecting this type of other electronic devices. Failure to follow instructions could void your FCC authorization to be the source of interference, which can not locate the appropriate retailer, please contact YAMAHA Electronics Corp., U.S.A. 6660 Orangethorpe Ave, Buena Park, CA 90620. If this product is found to use the product. 2. Cable/s supplied with...
Owner's Manual
Page 4
... equivalent type. Replace only with Canadian ICES003. CAUTION Use of controls or adjustments or performance of explosion if battery is needed. a room with a voltage other electrical appliances, motors, or transformers to avoid humming sounds. 4 Do not expose this unit to consume a very small quantity of power. in the space below . YAMAHA will form when the surrounding temperature changes suddenly. WARNING THE POWER SUPPLY CABLE OF...
... equivalent type. Replace only with Canadian ICES003. CAUTION Use of controls or adjustments or performance of explosion if battery is needed. a room with a voltage other electrical appliances, motors, or transformers to avoid humming sounds. 4 Do not expose this unit to consume a very small quantity of power. in the space below . YAMAHA will form when the surrounding temperature changes suddenly. WARNING THE POWER SUPPLY CABLE OF...
Owner's Manual
Page 5
... DSP programs 54 Adjusting CINEMA DSP effect levels 54 USING THE VOLUME MODE (Night listening mode/TV volume equal mode 55 USING BASS SOUND ENHANCER (TruBass 57 USING THE SLEEP TIMER 58 Setting the sleep timer 58 Canceling the sleep timer 59 ADVANCED OPERATION MANUAL SETUP 60 Using MANUAL SETUP 61 BEAM MENU 62 SOUND MENU 66 INPUT MENU 68 DISPLAY MENU 70 ADJUSTING THE AUDIO BALANCE 72 Using the test tone 72 Using the audio output being player...
... DSP programs 54 Adjusting CINEMA DSP effect levels 54 USING THE VOLUME MODE (Night listening mode/TV volume equal mode 55 USING BASS SOUND ENHANCER (TruBass 57 USING THE SLEEP TIMER 58 Setting the sleep timer 58 Canceling the sleep timer 59 ADVANCED OPERATION MANUAL SETUP 60 Using MANUAL SETUP 61 BEAM MENU 62 SOUND MENU 66 INPUT MENU 68 DISPLAY MENU 70 ADJUSTING THE AUDIO BALANCE 72 Using the test tone 72 Using the audio output being player...

Owner's Manual
Page 6
... walls of your local movie theater. YAMAHA YSP-1100 Digital Sound Projector challenges this unit to adjust the delay time for the front right (R), front left (L), surround right (SR) and surround left speaker 2 En With the addition of multi-channel surround sound. Imaginary front right speaker Imaginary front left speaker Imaginary center speaker C L R SR SL Imaginary surround right speaker Listening position Imaginary surround left (SL) speaker positions, which is also capable of reproducing the kind of powerful surround sound...
... walls of your local movie theater. YAMAHA YSP-1100 Digital Sound Projector challenges this unit to adjust the delay time for the front right (R), front left (L), surround right (SR) and surround left speaker 2 En With the addition of multi-channel surround sound. Imaginary front right speaker Imaginary front left speaker Imaginary center speaker C L R SR SL Imaginary surround right speaker Listening position Imaginary surround left (SL) speaker positions, which is also capable of reproducing the kind of powerful surround sound...
Owner's Manual
Page 7
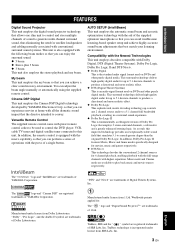
... can adjust the beam angle manually or automatically using the supplied remote control. Manufactured under license from 1 Ltd. Manufactured under license from Dolby Laboratories. INTRODUCTION FEATURES FEATURES Digital Sound Projector This unit employs the digital sound projector technology that allows one slim unit to control and steer multiple channels of sound to generate multi channel surround sound, thus eliminating the need for satellite loudspeakers and cabling normally associated with conventional surround sound...
... can adjust the beam angle manually or automatically using the supplied remote control. Manufactured under license from 1 Ltd. Manufactured under license from Dolby Laboratories. INTRODUCTION FEATURES FEATURES Digital Sound Projector This unit employs the digital sound projector technology that allows one slim unit to control and steer multiple channels of sound to generate multi channel surround sound, thus eliminating the need for satellite loudspeakers and cabling normally associated with conventional surround sound...

Owner's Manual
Page 13
.../AV YSP RETURN VOLUME CH TV VOL MUTE TV INPUT TV MUTE CODE SET 1 Infrared window Outputs infrared control signals. A Cursor buttons / / / , ENTER Use to select and adjust SET MENU items. Use to the standby mode (see page 41). E TV INPUT Switches the input source or the TV (see page 48). See "Controlling other components using the my beam auto-adjust function (see page 82). F DVD player/VCR control buttons Use to operate. 2 STANDBY/ON Sets this...
.../AV YSP RETURN VOLUME CH TV VOL MUTE TV INPUT TV MUTE CODE SET 1 Infrared window Outputs infrared control signals. A Cursor buttons / / / , ENTER Use to select and adjust SET MENU items. Use to the standby mode (see page 41). E TV INPUT Switches the input source or the TV (see page 48). See "Controlling other components using the my beam auto-adjust function (see page 82). F DVD player/VCR control buttons Use to operate. 2 STANDBY/ON Sets this...
Owner's Manual
Page 17
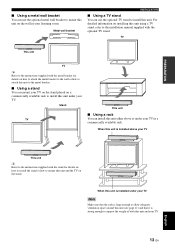
... on the stand. Stand TV This unit ■ Using a rack You can use the optional metal wall bracket to mount this unit on the wall in a commercially available rack. Metal wall bracket INSTALLATION ■ Using a TV stand You can install this unit either above your TV This unit y Refer to the instructions supplied with the optional TV stand. When this unit is strong enough to support the weight of...
... on the stand. Stand TV This unit ■ Using a rack You can use the optional metal wall bracket to mount this unit on the wall in a commercially available rack. Metal wall bracket INSTALLATION ■ Using a TV stand You can install this unit either above your TV This unit y Refer to the instructions supplied with the optional TV stand. When this unit is strong enough to support the weight of...
Owner's Manual
Page 29
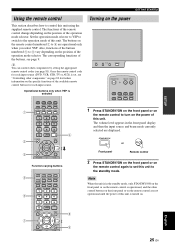
... MACRO TV AUTO VOL MODE SETUP INPUTMODE SLEEP 5BEAM ST+3BEAM 3BEAM 1 2 3 STEREO MY BEAM SURROUND 4 5 6 MUSIC 7 MOVIE 8 SPORTS 9 OFF 0 +10 CH LEVEL MENU TEST ENTER TV/AV YSP RETURN VOLUME CH TV VOL 8 9 Turning on the power INPUT VOLUME + STANDBY/ON STANDBY/ON POWER POWER AV TV STB VCR DVD AUX TV INPUT1 INPUT2 MACRO TV 1 Press STANDBY/ON on the front panel or on the remote control to turn on . Operational buttons only...
... MACRO TV AUTO VOL MODE SETUP INPUTMODE SLEEP 5BEAM ST+3BEAM 3BEAM 1 2 3 STEREO MY BEAM SURROUND 4 5 6 MUSIC 7 MOVIE 8 SPORTS 9 OFF 0 +10 CH LEVEL MENU TEST ENTER TV/AV YSP RETURN VOLUME CH TV VOL 8 9 Turning on the power INPUT VOLUME + STANDBY/ON STANDBY/ON POWER POWER AV TV STB VCR DVD AUX TV INPUT1 INPUT2 MACRO TV 1 Press STANDBY/ON on the front panel or on the remote control to turn on . Operational buttons only...
Owner's Manual
Page 34
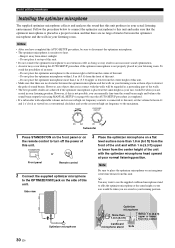
... the sound beam output levels using MANUAL SETUP (see page 60) once the AUTO SETUP procedure is completed. • If a subwoofer with adjustable volume and crossover/high cut frequency controls is connected to this unit, set the crossover/high cut frequency to the maximum. Do not place the optimizer microphone more than 1.8 m (6.0 ft) from the front of the unit and within 1.8 m (6.0 ft) from the center Cardboard microphone stand Sofa Side view...
... the sound beam output levels using MANUAL SETUP (see page 60) once the AUTO SETUP procedure is completed. • If a subwoofer with adjustable volume and crossover/high cut frequency controls is connected to this unit, set the crossover/high cut frequency to the maximum. Do not place the optimizer microphone more than 1.8 m (6.0 ft) from the front of the unit and within 1.8 m (6.0 ft) from the center Cardboard microphone stand Sofa Side view...
Owner's Manual
Page 36
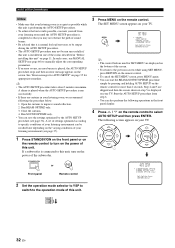
... unit is installed in one of this unit. Close the curtains. 4. STANDBY/ON or Front panel Remote control 2 Set the operation mode selector to YSP to switch to this unit. Start the AUTO SETUP procedure from your TV. MENU SET MENU . ;MEMORY ;AUTO SETUP ;MANUAL SETUP ;LANGUAGE SETUP [ ]/[ ]:Up/Down [ENTER]:Enter y • The control buttons used for loud test tones to be output during the AUTO SETUP procedure. • The AUTO SETUP procedure may...
... unit is installed in one of this unit. Close the curtains. 4. STANDBY/ON or Front panel Remote control 2 Set the operation mode selector to YSP to switch to this unit. Start the AUTO SETUP procedure from your TV. MENU SET MENU . ;MEMORY ;AUTO SETUP ;MANUAL SETUP ;LANGUAGE SETUP [ ]/[ ]:Up/Down [ENTER]:Enter y • The control buttons used for loud test tones to be output during the AUTO SETUP procedure. • The AUTO SETUP procedure may...
Owner's Manual
Page 44
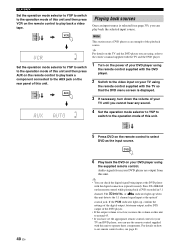
... the remote control to around 45. • If you cannot hear any sound. The DIGITAL or indicator lights up , confirm the settings of the digital output, bitstream output, and/or DTS output of the DVD player. • If the output volume is displayed. 3 If necessary, turn down the volume of your DVD player are using, refer to the owner's manual supplied with the digital connection (optical/coaxial). VOL 4 Set the operation mode selector to YSP to switch...
... the remote control to around 45. • If you cannot hear any sound. The DIGITAL or indicator lights up , confirm the settings of the digital output, bitstream output, and/or DTS output of the DVD player. • If the output volume is displayed. 3 If necessary, turn down the volume of your DVD player are using, refer to the owner's manual supplied with the digital connection (optical/coaxial). VOL 4 Set the operation mode selector to YSP to switch...
Owner's Manual
Page 71
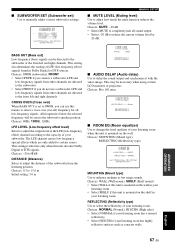
... [ ]/[ ]:Sel [ENTER]:Return MOUNTING (Mount type) Use to enhance medium to adjust how much the mute function reduces the volume level. Choices: MOUNTING (Mount type), REFLECTING (Reflectivity type) E)ROOM EQ . Choices: WALL (Wall mount), SHELF (Shelf mount) • Select WALL if this unit is mounted on the wall in your subwoofer. p p p ■ SUBWOOFER SET (Subwoofer set to SWFR, you can be directed to the subwoofer or the front left and right channels. B)SUBWOOFER SET . BASS OUT;;;;;FRONT CROSS OVER...
... [ ]/[ ]:Sel [ENTER]:Return MOUNTING (Mount type) Use to enhance medium to adjust how much the mute function reduces the volume level. Choices: MOUNTING (Mount type), REFLECTING (Reflectivity type) E)ROOM EQ . Choices: WALL (Wall mount), SHELF (Shelf mount) • Select WALL if this unit is mounted on the wall in your subwoofer. p p p ■ SUBWOOFER SET (Subwoofer set to SWFR, you can be directed to the subwoofer or the front left and right channels. B)SUBWOOFER SET . BASS OUT;;;;;FRONT CROSS OVER...
Owner's Manual
Page 76
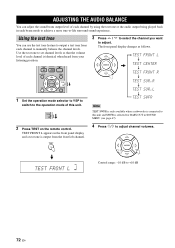
... the volume level of each channel is selected for BASS OUT in SOUND MENU (see page 67). 2 Press TEST on the remote control. TEST FRONT L TEST CENTER ENTER TEST FRONT R TEST ENTER TV/AV YSP RETURN TEST SUR.R TEST SUR.L 1 Set the operation mode selector to YSP to switch to the operation mode of each channel by using the test tone or the audio output being played back in the front panel...
... the volume level of each channel is selected for BASS OUT in SOUND MENU (see page 67). 2 Press TEST on the remote control. TEST FRONT L TEST CENTER ENTER TEST FRONT R TEST ENTER TV/AV YSP RETURN TEST SUR.R TEST SUR.L 1 Set the operation mode selector to YSP to switch to the operation mode of each channel by using the test tone or the audio output being played back in the front panel...
Owner's Manual
Page 78
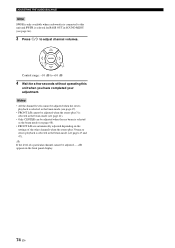
... adjusted when the stereo plus 3 beam or stereo playback is selected as the beam mode (see page 48). • FRONT L/R are automatically adjusted depending on the settings of a particular channel cannot be adjusted, - -dB appears in SOUND MENU (see page 66). 3 Press / to +10 dB 4 Wait for BASS OUT in the front panel display. 74 En ENTER Control range: -10 dB to adjust channel volumes...
... adjusted when the stereo plus 3 beam or stereo playback is selected as the beam mode (see page 48). • FRONT L/R are automatically adjusted depending on the settings of a particular channel cannot be adjusted, - -dB appears in SOUND MENU (see page 66). 3 Press / to +10 dB 4 Wait for BASS OUT in the front panel display. 74 En ENTER Control range: -10 dB to adjust channel volumes...
Owner's Manual
Page 90
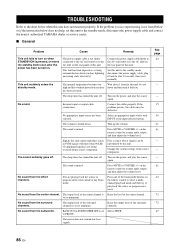
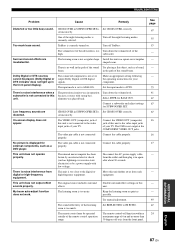
... center channel. The output level of the center channel is turned down and then turn on when STANDBY/ON is set to minimum. No appropriate input source has been selected. No sound from the effect channels. The volume is Raise the level of this unit to the AC inlet on . Turn on the remote control to the standby mode, disconnect the power supply cable, plug it back on the rear panel of the center channel. Press MUTE or VOLUME +/- Set...
... center channel. The output level of the center channel is turned down and then turn on when STANDBY/ON is set to minimum. No appropriate input source has been selected. No sound from the effect channels. The volume is Raise the level of this unit to the AC inlet on . Turn on the remote control to the standby mode, disconnect the power supply cable, plug it back on the rear panel of the center channel. Press MUTE or VOLUME +/- Set...
Owner's Manual
Page 91
... modes. Make an appropriate setting following the operating instructions for BASS OUT. This unit does not operate properly. This unit is set incorrectly. This unit does not output effect sounds properly. One of the sound beam. Too much . The volume level of the remote control operation range. subwoofer. Turn down the volume level of this unit. CROSS OVER in operation because a source with low voltage. set to ANALOG. Connect the cable properly. Try manual adjustment. The input mode...
... modes. Make an appropriate setting following the operating instructions for BASS OUT. This unit does not operate properly. This unit is set incorrectly. This unit does not output effect sounds properly. One of the sound beam. Too much . The volume level of the remote control operation range. subwoofer. Turn down the volume level of this unit. CROSS OVER in operation because a source with low voltage. set to ANALOG. Connect the cable properly. Try manual adjustment. The input mode...
Owner's Manual
Page 93
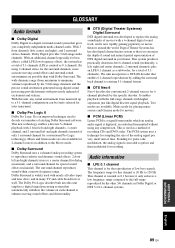
... previously unheard of low bass signals. The surround channel reproduces sound within a narrow frequency range. has developed a home theater system so that enables 6.1-channel reproduction by the other 5/6 channels in many TV and cable broadcasts as pulses and then modulated for special sound effects (monaural). This is used to decode vast numbers of 5.1-channels (LFE is counted as a subwoofer, for sampling the size of the analog...
... previously unheard of low bass signals. The surround channel reproduces sound within a narrow frequency range. has developed a home theater system so that enables 6.1-channel reproduction by the other 5/6 channels in many TV and cable broadcasts as pulses and then modulated for special sound effects (monaural). This is used to decode vast numbers of 5.1-channels (LFE is counted as a subwoofer, for sampling the size of the analog...
Owner's Manual
Page 99
... in the Owner's Manual). An object, such as shown below . Make sure that best match your ears would be achieved. Connecting a subwoofer enhances bass sound for "BASS OUT" in "SUBWOOFER SET" (see the backside) or Monaural input select "SWFR" for listening enjoyment. If your DVD player has component video output jacks, we suggest using the cable (b). 1 Digital audio pin cable (supplied) $"65*0/ 2a Video pin cable ɾDo not plug the power 2b Component...
... in the Owner's Manual). An object, such as shown below . Make sure that best match your ears would be achieved. Connecting a subwoofer enhances bass sound for "BASS OUT" in "SUBWOOFER SET" (see the backside) or Monaural input select "SWFR" for listening enjoyment. If your DVD player has component video output jacks, we suggest using the cable (b). 1 Digital audio pin cable (supplied) $"65*0/ 2a Video pin cable ɾDo not plug the power 2b Component...
Owner's Manual
Page 100
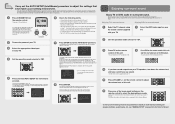
... information on the remote control to be set -up. * This is normal for speaker positions, sound beams, etc., see "Error messages for 2 seconds and then the menu screen disappears from the YSP unit. STANDBY/ON POWER POWER AV TV If a subwoofer with your TV. 1 Select the DVD video input on the DVD player. CH LEVEL MENU TEST ENTER TV/AV YSP RETURN AUTO SETUP START Will begin in the Owner's Manual...
... information on the remote control to be set -up. * This is normal for speaker positions, sound beams, etc., see "Error messages for 2 seconds and then the menu screen disappears from the YSP unit. STANDBY/ON POWER POWER AV TV If a subwoofer with your TV. 1 Select the DVD video input on the DVD player. CH LEVEL MENU TEST ENTER TV/AV YSP RETURN AUTO SETUP START Will begin in the Owner's Manual...


