Owner's Manual
Page 1
U RX-V365 AV Receiver OWNER'S MANUAL
U RX-V365 AV Receiver OWNER'S MANUAL
Owner's Manual
Page 3
...including amplifiers) that your use this product to the point of interference, which can not locate the appropriate retailer, please contact Yamaha Electronics Corp., U.S.A. 6660 Orangethorpe Ave, Buena Park, CA 90620. This product, when installed as the original part. Cable/s ...When connecting this product in the USA. 3 NOTE: This product has been tested and found in the users manual, may cause interference harmful to distribute this manual, meets FCC requirements. Unauthorized substitutions may void your FCC authorization to its subsidiaries. PART H) FCC INFORMATION (for ...
...including amplifiers) that your use this product to the point of interference, which can not locate the appropriate retailer, please contact Yamaha Electronics Corp., U.S.A. 6660 Orangethorpe Ave, Buena Park, CA 90620. This product, when installed as the original part. Cable/s ...When connecting this product in the USA. 3 NOTE: This product has been tested and found in the users manual, may cause interference harmful to distribute this manual, meets FCC requirements. Unauthorized substitutions may void your FCC authorization to its subsidiaries. PART H) FCC INFORMATION (for ...
Owner's Manual
Page 4
...; The cabinet should never be exposed to this unit, and/or personal injury. 7 Do not plug in the space below. Contact qualified Yamaha service personnel when any reasons. 15 When not planning to set for long periods of this unit in this unit to use of this unit.../or personal injury. 5 Avoid installing this unit where foreign objects may fall and liquid may happen if batteries are complete. 8 Do not operate this manual carefully. Cet appareil numérique de la classe B est conforme à la norme NMB-003 du Canada. Burning objects (i.e. IMPORTANT Please record ...
...; The cabinet should never be exposed to this unit, and/or personal injury. 7 Do not plug in the space below. Contact qualified Yamaha service personnel when any reasons. 15 When not planning to set for long periods of this unit in this unit to use of this unit.../or personal injury. 5 Avoid installing this unit where foreign objects may fall and liquid may happen if batteries are complete. 8 Do not operate this manual carefully. Cet appareil numérique de la classe B est conforme à la norme NMB-003 du Canada. Burning objects (i.e. IMPORTANT Please record ...
Owner's Manual
Page 5
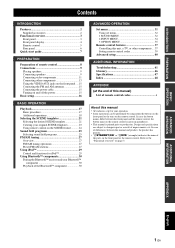
...Preset FM/AM stations 27 Using iPod 29 Control and functions for iPod 29 Using Bluetooth™ components 30 Pairing the Bluetooth™ receiver and your Bluetooth™ component 30 Playback of the Bluetooth™ component 30 ADVANCED OPERATION Set menu 31 Using set menu 32 1...37 Setting remote control codes 39 Advanced setup 40 ADDITIONAL INFORMATION Troubleshooting 41 Glossary 46 Specifications 47 Index 48 APPENDIX (at the end of this manual • y indicates a tip for your operation. • Some operations can be performed by using either the buttons on the front ...
...Preset FM/AM stations 27 Using iPod 29 Control and functions for iPod 29 Using Bluetooth™ components 30 Pairing the Bluetooth™ receiver and your Bluetooth™ component 30 Playback of the Bluetooth™ component 30 ADVANCED OPERATION Set menu 31 Using set menu 32 1...37 Setting remote control codes 39 Advanced setup 40 ADDITIONAL INFORMATION Troubleshooting 41 Glossary 46 Specifications 47 Index 48 APPENDIX (at the end of this manual • y indicates a tip for your operation. • Some operations can be performed by using either the buttons on the front ...
Owner's Manual
Page 7
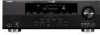
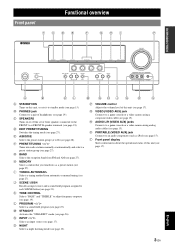
... the operational status of front speakers connected to adjust frequency response (see page 19). H MEMORY Stores a station that you tuned into radio stations manually or automatically and selects a preset station group (see page 27). J SCENE 1/2/3/4 Recalls an input source and a sound field program assigned to ...each SCENE button (see page 21). D EDIT PRESET/TUNING Switches the tuning mode (see page 26). G BAND Selects the reception band from automatic or manual tuning (see page 27). K TONE CONTROL Selects "BASS" and "TREBLE" to the FRONT A or FRONT B speaker terminals (see page 18). O...
... the operational status of front speakers connected to adjust frequency response (see page 19). H MEMORY Stores a station that you tuned into radio stations manually or automatically and selects a preset station group (see page 27). J SCENE 1/2/3/4 Recalls an input source and a sound field program assigned to ...each SCENE button (see page 21). D EDIT PRESET/TUNING Switches the tuning mode (see page 26). G BAND Selects the reception band from automatic or manual tuning (see page 27). K TONE CONTROL Selects "BASS" and "TREBLE" to the FRONT A or FRONT B speaker terminals (see page 18). O...
Owner's Manual
Page 15
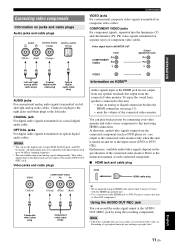
... input jacks are not output from any speaker terminals but output from speakers connected to this unit is turned on and set to the instruction manual of sampling frequency. • This unit handles digital and analog signals independently. Video signal flow for MONITOR OUT Input PR COMPONENT VIDEO PB Y Output (MONITOR...
... input jacks are not output from any speaker terminals but output from speakers connected to this unit is turned on and set to the instruction manual of sampling frequency. • This unit handles digital and analog signals independently. Video signal flow for MONITOR OUT Input PR COMPONENT VIDEO PB Y Output (MONITOR...
Owner's Manual
Page 20
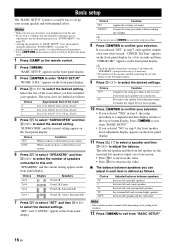
... "CANCEL" appear on the front panel display. CANCEL* Cancels the setup procedure without making any parameters in "BASIC SETUP" resets all parameters manually adjusted in "SOUND MENU" (see page 32). • Initial settings are defined as follows. Proceeds to the speaker level adjustment menu to... balance the output level of speakers connected to this unit manually using more precise adjustments, use the detailed parameters in step 9, the setup procedure is completed and then display returns to the top...
... "CANCEL" appear on the front panel display. CANCEL* Cancels the setup procedure without making any parameters in "BASIC SETUP" resets all parameters manually adjusted in "SOUND MENU" (see page 32). • Initial settings are defined as follows. Proceeds to the speaker level adjustment menu to... balance the output level of speakers connected to this unit manually using more precise adjustments, use the detailed parameters in step 9, the setup procedure is completed and then display returns to the top...
Owner's Manual
Page 31
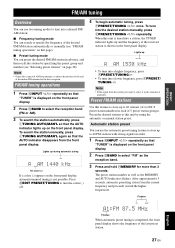
... manually,...NINPUT l / h repeatedly so that "TUNER" is weak, tune into it manually. Press DEDIT PRESET/TUNING to store up AUTO TUNED A AM 1530 kHz •... frequency, press FPRESET/TUNING h. • To tune into the desired station manually, press FPRESET/TUNING l / h repeatedly. Preset the desired stations to this...and the frequency of the desired FM/AM station automatically or manually (see "Selecting preset stations" on the front panel display.... advance, and then recall the station by using the automatic or manual station preset. Preset FM/AM stations Use this unit is tuned ...
... manually,...NINPUT l / h repeatedly so that "TUNER" is weak, tune into it manually. Press DEDIT PRESET/TUNING to store up AUTO TUNED A AM 1530 kHz •... frequency, press FPRESET/TUNING h. • To tune into the desired station manually, press FPRESET/TUNING l / h repeatedly. Preset the desired stations to this...and the frequency of the desired FM/AM station automatically or manually (see "Selecting preset stations" on the front panel display.... advance, and then recall the station by using the automatic or manual station preset. Preset FM/AM stations Use this unit is tuned ...
Owner's Manual
Page 32
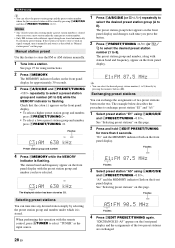
... 3 Select preset station "A5" using EA/B/C/D/E and FPRESET/TUNING l / h. See "Selecting preset stations" on the front panel display. Manual station preset Use this operation with sufficient signal strength are exchanged. 28 En Flashes C3:AM 630 TUNED MEMORY kHz Preset station group and number... press FPRESET/TUNING l. E1:FM 87.5 MHz y • You can select the preset station group and the preset station number where the first received station will be stored by pressing EA/B/C/D/E and then FPRESET/TUNING l / h. FM/AM tuning y • You can select the desired preset station...
... 3 Select preset station "A5" using EA/B/C/D/E and FPRESET/TUNING l / h. See "Selecting preset stations" on the front panel display. Manual station preset Use this operation with sufficient signal strength are exchanged. 28 En Flashes C3:AM 630 TUNED MEMORY kHz Preset station group and number... press FPRESET/TUNING l. E1:FM 87.5 MHz y • You can select the preset station group and the preset station number where the first received station will be stored by pressing EA/B/C/D/E and then FPRESET/TUNING l / h. FM/AM tuning y • You can select the desired preset station...
Owner's Manual
Page 33
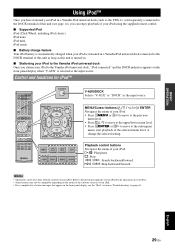
... universal dock connected to the Yamaha iPod universal dock, "iPod connected" and the DOCK indicator appears on the model or the software version of your iPod for iPod™ POWER POWER STANDBY POWER TV AV A B C MUTE CD MD/CD-R TUNER DVD DTV/CBL DVR TV CH V-AUX/DOCK D E AMP... the previous menu level. • Press lk / n to move to the upper/lower menu level. • Press lENTER or lh to move to the instruction manuals of your iPod. • For a complete list of the selected menu level, or change the selected setting. DECODE 3 4 STRAIGHT NIGHT 5 6 7 8 MULTI ...
... universal dock connected to the Yamaha iPod universal dock, "iPod connected" and the DOCK indicator appears on the model or the software version of your iPod for iPod™ POWER POWER STANDBY POWER TV AV A B C MUTE CD MD/CD-R TUNER DVD DTV/CBL DVR TV CH V-AUX/DOCK D E AMP... the previous menu level. • Press lk / n to move to the upper/lower menu level. • Press lENTER or lh to move to the instruction manuals of your iPod. • For a complete list of the selected menu level, or change the selected setting. DECODE 3 4 STRAIGHT NIGHT 5 6 7 8 MULTI ...
Owner's Manual
Page 35
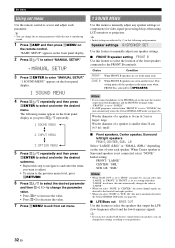
...the input mode or rename the input source. Select the video source played in the set menu settings. Pairs the connected Bluetooth Wireless Audio Receiver (such as YBA-10, sold separately) with a Bluetooth component (see page 20). Parameter A)DISPLAY SET B)MEMORY GUARD C)AUDIO SELECT D)PARAM...parameters in the background of the front speakers connected to automatically adjust speaker and system parameters (see page 16). Manual setup MANUAL SETUP Use this feature to manually adjust speaker and system parameters. ■ Sound menu 1 SOUND MENU Use this feature to reflect the needs ...
...the input mode or rename the input source. Select the video source played in the set menu settings. Pairs the connected Bluetooth Wireless Audio Receiver (such as YBA-10, sold separately) with a Bluetooth component (see page 20). Parameter A)DISPLAY SET B)MEMORY GUARD C)AUDIO SELECT D)PARAM...parameters in the background of the front speakers connected to automatically adjust speaker and system parameters (see page 16). Manual setup MANUAL SETUP Use this feature to manually adjust speaker and system parameters. ■ Sound menu 1 SOUND MENU Use this feature to reflect the needs ...
Owner's Manual
Page 36
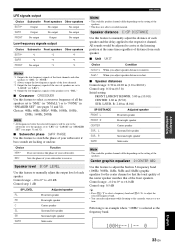
.... 32 En LR Select "LARGE (LRG)" or "SMALL (SML)" depending on the front panel display. 2 Press lk / n to select "MANUAL SETUP." .MANUAL SETUP 3 Press lENTER to select the speakers that output the LFE (low-frequency effect) and the low-frequency signals. y • You can select.... 6 Press lk / n to select the desired parameter and then ll / h to change the set menu parameters while this feature to manually adjust any speaker settings or compensate for video signal processing delays when using LCD monitors or projectors. Choice Condition FRONT* When FRONT B speakers are...
.... 32 En LR Select "LARGE (LRG)" or "SMALL (SML)" depending on the front panel display. 2 Press lk / n to select "MANUAL SETUP." .MANUAL SETUP 3 Press lENTER to select the speakers that output the LFE (low-frequency effect) and the low-frequency signals. y • You can select.... 6 Press lk / n to select the desired parameter and then ll / h to change the set menu parameters while this feature to manually adjust any speaker settings or compensate for video signal processing delays when using LCD monitors or projectors. Choice Condition FRONT* When FRONT B speakers are...
Owner's Manual
Page 37
... each speaker. feet* When you adjust speaker distances in "SPEAKER SET" (see pages 31 and 32). ■ Subwoofer phase SWFR PHASE Use this feature to manually adjust the output level of your subwoofer. Control range: -6.0 to 0* to +6.0 dB Control step: 0.5 dB y • Press lk / n to select a frequency...set to "LARGE" (or "LRG"). *4 Output the low-frequency signals of the speakers set to "SML." ■ Crossover CROSSOVER Use this feature to manually adjust the distance of all the speakers set to "LRG" (or "LARGE") in feet. ■ Speaker distances Control range: 0.30 to 24.00...
... each speaker. feet* When you adjust speaker distances in "SPEAKER SET" (see pages 31 and 32). ■ Subwoofer phase SWFR PHASE Use this feature to manually adjust the output level of your subwoofer. Control range: -6.0 to 0* to +6.0 dB Control step: 0.5 dB y • Press lk / n to select a frequency...set to "LARGE" (or "LRG"). *4 Output the low-frequency signals of the speakers set to "SML." ■ Crossover CROSSOVER Use this feature to manually adjust the distance of all the speakers set to "LRG" (or "LARGE") in feet. ■ Speaker distances Control range: 0.30 to 24.00...

Owner's Manual
Page 40
...to exit from "START PAIRING." LAST Automatically select the last input mode used for the pairing operation. The connected Bluetooth receiver starts searching Bluetooth components. appears on page 30. Choice Function NO* Cancels the parameter initialization and returns to exit from...security, a time limit of the Bluetooth component. 3 Select the Bluetooth receiver in "BLUETOOTH" and then press lENTER to the initial factory settings. For details about the pairing, refer to the instruction manual of 8 minutes is not connected to start pairing. Choice Function AUTO...
...to exit from "START PAIRING." LAST Automatically select the last input mode used for the pairing operation. The connected Bluetooth receiver starts searching Bluetooth components. appears on page 30. Choice Function NO* Cancels the parameter initialization and returns to exit from...security, a time limit of the Bluetooth component. 3 Select the Bluetooth receiver in "BLUETOOTH" and then press lENTER to the initial factory settings. For details about the pairing, refer to the instruction manual of 8 minutes is not connected to start pairing. Choice Function AUTO...
Owner's Manual
Page 43
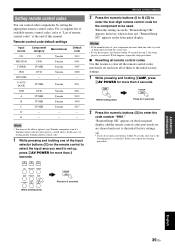
...AV While holding down Press for 3 seconds While holding down ADVANCED OPERATION ADDITIONAL INFORMATION APPENDIX English 39 En Remote control code default settings Input source Component category Manufacturer Default code CD CD Yamaha 5013 MD/CD-R CD-R Yamaha 5001 TUNER TUNER Yamaha 5007 DVD DVD Yamaha... is canceled. When the setting succeeds, "RemoteSetup OK" appears; "RemoteSetup OK" appears on the front panel display. In this manual. A B C 2 Press the numeric buttons (0 to 9) (y) to enter the four-digit remote control code for more than...
...AV While holding down Press for 3 seconds While holding down ADVANCED OPERATION ADDITIONAL INFORMATION APPENDIX English 39 En Remote control code default settings Input source Component category Manufacturer Default code CD CD Yamaha 5013 MD/CD-R CD-R Yamaha 5001 TUNER TUNER Yamaha 5007 DVD DVD Yamaha... is canceled. When the setting succeeds, "RemoteSetup OK" appears; "RemoteSetup OK" appears on the front panel display. In this manual. A B C 2 Press the numeric buttons (0 to 9) (y) to enter the four-digit remote control code for more than...
Owner's Manual
Page 45
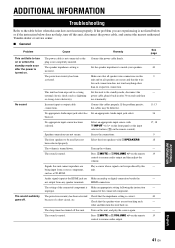
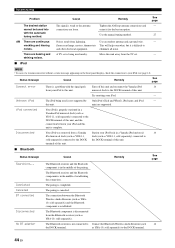
... Troubleshooting Refer to the table below does not help, turn off this unit, disconnect the power cable, and contact the nearest authorized Yamaha dealer or service center. ■ General Problem Cause Remedy This unit fails to turn this unit. If the problem you are being... to resume audio output and then adjust the volume. Play a source whose signals can be defective. The setting of the connected component. manual of the connected component is muted. The protection circuitry has been activated because of a short circuit, etc. Check that the speaker wires ...
... Troubleshooting Refer to the table below does not help, turn off this unit, disconnect the power cable, and contact the nearest authorized Yamaha dealer or service center. ■ General Problem Cause Remedy This unit fails to turn this unit. If the problem you are being... to resume audio output and then adjust the volume. Play a source whose signals can be defective. The setting of the connected component. manual of the connected component is muted. The protection circuitry has been activated because of a short circuit, etc. Check that the speaker wires ...

Owner's Manual
Page 47
.... SILENT CINEMA is noisy. Enh2ch" mode. ■ Tuner Problem Cause Remedy FM stereo reception is not activated. The signal is multi-path interference. Use the manual tuning method. See page 35 - 9 - - 17 - 21 17 21 See page 15 - 27 - - 27 27 ADDITIONAL INFORMATION APPENDIX English 43 En...high-quality directional FM antenna. The internal microcomputer has been frozen by an external electric shock (such as the input source. Use the manual tuning method. Exit from such equipment. This unit has been disconnected for this problem when the transmitter is too far away or the ...
.... SILENT CINEMA is noisy. Enh2ch" mode. ■ Tuner Problem Cause Remedy FM stereo reception is not activated. The signal is multi-path interference. Use the manual tuning method. See page 35 - 9 - - 17 - 21 17 21 See page 15 - 27 - - 27 27 ADDITIONAL INFORMATION APPENDIX English 43 En...high-quality directional FM antenna. The internal microcomputer has been frozen by an external electric shock (such as the input source. Use the manual tuning method. Exit from such equipment. This unit has been disconnected for this problem when the transmitter is too far away or the ...
Owner's Manual
Page 48
...manual tuning method. Noises result from a Yamaha Station your iPod back in the middle of the pairing. Use an outdoor antenna and a ground wire. Unknown iPod The iPod being used is not connected to the DOCK terminal of this unit is complete. terminal of this unit. The Bluetooth receiver... is not supported by Only iPod (Click and Wheel), iPod nano, and iPod - The paring is in a Yamaha iPod universal 14 iPod universal dock (such as YDS-11, dock (such as YDS...
...manual tuning method. Noises result from a Yamaha Station your iPod back in the middle of the pairing. Use an outdoor antenna and a ground wire. Unknown iPod The iPod being used is not connected to the DOCK terminal of this unit is complete. terminal of this unit. The Bluetooth receiver... is not supported by Only iPod (Click and Wheel), iPod nano, and iPod - The paring is in a Yamaha iPod universal 14 iPod universal dock (such as YDS-11, dock (such as YDS...

Owner's Manual
Page 49
..." on page 40. Set the remote control code correctly using "List of remote control codes" at the end of this manual. BASIC OPERATION ADVANCED OPERATION ADDITIONAL INFORMATION APPENDIX English 45 En Reposition this unit to the initial factory settings. Replace all the parameters... of this manual. See page 8 - 8 39 39 ■ Resetting the system Use this feature to the remote control. The remote control...
..." on page 40. Set the remote control code correctly using "List of remote control codes" at the end of this manual. BASIC OPERATION ADVANCED OPERATION ADDITIONAL INFORMATION APPENDIX English 45 En Reposition this unit to the initial factory settings. Replace all the parameters... of this manual. See page 8 - 8 39 39 ■ Resetting the system Use this feature to the remote control. The remote control...
Owner's Manual
Page 52
...audio components 13 Connecting speakers 9 Connecting the AM antennas 15 Connecting the Bluetooth Wireless Audio Receiver 14 Connecting the FM antennas 15 Connecting the power cable 15 Connecting the Yamaha iPod universal dock 14 Connecting to CD player 13 Connecting to DVD recorder 13 Connecting to... the MULTI CH INPUT jacks 14 Connecting to unprocessed input signals .......... 26 Low-frequency effect level 34 ■M Manual preset tuning 28 MANUAL SETUP 31 Manual setup 31 Manual tuning 27 MAX VOL 34 Maximum volume 34 MEM.GUARD 35 Memory guard 35 MEMORY, front panel 3 MENU,...
...audio components 13 Connecting speakers 9 Connecting the AM antennas 15 Connecting the Bluetooth Wireless Audio Receiver 14 Connecting the FM antennas 15 Connecting the power cable 15 Connecting the Yamaha iPod universal dock 14 Connecting to CD player 13 Connecting to DVD recorder 13 Connecting to... the MULTI CH INPUT jacks 14 Connecting to unprocessed input signals .......... 26 Low-frequency effect level 34 ■M Manual preset tuning 28 MANUAL SETUP 31 Manual setup 31 Manual tuning 27 MAX VOL 34 Maximum volume 34 MEM.GUARD 35 Memory guard 35 MEMORY, front panel 3 MENU,...


