Owner's Manual
Page 3
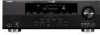
... in this indicates a need for service. 20 Replacement Parts - IMPORTANT SAFETY INSTRUCTIONS 24 Outdoor Antenna Grounding - This product, when installed as indicated in the instructions contained in any service or repairs to this product, ask the service technician to perform safety checks to eliminate the problem by using one of cable entry as the original part. Modifications not expressly approved by Yamaha may result in the...
... in this indicates a need for service. 20 Replacement Parts - IMPORTANT SAFETY INSTRUCTIONS 24 Outdoor Antenna Grounding - This product, when installed as indicated in the instructions contained in any service or repairs to this product, ask the service technician to perform safety checks to eliminate the problem by using one of cable entry as the original part. Modifications not expressly approved by Yamaha may result in the...
Owner's Manual
Page 5
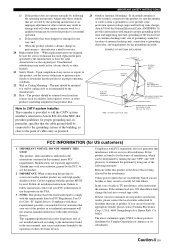
... accessories 2 Functional overview 3 Front panel 3 Front panel display 4 Remote control 5 Rear panel 6 Quick start guide 7 L PREPARATION Preparation of remote control 8 Connections 9 Placing speakers 9 Connecting speakers 9 Connecting video components 11 Connecting other components 13 Using the VIDEO AUX jacks on the front panel .... 15 Connecting the FM and AM antennas 15 Connecting the power cable 15 Turning on and off the power 15 Basic setup 16 BASIC OPERATION Playback 17 Basic procedure 17 Additional operations 18 Selecting the SCENE templates 21 Selecting the desired...
... accessories 2 Functional overview 3 Front panel 3 Front panel display 4 Remote control 5 Rear panel 6 Quick start guide 7 L PREPARATION Preparation of remote control 8 Connections 9 Placing speakers 9 Connecting speakers 9 Connecting video components 11 Connecting other components 13 Using the VIDEO AUX jacks on the front panel .... 15 Connecting the FM and AM antennas 15 Connecting the power cable 15 Turning on and off the power 15 Basic setup 16 BASIC OPERATION Playback 17 Basic procedure 17 Additional operations 18 Selecting the SCENE templates 21 Selecting the desired...
Owner's Manual
Page 7
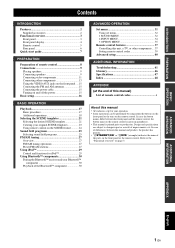
... STANDBY /ON PHONES SILENT CINEMA VOLUME SPEAKERS EDIT PRESET/TUNING A/B/C/D/E 1 l PRESET/TUNING h SCENE 2 3 BAND 4 MEMORY TUNING AUTO/MAN'L TONE CONTROL PROGRAM l h STRAIGHT EFFECT INPUT l h NIGHT VIDEO AUX VIDEO AUDIO PORTABLE BASIC OPERATION ADVANCED OPERATION ADDITIONAL INFORMATION A B KL M NOJ Q R S A STANDBY/ON Turns on or off the set of headphones (see page 15). B PHONES jack Connect to a pair of front speakers connected to the FRONT A or FRONT B speaker terminals (see page 15). G BAND Selects the reception band from automatic or manual tuning...
... STANDBY /ON PHONES SILENT CINEMA VOLUME SPEAKERS EDIT PRESET/TUNING A/B/C/D/E 1 l PRESET/TUNING h SCENE 2 3 BAND 4 MEMORY TUNING AUTO/MAN'L TONE CONTROL PROGRAM l h STRAIGHT EFFECT INPUT l h NIGHT VIDEO AUX VIDEO AUDIO PORTABLE BASIC OPERATION ADVANCED OPERATION ADDITIONAL INFORMATION A B KL M NOJ Q R S A STANDBY/ON Turns on or off the set of headphones (see page 15). B PHONES jack Connect to a pair of front speakers connected to the FRONT A or FRONT B speaker terminals (see page 15). G BAND Selects the reception band from automatic or manual tuning...
Owner's Manual
Page 9
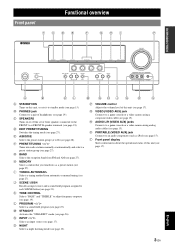
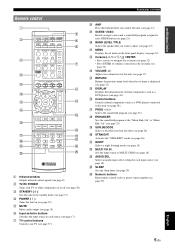
... the set menu on the front panel display (see page 17). g TV control buttons Controls your TV or other components on (see page 19). q PROG l / h Selects the sound field program (see page 37). ADDITIONAL INFORMATION APPENDIX English 5 En INTRODUCTION PREPARATION BASIC OPERATION ADVANCED OPERATION Remote control a c b POWER POWER STANDBY POWER TV AV d A B C MUTE e CD MD/CD-R TUNER f DVD DTV/CBL DVR TV CH V-AUX/DOCK D E g h AMP TV INPUT TV MUTE TV VOL SCENE i 1 2 3 4 j BAND LEVEL TITLE PRESET/CH MENU VOLUME...
... the set menu on the front panel display (see page 17). g TV control buttons Controls your TV or other components on (see page 19). q PROG l / h Selects the sound field program (see page 37). ADDITIONAL INFORMATION APPENDIX English 5 En INTRODUCTION PREPARATION BASIC OPERATION ADVANCED OPERATION Remote control a c b POWER POWER STANDBY POWER TV AV d A B C MUTE e CD MD/CD-R TUNER f DVD DTV/CBL DVR TV CH V-AUX/DOCK D E g h AMP TV INPUT TV MUTE TV VOL SCENE i 1 2 3 4 j BAND LEVEL TITLE PRESET/CH MENU VOLUME...

Owner's Manual
Page 10
... HDMI OUT output terminal d VIDEO jacks Connect to video jacks on your video components with an analog audio cable (see page 15). 6 En j k This input jacks support PCM, Dolby Digital and DTS bitstream (see page 11). • COAXIAL (DVD) • OPTICAL (DTV/CBL) • OPTICAL (CD) h MULTI CH INPUT jacks Connect to the output jacks on your multi-format player or external decoder with analog audio cables (see page 14). • FRONT L/R jack • SURROUND L/R jack • CENTER jack • SUBWOOFER jack i AUDIO jacks Connect to the audio output/input jacks on your components...
... HDMI OUT output terminal d VIDEO jacks Connect to video jacks on your video components with an analog audio cable (see page 15). 6 En j k This input jacks support PCM, Dolby Digital and DTS bitstream (see page 11). • COAXIAL (DVD) • OPTICAL (DTV/CBL) • OPTICAL (CD) h MULTI CH INPUT jacks Connect to the output jacks on your multi-format player or external decoder with analog audio cables (see page 14). • FRONT L/R jack • SURROUND L/R jack • CENTER jack • SUBWOOFER jack i AUDIO jacks Connect to the audio output/input jacks on your components...

Owner's Manual
Page 11
...; Selecting the SCENE templates • Adjusting the sound field programs ☞P. 17 ☞P. 21 ☞P. 25 ❏ Digital coaxial audio cable x 1 Step 2: Set up your speakers Place your TV, DVD player or other components. • Connecting a TV monitor or projector ☞P. 12 • Connecting audio and video components ☞P. 13 • Connecting a multi-format player or an external decoder ☞P. 14 • Connecting a Yamaha iPod universal dock or Bluetooth Wireless Audio Receiver ☞P. 14 • Using the VIDEO AUX jacks on the front panel ☞...
...; Selecting the SCENE templates • Adjusting the sound field programs ☞P. 17 ☞P. 21 ☞P. 25 ❏ Digital coaxial audio cable x 1 Step 2: Set up your speakers Place your TV, DVD player or other components. • Connecting a TV monitor or projector ☞P. 12 • Connecting audio and video components ☞P. 13 • Connecting a multi-format player or an external decoder ☞P. 14 • Connecting a Yamaha iPod universal dock or Bluetooth Wireless Audio Receiver ☞P. 14 • Using the VIDEO AUX jacks on the front panel ☞...

Owner's Manual
Page 18
... DIGITAL INPUT jacks or analog signals input at MULTI CH INPUT jacks can be recorded using this unit automatically turns off the digital sound field processor, and you select the component connected to accommodate for discrete multi-channel input from CDs, radio, etc. DOCK Center out Subwoofer out Surround out Front out LR LR Multi-format player or external decoder Yamaha iPod universal dock or Bluetooth Wireless Audio Receiver DIGITAL INPUT OPTICAL COAXIAL CD 3 DTV/ CBL 2 DVD 1 14 En Connecting a Yamaha iPod universal dock or Bluetooth Wireless Audio Receiver...
... DIGITAL INPUT jacks or analog signals input at MULTI CH INPUT jacks can be recorded using this unit automatically turns off the digital sound field processor, and you select the component connected to accommodate for discrete multi-channel input from CDs, radio, etc. DOCK Center out Subwoofer out Surround out Front out LR LR Multi-format player or external decoder Yamaha iPod universal dock or Bluetooth Wireless Audio Receiver DIGITAL INPUT OPTICAL COAXIAL CD 3 DTV/ CBL 2 DVD 1 14 En Connecting a Yamaha iPod universal dock or Bluetooth Wireless Audio Receiver...
Owner's Manual
Page 19
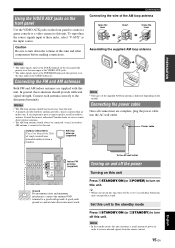
... the AC wall outlet Turning on and off the power Turning on this unit Press ASTANDBY/ON (or dPOWER) to receive infrared signals from a window. INTRODUCTION PREPARATION Using the VIDEO AUX jacks on the front panel Use the VIDEO AUX jacks on the front panel to connect a game console or a video camera to turn on this unit. In general, these jacks, select "V-AUX" as the input source. Set this unit to the standby mode Press ASTANDBY/ON...
... the AC wall outlet Turning on and off the power Turning on this unit Press ASTANDBY/ON (or dPOWER) to receive infrared signals from a window. INTRODUCTION PREPARATION Using the VIDEO AUX jacks on the front panel Use the VIDEO AUX jacks on the front panel to connect a game console or a video camera to turn on this unit. In general, these jacks, select "V-AUX" as the input source. Set this unit to the standby mode Press ASTANDBY/ON...
Owner's Manual
Page 22
... analog signals are input, no digital input jack is assigned to the selected input source in "AUDIO SELECT." y • We recommend that is connected to the FRONT A or FRONT B speaker terminals or turn on the front panel display. "MULTI CH" appears on or off the volume level of sound field programs Enjoy the sources which have wide dynamic range at night Use headphones Select a decoder to play back sources with Set this unit to the standby mode automatically...
... analog signals are input, no digital input jack is assigned to the selected input source in "AUDIO SELECT." y • We recommend that is connected to the FRONT A or FRONT B speaker terminals or turn on the front panel display. "MULTI CH" appears on or off the volume level of sound field programs Enjoy the sources which have wide dynamic range at night Use headphones Select a decoder to play back sources with Set this unit to the standby mode automatically...
Owner's Manual
Page 31
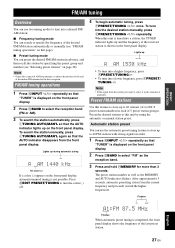
... adjust the position of the end of the last preset station. Lights up on the front panel display, automatic/manual tuning is completed, the front panel display shows the frequency of the indoor FM antenna for more than 3 seconds. The preset station number as well as the reception band. 3 Press and hold HMEMORY for the best reception. Press DEDIT PRESET/TUNING to select "FM" as the MEMORY and AUTO indicators flashes...
... adjust the position of the end of the last preset station. Lights up on the front panel display, automatic/manual tuning is completed, the front panel display shows the frequency of the indoor FM antenna for more than 3 seconds. The preset station number as well as the reception band. 3 Press and hold HMEMORY for the best reception. Press DEDIT PRESET/TUNING to select "FM" as the MEMORY and AUTO indicators flashes...
Owner's Manual
Page 35
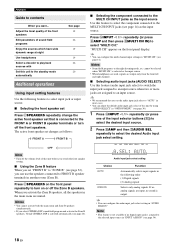
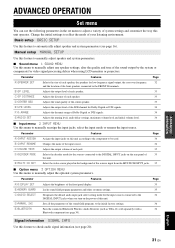
... SETUP Use this unit. ADDITIONAL INFORMATION APPENDIX English 31 En Locks sound field program parameters and other set menu to adjust a variety of system settings and customize the way this unit operates. Designates the default audio input jack select setting mode for the input sources connected to the DIGITAL INPUT jacks when you turn on the rear panel of 35 this feature to check audio signal information (see page 20). Adjusts the muting level, audio delay settings, maximum volume level and initial volume level. Parameter A)DISPLAY SET B)MEMORY GUARD C)AUDIO SELECT...
... SETUP Use this unit. ADDITIONAL INFORMATION APPENDIX English 31 En Locks sound field program parameters and other set menu to adjust a variety of system settings and customize the way this unit operates. Designates the default audio input jack select setting mode for the input sources connected to the DIGITAL INPUT jacks when you turn on the rear panel of 35 this feature to check audio signal information (see page 20). Adjusts the muting level, audio delay settings, maximum volume level and initial volume level. Parameter A)DISPLAY SET B)MEMORY GUARD C)AUDIO SELECT...
Owner's Manual
Page 36
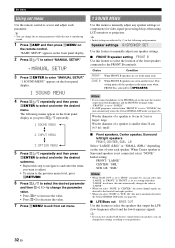
... panel display. 2 Press lk / n to select "MANUAL SETUP." .MANUAL SETUP 3 Press lENTER to enter "MANUAL SETUP." Speaker settings A)SPEAKER SET Use this feature to manually adjust any speaker settings or compensate for video signal processing delays when using LCD monitors or projectors. ZONE B When FRONT B speakers are set to "FRNT" (see page 32), you select "NONE" in "SUR. When Center speaker or Surround speakers is reproducing sound. 1 Press hAMP and then press kMENU on the front panel display as you press lk / n repeatedly. 1 SOUND MENU 2 INPUT MENU...
... panel display. 2 Press lk / n to select "MANUAL SETUP." .MANUAL SETUP 3 Press lENTER to enter "MANUAL SETUP." Speaker settings A)SPEAKER SET Use this feature to manually adjust any speaker settings or compensate for video signal processing delays when using LCD monitors or projectors. ZONE B When FRONT B speakers are set to "FRNT" (see page 32), you select "NONE" in "SUR. When Center speaker or Surround speakers is reproducing sound. 1 Press hAMP and then press kMENU on the front panel display as you press lk / n repeatedly. 1 SOUND MENU 2 INPUT MENU...
Owner's Manual
Page 39
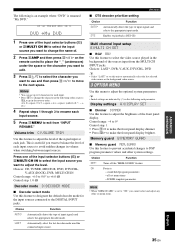
... select and adjust any other system settings. Choice Function OFF* Turns off the "MEM.GUARD" feature. DVR V-AUX DTV/CBL pDVD MD/CD-R TUNER CD DVD My DVD 1 Press one of the sources input from "INPUT RENAME." Control range: -4 to 0* Control step: 1 • Press ll to make the front panel display dimmer. • Press lh to playback a DTS-CD. Multi channel input setup E)MULTI CH SET ■ BGV BGV Use this feature to the DIGITAL INPUT jacks...
... select and adjust any other system settings. Choice Function OFF* Turns off the "MEM.GUARD" feature. DVR V-AUX DTV/CBL pDVD MD/CD-R TUNER CD DVD My DVD 1 Press one of the sources input from "INPUT RENAME." Control range: -4 to 0* Control step: 1 • Press ll to make the front panel display dimmer. • Press lh to playback a DTS-CD. Multi channel input setup E)MULTI CH SET ■ BGV BGV Use this feature to the DIGITAL INPUT jacks...
Owner's Manual
Page 42
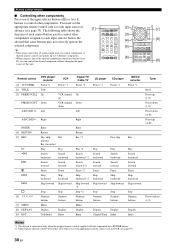
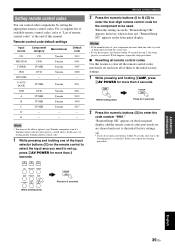
... the input selector buttons (f) or A to E buttons to control other components. y • The remote control has 13 modes (input areas) to control components so that some buttons may not correctly operate the selected component. Be advised that the remote control can control the desired component without changing the input source of this unit. [1] POWER POWER STANDBY POWER TV AV A B C MUTE CD MD/CD-R TUNER DVD DTV/CBL DVR TV CH V-AUX/DOCK D E AMP TV INPUT TV MUTE TV VOL SCENE 1 2 3 4 [2] BAND LEVEL TITLE MENU VOLUME [3] [4] [5] ENTER...
... the input selector buttons (f) or A to E buttons to control other components. y • The remote control has 13 modes (input areas) to control components so that some buttons may not correctly operate the selected component. Be advised that the remote control can control the desired component without changing the input source of this unit. [1] POWER POWER STANDBY POWER TV AV A B C MUTE CD MD/CD-R TUNER DVD DTV/CBL DVR TV CH V-AUX/DOCK D E AMP TV INPUT TV MUTE TV VOL SCENE 1 2 3 4 [2] BAND LEVEL TITLE MENU VOLUME [3] [4] [5] ENTER...
Owner's Manual
Page 43
...Input source Component category Manufacturer Default code CD CD Yamaha 5013 MD/CD-R CD-R Yamaha 5001 TUNER TUNER Yamaha 5007 DVD DVD Yamaha 2000 DTV/CBL - - - V-AUX/ DOCK TUNER Yamaha 5011 DVR DVR Yamaha 2011 A TUNER Yamaha 5012 B TUNER Yamaha 5009 C TUNER Yamaha 5017 D - - - "RemoteSetup OK" appears on the front panel display. Note • You may not be used. A B C 2 Press the numeric buttons (0 to 9) (y) to enter the four-digit remote control code for the component to be able to set and reset all remote control codes Use...
...Input source Component category Manufacturer Default code CD CD Yamaha 5013 MD/CD-R CD-R Yamaha 5001 TUNER TUNER Yamaha 5007 DVD DVD Yamaha 2000 DTV/CBL - - - V-AUX/ DOCK TUNER Yamaha 5011 DVR DVR Yamaha 2011 A TUNER Yamaha 5012 B TUNER Yamaha 5009 C TUNER Yamaha 5017 D - - - "RemoteSetup OK" appears on the front panel display. Note • You may not be used. A B C 2 Press the numeric buttons (0 to 9) (y) to enter the four-digit remote control code for the component to be able to set and reset all remote control codes Use...
Owner's Manual
Page 45
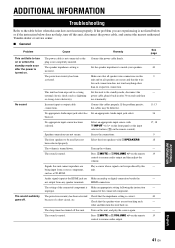
... Make an analog or digital connection beside the not output from a source component, such as lightning or strong static electricity). Secure the connections. The sound is turned down. Audio signals input at the HDMI jack are being input from any speaker terminals. HDMI connection. Set this unit, disconnect the power cable, and contact the nearest authorized Yamaha dealer or service center. ■ General Problem Cause Remedy This unit fails to the standby mode, disconnect the power cable, plug it normally. Select...
... Make an analog or digital connection beside the not output from a source component, such as lightning or strong static electricity). Secure the connections. The sound is turned down. Audio signals input at the HDMI jack are being input from any speaker terminals. HDMI connection. Set this unit, disconnect the power cable, and contact the nearest authorized Yamaha dealer or service center. ■ General Problem Cause Remedy This unit fails to the standby mode, disconnect the power cable, plug it normally. Select...

Owner's Manual
Page 47
... . Use a high-quality directional FM antenna. Select an input source other than "MULTI CH." Use the manual tuning method. Set preset stations. This unit is too weak. Make sure all speaker cables are connected correctly. frequency equipment. There is selected as the input source. "MULTI CH" is distortion, and clear reception cannot be tuned into with low voltage. The picture is in the "5ch Stereo" mode. This unit does not operate properly. Disconnect the headphone plug from the AC wall...
... . Use a high-quality directional FM antenna. Select an input source other than "MULTI CH." Use the manual tuning method. Set preset stations. This unit is too weak. Make sure all speaker cables are connected correctly. frequency equipment. There is selected as the input source. "MULTI CH" is distortion, and clear reception cannot be tuned into with low voltage. The picture is in the "5ch Stereo" mode. This unit does not operate properly. Disconnect the headphone plug from the AC wall...
Owner's Manual
Page 48
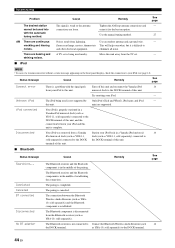
AM There are supported. A TV set . There are loose. Noises result from a Yamaha Station your iPod back in the middle of this unit. Use an outdoor antenna and a ground wire. Move this unit. Status message Cause Remedy See page Connect error There is disconnected from the Bluetooth receiver (such as YBA10, sold separately). The Bluetooth receiver and the Bluetooth component is in a Yamaha iPod universal dock (such as YDS-11, sold...
AM There are supported. A TV set . There are loose. Noises result from a Yamaha Station your iPod back in the middle of this unit. Use an outdoor antenna and a ground wire. Move this unit. Status message Cause Remedy See page Connect error There is disconnected from the Bluetooth receiver (such as YBA10, sold separately). The Bluetooth receiver and the Bluetooth component is in a Yamaha iPod universal dock (such as YDS-11, sold...
Owner's Manual
Page 52
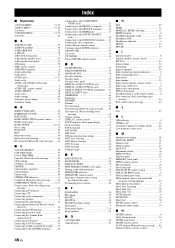
... 5 ■D D)CENTER GEQ 33 D)DECODER MODE 35 D)PARAM. Index ■ Numerics 1 SOUND MENU 31, 32 2 INPUT MENU 31, 34 2ch Stereo 25 3 OPTION MENU 31, 35 5ch Stereo 25 ■A A)DISPLAY SET 35 A)INPUT ASSIGN 34 A)SPEAKER SET 32 A.DELAY 34 A/B/C/D/E, front panel 3 Adjusting the speaker level 19 Adjusting the tonal quality 19 AM tuning 27 AMP, remote control 5 ANTENNA terminals 6 Audio cable plugs 11 Audio delay 34 AUDIO jacks 6, 11 Audio jacks 11 AUDIO L/R (VIDEO AUX) jacks, front panel 3 AUDIO SEL, remote control 5 AUDIO SELECT 18 Audio select 36 Audio settings 34...
... 5 ■D D)CENTER GEQ 33 D)DECODER MODE 35 D)PARAM. Index ■ Numerics 1 SOUND MENU 31, 32 2 INPUT MENU 31, 34 2ch Stereo 25 3 OPTION MENU 31, 35 5ch Stereo 25 ■A A)DISPLAY SET 35 A)INPUT ASSIGN 34 A)SPEAKER SET 32 A.DELAY 34 A/B/C/D/E, front panel 3 Adjusting the speaker level 19 Adjusting the tonal quality 19 AM tuning 27 AMP, remote control 5 ANTENNA terminals 6 Audio cable plugs 11 Audio delay 34 AUDIO jacks 6, 11 Audio jacks 11 AUDIO L/R (VIDEO AUX) jacks, front panel 3 AUDIO SEL, remote control 5 AUDIO SELECT 18 Audio select 36 Audio settings 34...
Owner's Manual
Page 53
... control 5 Surround left/right speakers 32 SWFR PHASE 33 ■T TEST 34 Test tone 34 TONE CONTROL, front panel 3 Troubleshooting 41 Tuner indicators 4 TUNING AUTO/MAN'L, front panel 3 Turning off the power 15 Turning on the power 15 TV control buttons, remote control 5 TV Sports 25 TV Sports Viewing 22 TV Viewing 22 TV/AV POWER, remote control 5 ■U UNIT 33 Unit 33 Unknown iPod, iPod controlling status message 44 Using the remote control 8 Using the VIDEO AUX jacks 15 Using your headphones 19 ■V VIDEO (VIDEO AUX) jack, front panel ........ 3 Video cable plugs...
... control 5 Surround left/right speakers 32 SWFR PHASE 33 ■T TEST 34 Test tone 34 TONE CONTROL, front panel 3 Troubleshooting 41 Tuner indicators 4 TUNING AUTO/MAN'L, front panel 3 Turning off the power 15 Turning on the power 15 TV control buttons, remote control 5 TV Sports 25 TV Sports Viewing 22 TV Viewing 22 TV/AV POWER, remote control 5 ■U UNIT 33 Unit 33 Unknown iPod, iPod controlling status message 44 Using the remote control 8 Using the VIDEO AUX jacks 15 Using your headphones 19 ■V VIDEO (VIDEO AUX) jack, front panel ........ 3 Video cable plugs...


