
Owner's Manual
Page 3
... by turning the unit "OFF" and "ON", please try to eliminate the problem by using one of radio or TV interference, relocate/reorient the antenna. In the case of the following the operating instructions. If you can be used replacement parts specified by Yamaha Corporation of America or its normal operation, e) If the product has been dropped or damaged in any service or repairs...
... by turning the unit "OFF" and "ON", please try to eliminate the problem by using one of radio or TV interference, relocate/reorient the antenna. In the case of the following the operating instructions. If you can be used replacement parts specified by Yamaha Corporation of America or its normal operation, e) If the product has been dropped or damaged in any service or repairs...
Owner's Manual
Page 5
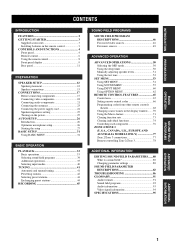
...Speaker connections 13 CONNECTIONS 17 Before connecting components 17 Connecting video components 18 Connecting audio components 21 Connecting the antennas 23 Connecting the power supply cord 24 Speaker impedance setting 25 Turning on the power 25 AUTO SETUP 26 Introduction 26 Optimizer microphone setup 26 Starting the setup 27 BASIC SETUP 31 Using BASIC MENU 31 BASIC OPERATION PLAYBACK 33 Basic operations 33 Selecting sound field programs 34 Additional operations 35 Selecting input modes 40 TUNING 41 Automatic and manual tuning 41 Presetting stations 42 Selecting preset...
...Speaker connections 13 CONNECTIONS 17 Before connecting components 17 Connecting video components 18 Connecting audio components 21 Connecting the antennas 23 Connecting the power supply cord 24 Speaker impedance setting 25 Turning on the power 25 AUTO SETUP 26 Introduction 26 Optimizer microphone setup 26 Starting the setup 27 BASIC SETUP 31 Using BASIC MENU 31 BASIC OPERATION PLAYBACK 33 Basic operations 33 Selecting sound field programs 34 Additional operations 35 Selecting input modes 40 TUNING 41 Automatic and manual tuning 41 Presetting stations 42 Selecting preset...
Owner's Manual
Page 6
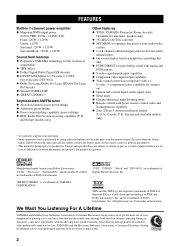
... ◆ SET MENU to optimize this unit ◆ PURE DIRECT for pure fidelity sound with analog and PCM sources ◆ S-video signal input/output capability ◆ Component video input/output capability ◆ Video signal conversion (composite video ↔ S-video → component video) capability for monitor out ◆ Optical and coaxial digital audio signal jacks ◆ Sleep timer ◆ Cinema and music night listening mode ◆ Remote control with preset remote control codes and learning/macro capability ◆ Zone 2/Zone 3 custom installation facility (U.S.A., Canada...
... ◆ SET MENU to optimize this unit ◆ PURE DIRECT for pure fidelity sound with analog and PCM sources ◆ S-video signal input/output capability ◆ Component video input/output capability ◆ Video signal conversion (composite video ↔ S-video → component video) capability for monitor out ◆ Optical and coaxial digital audio signal jacks ◆ Sleep timer ◆ Cinema and music night listening mode ◆ Remote control with preset remote control codes and learning/macro capability ◆ Zone 2/Zone 3 custom installation facility (U.S.A., Canada...
Owner's Manual
Page 8
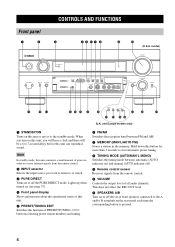
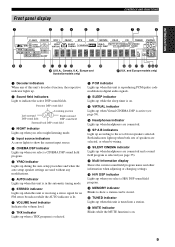
model) VOLUME SPEAKERS A B MULTI CH INPUT INPUT MODE TUNER YPAO A/B/C/D/E PRESET/ TUNING PRESET/ TUNING TUNING FM/AM MEMORY MODE EDIT SILENT CINEMA MAN'L/AUTO FM AUTO/MAN'L MONO S VIDEO VIDEO L AUDIO R OPTICAL OPTIMIZER MIC PHONES VIDEO AUX TONE CONTROL PROGRAM STRAIGHT EFFECT A BC DE F G H RDS MODE /FREQ EON PTY SEEK MODE START L M NO I J K (U.K. This does not affect the REC OUT level. Lights up when turned on (see page 37). 4 Front panel display Shows information about the operational status of this unit. 5 PRESET/TUNING EDIT Switches the function ...
model) VOLUME SPEAKERS A B MULTI CH INPUT INPUT MODE TUNER YPAO A/B/C/D/E PRESET/ TUNING PRESET/ TUNING TUNING FM/AM MEMORY MODE EDIT SILENT CINEMA MAN'L/AUTO FM AUTO/MAN'L MONO S VIDEO VIDEO L AUDIO R OPTICAL OPTIMIZER MIC PHONES VIDEO AUX TONE CONTROL PROGRAM STRAIGHT EFFECT A BC DE F G H RDS MODE /FREQ EON PTY SEEK MODE START L M NO I J K (U.K. This does not affect the REC OUT level. Lights up when turned on (see page 37). 4 Front panel display Shows information about the operational status of this unit. 5 PRESET/TUNING EDIT Switches the function ...
Owner's Manual
Page 10
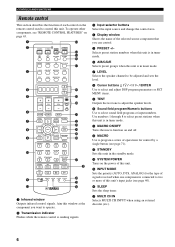
.... E INPUT MODE Sets the priority (AUTO, DTS, ANALOG) for control by a single button (see page 40). D SYSTEM POWER Turns on the power of this unit's input jacks (see page 71). AMP SOURCE TV MUTE LEVEL TITLE SET MENU MENU PURE DIRECT ENTER NIGHT AUDIO TEST RETURN STEREO 1 HALL 2 ON SCREEN DISPLAY STRAIGHT EFFECT JAZZ 3 ROCK 4 ENTERTAIN MUSIC 5 6 TV THTR 7 MOVIE 8 THX STANDARD EXTD. CONTROLS AND FUNCTIONS Remote control This section describes the function of each control on the remote control used to select sound field programs or input numbers. A/B/C/D/E TV...
.... E INPUT MODE Sets the priority (AUTO, DTS, ANALOG) for control by a single button (see page 40). D SYSTEM POWER Turns on the power of this unit's input jacks (see page 71). AMP SOURCE TV MUTE LEVEL TITLE SET MENU MENU PURE DIRECT ENTER NIGHT AUDIO TEST RETURN STEREO 1 HALL 2 ON SCREEN DISPLAY STRAIGHT EFFECT JAZZ 3 ROCK 4 ENTERTAIN MUSIC 5 6 TV THTR 7 MOVIE 8 THX STANDARD EXTD. CONTROLS AND FUNCTIONS Remote control This section describes the function of each control on the remote control used to select sound field programs or input numbers. A/B/C/D/E TV...
Owner's Manual
Page 13
... you select a CINEMA DSP sound field program. 6 YPAO indicator Lights up during the auto setup procedure and when the auto setup speaker settings are connected. INTRODUCTION Front panel display CONTROLS AND FUNCTIONS 1 2 34 56 78 9 THX PCM V-AUX DVR/VCR2 96 MATRIX 24 DISCRETE DIGITAL ZONE2 PL PL ZONE3 ZONE4 EX PL x SLEEP VCR 1 CBL/SAT DTV NIGHT SP SILENT VIRTUAL A B CINEMA DVD MD/TAPE CD-R CD TUNER PHONO YPAO PS PTY RT CT EON AUTO STEREO HiFi DSP...
... you select a CINEMA DSP sound field program. 6 YPAO indicator Lights up during the auto setup procedure and when the auto setup speaker settings are connected. INTRODUCTION Front panel display CONTROLS AND FUNCTIONS 1 2 34 56 78 9 THX PCM V-AUX DVR/VCR2 96 MATRIX 24 DISCRETE DIGITAL ZONE2 PL PL ZONE3 ZONE4 EX PL x SLEEP VCR 1 CBL/SAT DTV NIGHT SP SILENT VIRTUAL A B CINEMA DVD MD/TAPE CD-R CD TUNER PHONO YPAO PS PTY RT CT EON AUTO STEREO HiFi DSP...
Owner's Manual
Page 15
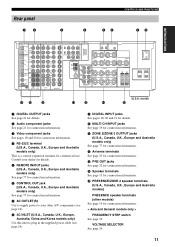
... for commercial use. Rear panel 12 CONTROLS AND FUNCTIONS 3 4 56 78 INTRODUCTION DIGITAL OUTPUT OPTICAL MD/TAPE IN (PLAY) AUDIO R L CD-R MD/TAPE OUT (REC) DIGITAL INPUT CD IN (PLAY) DVD CD-R OUT (REC) DTV CD CBL/SAT PHONO COAXIAL CD DVD FRONT (6CH)/SB (8CH) SURROUND DVR/ VCR 2 GND SUB WOOFER CENTER MULTI CH INPUT AUDIO R L VIDEO VIDEO DVD S VIDEO DVD COMPONENT VIDEO PR PB Y DTV DTV RS-232C R+ CBL /SAT IN VCR 1 OUT ZONE 2 IN DVR/ VCR 2 OUT CD-R ZONE 3 OUTPUT MONITOR OUT MONITOR OUT TUNER AM...
... for commercial use. Rear panel 12 CONTROLS AND FUNCTIONS 3 4 56 78 INTRODUCTION DIGITAL OUTPUT OPTICAL MD/TAPE IN (PLAY) AUDIO R L CD-R MD/TAPE OUT (REC) DIGITAL INPUT CD IN (PLAY) DVD CD-R OUT (REC) DTV CD CBL/SAT PHONO COAXIAL CD DVD FRONT (6CH)/SB (8CH) SURROUND DVR/ VCR 2 GND SUB WOOFER CENTER MULTI CH INPUT AUDIO R L VIDEO VIDEO DVD S VIDEO DVD COMPONENT VIDEO PR PB Y DTV DTV RS-232C R+ CBL /SAT IN VCR 1 OUT ZONE 2 IN DVR/ VCR 2 OUT CD-R ZONE 3 OUTPUT MONITOR OUT MONITOR OUT TUNER AM...

Owner's Manual
Page 33
... optimizer microphone. Only right surround back channel signal is not connected. Cause Optimizer microphone is detected. Select "RETRY" to the LEFT SURROUND BACK SPEAKERS terminal if you use (a) surround back speaker(s). The optimizer microphone does not detect test tones. • Connect the supplied optimizer microphone to the OPTIMIZER MIC jack on the front panel. • Check the microphone setting. • Check the speaker connections and placement. Error message E-1:NO FRONT SP E-2:NO SURR.SP E-3:NO PRES...
... optimizer microphone. Only right surround back channel signal is not connected. Cause Optimizer microphone is detected. Select "RETRY" to the LEFT SURROUND BACK SPEAKERS terminal if you use (a) surround back speaker(s). The optimizer microphone does not detect test tones. • Connect the supplied optimizer microphone to the OPTIMIZER MIC jack on the front panel. • Check the microphone setting. • Check the speaker connections and placement. Error message E-1:NO FRONT SP E-2:NO SURR.SP E-3:NO PRES...

Owner's Manual
Page 39
... panel to increase or decrease the high- "SILENT CINEMA" activates automatically whenever you to select BYPASS. AMP SOURCE TV MUTE LEVEL TITLE SET MENU MENU PURE DIRECT ENTER NIGHT AUDIO TEST RETURN STEREO 1 HALL 2 ON SCREEN DISPLAY STRAIGHT EFFECT JAZZ 3 ROCK 4 ENTERTAIN MUSIC 5 6 TV THTR 7 MOVIE 8 THX STANDARD EXTD. V-AUX DVR/VCR2 VCR 1 CBL/SAT DTV SP A JAZZ DVD MD/TAPE CD-R HiFi DSP CLUB CD TUNER PHONO dB VOLUME LR Program name y Choose a sound field program...
... panel to increase or decrease the high- "SILENT CINEMA" activates automatically whenever you to select BYPASS. AMP SOURCE TV MUTE LEVEL TITLE SET MENU MENU PURE DIRECT ENTER NIGHT AUDIO TEST RETURN STEREO 1 HALL 2 ON SCREEN DISPLAY STRAIGHT EFFECT JAZZ 3 ROCK 4 ENTERTAIN MUSIC 5 6 TV THTR 7 MOVIE 8 THX STANDARD EXTD. V-AUX DVR/VCR2 VCR 1 CBL/SAT DTV SP A JAZZ DVD MD/TAPE CD-R HiFi DSP CLUB CD TUNER PHONO dB VOLUME LR Program name y Choose a sound field program...

Owner's Manual
Page 41
... possible sound fidelity from analog and PCM sources. switching the sound field program - all video functions (video conversion etc.) • PURE DIRECT is automatically cancelled whenever this unit automatically switches to the standby mode. STANDARD Standard processing for game software. The indicator around the front panel button goes out and the previous settings are playing and your personal preference. ■ Enjoying 2-channel software in this mode. • When a multi-channel signal (Dolby Digital or DTS) is input...
... possible sound fidelity from analog and PCM sources. switching the sound field program - all video functions (video conversion etc.) • PURE DIRECT is automatically cancelled whenever this unit automatically switches to the standby mode. STANDARD Standard processing for game software. The indicator around the front panel button goes out and the previous settings are playing and your personal preference. ■ Enjoying 2-channel software in this mode. • When a multi-channel signal (Dolby Digital or DTS) is input...

Owner's Manual
Page 42
...-of a video source. y NIGHT:CINEMA and NIGHT:MUSIC adjustments are playing. Press NIGHT on the type of compression. y This operation is recommended for all sounds. • Select OFF if you do not play DTS-encoded CDs in this mode. • When multi-channel signals (Dolby Digital and DTS) are input, this unit's decoders and DSP processors, allowing you are stored independently. PLAYBACK ■ Listening to high fidelity stereo sound with Direct Stereo Direct Stereo bypasses this...
...-of a video source. y NIGHT:CINEMA and NIGHT:MUSIC adjustments are playing. Press NIGHT on the type of compression. y This operation is recommended for all sounds. • Select OFF if you do not play DTS-encoded CDs in this mode. • When multi-channel signals (Dolby Digital and DTS) are input, this unit's decoders and DSP processors, allowing you are stored independently. PLAYBACK ■ Listening to high fidelity stereo sound with Direct Stereo Direct Stereo bypasses this...

Owner's Manual
Page 43
... a video source with a video source, first select the video source and then press MULTI CH INPUT. STRAIGHT EFFECT Front panel STRAIGHT or EFFECT Remote control PLAYBACK ■ Playing video sources in LFE/BASS OUT. ■ Listening to unprocessed input signals In STRAIGHT mode, two channel stereo sources are output from only the front left and right speakers. PHONO TUNER CD MULTI CH IN V-AUX CBL/SAT MD/TAPE CD-R DTV VCR 1 DVR/VCR2 DVD Audio sources Video sources Note If you to enjoy the CINEMA DSP programs without...
... a video source with a video source, first select the video source and then press MULTI CH INPUT. STRAIGHT EFFECT Front panel STRAIGHT or EFFECT Remote control PLAYBACK ■ Playing video sources in LFE/BASS OUT. ■ Listening to unprocessed input signals In STRAIGHT mode, two channel stereo sources are output from only the front left and right speakers. PHONO TUNER CD MULTI CH IN V-AUX CBL/SAT MD/TAPE CD-R DTV VCR 1 DVR/VCR2 DVD Audio sources Video sources Note If you to enjoy the CINEMA DSP programs without...
Owner's Manual
Page 57
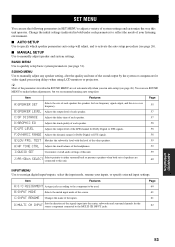
Item Features Page A)SPEAKER SET Selects the size of each speaker, the speakers for low-frequency signal output, and the cross over frequency. 55 B)SPEAKER LEVEL Adjusts the output level of each speaker. 57 C)SP DISTANCE Adjusts the delay time of each speaker. 57 D)GRAPHIC EQ Adjusts the tonal quality of each parameter) to reflect the needs of the LFE channel for Dolby Digital or DTS signals. 58 F)DYNAMIC RANGE Adjusts the dynamic range for the source component connected to the MULTI CH INPUT jacks. Page 60...
Item Features Page A)SPEAKER SET Selects the size of each speaker, the speakers for low-frequency signal output, and the cross over frequency. 55 B)SPEAKER LEVEL Adjusts the output level of each speaker. 57 C)SP DISTANCE Adjusts the delay time of each speaker. 57 D)GRAPHIC EQ Adjusts the tonal quality of each parameter) to reflect the needs of the LFE channel for Dolby Digital or DTS signals. 58 F)DYNAMIC RANGE Adjusts the dynamic range for the source component connected to the MULTI CH INPUT jacks. Page 60...

Owner's Manual
Page 63
... you want to use the test tone not only for adjusting the subwoofer level, but also for checking the low-frequency characteristics of sound. • Select "-20 dB" to . Audio Delay AUDIO DELAY Use to delay the sound output and synchronize it to reduce the current volume by the listener's position, speaker placement, subwoofer polarity and other speakers. Note DIALG.LIFT appears only when PRESENCE is heard, turn up the volume too high. Choices...
... you want to use the test tone not only for adjusting the subwoofer level, but also for checking the low-frequency characteristics of sound. • Select "-20 dB" to . Audio Delay AUDIO DELAY Use to delay the sound output and synchronize it to reduce the current volume by the listener's position, speaker placement, subwoofer polarity and other speakers. Note DIALG.LIFT appears only when PRESENCE is heard, turn up the volume too high. Choices...

Owner's Manual
Page 64
...MD/TAPE (MD/TAPE ) (2);;;;; Using INPUT MENU Use to reassign digital input/outputs, select the input mode or rename your needs. CD-R ( CD-R ) 60 You can select to prioritize either speaker set when playing sources that contain surround back channel signals using INPUT on the front panel or the input selector buttons on the OSD. Note The default settings are input. A)I/O ASSIGNMENT B)INPUT MODE C)INPUT RENAME D)MULTI CH INPUT / : Up/Down : Enter ■ Input/output assignment A)I/O ASSIGNMENT You can select the corresponding component by using CINEMA DSP sound field programs...
...MD/TAPE (MD/TAPE ) (2);;;;; Using INPUT MENU Use to reassign digital input/outputs, select the input mode or rename your needs. CD-R ( CD-R ) 60 You can select to prioritize either speaker set when playing sources that contain surround back channel signals using INPUT on the front panel or the input selector buttons on the OSD. Note The default settings are input. A)I/O ASSIGNMENT B)INPUT MODE C)INPUT RENAME D)MULTI CH INPUT / : Up/Down : Enter ■ Input/output assignment A)I/O ASSIGNMENT You can select the corresponding component by using CINEMA DSP sound field programs...

Owner's Manual
Page 67
... turn on /off conversion of composite (VIDEO) signals to output the OSD signals from COMPONENT VIDEO MONITOR OUT jacks. • Select "OFF" if you cannot use the test tone or select any signals. • Select "ON" to convert composite signals to S-video and component signals, and to convert S-video signals to protect: • DSP program parameters • All SET MENU items • All speaker levels • The on your speakers. Press the corresponding numeric button for each component. • When converting composite video...
... turn on /off conversion of composite (VIDEO) signals to output the OSD signals from COMPONENT VIDEO MONITOR OUT jacks. • Select "OFF" if you cannot use the test tone or select any signals. • Select "ON" to convert composite signals to S-video and component signals, and to convert S-video signals to protect: • DSP program parameters • All SET MENU items • All speaker levels • The on your speakers. Press the corresponding numeric button for each component. • When converting composite video...

Owner's Manual
Page 71
... setup mode. digit remote control code for about 3 seconds using this manual. y If you want to setup for another component, press the input selector button or SELECT k/n to select the component, then repeat steps 4 through 6. 7 Press LEARN again to exit from step 3. "OK" appears in the display window if the setting was successful. LEARN ADVANCED OPERATION 67 Library choices: L:DVD, L:DVR, L:LD, L:CD, L:CDR, L:MD, L:TAP (tape), L:TUN (tuner), L:AMP*, L:TV, L:CAB (cable...
... setup mode. digit remote control code for about 3 seconds using this manual. y If you want to setup for another component, press the input selector button or SELECT k/n to select the component, then repeat steps 4 through 6. 7 Press LEARN again to exit from step 3. "OK" appears in the display window if the setting was successful. LEARN ADVANCED OPERATION 67 Library choices: L:DVD, L:DVR, L:LD, L:CD, L:CDR, L:MD, L:TAP (tape), L:TUN (tuner), L:AMP*, L:TV, L:CAB (cable...

Owner's Manual
Page 80
... buttons may not correctly operate the selected component. AMP SOURCE TV MUTE LEVEL TITLE SET MENU MENU PURE DIRECT 9 5 TV VOL CH -- FREQ/RDS EON MODE PTY SEEK START 0 A B REC DISC SKIP OFF ON MACRO LEARN CLEAR RE-NAME ENTER NIGHT AUDIO 1 AV POWER 2 TV POWER 3 TV VOL + DVD player/ DVD recorder VCR Cable TV/ Satellite tuner TV LD player TEST RETURN ON SCREEN DISPLAY CD player STRAIGHT MD recorder/ CD recorder Tape deck Tuner Power *1 Power *1 Power *1 VCR power *3 Power *1 Power *1 Power *1 Power *1 Power *1 TV power *2 TV power *2 TV power *2 Power...
... buttons may not correctly operate the selected component. AMP SOURCE TV MUTE LEVEL TITLE SET MENU MENU PURE DIRECT 9 5 TV VOL CH -- FREQ/RDS EON MODE PTY SEEK START 0 A B REC DISC SKIP OFF ON MACRO LEARN CLEAR RE-NAME ENTER NIGHT AUDIO 1 AV POWER 2 TV POWER 3 TV VOL + DVD player/ DVD recorder VCR Cable TV/ Satellite tuner TV LD player TEST RETURN ON SCREEN DISPLAY CD player STRAIGHT MD recorder/ CD recorder Tape deck Tuner Power *1 Power *1 Power *1 VCR power *3 Power *1 Power *1 Power *1 Power *1 Power *1 TV power *2 TV power *2 TV power *2 Power...

Owner's Manual
Page 92
.... The volume level is The record is being played on a turntable The turntable should be changed. The volume level The component connected to the OUT Turn on this unit's DIGITAL INPUT jacks. It is not set to this unit. "CHECK SP WIRES" appears in again after about 30 seconds. Speaker cables are connected correctly. 13 88 Some components cannot record Dolby Digital or DTS sources. can be recorded by a power supply with low voltage...
.... The volume level is The record is being played on a turntable The turntable should be changed. The volume level The component connected to the OUT Turn on this unit's DIGITAL INPUT jacks. It is not set to this unit. "CHECK SP WIRES" appears in again after about 30 seconds. Speaker cables are connected correctly. 13 88 Some components cannot record Dolby Digital or DTS sources. can be recorded by a power supply with low voltage...

Owner's Manual
Page 94
... remote control code is Program the necessary functions independently into 68 correctly set it to make room for 73 the new functions. 90 Direct sunlight or lighting (from the front panel. When operating the TV set in the DTV or PHONO area, set , there are some models that the programmable buttons using the Learn feature. The remote control code was not correctly Set the remote control code correctly. 66 set incorrectly Set AMP/SOURCE/TV correctly. - Try setting another code...
... remote control code is Program the necessary functions independently into 68 correctly set it to make room for 73 the new functions. 90 Direct sunlight or lighting (from the front panel. When operating the TV set in the DTV or PHONO area, set , there are some models that the programmable buttons using the Learn feature. The remote control code was not correctly Set the remote control code correctly. 66 set incorrectly Set AMP/SOURCE/TV correctly. - Try setting another code...


