Owner's Manual
Page 4
...: READ THIS BEFORE OPERATING YOUR UNIT. CAUTION: READ THIS BEFORE OPERATING YOUR UNIT. 1 To assure the finest performance, please read the "TROUBLESHOOTING" section on the rear panel of this unit in the standby mode, and disconnect the AC power plug from the wall outlet, grasp the... Use a clean, dry cloth. 12 Only voltage specified on this unit must be exposed to wide slot and fully insert. Contact qualified YAMAHA service personnel when any reasons. 15 When not planning to obstruct heat radiation. The cabinet should never be used. FOR CANADIAN CUSTOMERS To ...
...: READ THIS BEFORE OPERATING YOUR UNIT. CAUTION: READ THIS BEFORE OPERATING YOUR UNIT. 1 To assure the finest performance, please read the "TROUBLESHOOTING" section on the rear panel of this unit in the standby mode, and disconnect the AC power plug from the wall outlet, grasp the... Use a clean, dry cloth. 12 Only voltage specified on this unit must be exposed to wide slot and fully insert. Contact qualified YAMAHA service personnel when any reasons. 15 When not planning to obstruct heat radiation. The cabinet should never be used. FOR CANADIAN CUSTOMERS To ...
Owner's Manual
Page 5
... controlling Zone 2/Zone 3 78 ADDITIONAL INFORMATION EDITING SOUND FIELD PARAMETERS ......80 What is a sound field 80 Changing parameter settings 80 SOUND FIELD PARAMETER DESCRIPTIONS 82 TROUBLESHOOTING 86 GLOSSARY 91 Audio formats 91 Sound field programs 92 Audio information 93 Video signal information 94 SPECIFICATIONS 95 SOUND FIELD PROGRAMS ADVANCED OPERATION ADDITIONAL...
... controlling Zone 2/Zone 3 78 ADDITIONAL INFORMATION EDITING SOUND FIELD PARAMETERS ......80 What is a sound field 80 Changing parameter settings 80 SOUND FIELD PARAMETER DESCRIPTIONS 82 TROUBLESHOOTING 86 GLOSSARY 91 Audio formats 91 Sound field programs 92 Audio information 93 Video signal information 94 SPECIFICATIONS 95 SOUND FIELD PROGRAMS ADVANCED OPERATION ADDITIONAL...
Owner's Manual
Page 30
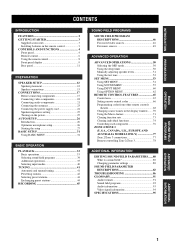
... be output during the auto setup procedure. • If auto setup stops and error messages appear on the screen, follow the troubleshooting on page 29. However, we recommend that it on top of each speaker. DISTANCE Checks the distance of each channel. If possible...that you the best possible sound from your listening position. Optimizer microphone position 26 AUTO SETUP AUTO SETUP Introduction This receiver employs YAMAHA Parametric Room Acoustic Optimizer (YPAO) technology which speakers are seated in your system quickly and with minimal effort. The supplied optimizer ...
... be output during the auto setup procedure. • If auto setup stops and error messages appear on the screen, follow the troubleshooting on page 29. However, we recommend that it on top of each speaker. DISTANCE Checks the distance of each channel. If possible...that you the best possible sound from your listening position. Optimizer microphone position 26 AUTO SETUP AUTO SETUP Introduction This receiver employs YAMAHA Parametric Room Acoustic Optimizer (YPAO) technology which speakers are seated in your system quickly and with minimal effort. The supplied optimizer ...

Owner's Manual
Page 33
... setup procedure in a quiet environment. • Turn off noisy electric equipment like air conditioners (etc.) or move them away from the optimizer microphone. PREPARATION ■ Troubleshooting for auto setup procedure Before auto setup Error message Connect MIC! The optimizer microphone does not detect test tones. • Connect the supplied optimizer microphone...
... setup procedure in a quiet environment. • Turn off noisy electric equipment like air conditioners (etc.) or move them away from the optimizer microphone. PREPARATION ■ Troubleshooting for auto setup procedure Before auto setup Error message Connect MIC! The optimizer microphone does not detect test tones. • Connect the supplied optimizer microphone...
Owner's Manual
Page 90
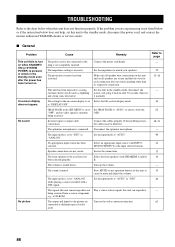
...video conversion function. 63 connected to different types of this unit to the standby mode, disconnect the power cord, and contact the nearest authorized YAMAHA dealer or service center. ■ General Problem This unit fails to turn on -screen display is set to "DTS" or Set the ... from a source component e.g.: a CD-ROM. Press MUTE or any operation buttons of video jacks. 86 If the problem you are not secure. TROUBLESHOOTING TROUBLESHOOTING Refer to the chart below does not help, set Select the full or short display mode. 50 to "DISPLAY OFF". On-screen display does not...
...video conversion function. 63 connected to different types of this unit to the standby mode, disconnect the power cord, and contact the nearest authorized YAMAHA dealer or service center. ■ General Problem This unit fails to turn on -screen display is set to "DTS" or Set the ... from a source component e.g.: a CD-ROM. Press MUTE or any operation buttons of video jacks. 86 If the problem you are not secure. TROUBLESHOOTING TROUBLESHOOTING Refer to the chart below does not help, set Select the full or short display mode. 50 to "DISPLAY OFF". On-screen display does not...
Owner's Manual
Page 91
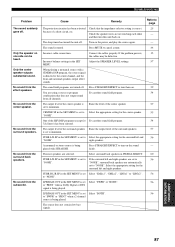
.... Turn on one side can be defective. A monaural or stereo source is set Select "SMLx1", "SMLx2", "LRGx1" or "LRGx2". 56 to "NONE". ADDITIONAL INFORMATION 87 TROUBLESHOOTING Problem The sound suddenly goes off . The sound is correct. 25 because of the HiFi DSP programs (except for the surround left and right speakers...
.... Turn on one side can be defective. A monaural or stereo source is set Select "SMLx1", "SMLx2", "LRGx1" or "LRGx2". 56 to "NONE". ADDITIONAL INFORMATION 87 TROUBLESHOOTING Problem The sound suddenly goes off . The sound is correct. 25 because of the HiFi DSP programs (except for the surround left and right speakers...

Owner's Manual
Page 92
... to "AUTO" or "DTS". 40 display does not light up.) A "humming" sound Incorrect cable connections. "CHECK SP WIRES" appears in again after about 30 seconds. TROUBLESHOOTING Problem Cause Remedy Refer to page Dolby Digital or DTS The connected component is not connected to Connect the source component to the analog AUDIO...
... to "AUTO" or "DTS". 40 display does not light up.) A "humming" sound Incorrect cable connections. "CHECK SP WIRES" appears in again after about 30 seconds. TROUBLESHOOTING Problem Cause Remedy Refer to page Dolby Digital or DTS The connected component is not connected to Connect the source component to the analog AUDIO...
Owner's Manual
Page 93
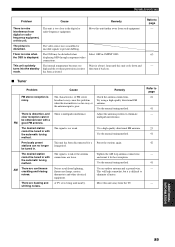
... cause this problem when the transmitter is too far away or the antenna input is poor. The signal is being used nearby. ADDITIONAL INFORMATION 89 TROUBLESHOOTING Problem Cause Remedy There is noise interference from digital or radiofrequency equipment, or this unit away from the TV. Move this unit cools down and...
... cause this problem when the transmitter is too far away or the antenna input is poor. The signal is being used nearby. ADDITIONAL INFORMATION 89 TROUBLESHOOTING Problem Cause Remedy There is noise interference from digital or radiofrequency equipment, or this unit away from the TV. Move this unit cools down and...

Owner's Manual
Page 94
... the two remote Place the remote controls at the proper distance. 68 controls is full. Delete other unnecessary functions to page Wrong distance or angle. TROUBLESHOOTING ■ Remote control Problem The remote control does not work nor function properly. The remote control will function within a maximum 8 range of the Learning is...
... the two remote Place the remote controls at the proper distance. 68 controls is full. Delete other unnecessary functions to page Wrong distance or angle. TROUBLESHOOTING ■ Remote control Problem The remote control does not work nor function properly. The remote control will function within a maximum 8 range of the Learning is...

