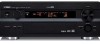

Owner's Manual
Page 1
U RX-V1500 AV Receiver OWNER'S MANUAL
U RX-V1500 AV Receiver OWNER'S MANUAL

Owner's Manual
Page 3
... has used replacement parts specified by the manufacturer or have the same characteristics as indicated in the instructions contained in this manual, meets FCC requirements. Article 810 of the National Electrical Code, ANSI/NFPA 70, provides information with regard to proper ...grounding of the mast and supporting structure, grounding of interference, which can not locate the appropriate retailer, please contact Yamaha Electronics Corp., U.S.A. 6660 Orangethorpe Ave, Buena Park, CA 90620. PART H) FCC INFORMATION (for service. 20 Replacement Parts - Follow all...
... has used replacement parts specified by the manufacturer or have the same characteristics as indicated in the instructions contained in this manual, meets FCC requirements. Article 810 of the National Electrical Code, ANSI/NFPA 70, provides information with regard to proper ...grounding of the mast and supporting structure, grounding of interference, which can not locate the appropriate retailer, please contact Yamaha Electronics Corp., U.S.A. 6660 Orangethorpe Ave, Buena Park, CA 90620. PART H) FCC INFORMATION (for service. 20 Replacement Parts - Follow all...
Owner's Manual
Page 4
... to set for your local main voltage BEFORE plugging into the AC main supply. Retain this Owner's Manual in a well ventilated, cool, dry, clean place - this manual carefully. Contact qualified YAMAHA service personnel when any service is faulty. 17 Before moving this unit, press STANDBY/ON to liquid ... cold. Containers with liquid in the standby mode, and disconnect the AC power plug from other than specified is called the standby mode. YAMAHA will not be opened for long periods of the unit. In this state, this unit away from the wall outlet. 18 VOLTAGE SELECTOR...
... to set for your local main voltage BEFORE plugging into the AC main supply. Retain this Owner's Manual in a well ventilated, cool, dry, clean place - this manual carefully. Contact qualified YAMAHA service personnel when any service is faulty. 17 Before moving this unit, press STANDBY/ON to liquid ... cold. Containers with liquid in the standby mode, and disconnect the AC power plug from other than specified is called the standby mode. YAMAHA will not be opened for long periods of the unit. In this state, this unit away from the wall outlet. 18 VOLTAGE SELECTOR...
Owner's Manual
Page 5
...BASIC OPERATION PLAYBACK 33 Basic operations 33 Selecting sound field programs 34 Additional operations 35 Selecting input modes 40 TUNING 41 Automatic and manual tuning 41 Presetting stations 42 Selecting preset stations 44 Exchanging preset stations 44 RECORDING 45 SOUND FIELD PROGRAMS SOUND FIELD PROGRAM DESCRIPTIONS .../video sources 46 For music sources 49 ADVANCED OPERATION ADVANCED OPERATIONS 50 Selecting the OSD mode 50 Using the sleep timer 50 Manually adjusting speaker levels 51 Using the test tone 52 SET MENU 53 Using SET MENU 54 Using SOUND MENU 55 Using INPUT ...
...BASIC OPERATION PLAYBACK 33 Basic operations 33 Selecting sound field programs 34 Additional operations 35 Selecting input modes 40 TUNING 41 Automatic and manual tuning 41 Presetting stations 42 Selecting preset stations 44 Exchanging preset stations 44 RECORDING 45 SOUND FIELD PROGRAMS SOUND FIELD PROGRAM DESCRIPTIONS .../video sources 46 For music sources 49 ADVANCED OPERATION ADVANCED OPERATIONS 50 Selecting the OSD mode 50 Using the sleep timer 50 Manually adjusting speaker levels 51 Using the test tone 52 SET MENU 53 Using SET MENU 54 Using SOUND MENU 55 Using INPUT ...
Owner's Manual
Page 6
... Since hearing damage from loud sounds is often undetectable until it at a safe level. In cases when the button names differ between the manual and product, the product has priority. "SILENT CINEMA" is a trademark of Digital Theater Systems, Inc. THX and the THX logo are...; SET MENU to change in part as a result of your operation. • Some operations can be performed by playing it is too late, YAMAHA and the Electronic Industries Association's Consumer Electronics Group recommend you to get the most importantly, without annoying blaring or distortion - "DTS", "DTS-ES",...
... Since hearing damage from loud sounds is often undetectable until it at a safe level. In cases when the button names differ between the manual and product, the product has priority. "SILENT CINEMA" is a trademark of Digital Theater Systems, Inc. THX and the THX logo are...; SET MENU to change in part as a result of your operation. • Some operations can be performed by playing it is too late, YAMAHA and the Electronic Industries Association's Consumer Electronics Group recommend you to get the most importantly, without annoying blaring or distortion - "DTS", "DTS-ES",...
Owner's Manual
Page 8
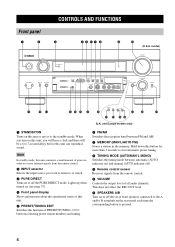
... (see page 37). 4 Front panel display Shows information about the operational status of this unit or sets it to the A and/or B terminals on ) and manual (AUTO indicator off the set of PRESET/TUNING l / h between selecting preset station numbers and tuning. 6 FM/AM Switches the reception band between automatic (AUTO indicator...
... (see page 37). 4 Front panel display Shows information about the operational status of this unit or sets it to the A and/or B terminals on ) and manual (AUTO indicator off the set of PRESET/TUNING l / h between selecting preset station numbers and tuning. 6 FM/AM Switches the reception band between automatic (AUTO indicator...
Owner's Manual
Page 26
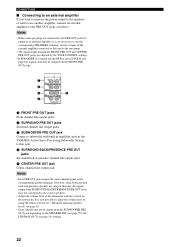
...be output from the SUBWOOFER PRE OUT jack depending on the subwoofer. Set the volume of the subwoofer with built-in amplifier, such as the YAMAHA Active Servo Processing Subwoofer System, to this unit to the maximum. • The signal output through the FRONT PRE OUT and CENTER PRE ...line output jacks. 3 SUBWOOFER PRE OUT jack Connect a subwoofer with the control on the SPEAKER SET (see page 55) and LFE/BASS OUT (see "Manually adjusting speaker levels" on page 51). • Some signals may not correspond to the correct speakers. • Adjust the volume level of the external ...
...be output from the SUBWOOFER PRE OUT jack depending on the subwoofer. Set the volume of the subwoofer with built-in amplifier, such as the YAMAHA Active Servo Processing Subwoofer System, to this unit to the maximum. • The signal output through the FRONT PRE OUT and CENTER PRE ...line output jacks. 3 SUBWOOFER PRE OUT jack Connect a subwoofer with the control on the SPEAKER SET (see page 55) and LFE/BASS OUT (see "Manually adjusting speaker levels" on page 51). • Some signals may not correspond to the correct speakers. • Adjust the volume level of the external ...
Owner's Manual
Page 31
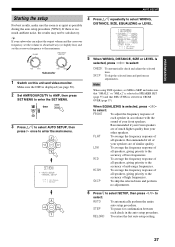
... all speakers, giving priority to select: FRONT To adjust the frequency response of each check in the auto setup procedure. ENTER SET MENU . ;AUTO SETUP ;MANUAL SETUP / : Up/Down : Enter 4 Press k / n repeatedly to enter the main menu. ENTER STEP To pause for confirmation between each speaker in accordance with the sound...
... all speakers, giving priority to select: FRONT To adjust the frequency response of each check in the auto setup procedure. ENTER SET MENU . ;AUTO SETUP ;MANUAL SETUP / : Up/Down : Enter 4 Press k / n repeatedly to enter the main menu. ENTER STEP To pause for confirmation between each speaker in accordance with the sound...
Owner's Manual
Page 32
... press n to exit. If you are set for a few seconds after all items are not satisfied with the result or want to manually adjust each setup parameter, use the manual setup parameters (see page 55). EQ;;;;;FRONT L 63Hz;;;-2.0dB 125Hz;;;-5.0dB 500Hz;;;;;;0dB 630Hz;;;;;;0dB 1.0kHz;;;;;;0dB 3.15kHz;;;+3.0dB 10.0kHz;;;+1.0dB...
... press n to exit. If you are set for a few seconds after all items are not satisfied with the result or want to manually adjust each setup parameter, use the manual setup parameters (see page 55). EQ;;;;;FRONT L 63Hz;;;-2.0dB 125Hz;;;-5.0dB 500Hz;;;;;;0dB 630Hz;;;;;;0dB 1.0kHz;;;;;;0dB 3.15kHz;;;+3.0dB 10.0kHz;;;+1.0dB...

Owner's Manual
Page 35
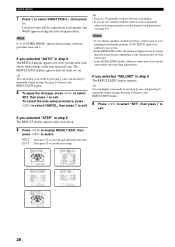
... : S [M L SWFR : [YES NONE PRESENCE;;;;NONE SPEAKERS;;;;7spk 1 Set AMP/SOURCE/TV to AMP, then press SET MENU to configure the unit manually using more precise adjustments, use the detailed parameters in SOUND MENU (page 55) instead of BASIC MENU. Using BASIC MENU 2-9 SELECT ++ TV VOL CH ... parameters are defined as follows: [U.S.A. A/B/C/D/E TV MUTE TV INPUT + VOL - AMP SOURCE TV then SET MENU MENU 2 Press k / n repeatedly to select MANUAL SETUP, then press l / h to select: YES If you have a subwoofer in your system. NONE If you have presence speakers in . If you do...
... : S [M L SWFR : [YES NONE PRESENCE;;;;NONE SPEAKERS;;;;7spk 1 Set AMP/SOURCE/TV to AMP, then press SET MENU to configure the unit manually using more precise adjustments, use the detailed parameters in SOUND MENU (page 55) instead of BASIC MENU. Using BASIC MENU 2-9 SELECT ++ TV VOL CH ... parameters are defined as follows: [U.S.A. A/B/C/D/E TV MUTE TV INPUT + VOL - AMP SOURCE TV then SET MENU MENU 2 Press k / n repeatedly to select MANUAL SETUP, then press l / h to select: YES If you have a subwoofer in your system. NONE If you have presence speakers in . If you do...

Owner's Manual
Page 40
... played in the front panel display and video monitor. To select another input source with 6.1-channel, select decoders (PLIIxMovie, PLIIx Music, EX/ES or EX) manually. • 6.1-channel playback is displayed.
... played in the front panel display and video monitor. To select another input source with 6.1-channel, select decoders (PLIIxMovie, PLIIx Music, EX/ES or EX) manually. • 6.1-channel playback is displayed.
Owner's Manual
Page 45
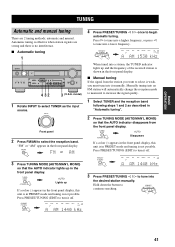
... is effective when station signals are 2 tuning methods; "FM" or "AM" appears in the front panel display. BASIC OPERATION TUNING TUNING Automatic and manual tuning There are strong and there is no interference. ■ Automatic tuning 1 STANDBY /ON INPUT SPEAKERS A B MULTI CH INPUT MODE INPUT PURE .../TAPE CD-R CD TU SP A AUTO TUNED A~~AM~1530 kHz When tuned into a higher frequency, or press l to continue searching. automatic and manual. Press h to tune into a station, the TUNED indicator lights up If a colon (:) appears in the front panel display, this unit is in...
... is effective when station signals are 2 tuning methods; "FM" or "AM" appears in the front panel display. BASIC OPERATION TUNING TUNING Automatic and manual tuning There are strong and there is no interference. ■ Automatic tuning 1 STANDBY /ON INPUT SPEAKERS A B MULTI CH INPUT MODE INPUT PURE .../TAPE CD-R CD TU SP A AUTO TUNED A~~AM~1530 kHz When tuned into a higher frequency, or press l to continue searching. automatic and manual. Press h to tune into a station, the TUNED indicator lights up If a colon (:) appears in the front panel display, this unit is in...
Owner's Manual
Page 46
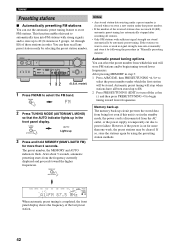
... recall any preset station easily by selecting the preset station number. However, if the power is cleared when you want to automatically tune into it manually and store it by following the procedure in the front panel display. FM/AM Notes • Any stored station data existing under a preset number is... cut due to begin tuning toward the higher frequencies. TUNING MODE AUTO/MAN'L MONO AUTO Lights up in "Manually presetting stations". You can use the automatic preset tuning feature to select the FM band.
... recall any preset station easily by selecting the preset station number. However, if the power is cleared when you want to automatically tune into it manually and store it by following the procedure in the front panel display. FM/AM Notes • Any stored station data existing under a preset number is... cut due to begin tuning toward the higher frequencies. TUNING MODE AUTO/MAN'L MONO AUTO Lights up in "Manually presetting stations". You can use the automatic preset tuning feature to select the FM band.
Owner's Manual
Page 47
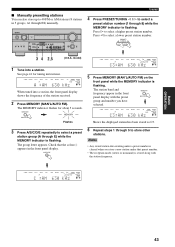
...'L/AUTO FM) on the front panel while the MEMORY indicator is cleared when you store a new station under a preset number is flashing. BASIC OPERATION ■ Manually presetting stations You can also store up to 40 FM or AM stations (8 stations in 5 groups, A1 through 8) while the MEMORY indicator is flashing. V-AUX...'L MONO S VIDEO VIDEO L AUDIO R OPTICAL SILENT VIDEO AUX VOLUME PROGRAM TONE CONTROL STRAIGHT EFFECT TUNING 4 Press PRESET/TUNING l / h to select a preset station number (1 through E8) manually.
...'L/AUTO FM) on the front panel while the MEMORY indicator is cleared when you store a new station under a preset number is flashing. BASIC OPERATION ■ Manually presetting stations You can also store up to 40 FM or AM stations (8 stations in 5 groups, A1 through 8) while the MEMORY indicator is flashing. V-AUX...'L MONO S VIDEO VIDEO L AUDIO R OPTICAL SILENT VIDEO AUX VOLUME PROGRAM TONE CONTROL STRAIGHT EFFECT TUNING 4 Press PRESET/TUNING l / h to select a preset station number (1 through E8) manually.
Owner's Manual
Page 55
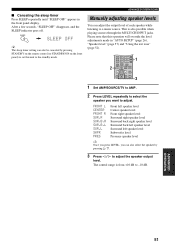
... AMP/SOURCE/TV to AMP. 2 Press LEVEL repeatedly to select the speaker you can also be canceled by pressing k / n. 3 Press l / h to -10 dB. ADVANCED OPERATIONS Manually adjusting speaker levels You can adjust the output level of each speaker while listening to adjust. After a few seconds, "SLEEP OFF" disappears, and the SLEEP...
... AMP/SOURCE/TV to AMP. 2 Press LEVEL repeatedly to select the speaker you can also be canceled by pressing k / n. 3 Press l / h to -10 dB. ADVANCED OPERATIONS Manually adjusting speaker levels You can adjust the output level of each speaker while listening to adjust. After a few seconds, "SLEEP OFF" disappears, and the SLEEP...

Owner's Manual
Page 56
... B. L TEST SUR. B. y • If you set to 75 dB. • Before outputting the test tone, we recommend that you use the test tone feature to manually balance your adjustment. The unit outputs a test tone. 3 Press k / n repeatedly to select the speaker you want to the PHONES jack. If PRESENCE SP in SPEAKER... SET is in "AUTO SETUP" (page 26), "Speaker level" (page 57) and "Manually adjusting speaker levels" (page 51). Note You cannot activate the test tone if headphones are connected to adjust.
... B. L TEST SUR. B. y • If you set to 75 dB. • Before outputting the test tone, we recommend that you use the test tone feature to manually balance your adjustment. The unit outputs a test tone. 3 Press k / n repeatedly to select the speaker you want to the PHONES jack. If PRESENCE SP in SPEAKER... SET is in "AUTO SETUP" (page 26), "Speaker level" (page 57) and "Manually adjusting speaker levels" (page 51). Note You cannot activate the test tone if headphones are connected to adjust.
Owner's Manual
Page 57
...other speakers. 59 H)HP TONE CTRL Adjusts the tonal balance of the headphones. 59 I /O ASSIGNMENT Assigns jacks according to the component to manually adjust speaker and system settings. D)MULTI CH INPUT Sets the direction of the inputs. Page 60 61 61 62 ADVANCED OPERATION 53 C)INPUT ...RENAME Changes the name of the signals input into the center, subwoofer and surround channels for the source component connected to manually adjust any speaker setting, alter the quality and tone of the LFE channel for Dolby Digital or DTS signals. 58 F)DYNAMIC RANGE ...
...other speakers. 59 H)HP TONE CTRL Adjusts the tonal balance of the headphones. 59 I /O ASSIGNMENT Assigns jacks according to the component to manually adjust speaker and system settings. D)MULTI CH INPUT Sets the direction of the inputs. Page 60 61 61 62 ADVANCED OPERATION 53 C)INPUT ...RENAME Changes the name of the signals input into the center, subwoofer and surround channels for the source component connected to manually adjust any speaker setting, alter the quality and tone of the LFE channel for Dolby Digital or DTS signals. 58 F)DYNAMIC RANGE ...

Owner's Manual
Page 58
... control to adjust the optional system settings. then ENTER ENTER SET MENU . ;AUTO SETUP ;MANUAL SETUP / : Up/Down : Enter p p Note If k is pressed when AUTO SETUP is selected, or if n is pressed when MANUAL SETUP is in either cinema or music night listening mode. 1 Set AMP/SOURCE/TV to...the settings of the item you want to enter the SET MENU. AMP SOURCE TV then SET MENU MENU 2 Press k / n to select AUTO SETUP or MANUAL SETUP, then press l / h to enter the menu item. Repeat this operation to navigate to the SPEAKERS B terminals. Initializes the parameters of a group ...
... control to adjust the optional system settings. then ENTER ENTER SET MENU . ;AUTO SETUP ;MANUAL SETUP / : Up/Down : Enter p p Note If k is pressed when AUTO SETUP is selected, or if n is pressed when MANUAL SETUP is in either cinema or music night listening mode. 1 Set AMP/SOURCE/TV to...the settings of the item you want to enter the SET MENU. AMP SOURCE TV then SET MENU MENU 2 Press k / n to select AUTO SETUP or MANUAL SETUP, then press l / h to enter the menu item. Repeat this operation to navigate to the SPEAKERS B terminals. Initializes the parameters of a group ...

Owner's Manual
Page 59
... speaker. The unit directs all of the center channel signal to SMALL (SML). y If you are set A)SPEAKER SET Use to manually adjust any speaker setting. The unit directs the low-frequency signals of the sound field program group buttons. Most of the center channel ... center speaker. ENTER or STEREO 1 HALL 2 JAZZ 3 ROCK 4 ENTERTAIN MUSIC 5 6 TY THTR 7 MOVIE 8 THX STANDARD EXTD. p Using SOUND MENU Use to manually adjust any speaker setting or compensate for more than one of the front channel to the center speaker. If so, adjust the items again. ■...
... speaker. The unit directs all of the center channel signal to SMALL (SML). y If you are set A)SPEAKER SET Use to manually adjust any speaker setting. The unit directs the low-frequency signals of the sound field program group buttons. Most of the center channel ... center speaker. ENTER or STEREO 1 HALL 2 JAZZ 3 ROCK 4 ENTERTAIN MUSIC 5 6 TY THTR 7 MOVIE 8 THX STANDARD EXTD. p Using SOUND MENU Use to manually adjust any speaker setting or compensate for more than one of the front channel to the center speaker. If so, adjust the items again. ■...

Owner's Manual
Page 61
..., 120Hz, 160Hz, 200Hz THX recommendation: "80Hz" CROSS OVER FREQ;;;80Hz(THX) ■ Speaker level B)SPEAKER LEVEL Use these settings to manually balance the speaker levels between the front left (or surround left speaker. C)SP DISTANCE . All frequencies below the selected frequency will be displayed...of the center speaker. Initial setting: 3.0 m (10.0 ft) • SURR R adjusts the distance of each speaker should be sent to manually input the distance of the surround right speaker. Choices: -10.0 dB to input speaker distances in feet. Ideally, each speaker and adjust the ...
..., 120Hz, 160Hz, 200Hz THX recommendation: "80Hz" CROSS OVER FREQ;;;80Hz(THX) ■ Speaker level B)SPEAKER LEVEL Use these settings to manually balance the speaker levels between the front left (or surround left speaker. C)SP DISTANCE . All frequencies below the selected frequency will be displayed...of the center speaker. Initial setting: 3.0 m (10.0 ft) • SURR R adjusts the distance of each speaker should be sent to manually input the distance of the surround right speaker. Choices: -10.0 dB to input speaker distances in feet. Ideally, each speaker and adjust the ...


