

Owner's Manual
Page 5
... components........ 57 Setting remote control codes 59 Advanced setup 60 PREPARATION Connections 10 Rear panel 10 Placing speakers 11 Connecting speakers 12 Setting the speaker impedance 13 Information on jacks and cable plugs 14 Information on HDMI 15 Connecting video components 16 Connecting... PREPARATION BASIC OPERATION Contents INTRODUCTION Features 2 Getting started 3 Quick start guide 4 Preparation: Check the items 4 Step 1: Set up your speakers 5 Step 2: Connect your DVD player and other components 6 Step 3: Turn on the power and press SCENE 1 button 8 What do...
... components........ 57 Setting remote control codes 59 Advanced setup 60 PREPARATION Connections 10 Rear panel 10 Placing speakers 11 Connecting speakers 12 Setting the speaker impedance 13 Information on jacks and cable plugs 14 Information on HDMI 15 Connecting video components 16 Connecting... PREPARATION BASIC OPERATION Contents INTRODUCTION Features 2 Getting started 3 Quick start guide 4 Preparation: Check the items 4 Step 1: Set up your speakers 5 Step 2: Connect your DVD player and other components 6 Step 3: Turn on the power and press SCENE 1 button 8 What do...

Owner's Manual
Page 6
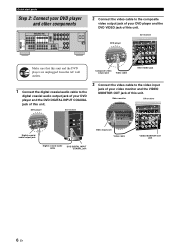
...; USB port to connect a USB memory device or a USB portable audio player ◆ MP3, WMA and WAV capability Other features ◆ YPAO (Yamaha Parametric Room Acoustic Optimizer) for automatic speaker setup ◆ 192-kHz/24-bit D/A converter ◆ Direct Stereo mode for pure hi-fi sound for analog and PCM 2-channel sources...
...; USB port to connect a USB memory device or a USB portable audio player ◆ MP3, WMA and WAV capability Other features ◆ YPAO (Yamaha Parametric Room Acoustic Optimizer) for automatic speaker setup ◆ 192-kHz/24-bit D/A converter ◆ Direct Stereo mode for pure hi-fi sound for analog and PCM 2-channel sources...

Owner's Manual
Page 8
... to enjoy DVD movie playback in the package of this unit. ❏ Speakers ❏ Front speakers 2 ❏ Center speaker 1 ❏ Surround speakers 2 Select magnetically shielded speakers. Video monitor Front left speaker Step 1: Set up your speakers ☞ P. 5 Step 2: Connect your home theater. The minimum required speakers are not included in your DVD player and other components ☞ P. 6 The...
... to enjoy DVD movie playback in the package of this unit. ❏ Speakers ❏ Front speakers 2 ❏ Center speaker 1 ❏ Surround speakers 2 Select magnetically shielded speakers. Video monitor Front left speaker Step 1: Set up your speakers ☞ P. 5 Step 2: Connect your home theater. The minimum required speakers are not included in your DVD player and other components ☞ P. 6 The...

Owner's Manual
Page 9
... any metal part of this unit. Connect the plain cable to the "-" (black) terminals. 3 Connect each speaker cable to the corresponding speaker terminal of your speaker. COMPONENT VIDEO DVD DTV/CBL DVR MONITOR OUT OUT DVD DVD DTV/CBL VIDEO DTV/CBL IN DVR OUT HDMI... are colored or shaped differently, perhaps with a stripe, groove or ridge. INTRODUCTION Step 1: Set up your speakers Place your speakers in the room. 2 Connect speaker cables to connect the left speaker Center and surround speakers Cables are unplugged from the AC wall outlets. 2 Twist the exposed wires of the...
... any metal part of this unit. Connect the plain cable to the "-" (black) terminals. 3 Connect each speaker cable to the corresponding speaker terminal of your speaker. COMPONENT VIDEO DVD DTV/CBL DVR MONITOR OUT OUT DVD DVD DTV/CBL VIDEO DTV/CBL IN DVR OUT HDMI... are colored or shaped differently, perhaps with a stripe, groove or ridge. INTRODUCTION Step 1: Set up your speakers Place your speakers in the room. 2 Connect speaker cables to connect the left speaker Center and surround speakers Cables are unplugged from the AC wall outlets. 2 Twist the exposed wires of the...
Owner's Manual
Page 10
... PB S VIDEO OPTICAL CD 3 Y DTV/ CBL 2 MULTI CH INPUT FRONT SURROUND CENTER L VIDEO DVD DTV/CBL L AUDIO IN DVR OUT CD DVD 1 R COAXIAL R SUBWOOFER ANTENNA SPEAKERS AM GND FM 75 UNBAL.
... PB S VIDEO OPTICAL CD 3 Y DTV/ CBL 2 MULTI CH INPUT FRONT SURROUND CENTER L VIDEO DVD DTV/CBL L AUDIO IN DVR OUT CD DVD 1 R COAXIAL R SUBWOOFER ANTENNA SPEAKERS AM GND FM 75 UNBAL.

Owner's Manual
Page 11
.... INTRODUCTION 4 Connect the FM and AM antennas to AM and GND terminal. Quick start guide ■ For further connections • Using the other kind of speaker combinations ☞ P. 12 • Connecting a video monitor ☞ P. 16 • Connecting a DVD player ☞ P. 16 • Connecting a DVD recorder ☞ P. 16 • Connecting a cable TV...
.... INTRODUCTION 4 Connect the FM and AM antennas to AM and GND terminal. Quick start guide ■ For further connections • Using the other kind of speaker combinations ☞ P. 12 • Connecting a video monitor ☞ P. 16 • Connecting a DVD player ☞ P. 16 • Connecting a DVD recorder ☞ P. 16 • Connecting a cable TV...

Owner's Manual
Page 12
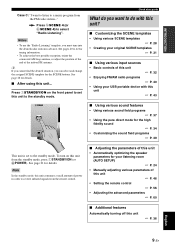
...5 Rotate 8VOLUME to adjust the volume. 1 Turn on the video monitor connected to this unit. 2 Press 1STANDBY/ON on the front panel. If the speakers are 6 ohm speakers, set "SP IMP." Quick start guide Step 3: Turn on the power and press SCENE 1 button Check the type of power in order to receive...signals from the connected DVD player as the back ground music for this room..." Case B: "I want to this unit consumes a small amount of the connected speakers. Note To use the "TV Viewing" template, you change the input source or sound field program, the SCENE mode is in the SCENE mode. 8 ...
...5 Rotate 8VOLUME to adjust the volume. 1 Turn on the video monitor connected to this unit. 2 Press 1STANDBY/ON on the front panel. If the speakers are 6 ohm speakers, set "SP IMP." Quick start guide Step 3: Turn on the power and press SCENE 1 button Check the type of power in order to receive...signals from the connected DVD player as the back ground music for this room..." Case B: "I want to this unit consumes a small amount of the connected speakers. Note To use the "TV Viewing" template, you change the input source or sound field program, the SCENE mode is in the SCENE mode. 8 ...
Owner's Manual
Page 13
... the desired radio station in order to receive infrared signals from the remote control. ■ Adjusting the parameters of this unit • Automatically optimizing the speaker parameters for your USB portable device with this unit? ■ Customizing the SCENE templates • Using various SCENE templates ☞ P. 28 • Creating your original...
... the desired radio station in order to receive infrared signals from the remote control. ■ Adjusting the parameters of this unit • Automatically optimizing the speaker parameters for your USB portable device with this unit? ■ Customizing the SCENE templates • Using various SCENE templates ☞ P. 28 • Creating your original...

Owner's Manual
Page 14
... jacks See page 17 for connection information. 3 VIDEO jacks See pages 16 and 18 for connection information. 4 ANTENNA terminals See page 20 for connection information. 5 SPEAKERS terminals See page 12 for connection information. 0 6 AC OUTLETS See page 21 for connection information. 7 DIGITAL INPUT jacks See pages 16 and 19 for connection... PB S VIDEO OPTICAL CD 3 Y DTV/ CBL 2 MULTI CH INPUT FRONT SURROUND CENTER L VIDEO DVD DTV/CBL L AUDIO IN DVR OUT CD DVD 1 R COAXIAL R SUBWOOFER ANTENNA SPEAKERS AM GND FM 75 UNBAL.
... jacks See page 17 for connection information. 3 VIDEO jacks See pages 16 and 18 for connection information. 4 ANTENNA terminals See page 20 for connection information. 5 SPEAKERS terminals See page 12 for connection information. 0 6 AC OUTLETS See page 21 for connection information. 7 DIGITAL INPUT jacks See pages 16 and 19 for connection... PB S VIDEO OPTICAL CD 3 Y DTV/ CBL 2 MULTI CH INPUT FRONT SURROUND CENTER L VIDEO DVD DTV/CBL L AUDIO IN DVR OUT CD DVD 1 R COAXIAL R SUBWOOFER ANTENNA SPEAKERS AM GND FM 75 UNBAL.

Owner's Manual
Page 15
...amplifier, such as the Yamaha Active Servo Processing Subwoofer System, is effective not only for reinforcing bass frequencies from any or all channels, but also for high fidelity sound reproduction of the subwoofer is not practical to place the subwoofer near the front speakers. The position of the ...it slightly toward the center of a subwoofer with the full system. English 11 En If for effect and surround sounds. Center speaker (C) The center speaker is better to use it . Subwoofer (SW) The use of the room to enjoy CINEMA DSP and multichannel audio sources. Place...
...amplifier, such as the Yamaha Active Servo Processing Subwoofer System, is effective not only for reinforcing bass frequencies from any or all channels, but also for high fidelity sound reproduction of the subwoofer is not practical to place the subwoofer near the front speakers. The position of the ...it slightly toward the center of a subwoofer with the full system. English 11 En If for effect and surround sounds. Center speaker (C) The center speaker is better to use it . Subwoofer (SW) The use of the room to enjoy CINEMA DSP and multichannel audio sources. Place...
Owner's Manual
Page 16
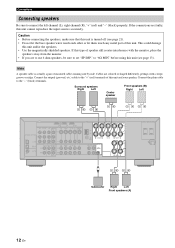
... interference with a stripe, groove or ridge. Connect the striped (grooved, etc.) cable to the "+" (red) terminals of this unit and your speaker. Connect the plain cable to connect the left channel (L), right channel (R), "+" (red) and "-" (black) properly. R SURROUND L CENTER R...SUB WOOFER R FRONT A L AC OUTLETS Subwoofer Right Left Front speakers (A) 12 En Note A speaker cable is turned off (see page 13). Surround speakers Right Left Front speakers (B) Right Left Center speaker Subwoofer Center speaker COMPONENT VIDEO DVD DTV/CBL DVR MONITOR OUT OUT DVD DVD ...
... interference with a stripe, groove or ridge. Connect the striped (grooved, etc.) cable to the "+" (red) terminals of this unit and your speaker. Connect the plain cable to connect the left channel (L), right channel (R), "+" (red) and "-" (black) properly. R SURROUND L CENTER R...SUB WOOFER R FRONT A L AC OUTLETS Subwoofer Right Left Front speakers (A) 12 En Note A speaker cable is turned off (see page 13). Surround speakers Right Left Front speakers (B) Right Left Center speaker Subwoofer Center speaker COMPONENT VIDEO DVD DTV/CBL DVR MONITOR OUT OUT DVD DVD ...

Owner's Manual
Page 17
...the knob and then insert the banana plug connector into the hole on the terminal. 4 Press BSTRAIGHT repeatedly to the "+" (red) terminals of the speaker wire into the end of the corresponding terminal. Banana plug SP IMP.- 6 MIN 5 Press 1STANDBY/ON to "6Ω MIN" as follows BEFORE using ...this unit. 1 Make sure this unit. to confirm your speaker. Note The setting you made is reflected next time you are colored or shaped differently, perhaps with a stripe, groove or ridges. Cables are to the...
...the knob and then insert the banana plug connector into the hole on the terminal. 4 Press BSTRAIGHT repeatedly to the "+" (red) terminals of the speaker wire into the end of the corresponding terminal. Banana plug SP IMP.- 6 MIN 5 Press 1STANDBY/ON to "6Ω MIN" as follows BEFORE using ...this unit. 1 Make sure this unit. to confirm your speaker. Note The setting you made is reflected next time you are colored or shaped differently, perhaps with a stripe, groove or ridges. Cables are to the...

Owner's Manual
Page 19
At that time, audio/video signals output from the connected component (such as DVD player etc.) are not output from any speaker terminals but output from speakers connected to this unit using an HDMI cable shorter than 5 meters (16 feet) with the HDMI logo printed on it. • Use a conversion cable (HDMI ...
At that time, audio/video signals output from the connected component (such as DVD player etc.) are not output from any speaker terminals but output from speakers connected to this unit using an HDMI cable shorter than 5 meters (16 feet) with the HDMI logo printed on it. • Use a conversion cable (HDMI ...

Owner's Manual
Page 21
... the HDMI OUT jack. • Audio/video signals output from the connected component (such as DVD player etc.) are not output from any speaker terminals but output from speakers connected to this unit using a HDMI connection, connect your video components to this unit. ENT VIDEO DVR MONITOR OUT OUT DVD DVD DTV...
... the HDMI OUT jack. • Audio/video signals output from the connected component (such as DVD player etc.) are not output from any speaker terminals but output from speakers connected to this unit using a HDMI connection, connect your video components to this unit. ENT VIDEO DVR MONITOR OUT OUT DVD DVD DTV...

Owner's Manual
Page 23
... VIDEO DVD DTV/CBL L AUDIO IN DVR OUT CD R R SUBWOOFER FM 75 UNBAL. Make sure that you connect a 5.1-channel speaker system before using this feature. Be sure to match the left and right input jacks for the front and surround channels. Connect the output...player via analog and digital connection, priority is equipped with 6 additional input jacks (FRONT L/R, SURROUND L/R, CENTER and SUBWOOFER) for missing speakers. PREPARATION Connections Connecting audio components Connect the audio components as the input source (see page 33), this unit and other components are unplugged...
... VIDEO DVD DTV/CBL L AUDIO IN DVR OUT CD R R SUBWOOFER FM 75 UNBAL. Make sure that you connect a 5.1-channel speaker system before using this feature. Be sure to match the left and right input jacks for the front and surround channels. Connect the output...player via analog and digital connection, priority is equipped with 6 additional input jacks (FRONT L/R, SURROUND L/R, CENTER and SUBWOOFER) for missing speakers. PREPARATION Connections Connecting audio components Connect the audio components as the input source (see page 33), this unit and other components are unplugged...

Owner's Manual
Page 24
STANDBY /ON PHONES SILENT CINEMA SPEAKERS A/B/OFF OPTIMIZER MIC EDIT PRESET/TUNING FM/AM A/B/C/D/E 1 l PRESET/TUNING h SCENE 2 3 4 MEMORY TUNING AUTO/MAN'L TONE CONTROL l PROGRAM h STRAIGHT DIRECT STEREO l INPUT h AUDIO SELECT EFFECT ... of vinyl-covered wire extended outdoors from this unit. • A properly installed outdoor antenna provides clearer reception than an indoor one. Consult the nearest authorized Yamaha dealer or service center about outdoor antennas. • The AM loop antenna should always be placed away from a window.
STANDBY /ON PHONES SILENT CINEMA SPEAKERS A/B/OFF OPTIMIZER MIC EDIT PRESET/TUNING FM/AM A/B/C/D/E 1 l PRESET/TUNING h SCENE 2 3 4 MEMORY TUNING AUTO/MAN'L TONE CONTROL l PROGRAM h STRAIGHT DIRECT STEREO l INPUT h AUDIO SELECT EFFECT ... of vinyl-covered wire extended outdoors from this unit. • A properly installed outdoor antenna provides clearer reception than an indoor one. Consult the nearest authorized Yamaha dealer or service center about outdoor antennas. • The AM loop antenna should always be placed away from a window.

Owner's Manual
Page 26
...or AM tuning mode (see pages 40). 8 MUTE indicator Flashes while the MUTE function is on (see page 37). G Input channel and speaker indicators LFE L CR SL SR LFE indicator Input channel indicators LFE indicator Lights up when you run "AUTO SETUP" and when the... you select a HiFi DSP sound field program (see page 36). F SLEEP indicator Lights up when headphones are used without any of the decoders of front speakers selected (see page 33). D E F G A Headphones indicator Lights up while the sleep timer is reproducing PCM (Pulse Code Modulation) digital audio signals. ...
...or AM tuning mode (see pages 40). 8 MUTE indicator Flashes while the MUTE function is on (see page 37). G Input channel and speaker indicators LFE L CR SL SR LFE indicator Input channel indicators LFE indicator Lights up when you run "AUTO SETUP" and when the... you select a HiFi DSP sound field program (see page 36). F SLEEP indicator Lights up when headphones are used without any of the decoders of front speakers selected (see page 33). D E F G A Headphones indicator Lights up while the sleep timer is reproducing PCM (Pulse Code Modulation) digital audio signals. ...

Owner's Manual
Page 27
... low temperatures - dusty places Connections English 23 En places of high humidity, such as near a bath - Be sure to operate. STANDBY /ON PHONES SILENT CINEMA SPEAKERS A/B/OFF OPTIMIZER MIC EDIT PRESET/TUNING FM/AM A/B/C/D/E 1 l PRESET/TUNING h SCENE 2 3 4 MEMORY TUNING AUTO/MAN'L TONE CONTROL l PROGRAM h STRAIGHT NIGHT l INPUT h AUDIO SELECT EFFECT VOLUME...
... low temperatures - dusty places Connections English 23 En places of high humidity, such as near a bath - Be sure to operate. STANDBY /ON PHONES SILENT CINEMA SPEAKERS A/B/OFF OPTIMIZER MIC EDIT PRESET/TUNING FM/AM A/B/C/D/E 1 l PRESET/TUNING h SCENE 2 3 4 MEMORY TUNING AUTO/MAN'L TONE CONTROL l PROGRAM h STRAIGHT NIGHT l INPUT h AUDIO SELECT EFFECT VOLUME...

Owner's Manual
Page 28
...less). ❏ The crossover frequency controls of the connected subwoofer is set to the tripod (etc.). Optimizing the speaker setting for your listening room Optimizing the speaker setting for loud test tones to be output during the "AUTO SETUP" procedure. • To achieve the best... Automatic processing of a tripod (etc.) to fix the optimizer microphone to the maximum. ❏ FRONT A speakers are seated in your listening room This unit employs the YPAO (Yamaha Parametric Room Acoustic Optimizer) technology which lets you are selected as your ears would be satisfactory.
...less). ❏ The crossover frequency controls of the connected subwoofer is set to the tripod (etc.). Optimizing the speaker setting for your listening room Optimizing the speaker setting for loud test tones to be output during the "AUTO SETUP" procedure. • To achieve the best... Automatic processing of a tripod (etc.) to fix the optimizer microphone to the maximum. ❏ FRONT A speakers are seated in your listening room This unit employs the YPAO (Yamaha Parametric Room Acoustic Optimizer) technology which lets you are selected as your ears would be satisfactory.

Owner's Manual
Page 29
...SETUP", press Gl / h to complete the auto setup procedure. It takes approximately 3 minutes for your listening room The display changes as follows. Speaker size SIZE Checks the frequency response of the following choises and then select "START". Once all item [ ]/[ ]:Up/Down [ENTER]:Start AUTO:... setup procedure, do not perform any operation on page 27. • When this unit. • We recommend getting out of each speaker from each speaker. Also checks and adjusts the volume level of all items are output. • If an error occurs during the auto setup procedure. ...
...SETUP", press Gl / h to complete the auto setup procedure. It takes approximately 3 minutes for your listening room The display changes as follows. Speaker size SIZE Checks the frequency response of the following choises and then select "START". Once all item [ ]/[ ]:Up/Down [ENTER]:Start AUTO:... setup procedure, do not perform any operation on page 27. • When this unit. • We recommend getting out of each speaker from each speaker. Also checks and adjusts the volume level of all items are output. • If an error occurs during the auto setup procedure. ...


