Owners Manual
Page 5
... the remote control 3 CONTROLS AND FUNCTIONS 4 Front panel 4 Remote control 6 Front panel display 9 Rear panel 11 PREPARATION CONNECTIONS 12 Placing speakers 12 Connecting speakers 13 Information on jacks and cable plugs 16 Audio and video signal flow 17 Connecting a TV 18 Connecting a DVD player, a DVD recorder... FIELD PROGRAMS 62 Selecting sound field programs 62 Sound field program descriptions 63 Changing sound field parameter settings 65 Sound field program speaker layouts 71 ADVANCED OPERATION SET MENU 74 Using SET MENU 76 1 SOUND MENU 78 2 INPUT MENU 81 3 OPTION MENU...
... the remote control 3 CONTROLS AND FUNCTIONS 4 Front panel 4 Remote control 6 Front panel display 9 Rear panel 11 PREPARATION CONNECTIONS 12 Placing speakers 12 Connecting speakers 13 Information on jacks and cable plugs 16 Audio and video signal flow 17 Connecting a TV 18 Connecting a DVD player, a DVD recorder... FIELD PROGRAMS 62 Selecting sound field programs 62 Sound field program descriptions 63 Changing sound field parameter settings 65 Sound field program speaker layouts 71 ADVANCED OPERATION SET MENU 74 Using SET MENU 76 1 SOUND MENU 78 2 INPUT MENU 81 3 OPTION MENU...
Owners Manual
Page 7
... control is cleared, insert new batteries, set up the remote control code and program any acquired functions that you notice the following parts. DIRECT ST. 5 6 7 8 SPEAKERS 9 LEVEL TITLE BAND ENHANCER 0 NIGHT 10 PRESET/CH STRAIGHT ENT.
... control is cleared, insert new batteries, set up the remote control code and program any acquired functions that you notice the following parts. DIRECT ST. 5 6 7 8 SPEAKERS 9 LEVEL TITLE BAND ENHANCER 0 NIGHT 10 PRESET/CH STRAIGHT ENT.
Owners Manual
Page 8
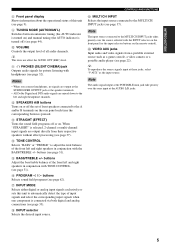
...selected as the input source (see page 46). 4 The colon (:) is displayed in the front panel display (see page 44). • Selects the speaker channel whose output level you turn on this unit, there will be a 4 to 5-second delay before this unit can reproduce sound. 2 Remote control ...; In the standby mode, this unit consumes a small amount of the 8 preset station numbers (1 to the U.S.A. buttons • Selects one of the speaker channel selected using NEXT when "TUNER" is selected as the input source (see page 26). For details, see "XM Satellite Radio controls and functions" on...
...selected as the input source (see page 46). 4 The colon (:) is displayed in the front panel display (see page 44). • Selects the speaker channel whose output level you turn on this unit, there will be a 4 to 5-second delay before this unit can reproduce sound. 2 Remote control ...; In the standby mode, this unit consumes a small amount of the 8 preset station numbers (1 to the U.S.A. buttons • Selects one of the speaker channel selected using NEXT when "TUNER" is selected as the input source (see page 26). For details, see "XM Satellite Radio controls and functions" on...
Owners Manual
Page 9
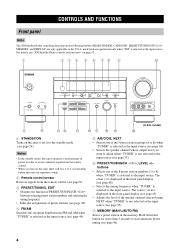
...video camera or a portable audio player (see page 32). Notes • When you connect headphones, no signals are mixed down to the left and right speakers in conjunction with headphones (see page 22). D TONE CONTROL Selects "BASS" or "TREBLE" to the A and/or B terminals on ) and manual ... page 37). y This does not affect the AUDIO OUT (REC) level. J VIDEO AUX jacks Input audio and video signals from their respective speakers without effect processing (see page 9). 9 TUNING MODE (AUTO/MAN'L) Switches between automatic tuning (the AUTO indicator is turned on the rear panel each...
...video camera or a portable audio player (see page 32). Notes • When you connect headphones, no signals are mixed down to the left and right speakers in conjunction with headphones (see page 22). D TONE CONTROL Selects "BASS" or "TREBLE" to the A and/or B terminals on ) and manual ... page 37). y This does not affect the AUDIO OUT (REC) level. J VIDEO AUX jacks Input audio and video signals from their respective speakers without effect processing (see page 9). 9 TUNING MODE (AUTO/MAN'L) Switches between automatic tuning (the AUTO indicator is turned on the rear panel each...
Owners Manual
Page 10
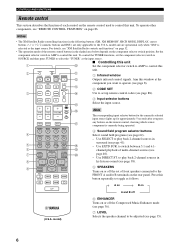
...see "REMOTE CONTROL FEATURES" on page 86. Press this button repeatedly to toggle as the input source. DIRECT ST. 5 6 7 8 SPEAKERS 9 LEVEL TITLE BAND ENHANCER 0 NIGHT 10 PRESET/CH STRAIGHT ENT. CONTROLS AND FUNCTIONS Remote control This section describes the function of each control... To operate other components, see page 41). - model and are only applicable to the U.S.A. To control the TUNER functions, set of front speakers connected to switch between 5.1 and 6.1- Aim this 2 CODE SET TRANSMIT POWER POWER STANDBY POWER A unit. 1 Infrared window TV AV B ...
...see "REMOTE CONTROL FEATURES" on page 86. Press this button repeatedly to toggle as the input source. DIRECT ST. 5 6 7 8 SPEAKERS 9 LEVEL TITLE BAND ENHANCER 0 NIGHT 10 PRESET/CH STRAIGHT ENT. CONTROLS AND FUNCTIONS Remote control This section describes the function of each control... To operate other components, see page 41). - model and are only applicable to the U.S.A. To control the TUNER functions, set of front speakers connected to switch between 5.1 and 6.1- Aim this 2 CODE SET TRANSMIT POWER POWER STANDBY POWER A unit. 1 Infrared window TV AV B ...
Owners Manual
Page 11
... you set for both DTV/CBL and (see page 87), priority is selected, 2-channel or multi-channel input signals are output directly from their respective speakers without effect processing (see page 37). AMP Operates this unit to the one set the remote control codes for DTV/ CBL. SOURCE Operates the component...
... you set for both DTV/CBL and (see page 87), priority is selected, 2-channel or multi-channel input signals are output directly from their respective speakers without effect processing (see page 37). AMP Operates this unit to the one set the remote control codes for DTV/ CBL. SOURCE Operates the component...
Owners Manual
Page 12
...; Do not leave or store the remote control in the following types of extremely low temperatures - DIRECT ST. 5 6 7 8 SPEAKERS 9 LEVEL TITLE BAND ENHANCER 0 NIGHT 10 PRESET/CH STRAIGHT ENT. model) STANDBY /ON PHONES SPEAKERS A B SILENT CINEMA PRESET/TUNING SEARCH MODE EDIT FM/AM A/B/C/D/E CATEGORY NEXT STRAIGHT EFFECT TONE CONTROL l PROGRAM h BASS/TREBLE...
...; Do not leave or store the remote control in the following types of extremely low temperatures - DIRECT ST. 5 6 7 8 SPEAKERS 9 LEVEL TITLE BAND ENHANCER 0 NIGHT 10 PRESET/CH STRAIGHT ENT. model) STANDBY /ON PHONES SPEAKERS A B SILENT CINEMA PRESET/TUNING SEARCH MODE EDIT FM/AM A/B/C/D/E CATEGORY NEXT STRAIGHT EFFECT TONE CONTROL l PROGRAM h BASS/TREBLE...
Owners Manual
Page 13
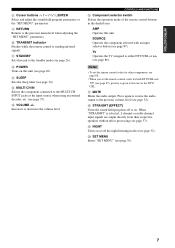
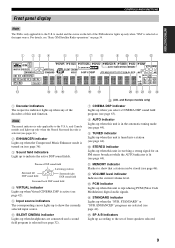
... SR C D EF G HI J KL M N 1 Decoder indicators The respective indicator lights up when the "SUR. D STANDARD indicator Lights up when any of the decoders of front speakers selected. 9 and Europe models only) 7 CINEMA DSP indicator Lights up when you select a CINEMA DSP sound field program (see page 63). 8 AUTO indicator Lights up...
... SR C D EF G HI J KL M N 1 Decoder indicators The respective indicator lights up when the "SUR. D STANDARD indicator Lights up when any of the decoders of front speakers selected. 9 and Europe models only) 7 CINEMA DSP indicator Lights up when you select a CINEMA DSP sound field program (see page 63). 8 AUTO indicator Lights up...

Owners Manual
Page 15
...model) 0 7 COMPONENT VIDEO jacks See pages 18 and 19 for connection information. 8 Antenna terminals See page 23 for connection information. 9 Speaker terminals See page 13 for connection information. (U.S.A. model only) See page 51 for connection information. 0 AC OUTLET(S) Use to supply power to... your other audiovisual components. DVD DTV/CBL IN DVR OUT S VIDEO FRONT MONITOR OUT SPEAKERS A SURROUND B CENTER SURROUND BACK CONTROLS AND FUNCTIONS 7 COMPONENT VIDEO DVD DVR Y PB PR Y PB PR DTV/CBL AC OUTLETS MONITOR OUT...
...model) 0 7 COMPONENT VIDEO jacks See pages 18 and 19 for connection information. 8 Antenna terminals See page 23 for connection information. 9 Speaker terminals See page 13 for connection information. (U.S.A. model only) See page 51 for connection information. 0 AC OUTLET(S) Use to supply power to... your other audiovisual components. DVD DTV/CBL IN DVR OUT S VIDEO FRONT MONITOR OUT SPEAKERS A SURROUND B CENTER SURROUND BACK CONTROLS AND FUNCTIONS 7 COMPONENT VIDEO DVD DVR Y PB PR Y PB PR DTV/CBL AC OUTLETS MONITOR OUT...
Owners Manual
Page 16
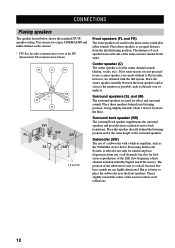
...the ideal listening position. If for effect and surround sounds. Surround speakers (SL and SR) The surround speakers are not highly directional. The position of the room to the monitor as possible, such as the YAMAHA Active Servo Processing Subwoofer System, is for the main source sound ...plus effect sounds. Place the center speaker centrally between the front speakers and as close to reduce wall reflections. 12 Subwoofer (SW) The use...
...the ideal listening position. If for effect and surround sounds. Surround speakers (SL and SR) The surround speakers are not highly directional. The position of the room to the monitor as possible, such as the YAMAHA Active Servo Processing Subwoofer System, is for the main source sound ...plus effect sounds. Place the center speaker centrally between the front speakers and as close to reduce wall reflections. 12 Subwoofer (SW) The use...
Owners Manual
Page 17
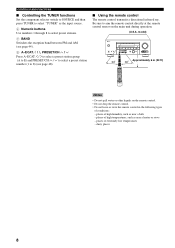
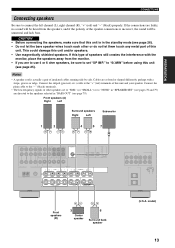
... unit. Front speakers (A) Right Left Surround speakers Right Left Subwoofer 1 2 4 57 OUTPUT SUB WOOFER FRONT SPEAKERS SURROUND A B CLASS 2 WIRING CENTER SURROUND BACK Front speakers (B) 3 Center speaker 6 Surround back speaker (U.S.A. model) 13 Notes • A speaker cord is in "SPEAKER SET" (see...cable to the "-" (black) terminals. • The low-frequency signals of speakers still creates the interference with a stripe, groove or ridge. PREPARATION CONNECTIONS Connecting speakers Be sure to connect the left channel (L), right channel (R), "+" (red) and...
... unit. Front speakers (A) Right Left Surround speakers Right Left Subwoofer 1 2 4 57 OUTPUT SUB WOOFER FRONT SPEAKERS SURROUND A B CLASS 2 WIRING CENTER SURROUND BACK Front speakers (B) 3 Center speaker 6 Surround back speaker (U.S.A. model) 13 Notes • A speaker cord is in "SPEAKER SET" (see...cable to the "-" (black) terminals. • The low-frequency signals of speakers still creates the interference with a stripe, groove or ridge. PREPARATION CONNECTIONS Connecting speakers Be sure to connect the left channel (L), right channel (R), "+" (red) and...

Owners Manual
Page 18
CONNECTIONS FRONT terminals Connect one front speaker system, connect it to the FRONT A or B terminal. SURROUND BACK terminals Connect a surround back speaker (6) to these terminals. If you use only one or two front speaker systems (1, 2) to these terminals. SURROUND terminals Connect surround speakers (4, 5) to these terminals. SUBWOOFER jack Connect a subwoofer with a built-in amplifier (7) (such as the YAMAHA Active Servo Processing Subwoofer System) to these terminals. CENTER terminals Connect a center speaker (3) to this jack. 1 2 3 7 4 5 6 Speaker layout 14
CONNECTIONS FRONT terminals Connect one front speaker system, connect it to the FRONT A or B terminal. SURROUND BACK terminals Connect a surround back speaker (6) to these terminals. If you use only one or two front speaker systems (1, 2) to these terminals. SURROUND terminals Connect surround speakers (4, 5) to these terminals. SUBWOOFER jack Connect a subwoofer with a built-in amplifier (7) (such as the YAMAHA Active Servo Processing Subwoofer System) to these terminals. CENTER terminals Connect a center speaker (3) to this jack. 1 2 3 7 4 5 6 Speaker layout 14

Owners Manual
Page 19
... corresponding terminal. 3 Insert one bare wire into the hole on the side of the cable together to secure the wire. PREPARATION ■ Connecting the speaker cable 1 Remove approximately 10 mm (0.4 in ) 2 Loosen the knob. 1 Tighten the knob. Banana plug 10 mm (0.4 in ) of insulation from... the end of each speaker cable and then twist the exposed wires of each terminal. Red: positive (+) Black: negative (-) 15 Red: positive (+) Black: negative (-) 4 Tighten the knob...
... corresponding terminal. 3 Insert one bare wire into the hole on the side of the cable together to secure the wire. PREPARATION ■ Connecting the speaker cable 1 Remove approximately 10 mm (0.4 in ) 2 Loosen the knob. 1 Tighten the knob. Banana plug 10 mm (0.4 in ) of insulation from... the end of each speaker cable and then twist the exposed wires of each terminal. Red: positive (+) Black: negative (-) 15 Red: positive (+) Black: negative (-) 4 Tighten the knob...
Owners Manual
Page 26
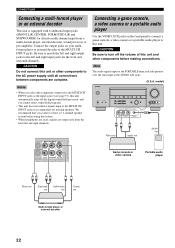
...your multiformat player or external decoder to the left and right output jacks to the MULTI CH INPUT jacks. model) STANDBY /ON PHONES SPEAKERS A B SILENT CINEMA PRESET/TUNING SEARCH MODE EDIT FM/AM A/B/C/D/E CATEGORY NEXT STRAIGHT EFFECT TONE CONTROL l PROGRAM h BASS/TREBLE l PRESET...for discrete multi-channel input from the front left and right channels. Notes • When you connect at least a 5.1-channel speaker system before making connections. We recommend that you select the component connected to the AC power supply until all connections between components...
...your multiformat player or external decoder to the left and right output jacks to the MULTI CH INPUT jacks. model) STANDBY /ON PHONES SPEAKERS A B SILENT CINEMA PRESET/TUNING SEARCH MODE EDIT FM/AM A/B/C/D/E CATEGORY NEXT STRAIGHT EFFECT TONE CONTROL l PROGRAM h BASS/TREBLE l PRESET...for discrete multi-channel input from the front left and right channels. Notes • When you connect at least a 5.1-channel speaker system before making connections. We recommend that you select the component connected to the AC power supply until all connections between components...
Owners Manual
Page 29
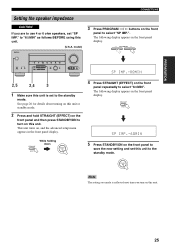
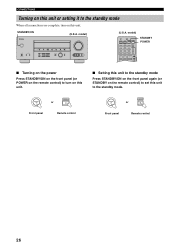
...setup menu appears in the front panel display. STANDBY /ON Note The setting you made is set "SP IMP." l PROGRAM h STANDBY /ON PHONES SPEAKERS A B SILENT CINEMA PRESET/TUNING SEARCH MODE EDIT FM/AM A/B/C/D/E CATEGORY NEXT STRAIGHT EFFECT TONE CONTROL l PROGRAM h BASS/TREBLE l PRESET/TUNING/CH...following display appears in the front panel display. model) 3 Press PROGRAM l / h buttons on this unit. PREPARATION CONNECTIONS Setting the speaker impedance CAUTION If you turn on the front panel to save the new setting and set this unit is reflected next time you are to...
...setup menu appears in the front panel display. STANDBY /ON Note The setting you made is set "SP IMP." l PROGRAM h STANDBY /ON PHONES SPEAKERS A B SILENT CINEMA PRESET/TUNING SEARCH MODE EDIT FM/AM A/B/C/D/E CATEGORY NEXT STRAIGHT EFFECT TONE CONTROL l PROGRAM h BASS/TREBLE l PRESET/TUNING/CH...following display appears in the front panel display. model) 3 Press PROGRAM l / h buttons on this unit. PREPARATION CONNECTIONS Setting the speaker impedance CAUTION If you turn on the front panel to save the new setting and set this unit is reflected next time you are to...
Owners Manual
Page 30
model) STANDBY /ON PHONES SPEAKERS A B SILENT CINEMA PRESET/TUNING SEARCH MODE EDIT FM/AM A/B/C/D/E CATEGORY NEXT STRAIGHT EFFECT TONE CONTROL l PROGRAM h BASS/TREBLE l PRESET/TUNING/CH h LEVEL INPUT MODE MEMORY ...
model) STANDBY /ON PHONES SPEAKERS A B SILENT CINEMA PRESET/TUNING SEARCH MODE EDIT FM/AM A/B/C/D/E CATEGORY NEXT STRAIGHT EFFECT TONE CONTROL l PROGRAM h BASS/TREBLE l PRESET/TUNING/CH h LEVEL INPUT MODE MEMORY ...
Owners Manual
Page 31
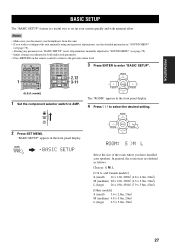
... L (large) 6.3 x 5.0m, 30m2 27 PREPARATION BASIC SETUP BASIC SETUP The "BASIC SETUP" feature is a useful way to set up your speakers. Notes • Make sure you disconnect your headphones from this unit manually using more precise adjustments, use the detailed parameters in "SOUND MENU" (see...(see page 78). • Initial settings are defined as follows: Choices: S, M, L [U.S.A. PRESET/CH A-E/CAT. DIRECT ST. 5 6 7 8 SPEAKERS 9 LEVEL TITLE BAND ENHANCER 0 NIGHT 10 PRESET/CH STRAIGHT ENT. SET MENU MENU SRCH MODE .BASIC SETUP 3 Press ENTER to select the desired setting....
... L (large) 6.3 x 5.0m, 30m2 27 PREPARATION BASIC SETUP BASIC SETUP The "BASIC SETUP" feature is a useful way to set up your speakers. Notes • Make sure you disconnect your headphones from this unit manually using more precise adjustments, use the detailed parameters in "SOUND MENU" (see...(see page 78). • Initial settings are defined as follows: Choices: S, M, L [U.S.A. PRESET/CH A-E/CAT. DIRECT ST. 5 6 7 8 SPEAKERS 9 LEVEL TITLE BAND ENHANCER 0 NIGHT 10 PRESET/CH STRAIGHT ENT. SET MENU MENU SRCH MODE .BASIC SETUP 3 Press ENTER to select the desired setting....

Owners Manual
Page 32
.../CH A-E/CAT. ENTER A-E/CAT. >SET CANCEL Choices: SET, CANCEL • Select "SET" to apply the settings you selected "SET" in step 7, each speaker outputs a test tone twice in turn. A-E/CAT. SUBWOOFER .. A-E/CAT. PRESET/CH A-E/CAT. appears in step 6, if necessary. 4spk L CR SL SB SR... also press SET MENU to cancel the setup procedure. 8 Press ENTER to confirm your system. 6 Press d to select "SPEAKERS" and then j / i to select the number of speakers connected to cancel the setup procedure without making any changes. YES Choices: YES, NONE • Select "YES" if you ...
.../CH A-E/CAT. ENTER A-E/CAT. >SET CANCEL Choices: SET, CANCEL • Select "SET" to apply the settings you selected "SET" in step 7, each speaker outputs a test tone twice in turn. A-E/CAT. SUBWOOFER .. A-E/CAT. PRESET/CH A-E/CAT. appears in step 6, if necessary. 4spk L CR SL SB SR... also press SET MENU to cancel the setup procedure. 8 Press ENTER to confirm your system. 6 Press d to select "SPEAKERS" and then j / i to select the number of speakers connected to cancel the setup procedure without making any changes. YES Choices: YES, NONE • Select "YES" if you ...

Owners Manual
Page 33
...; Select "SWFR" to complete the setup procedure if the test tone levels from "BASIC SETUP". BASIC SETUP 11 Press d / u to select a speaker and then j / i to select the desired setting. ENTER A-E/CAT. • If you selected "YES" in step 9, the setup procedure is ...completed and the display returns to the top "SET MENU" display. • If you selected "NO" in step 9, the front speaker level adjustment display appears in turn. • Press i to increase the value. • Press j to confirm your selection. ENTER A-E/CAT. PREPARATION 9 Press j ...
...; Select "SWFR" to complete the setup procedure if the test tone levels from "BASIC SETUP". BASIC SETUP 11 Press d / u to select a speaker and then j / i to select the desired setting. ENTER A-E/CAT. • If you selected "YES" in step 9, the setup procedure is ...completed and the display returns to the top "SET MENU" display. • If you selected "NO" in step 9, the front speaker level adjustment display appears in turn. • Press i to increase the value. • Press j to confirm your selection. ENTER A-E/CAT. PREPARATION 9 Press j ...
Owners Manual
Page 34
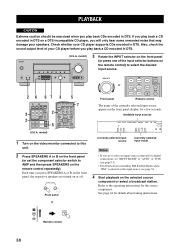
... level of the input selector buttons on the selected source component or select a broadcast station. EFFECT SET MENU MENU SRCH MODE A-E/CAT. SPEAKERS A B Front panel Front panel V-AUX DVR Remote control The name of the currently selected input source appears in DTS. or AMP SOURCE TV... TV INPUT MUTE (U.S.A. DISPLAY AUDIO 7 1 Turn on the video monitor connected to this unit. 2 Press SPEAKERS A or B on the front panel (or set "INPUT MODE" to AMP and then press SPEAKERS on the front panel (or press one of your CD player supports CDs encoded in DTS. RETURN XM...
... level of the input selector buttons on the selected source component or select a broadcast station. EFFECT SET MENU MENU SRCH MODE A-E/CAT. SPEAKERS A B Front panel Front panel V-AUX DVR Remote control The name of the currently selected input source appears in DTS. or AMP SOURCE TV... TV INPUT MUTE (U.S.A. DISPLAY AUDIO 7 1 Turn on the video monitor connected to this unit. 2 Press SPEAKERS A or B on the front panel (or set "INPUT MODE" to AMP and then press SPEAKERS on the front panel (or press one of your CD player supports CDs encoded in DTS. RETURN XM...


