
Owners Manual
Page 5
... the remote control 3 CONTROLS AND FUNCTIONS 4 Front panel 4 Remote control 6 Front panel display 8 Rear panel 10 PREPARATION CONNECTIONS 11 Placing speakers 11 Connecting speakers 12 Information on jacks and cable plugs 15 Audio and video signal flow 16 Connecting a TV 17 Connecting a DVD player, a DVD recorder... FIELD PROGRAMS 59 Selecting sound field programs 59 Sound field program descriptions 60 Changing sound field parameter settings 62 Sound field program speaker layouts 68 ADVANCED OPERATION SET MENU 71 Using SET MENU 73 1 SOUND MENU 75 2 INPUT MENU 78 3 OPTION MENU...
... the remote control 3 CONTROLS AND FUNCTIONS 4 Front panel 4 Remote control 6 Front panel display 8 Rear panel 10 PREPARATION CONNECTIONS 11 Placing speakers 11 Connecting speakers 12 Information on jacks and cable plugs 15 Audio and video signal flow 16 Connecting a TV 17 Connecting a DVD player, a DVD recorder... FIELD PROGRAMS 59 Selecting sound field programs 59 Sound field program descriptions 60 Changing sound field parameter settings 62 Sound field program speaker layouts 68 ADVANCED OPERATION SET MENU 71 Using SET MENU 73 1 SOUND MENU 75 2 INPUT MENU 78 3 OPTION MENU...
Owners Manual
Page 6
... coaxial digital audio signal jacks ◆ Sleep timer ◆ Cinema and music night listening modes ◆ Remote control with the 5.1-channel speaker system ◆ Virtual CINEMA DSP ◆ SILENT CINEMA™ Sophisticated AM/FM tuner ◆ 40-station random and direct preset tuning ...6 Ω) Front: 120 W + 120 W Center: 120 W Surround: 120 W + 120 W Subwoofer: 120 W (30 Hz, 6 Ω) Sound field features ◆ Proprietary YAMAHA technology for the creation of sound fields ◆ Dolby Digital decoder ◆ DTS, DTS Neo:6, DTS 96/24 decoder ◆ Dolby Pro Logic/Dolby Pro...
... coaxial digital audio signal jacks ◆ Sleep timer ◆ Cinema and music night listening modes ◆ Remote control with the 5.1-channel speaker system ◆ Virtual CINEMA DSP ◆ SILENT CINEMA™ Sophisticated AM/FM tuner ◆ 40-station random and direct preset tuning ...6 Ω) Front: 120 W + 120 W Center: 120 W Surround: 120 W + 120 W Subwoofer: 120 W (30 Hz, 6 Ω) Sound field features ◆ Proprietary YAMAHA technology for the creation of sound fields ◆ Dolby Digital decoder ◆ DTS, DTS Neo:6, DTS 96/24 decoder ◆ Dolby Pro Logic/Dolby Pro...
Owners Manual
Page 7
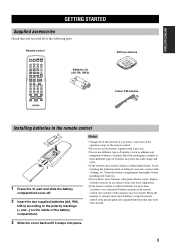
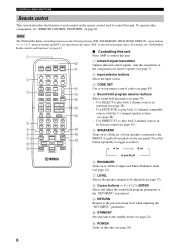
... SKIP CODE SET MULTI CH IN SLEEP AMP TV VOL CH VOLUME MUTE INPUT MUTE STEREO 1 MUSIC ENTERTAIN MOVIE 2 3 4 STANDARD 5 SELECT 6 EXTD SUR. 7 DIRECT ST. 8 SPEAKERS 9 ENHANCER 0 NIGHT STRAIGHT 10 ENT. LEVEL TITLE BAND SET MENU MENU SRCH MODE ENTER A-E/CAT. Notes • Change all of them correctly in the remote...
... SKIP CODE SET MULTI CH IN SLEEP AMP TV VOL CH VOLUME MUTE INPUT MUTE STEREO 1 MUSIC ENTERTAIN MOVIE 2 3 4 STANDARD 5 SELECT 6 EXTD SUR. 7 DIRECT ST. 8 SPEAKERS 9 ENHANCER 0 NIGHT STRAIGHT 10 ENT. LEVEL TITLE BAND SET MENU MENU SRCH MODE ENTER A-E/CAT. Notes • Change all of them correctly in the remote...
Owners Manual
Page 8
... band between FM and AM when "TUNER" is selected as the input source (see page 41). 5 A/B/C/D/E, NEXT • Selects one of the speaker channel selected using NEXT when "TUNER" is selected as the input source. For details, see "XM Satellite Radio controls and functions" on page 49.... 1 2 3 4 5 6 78 9 0 STANDBY /ON PHONES SPEAKERS A B SILENT CINEMA PRESET/TUNING SEARCH MODE EDIT FM/AM A/B/C/D/E CATEGORY NEXT STRAIGHT EFFECT TONE CONTROL l PROGRAM h BASS/TREBLE l PRESET/TUNING/CH h LEVEL ...
... band between FM and AM when "TUNER" is selected as the input source (see page 41). 5 A/B/C/D/E, NEXT • Selects one of the speaker channel selected using NEXT when "TUNER" is selected as the input source. For details, see "XM Satellite Radio controls and functions" on page 49.... 1 2 3 4 5 6 78 9 0 STANDBY /ON PHONES SPEAKERS A B SILENT CINEMA PRESET/TUNING SEARCH MODE EDIT FM/AM A/B/C/D/E CATEGORY NEXT STRAIGHT EFFECT TONE CONTROL l PROGRAM h BASS/TREBLE l PRESET/TUNING/CH h LEVEL ...
Owners Manual
Page 9
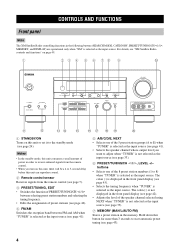
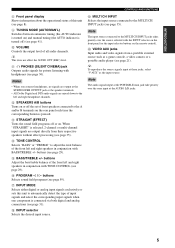
...directly from a portable external source such as the input source. buttons Adjust the bass/treble balance of the front left and right speakers in conjunction with headphones (see page 35). H INPUT selector Selects the desired input source. INTRODUCTION 8 Front panel display Shows ... to adjust the total balance of the front left and right headphone channels. J VIDEO AUX jacks Input audio and video signals from their respective speakers without effect processing (see page 35). buttons (see page 21). F PROGRAM l / h buttons Selects sound field programs (see page 29)....
...directly from a portable external source such as the input source. buttons Adjust the bass/treble balance of the front left and right speakers in conjunction with headphones (see page 35). H INPUT selector Selects the desired input source. INTRODUCTION 8 Front panel display Shows ... to adjust the total balance of the front left and right headphone channels. J VIDEO AUX jacks Input audio and video signals from their respective speakers without effect processing (see page 35). buttons (see page 21). F PROGRAM l / h buttons Selects sound field programs (see page 29)....
Owners Manual
Page 10
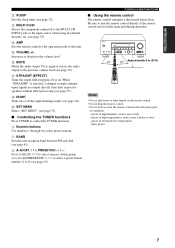
... MOVIE 2 3 4 STANDARD 5 SELECT 6 EXTD SUR. 7 DIRECT ST. 8 SPEAKERS 9 ENHANCER 0 NIGHT STRAIGHT 10 ENT. Use SELECT to play back 6.1-channel compatible sources with the 5.1-channel speaker system (see page 36). 5 SPEAKERS Turns on or off the Compressed Music Enhancer mode (see page 34). 7 LEVEL ...Selects the speaker channel to be adjusted (see page 24). 6 For details, see page ...
... MOVIE 2 3 4 STANDARD 5 SELECT 6 EXTD SUR. 7 DIRECT ST. 8 SPEAKERS 9 ENHANCER 0 NIGHT STRAIGHT 10 ENT. Use SELECT to play back 6.1-channel compatible sources with the 5.1-channel speaker system (see page 36). 5 SPEAKERS Turns on or off the Compressed Music Enhancer mode (see page 34). 7 LEVEL ...Selects the speaker channel to be adjusted (see page 24). 6 For details, see page ...
Owners Manual
Page 11
...: - F MUTE Mutes the audio output. When "STRAIGHT" is selected, 2-channel or multi-channel input signals are output directly from their respective speakers without effect processing (see page 30). STANDBY /ON PHONES SPEAKERS A B SILENT CINEMA PRESET/TUNING EDIT FM/AM A/B/C/D/E NEXT STRAIGHT EFFECT TONE CONTROL l PROGRAM h BASS/TREBLE l PRESET/TUNING/CH h LEVEL INPUT...
...: - F MUTE Mutes the audio output. When "STRAIGHT" is selected, 2-channel or multi-channel input signals are output directly from their respective speakers without effect processing (see page 30). STANDBY /ON PHONES SPEAKERS A B SILENT CINEMA PRESET/TUNING EDIT FM/AM A/B/C/D/E NEXT STRAIGHT EFFECT TONE CONTROL l PROGRAM h BASS/TREBLE l PRESET/TUNING/CH h LEVEL INPUT...
Owners Manual
Page 12
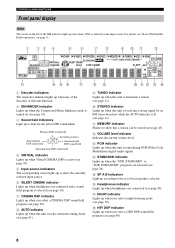
... a night listening mode (see page 30). F Headphones indicator Lights up when headphones are connected (see page 43). Presence DSP sound field Surround left of front speakers selected. G NIGHT indicator Lights up when you select a HiFi DSP sound field program (see page 60). 8 A MEMORY indicator Flashes to show the currently selected input...
... a night listening mode (see page 30). F Headphones indicator Lights up when headphones are connected (see page 43). Presence DSP sound field Surround left of front speakers selected. G NIGHT indicator Lights up when you select a HiFi DSP sound field program (see page 60). 8 A MEMORY indicator Flashes to show the currently selected input...
Owners Manual
Page 14
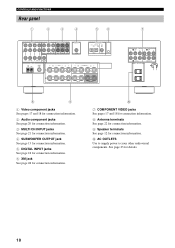
A FRONT SPEAKERS SURROUND B CENTER SUBWOOFER 7 COMPONENT VIDEO DVD DVR Y PB PR Y PB PR DTV/CBL AC OUTLETS MONITOR OUT 8 9 1 Video component jacks See pages 17 and 18 ... See page 48 for connection information. 0 7 COMPONENT VIDEO jacks See pages 17 and 18 for connection information. 8 Antenna terminals See page 22 for connection information. 9 Speaker terminals See page 12 for details. 10 CONTROLS AND FUNCTIONS Rear panel 1 2 3 4 56 AUDIO AUDIO MULTI CH INPUT CENTER OUTPUT DIGITAL INPUT XM DVD DTV...
A FRONT SPEAKERS SURROUND B CENTER SUBWOOFER 7 COMPONENT VIDEO DVD DVR Y PB PR Y PB PR DTV/CBL AC OUTLETS MONITOR OUT 8 9 1 Video component jacks See pages 17 and 18 ... See page 48 for connection information. 0 7 COMPONENT VIDEO jacks See pages 17 and 18 for connection information. 8 Antenna terminals See page 22 for connection information. 9 Speaker terminals See page 12 for details. 10 CONTROLS AND FUNCTIONS Rear panel 1 2 3 4 56 AUDIO AUDIO MULTI CH INPUT CENTER OUTPUT DIGITAL INPUT XM DVD DTV...
Owners Manual
Page 15
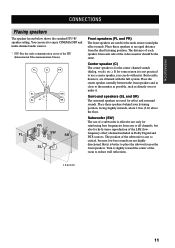
.... Turn it slightly toward the center of the video monitor should be the same. PREPARATION CONNECTIONS CONNECTIONS Placing speakers The speaker layout below shows the standard ITU-R* speaker setting. But it . You can do without it is the radio communication sector of a subwoofer is for... frequencies from the ideal listening position. If for hi-fi stereo reproduction of the subwoofer is not practical to use a center speaker, you can use of the ITU (International Telecommunication Union). The position of the LFE (lowfrequency effect) channel included in Dolby Digital...
.... Turn it slightly toward the center of the video monitor should be the same. PREPARATION CONNECTIONS CONNECTIONS Placing speakers The speaker layout below shows the standard ITU-R* speaker setting. But it . You can do without it is the radio communication sector of a subwoofer is for... frequencies from the ideal listening position. If for hi-fi stereo reproduction of the subwoofer is not practical to use a center speaker, you can use of the ITU (International Telecommunication Union). The position of the LFE (lowfrequency effect) channel included in Dolby Digital...

Owners Manual
Page 16
...unit. Connect the striped (grooved, etc.) cable to the speakers selected in the standby mode (see page 24). • Do not let the bare speaker wires touch each speaker must be heard from the monitor. • Use speakers with a stripe, groove or ridge. This could damage this ... OUT" (see page 75). 12 The impedance of each other speakers set (A or B), the impedance of this unit and/or speakers. • Use magnetically shielded speakers. If the connections are directed to the "+" (red) terminals of each speaker must be 4 Ω or higher. Connect the plain cable ...
...unit. Connect the striped (grooved, etc.) cable to the speakers selected in the standby mode (see page 24). • Do not let the bare speaker wires touch each speaker must be heard from the monitor. • Use speakers with a stripe, groove or ridge. This could damage this ... OUT" (see page 75). 12 The impedance of each other speakers set (A or B), the impedance of this unit and/or speakers. • Use magnetically shielded speakers. If the connections are directed to the "+" (red) terminals of each speaker must be 4 Ω or higher. Connect the plain cable ...
Owners Manual
Page 17
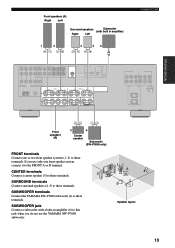
... a built-in amplifier) Right Left 1 2 4 56 CONNECTIONS OUTPUT SUB WOOFER FRONT SPEAKERS SURROUND A B CENTER SUBWOOFER PREPARATION Front speakers (B) 3 6 Center speaker Subwoofer (SW-P3600 only) FRONT terminals Connect one front speaker system, connect it to the FRONT A or B terminal. SUBWOOFER terminals Connect the YAMAHA SW-P3600 subwoofer (6) to these terminals. SUBWOOFER jack Connect a subwoofer with built...
... a built-in amplifier) Right Left 1 2 4 56 CONNECTIONS OUTPUT SUB WOOFER FRONT SPEAKERS SURROUND A B CENTER SUBWOOFER PREPARATION Front speakers (B) 3 6 Center speaker Subwoofer (SW-P3600 only) FRONT terminals Connect one front speaker system, connect it to the FRONT A or B terminal. SUBWOOFER terminals Connect the YAMAHA SW-P3600 subwoofer (6) to these terminals. SUBWOOFER jack Connect a subwoofer with built...
Owners Manual
Page 18
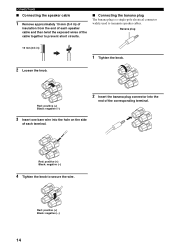
... mm (0.4 in ) 1 Tighten the knob. 2 Loosen the knob. Red: positive (+) Black: negative (-) 14 Banana plug 10 mm (0.4 in ) of insulation from the end of each speaker cable and then twist the exposed wires of each terminal. Red: positive (+) Black: negative (-) 2 Insert the banana plug connector into the end of the corresponding... banana plug The banana plug is a single-pole electrical connector widely used to secure the wire. Red: positive (+) Black: negative (-) 4 Tighten the knob to terminate speaker cables.
... mm (0.4 in ) 1 Tighten the knob. 2 Loosen the knob. Red: positive (+) Black: negative (-) 14 Banana plug 10 mm (0.4 in ) of insulation from the end of each speaker cable and then twist the exposed wires of each terminal. Red: positive (+) Black: negative (-) 2 Insert the banana plug connector into the end of the corresponding... banana plug The banana plug is a single-pole electrical connector widely used to secure the wire. Red: positive (+) Black: negative (-) 4 Tighten the knob to terminate speaker cables.
Owners Manual
Page 25
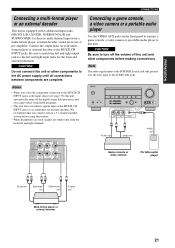
Note The audio signals input at the PORTABLE mini jack take priority over the ones input at least a 5.1-channel speaker system before using this unit or other components before making connections. Connect the output jacks on the front panel to...-format player or an external decoder This unit is equipped with 6 additional input jacks (FRONT L/R, CENTER, SURROUND L/R and SUBWOOFER) for missing speakers. STANDBY /ON PHONES SPEAKERS A B SILENT CINEMA PRESET/TUNING SEARCH MODE EDIT FM/AM A/B/C/D/E CATEGORY NEXT STRAIGHT EFFECT TONE CONTROL l PROGRAM h BASS/TREBLE l PRESET/TUNING...
Note The audio signals input at the PORTABLE mini jack take priority over the ones input at least a 5.1-channel speaker system before using this unit or other components before making connections. Connect the output jacks on the front panel to...-format player or an external decoder This unit is equipped with 6 additional input jacks (FRONT L/R, CENTER, SURROUND L/R and SUBWOOFER) for missing speakers. STANDBY /ON PHONES SPEAKERS A B SILENT CINEMA PRESET/TUNING SEARCH MODE EDIT FM/AM A/B/C/D/E CATEGORY NEXT STRAIGHT EFFECT TONE CONTROL l PROGRAM h BASS/TREBLE l PRESET/TUNING...
Owners Manual
Page 28
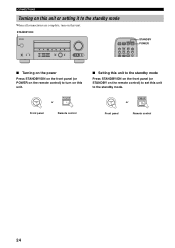
... STANDBY/ON on the front panel (or STANDBY on the remote control) to set this unit to the standby mode. S STANDBY/ON STANDBY /ON PHONES SPEAKERS A B SILENT CINEMA PRESET/TUNING SEARCH MODE EDIT FM/AM A/B/C/D/E CATEGORY NEXT STRAIGHT EFFECT TONE CONTROL l PROGRAM h BASS/TREBLE l PRESET/TUNING/CH h LEVEL INPUT MODE MEMORY...
... STANDBY/ON on the front panel (or STANDBY on the remote control) to set this unit to the standby mode. S STANDBY/ON STANDBY /ON PHONES SPEAKERS A B SILENT CINEMA PRESET/TUNING SEARCH MODE EDIT FM/AM A/B/C/D/E CATEGORY NEXT STRAIGHT EFFECT TONE CONTROL l PROGRAM h BASS/TREBLE l PRESET/TUNING/CH h LEVEL INPUT MODE MEMORY...
Owners Manual
Page 29
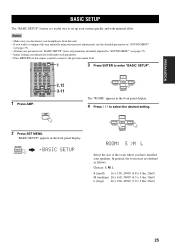
... to select the desired setting. A-E/CAT. PREPARATION BASIC SETUP BASIC SETUP The "BASIC SETUP" feature is a useful way to set up your speakers. RETURN XM MEMORY PRESET/CH A-E/CAT. "BASIC SETUP" appears in "SOUND MENU" (see page 75). • Initial settings are defined as... A-E/CAT. TV VOL CH AMP VOLUME MUTE INPUT MUTE STEREO 1 MUSIC ENTERTAIN MOVIE 2 3 4 STANDARD 5 SELECT 6 EXTD SUR. 7 DIRECT ST. 8 SPEAKERS 9 ENHANCER 0 NIGHT STRAIGHT 10 ENT. AMP 2 Press SET MENU. SET MENU MENU SRCH MODE .BASIC SETUP A-E/CAT. PRESET/CH ROOM: S >M L ...
... to select the desired setting. A-E/CAT. PREPARATION BASIC SETUP BASIC SETUP The "BASIC SETUP" feature is a useful way to set up your speakers. RETURN XM MEMORY PRESET/CH A-E/CAT. "BASIC SETUP" appears in "SOUND MENU" (see page 75). • Initial settings are defined as... A-E/CAT. TV VOL CH AMP VOLUME MUTE INPUT MUTE STEREO 1 MUSIC ENTERTAIN MOVIE 2 3 4 STANDARD 5 SELECT 6 EXTD SUR. 7 DIRECT ST. 8 SPEAKERS 9 ENHANCER 0 NIGHT STRAIGHT 10 ENT. AMP 2 Press SET MENU. SET MENU MENU SRCH MODE .BASIC SETUP A-E/CAT. PRESET/CH ROOM: S >M L ...
Owners Manual
Page 30
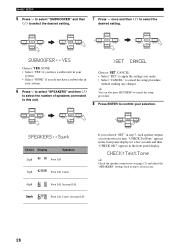
... Choices: SET, CANCEL • Select "SET" to cancel the setup procedure without making any changes. ENTER A-E/CAT. PRESET/CH SPEAKERS ..5spk Choice Display Speakers 2spk L CR SL SB SR Front L/R 3spk L CR SL SB SR Front L/R, Center 4spk L CR SL SB SR Front.... PRESET/CH A-E/CAT. PRESET/CH If you made. • Select "CANCEL" to apply the settings you selected "SET" in step 7, each speaker outputs a test tone twice in turn. A-E/CAT. ENTER A-E/CAT. PRESET/CH A-E/CAT. "CHECK:TestTone" appears in your selection. YES Choices: YES...
... Choices: SET, CANCEL • Select "SET" to cancel the setup procedure without making any changes. ENTER A-E/CAT. PRESET/CH SPEAKERS ..5spk Choice Display Speakers 2spk L CR SL SB SR Front L/R 3spk L CR SL SB SR Front L/R, Center 4spk L CR SL SB SR Front.... PRESET/CH A-E/CAT. PRESET/CH If you made. • Select "CANCEL" to apply the settings you selected "SET" in step 7, each speaker outputs a test tone twice in turn. A-E/CAT. ENTER A-E/CAT. PRESET/CH A-E/CAT. "CHECK:TestTone" appears in your selection. YES Choices: YES...

Owners Manual
Page 31
... setup procedure is completed and the display returns to the top "SET MENU" display. • If you selected "NO" in step 9, the front speaker level adjustment display appears in turn. • Press i to increase the value. • Press j to exit from each... speaker were satisfactory. • Select "NO" to proceed to the speaker level adjustment menu to balance the output level of each speaker. 10 Press ENTER to adjust the balance. ENTER A-E/CAT. ENTER A-E/CAT. A-E/CAT. PRESET/CH FR ...
... setup procedure is completed and the display returns to the top "SET MENU" display. • If you selected "NO" in step 9, the front speaker level adjustment display appears in turn. • Press i to increase the value. • Press j to exit from each... speaker were satisfactory. • Select "NO" to proceed to the speaker level adjustment menu to balance the output level of each speaker. 10 Press ENTER to adjust the balance. ENTER A-E/CAT. ENTER A-E/CAT. A-E/CAT. PRESET/CH FR ...
Owners Manual
Page 32
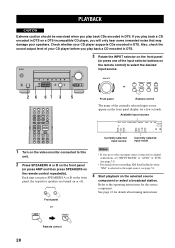
... on the front panel (or press one of the input selector buttons on the remote control repeatedly). Each time you press SPEAKERS A or B on the front panel, the respective speakers are to select an input source connected via digital connections, set "INPUT MODE" to "AUTO" or "DTS" (see page... 51. 4 Start playback on a DTS-incompatible CD player, you will only hear some unwanted noise that may damage your speakers. Front panel or AMP SPEAKERS 9 Remote control 28 Available input sources DVR V-AUX DTV/CBL pDVD MD/CD-R TUNER CD XM VOLUME SP A dB DVD AUTO L R...
... on the front panel (or press one of the input selector buttons on the remote control repeatedly). Each time you press SPEAKERS A or B on the front panel, the respective speakers are to select an input source connected via digital connections, set "INPUT MODE" to "AUTO" or "DTS" (see page... 51. 4 Start playback on a DTS-incompatible CD player, you will only hear some unwanted noise that may damage your speakers. Front panel or AMP SPEAKERS 9 Remote control 28 Available input sources DVR V-AUX DTV/CBL pDVD MD/CD-R TUNER CD XM VOLUME SP A dB DVD AUTO L R...
Owners Manual
Page 33
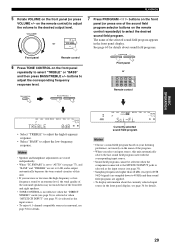
.... TONE CONTROL BASS/TREBLE l PROGRAM h Front panel or STEREO 1 MUSIC ENTERTAIN MOVIE 2 3 4 STANDARD 5 SELECT 6 EXTD SUR. 7 DIRECT ST. 8 SPEAKERS 9 ENHANCER 0 NIGHT STRAIGHT 10 ENT. BASIC OPERATION PLAYBACK 5 Rotate VOLUME on the remote control) to adjust the volume to the desired output level. on the... VOLUME +/- VOLUME + or VOLUME - 7 Press PROGRAM l / h buttons on the front panel (or press one of the front left and right speakers. • TONE CONTROL is not effective when the "DIRECT STEREO" mode (see page 36) is selected or when "MULTI CH INPUT" (see page...
.... TONE CONTROL BASS/TREBLE l PROGRAM h Front panel or STEREO 1 MUSIC ENTERTAIN MOVIE 2 3 4 STANDARD 5 SELECT 6 EXTD SUR. 7 DIRECT ST. 8 SPEAKERS 9 ENHANCER 0 NIGHT STRAIGHT 10 ENT. BASIC OPERATION PLAYBACK 5 Rotate VOLUME on the remote control) to adjust the volume to the desired output level. on the... VOLUME +/- VOLUME + or VOLUME - 7 Press PROGRAM l / h buttons on the front panel (or press one of the front left and right speakers. • TONE CONTROL is not effective when the "DIRECT STEREO" mode (see page 36) is selected or when "MULTI CH INPUT" (see page...


