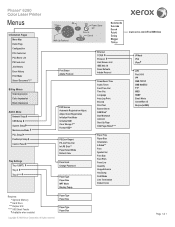
Menu Map
Page 1
... PS Disk** Paper Select Mode Default Color Panel Lock Change Password Paper Type Paper Size MPT Mode Display Popup Ethernet TCP/IP Protocol Host Access List IEEE 802.1X Reset Defaults Adobe Protocol PowerSaver Time Audio Tones Fault Time-Out Time-Out Language Auto Log Print Print ID Print Text Banner Sheet RAM Disk* Size Mismatch mm/inch Start Up Page Odd Page 2Sided*** Paper Tray Paper Size Orientation 2-Sided*** Font Symbol Set Font Size Font Pitch Form Line Quantity Image Enhance Hex Dump Draft Mode Line Termination Default Color Requires: * Optional Memory ** Hard Drive *** Duplex Unit...
... PS Disk** Paper Select Mode Default Color Panel Lock Change Password Paper Type Paper Size MPT Mode Display Popup Ethernet TCP/IP Protocol Host Access List IEEE 802.1X Reset Defaults Adobe Protocol PowerSaver Time Audio Tones Fault Time-Out Time-Out Language Auto Log Print Print ID Print Text Banner Sheet RAM Disk* Size Mismatch mm/inch Start Up Page Odd Page 2Sided*** Paper Tray Paper Size Orientation 2-Sided*** Font Symbol Set Font Size Font Pitch Form Line Quantity Image Enhance Hex Dump Draft Mode Line Termination Default Color Requires: * Optional Memory ** Hard Drive *** Duplex Unit...
User Guide
Page 4
... Connecting via USB 34 Configuring the Network Address 35 TCP/IP and IP Addresses 35 Dynamic Methods of Setting the Printer's IP Address 36 Manually Setting the Printer's IP Address 37 Installing the Printer Drivers 39 Available Drivers 39 Windows 2000 or Later 40 Macintosh OS X, Version 10.3 and Higher 41 4 Printing Basics Supported Paper and Media 46 Paper Usage Guidelines 46 Paper That Can Damage Your Printer 48 Paper Storage Guidelines 48 About Paper 49 Setting Paper Types and Sizes...
... Connecting via USB 34 Configuring the Network Address 35 TCP/IP and IP Addresses 35 Dynamic Methods of Setting the Printer's IP Address 36 Manually Setting the Printer's IP Address 37 Installing the Printer Drivers 39 Available Drivers 39 Windows 2000 or Later 40 Macintosh OS X, Version 10.3 and Higher 41 4 Printing Basics Supported Paper and Media 46 Paper Usage Guidelines 46 Paper That Can Damage Your Printer 48 Paper Storage Guidelines 48 About Paper 49 Setting Paper Types and Sizes...
User Guide
Page 31
See also: (English Only) Using CentreWare Internet Services tutorial www.office.xerox.com Using the Windows Printer Driver tutorial www.office.xerox.com Phaser® 6280 Printer 31 Network Basics 3 This chapter includes: • Overview of Network Setup and Configuration on page 32 • Choosing a Connection Method on page 33 • Configuring the Network Address on page 35 • Installing the Printer Drivers on page 39 This chapter provides basic information about setting up and connecting to your printer.
See also: (English Only) Using CentreWare Internet Services tutorial www.office.xerox.com Using the Windows Printer Driver tutorial www.office.xerox.com Phaser® 6280 Printer 31 Network Basics 3 This chapter includes: • Overview of Network Setup and Configuration on page 32 • Choosing a Connection Method on page 33 • Configuring the Network Address on page 35 • Installing the Printer Drivers on page 39 This chapter provides basic information about setting up and connecting to your printer.
User Guide
Page 33
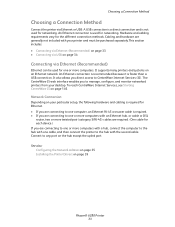
... supports many printers and systems on page 39 Phaser® 6280 Printer 33 A USB connection is a direct connection and is faster than a USB connection. An Ethernet connection is recommended because it is not used for each device.) If you are required. (One cable for networking. The CentreWare IS web interface enables you direct access to the hub with the second cable. See also: Configuring the Network Address on page 35 Installing the Printer Drivers on an Ethernet network. Cabling...
... supports many printers and systems on page 39 Phaser® 6280 Printer 33 A USB connection is a direct connection and is faster than a USB connection. An Ethernet connection is recommended because it is not used for each device.) If you are required. (One cable for networking. The CentreWare IS web interface enables you direct access to the hub with the second cable. See also: Configuring the Network Address on page 35 Installing the Printer Drivers on an Ethernet network. Cabling...
User Guide
Page 40
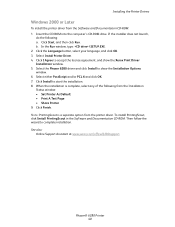
... Installation Status window: • Set Printer As Default • Print A Test Page • Share Printer 9. In the Run window, type: :\SETUP.EXE. 2. Click Install to complete installation. Click Start, and then click Run. Click I Agree to show the Xerox Print Driver Installation window. 5. When the installation is a separate option from the Software and Documentation CD-ROM: 1. Installing the Printer Drivers Windows 2000 or Later To install the printer driver from the printer driver. Select either PostScript and/or PCL 6 and click OK. 7. To install...
... Installation Status window: • Set Printer As Default • Print A Test Page • Share Printer 9. In the Run window, type: :\SETUP.EXE. 2. Click Install to complete installation. Click Start, and then click Run. Click I Agree to show the Xerox Print Driver Installation window. 5. When the installation is a separate option from the Software and Documentation CD-ROM: 1. Installing the Printer Drivers Windows 2000 or Later To install the printer driver from the printer driver. Select either PostScript and/or PCL 6 and click OK. 7. To install...
User Guide
Page 42
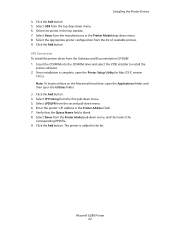
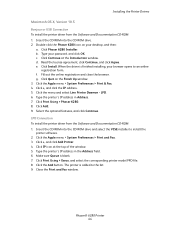
... Add button. Note: To locate utilities on the Macintosh hard drive, open the Applications folder, and then open the Printer Setup Utility for Mac OS X, version 10.3.x. Select IP Printing from the manufacturers in the Printer Model drop-down menu. 5. Select the appropriate printer configuration from the top drop-down menu, and then select the corresponding PPD file. 9. Select the printer in the Printer Address field. 7. Select USB from the list of available printers. 9. Phaser...
... Add button. Note: To locate utilities on the Macintosh hard drive, open the Applications folder, and then open the Printer Setup Utility for Mac OS X, version 10.3.x. Select IP Printing from the manufacturers in the Printer Model drop-down menu. 5. Select the appropriate printer configuration from the top drop-down menu, and then select the corresponding PPD file. 9. Select the printer in the Printer Address field. 7. Select USB from the list of available printers. 9. Phaser...
User Guide
Page 43
... locate utilities on the Macintosh hard drive, open the Applications folder, and then open the Printer Setup Utility. Select the Default Browser in the Address field. 7. b. Type your browser opens to the list. Click Continue at the Introduction window. When the driver is added to an online registration form. Once installation is blank. 8. Make sure Queue Name is complete, open the Utilities folder. 3. Click Printer Model > Xerox, and select the corresponding printer model PPD file...
... locate utilities on the Macintosh hard drive, open the Applications folder, and then open the Printer Setup Utility. Select the Default Browser in the Address field. 7. b. Type your browser opens to the list. Click Continue at the Introduction window. When the driver is added to an online registration form. Once installation is blank. 8. Make sure Queue Name is complete, open the Utilities folder. 3. Click Printer Model > Xerox, and select the corresponding printer model PPD file...
User Guide
Page 44
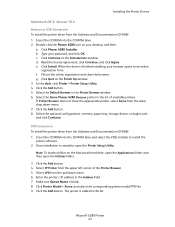
... Introduction window. d. When the driver is finished installing, your password, and click OK. Fill out the online registration and close the browser. Click Add. 9. Make sure Queue is added to the list. 9. Close the Print and Fax window. Type your browser opens to install the printer software. 2. e. f. Click Print Using > Phaser 6280. 8. Phaser® 6280 Printer 44 Click Phaser 6280 Installer. c. Type the printer's IP address in the Address field. 6. Click the Apple menu > System Preferences > Print and...
... Introduction window. d. When the driver is finished installing, your password, and click OK. Fill out the online registration and close the browser. Click Add. 9. Make sure Queue is added to the list. 9. Close the Print and Fax window. Type your browser opens to install the printer software. 2. e. f. Click Print Using > Phaser 6280. 8. Phaser® 6280 Printer 44 Click Phaser 6280 Installer. c. Type the printer's IP address in the Address field. 6. Click the Apple menu > System Preferences > Print and...
User Guide
Page 69
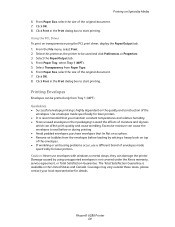
... Tray 1 (MPT). 5. Click OK. 8. Use envelopes made specifically for laser printers. Select this printer as the printer to seal before loading by using the PCL print driver, display the Paper/Output tab. 1. they can cause the envelopes to be printed only from Paper Type. 6. Coverage may vary outside these areas, please contact your local representative for laser printers. • It is highly dependent on top of the envelopes. • If wrinkling or embossing problems...
... Tray 1 (MPT). 5. Click OK. 8. Use envelopes made specifically for laser printers. Select this printer as the printer to seal before loading by using the PCL print driver, display the Paper/Output tab. 1. they can cause the envelopes to be printed only from Paper Type. 6. Coverage may vary outside these areas, please contact your local representative for laser printers. • It is highly dependent on top of the envelopes. • If wrinkling or embossing problems...
User Guide
Page 82
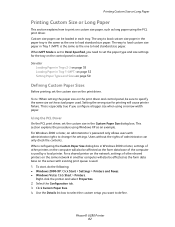
... print driver. Using the PCL Driver On the PCL print driver, set the custom size in another computer will also be loaded in Tray 1 (MPT) on page 52 Setting Paper Types and Sizes on page 50 Defining Custom Paper Sizes Before printing, set the paper type and size settings for printing will also be sure to specify the same size as the form data base of administrator can be affected as the form data base on the server with administrator rights to change the settings...
... print driver. Using the PCL Driver On the PCL print driver, set the custom size in another computer will also be loaded in Tray 1 (MPT) on page 52 Setting Paper Types and Sizes on page 50 Defining Custom Paper Sizes Before printing, set the paper type and size settings for printing will also be sure to specify the same size as the form data base of administrator can be affected as the form data base on the server with administrator rights to change the settings...
User Guide
Page 85
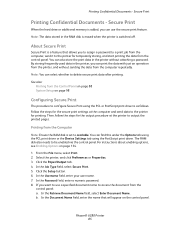
... use the secure print feature. From the File menu, select Print. 2. Click the Paper/Output tab. 4. In the Job Type field, select Secure Print. 5. In the Retrieve Document Name field, select Enter Document Name. Then, follow the steps for temporarily storing, and start printing the data from the Control Panel on page 88 System Setup on page 134. 1. For instructions about enabling options, see Enabling Options on page 98 Configuring Secure Print The procedure to output...
... use the secure print feature. From the File menu, select Print. 2. Click the Paper/Output tab. 4. In the Job Type field, select Secure Print. 5. In the Retrieve Document Name field, select Enter Document Name. Then, follow the steps for temporarily storing, and start printing the data from the Control Panel on page 88 System Setup on page 134. 1. For instructions about enabling options, see Enabling Options on page 98 Configuring Secure Print The procedure to output...
User Guide
Page 87
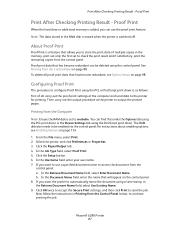
... PCL print driver or the Device Settings tab using a time stamp, in Printing from the control panel: a. Phaser® 6280 Printer 87 Print After Checking Printing Result - Proof Print When the hard drive or additional memory is a feature that has become redundant can be enabled via the control panel. About Proof Print Proof Print is added, you want to send the job. Printing from the Computer Note: Ensure the RAM disk is set to the printer for printing. From the File menu...
... PCL print driver or the Device Settings tab using a time stamp, in Printing from the control panel: a. Phaser® 6280 Printer 87 Print After Checking Printing Result - Proof Print When the hard drive or additional memory is a feature that has become redundant can be enabled via the control panel. About Proof Print Proof Print is added, you want to send the job. Printing from the Computer Note: Ensure the RAM disk is set to the printer for printing. From the File menu...

User Guide
Page 94
... configuration and network information. Press the Menu button to Printing Confidential Documents - Load A4 size paper into the tray. • For the procedure for every 22 jobs completed. For details, refer to display the Menu screen. 2. Proof Print on the Job History Report. Prints status of PCL macros. Prints a list of the printer, such as whether data from the control panel. 1. For details, refer to check whether optional accessories have been correctly installed. Printing Information Pages Information pages are printed...
... configuration and network information. Press the Menu button to Printing Confidential Documents - Load A4 size paper into the tray. • For the procedure for every 22 jobs completed. For details, refer to display the Menu screen. 2. Proof Print on the Job History Report. Prints status of PCL macros. Prints a list of the printer, such as whether data from the control panel. 1. For details, refer to check whether optional accessories have been correctly installed. Printing Information Pages Information pages are printed...
User Guide
Page 108
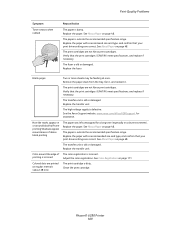
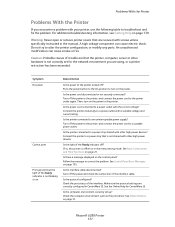
... size and type, and confirm that the print cartridges (C/M/Y/K) meet specifications, and replace if necessary. See Color Registration on page 111. Print-Quality Problems Symptom Toner smears when rubbed Reason/Action The paper is old or damaged. Remove the paper stack from the tray, fan it, and reinsert it. The transfer unit is damp. Verify that your print driver settings are correct. See the Xerox Support website, www.xerox.com/office/6280support, for a long time...
... size and type, and confirm that the print cartridges (C/M/Y/K) meet specifications, and replace if necessary. See Color Registration on page 111. Print-Quality Problems Symptom Toner smears when rubbed Reason/Action The paper is old or damaged. Remove the paper stack from the tray, fan it, and reinsert it. The transfer unit is damp. Verify that your print driver settings are correct. See the Xerox Support website, www.xerox.com/office/6280support, for a long time...
User Guide
Page 109
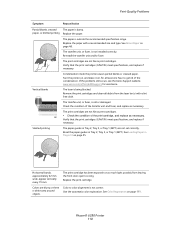
... print cartridges (C/M/Y/K) meet specifications, and replace if necessary. If the problems still occurs, see the Xerox Support website, www.xerox.com/office/6280support, for at least one hour to too much light; possibly from the laser len(s) with a recommended size and type. See About Paper on page 55. Reinstall the transfer unit and/or fuser. Phaser® 6280 Printer 110 See Loading Paper in Tray 2, Tray 3, or Tray 1 (MPT). Vertical blanks The laser is not correct Use...
... print cartridges (C/M/Y/K) meet specifications, and replace if necessary. If the problems still occurs, see the Xerox Support website, www.xerox.com/office/6280support, for at least one hour to too much light; possibly from the laser len(s) with a recommended size and type. See About Paper on page 55. Reinstall the transfer unit and/or fuser. Phaser® 6280 Printer 110 See Loading Paper in Tray 2, Tray 3, or Tray 1 (MPT). Vertical blanks The laser is not correct Use...
User Guide
Page 115
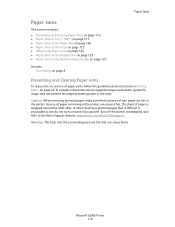
... area are left in the trays. It includes information about supported paper and media, guides for usage, and instructions for properly loading paper in the printer. Caution: When removing jammed paper, make sure that is difficult or impossible to see, do not try to the Xerox Support website, www.xerox.com/office/6280support. A piece of paper remaining in Printing Basics on page 8 Preventing and Clearing Paper Jams To reduce the occurrence of...
... area are left in the trays. It includes information about supported paper and media, guides for usage, and instructions for properly loading paper in the printer. Caution: When removing jammed paper, make sure that is difficult or impossible to see, do not try to the Xerox Support website, www.xerox.com/office/6280support. A piece of paper remaining in Printing Basics on page 8 Preventing and Clearing Paper Jams To reduce the occurrence of...
User Guide
Page 130
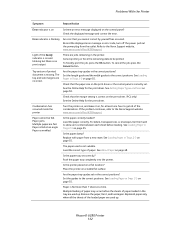
... protocol configured? Warning: Never open or remove printer covers that is not blinking or on the power to the printer. Turn off the power to the printer, and connect the power cord to correct the problem. See Main Components and Their Functions on the control panel? See Control Panel Error Messages on page 31. Is the computer environment correctly set for CentreWare IS. Check the computer environment, such as the print driver. Connect the printer to troubleshoot and fix the problem. Turn...
... protocol configured? Warning: Never open or remove printer covers that is not blinking or on the power to the printer. Turn off the power to the printer, and connect the power cord to correct the problem. See Main Components and Their Functions on the control panel? See Control Panel Error Messages on page 31. Is the computer environment correctly set for CentreWare IS. Check the computer environment, such as the print driver. Connect the printer to troubleshoot and fix the problem. Turn...
User Guide
Page 131
.... Replace with paper from the outlet. Light of paper may occur before loading. Is the paper tray set in Trays 2-3 on page 55. Set the guides to the Xerox Support website, www.xerox.com/office/6280support. Check the displayed message and correct the error. Record the displayed error message or error code, turn off the power, pull out the power plug from a new ream. Cancel printing or force the remaining data to be fed. Are the paper tray guides in Trays 2-3 on the control panel? See Setting Paper Types and Sizes...
.... Replace with paper from the outlet. Light of paper may occur before loading. Is the paper tray set in Trays 2-3 on page 55. Set the guides to the Xerox Support website, www.xerox.com/office/6280support. Check the displayed message and correct the error. Record the displayed error message or error code, turn off the power, pull out the power plug from a new ream. Cancel printing or force the remaining data to be fed. Are the paper tray guides in Trays 2-3 on the control panel? See Setting Paper Types and Sizes...
User Guide
Page 153
...values, 112 enabling/disabling automatic adjustment, 113 entering values, 112 manual adjustment, 111 printing the correction chart, 111 configuration optional accessories, 29 connection Ethernet, 33 USB, 34 consumables, 143 error messages, 135 control panel, 25 Configuration page, 26 display, 25 error messages, 135 information pages, 26 layout, 25 Menu Map, 26 menus, 91 messages, 139 control panel menus changing settings, 92 control panel, 104 description of, 93 information pages, 95 maintenance mode, 101 system settings, 98 tray settings, 93 custom paper defining size with PCL driver, 83 with...
...values, 112 enabling/disabling automatic adjustment, 113 entering values, 112 manual adjustment, 111 printing the correction chart, 111 configuration optional accessories, 29 connection Ethernet, 33 USB, 34 consumables, 143 error messages, 135 control panel, 25 Configuration page, 26 display, 25 error messages, 135 information pages, 26 layout, 25 Menu Map, 26 menus, 91 messages, 139 control panel menus changing settings, 92 control panel, 104 description of, 93 information pages, 95 maintenance mode, 101 system settings, 98 tray settings, 93 custom paper defining size with PCL driver, 83 with...
User Guide
Page 156
... media, 68 setting sizes, 52 setting trays, 51 setting types, 51 storage guidelines, 48 supported, 46 transparencies, 68 types, 46 unacceptable media types, 48 usage guidelines, 46 paper tray settings, 29 PCL, 39 PostScript, 39 power saver mode, 27 exiting, 27 pre-printed paper, 53 print quality problems, 107 print status checking, 28 printer caution symbols, 13 changing or modifying the IP address using CentreWare IS, 38 cleaning, 142 cleaning the exterior, 142 cleaning the interior, 142 clearance, 10 drivers, 39 enabling AutoIP, 36 enabling DHCP...
... media, 68 setting sizes, 52 setting trays, 51 setting types, 51 storage guidelines, 48 supported, 46 transparencies, 68 types, 46 unacceptable media types, 48 usage guidelines, 46 paper tray settings, 29 PCL, 39 PostScript, 39 power saver mode, 27 exiting, 27 pre-printed paper, 53 print quality problems, 107 print status checking, 28 printer caution symbols, 13 changing or modifying the IP address using CentreWare IS, 38 cleaning, 142 cleaning the exterior, 142 cleaning the interior, 142 clearance, 10 drivers, 39 enabling AutoIP, 36 enabling DHCP...


