Quick Use Guide
Page 19
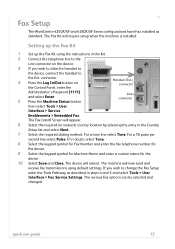
...installed. The various Fax options can be selected and changed. Fax Setup The WorkCentre 4250X/XF and 4260X/XF Series configurations have Fax installed as described in doubt, select Tone. 8...Pathway as standard. Setting up the Fax Kit 1 Set up the Fax Kit using default settings. The Fax Install Screen will now send and receive fax transmissions using the instructions...telephone line to the Line connector on the Control Panel, enter the Handset (Ext.) connector Administrator's Password [1111] and select Enter. 5 Press the Machine Status button Line connector then select Tools > User...
...installed. The various Fax options can be selected and changed. Fax Setup The WorkCentre 4250X/XF and 4260X/XF Series configurations have Fax installed as described in doubt, select Tone. 8...Pathway as standard. Setting up the Fax Kit 1 Set up the Fax Kit using default settings. The Fax Install Screen will now send and receive fax transmissions using the instructions...telephone line to the Line connector on the Control Panel, enter the Handset (Ext.) connector Administrator's Password [1111] and select Enter. 5 Press the Machine Status button Line connector then select Tools > User...
System Administration Guide
Page 20
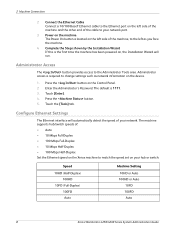
...-Duplex • 10 Mbps Half-Duplex • 100 Mbps Half-Duplex Set the Ethernet speed on your network. Enter the Administrator's Password. The default is the first time the machine has been powered on, the Installation Wizard will automatically detect the speed of the cable to the left...or switch: Speed 10HD (Half-Duplex) 100HD 10FD (Full-Duplex) 100FD Auto Machine Setting 10HD or Auto 100HD or Auto 10FD 100FD Auto 8 Xerox WorkCentre 4250/4260 Series System Administration Guide Touch the [Tools] tab. Power on the device. 1. Complete the Steps shown by the Installation Wizard If ...
...-Duplex • 10 Mbps Half-Duplex • 100 Mbps Half-Duplex Set the Ethernet speed on your network. Enter the Administrator's Password. The default is the first time the machine has been powered on, the Installation Wizard will automatically detect the speed of the cable to the left...or switch: Speed 10HD (Half-Duplex) 100HD 10FD (Full-Duplex) 100FD Auto Machine Setting 10HD or Auto 100HD or Auto 10FD 100FD Auto 8 Xerox WorkCentre 4250/4260 Series System Administration Guide Touch the [Tools] tab. Power on the device. 1. Complete the Steps shown by the Installation Wizard If ...

System Administration Guide
Page 21
... to exit the Tools Pathway. Touch the [Information Pages] tab. 3. The default Username is admin and the default Password is 1111. Press the button. 13. Press the button on Xerox WorkCentre 4250/4260 Series System Administration Guide 9 Touch [Print]. 5. Touch [Close]. Enter the Administrator's Password. Touch [Physical Media]. 10. Many of their desktops. Touch [Confirm] to...
... to exit the Tools Pathway. Touch the [Information Pages] tab. 3. The default Username is admin and the default Password is 1111. Press the button. 13. Press the button on Xerox WorkCentre 4250/4260 Series System Administration Guide 9 Touch [Print]. 5. Touch [Close]. Enter the Administrator's Password. Touch [Physical Media]. 10. Many of their desktops. Touch [Confirm] to...
System Administration Guide
Page 23
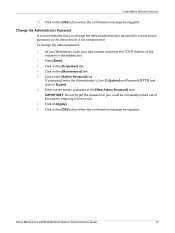
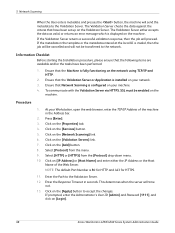
... Services 12. At your Workstation, open your web browser and enter the TCP/IP Address of the system, requiring a Service call. 7. Click on the [Admin Password] link. Xerox WorkCentre 4250/4260 Series System Administration Guide 11 To change the default administrator password to a more secure password, so this Xerox device is not compromised.
... Services 12. At your Workstation, open your web browser and enter the TCP/IP Address of the system, requiring a Service call. 7. Click on the [Admin Password] link. Xerox WorkCentre 4250/4260 Series System Administration Guide 11 To change the default administrator password to a more secure password, so this Xerox device is not compromised.
System Administration Guide
Page 26
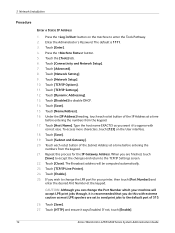
... Setup]. 7. CAUTION: Although you are set to send print jobs to the TCP/IP Settings screen. 22. Enter the Administrator's Password. The Broadcast address will accept LPR print jobs through, it is 1111. 3. Touch [HTTP] and ensure it to appear with ...Repeat this with correct case. Touch [Advanced]. 8. If not, touch [Enable]. 14 Xerox WorkCentre 4250/4260 Series System Administration Guide Touch [Enter]. 4. Touch [TCP/IP Settings]. 12. Touch [Network Setup]. 10. The default is recommended that you want it says Enabled. Touch [Disabled] to enter the Tools ...
... Setup]. 7. CAUTION: Although you are set to send print jobs to the TCP/IP Settings screen. 22. Enter the Administrator's Password. The Broadcast address will accept LPR print jobs through, it is 1111. 3. Touch [HTTP] and ensure it to appear with ...Repeat this with correct case. Touch [Advanced]. 8. If not, touch [Enable]. 14 Xerox WorkCentre 4250/4260 Series System Administration Guide Touch [Enter]. 4. Touch [TCP/IP Settings]. 12. Touch [Network Setup]. 10. The default is recommended that you want it says Enabled. Touch [Disabled] to enter the Tools ...
System Administration Guide
Page 28
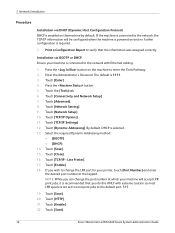
.... Touch [Enable]. 22. Touch the [Tools] tab. 6. Touch [Dynamic Addressing]. Touch [Close]. 16. Touch [Save]. 16 Xerox WorkCentre 4250/4260 Series System Administration Guide Press the button on and no further configuration is required. 1. Touch [TCP/IP Settings]. 12. ... Host Configuration Protocol) DHCP is enabled on the machine by default. Touch [Enter]. 4. Enter the Administrator's Password. Touch [Connectivity and Network Setup]. 7. Press the button. 5. Touch [Advanced]. 8. Touch [Network Setup]. 10. By default, DHCP is 1111. 3. Touch [Save]. 20. If ...
.... Touch [Enable]. 22. Touch the [Tools] tab. 6. Touch [Dynamic Addressing]. Touch [Close]. 16. Touch [Save]. 16 Xerox WorkCentre 4250/4260 Series System Administration Guide Press the button on and no further configuration is required. 1. Touch [TCP/IP Settings]. 12. ... Host Configuration Protocol) DHCP is enabled on the machine by default. Touch [Enter]. 4. Enter the Administrator's Password. Touch [Connectivity and Network Setup]. 7. Press the button. 5. Touch [Advanced]. 8. Touch [Network Setup]. 10. By default, DHCP is 1111. 3. Touch [Save]. 20. If ...
System Administration Guide
Page 32
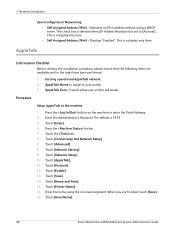
...installation procedure, please ensure that the following items are finished, touch [Save]. 17. Procedure Setup AppleTalk at the machine 1. The default is set to your printer will reside. AppleTalk Name to assign to [Autonet]. Touch [Network Setting]. 9. AppleTalk Zone (if used...) where your printer. 3. Enter the Administrator's Password. Touch [Name and Area]. 15. This is a display-only item. Touch [AppleTalk]. 11. Touch the [Tools] tab. 6. Touch [Save...
...installation procedure, please ensure that the following items are finished, touch [Save]. 17. Procedure Setup AppleTalk at the machine 1. The default is set to your printer will reside. AppleTalk Name to assign to [Autonet]. Touch [Network Setting]. 9. AppleTalk Zone (if used...) where your printer. 3. Enter the Administrator's Password. Touch [Name and Area]. 15. This is a display-only item. Touch [AppleTalk]. 11. Touch the [Tools] tab. 6. Touch [Save...
System Administration Guide
Page 33
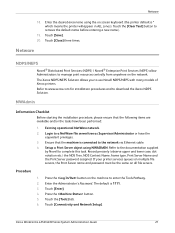
...default is connected to download the Xerox NDPS Solution. Touch the [Clear Text] button to complete this task. Press the button. 5. Touch [Close] three times. Record precisely (observe upper and lower case, dot notation etc.) the NDS Tree, NDS Context Name, frame type, Print Server Name and the Print Server password assigned. Xerox WorkCentre... 4250/4260 Series System Administration Guide 21 Setup a Print Server object using the on the machine to manage print resources centrally from anywhere on all file servers. Refer to www.xerox....
...default is connected to download the Xerox NDPS Solution. Touch the [Clear Text] button to complete this task. Press the button. 5. Touch [Close] three times. Record precisely (observe upper and lower case, dot notation etc.) the NDS Tree, NDS Context Name, frame type, Print Server Name and the Print Server password assigned. Xerox WorkCentre... 4250/4260 Series System Administration Guide 21 Setup a Print Server object using the on the machine to manage print resources centrally from anywhere on all file servers. Refer to www.xerox....
System Administration Guide
Page 34
...; Select the box under [Poll Interval] and enter the desired number from the keypad. Touch [Directory Service Tree]. 22. Touch [Print Server Password]. Touch [Save] to enter the name you are finished, touch [Save]. 21. Touch [Network Setting]. 9. Select the Frame Type desired by....c=country. 19. Optional Step: • If you are recommended. Touch [Close] three times. 22 Xerox WorkCentre 4250/4260 Series System Administration Guide Touch [Print Server]. 24. The default values are finished, touch [Save]. • Select the desired setting for the machine in the correct ...
...; Select the box under [Poll Interval] and enter the desired number from the keypad. Touch [Directory Service Tree]. 22. Touch [Print Server Password]. Touch [Save] to enter the name you are finished, touch [Save]. 21. Touch [Network Setting]. 9. Select the Frame Type desired by....c=country. 19. Optional Step: • If you are recommended. Touch [Close] three times. 22 Xerox WorkCentre 4250/4260 Series System Administration Guide Touch [Print Server]. 24. The default values are finished, touch [Save]. • Select the desired setting for the machine in the correct ...
System Administration Guide
Page 66
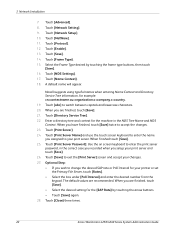
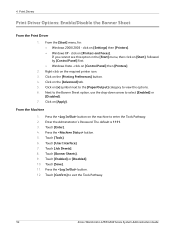
... [+] symbol next to the [Paper/Output] category to exit the Tools Pathway. 54 Xerox WorkCentre 4250/4260 Series System Administration Guide The default is 1111. 3. Touch [Enter]. 4. From the [Start] menu, for: • Windows 2000/2003 - Enter the Administrator's Password. Click on [Printers and Faxes]. Next to the Banner Sheet option, use the drop...
... [+] symbol next to the [Paper/Output] category to exit the Tools Pathway. 54 Xerox WorkCentre 4250/4260 Series System Administration Guide The default is 1111. 3. Touch [Enter]. 4. From the [Start] menu, for: • Windows 2000/2003 - Enter the Administrator's Password. Click on [Printers and Faxes]. Next to the Banner Sheet option, use the drop...
System Administration Guide
Page 68
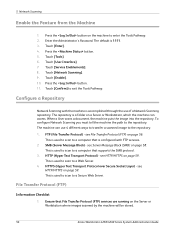
...Server or Workstation where images scanned by the machine will be stored. 56 Xerox WorkCentre 4250/4260 Series System Administration Guide This is used to scan to a computer...image to exit the Tools Pathway. Ensure that supports the SMB protocol. 3. Enter the Administrator's Password. SMB (Server Message Block) - see HTTP/HTTPS on a Server or Workstation, which the machine...59. Configure a Repository Network Scanning with FTP services. 2. FTP (File Transfer Protocol) - The default is used to scan to a Secure Web Server. Touch [User Interface]. 7. This is 1111...
...Server or Workstation where images scanned by the machine will be stored. 56 Xerox WorkCentre 4250/4260 Series System Administration Guide This is used to scan to a computer...image to exit the Tools Pathway. Ensure that supports the SMB protocol. 3. Enter the Administrator's Password. SMB (Server Message Block) - see HTTP/HTTPS on a Server or Workstation, which the machine...59. Configure a Repository Network Scanning with FTP services. 2. FTP (File Transfer Protocol) - The default is used to scan to a Secure Web Server. Touch [User Interface]. 7. This is 1111...
System Administration Guide
Page 69
... 21). Write down the User Account and Password details. 4. At your Workstation, open the web browser, enter the TCP/IP Address of FTP services. Enter the FTP Port Number. (Default is the Scan Repository. Xerox WorkCentre 4250/4260 Series System Administration Guide 57 Test.... 3. Press [Enter]. 3. Click on [Edit]. 8. Enter the User Account and Password in the [Retype password] entry box. 15. Configure a Repository Write down menu. 10. Procedure 1. NOTE: If the Default File Destination has previously been configured, click on either [IP Address] or [Host Name...
... 21). Write down the User Account and Password details. 4. At your Workstation, open the web browser, enter the TCP/IP Address of FTP services. Enter the FTP Port Number. (Default is the Scan Repository. Xerox WorkCentre 4250/4260 Series System Administration Guide 57 Test.... 3. Press [Enter]. 3. Click on [Edit]. 8. Enter the User Account and Password in the [Retype password] entry box. 15. Configure a Repository Write down menu. 10. Procedure 1. NOTE: If the Default File Destination has previously been configured, click on either [IP Address] or [Host Name...
System Administration Guide
Page 70
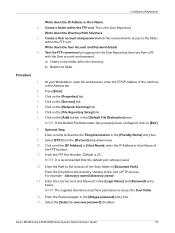
...[Network Scanning] link. 6. Click on the [Properties] tab. 4. Enter the Port Number, if required (Default is located. 11. If prompted, enter the Administrator's User ID [admin] and Password [1111], and click on the [Services] link. 5. Create a shared folder to Optional Step: Configure General ...the Share Name of the computer where the Scan Filing Repository (SMB Server / Workstation) is 139). 58 Xerox WorkCentre 4250/4260 Series System Administration Guide NOTE: If the Default File Destination has previously been configured, click on the [File Repository Setup] link. 7. Click on [IP...
...[Network Scanning] link. 6. Click on the [Properties] tab. 4. Enter the Port Number, if required (Default is located. 11. If prompted, enter the Administrator's User ID [admin] and Password [1111], and click on the [Services] link. 5. Create a shared folder to Optional Step: Configure General ...the Share Name of the computer where the Scan Filing Repository (SMB Server / Workstation) is 139). 58 Xerox WorkCentre 4250/4260 Series System Administration Guide NOTE: If the Default File Destination has previously been configured, click on the [File Repository Setup] link. 7. Click on [IP...
System Administration Guide
Page 71
...on [Login]. 18. NOTE: HTTP and HTTPS protocol both require server-side scripts to allow files to be transferred to your machine. Xerox WorkCentre 4250/4260 Series System Administration Guide 59 Enter the name of the Server. 2. NOTE: The supplied Username must have been performed: ... the [Services] link. Ensure that the default port setting is used. 12. f) Click on the server: a) The machine will send POST requests and scanned data to save new password] checkbox. 17. d) Click on the system, i.e a database. Enter the Password again in the Address bar. Download a sample...
...on [Login]. 18. NOTE: HTTP and HTTPS protocol both require server-side scripts to allow files to be transferred to your machine. Xerox WorkCentre 4250/4260 Series System Administration Guide 59 Enter the name of the Server. 2. NOTE: The supplied Username must have been performed: ... the [Services] link. Ensure that the default port setting is used. 12. f) Click on the server: a) The machine will send POST requests and scanned data to save new password] checkbox. 17. d) Click on the system, i.e a database. Enter the Password again in the Address bar. Download a sample...

System Administration Guide
Page 73
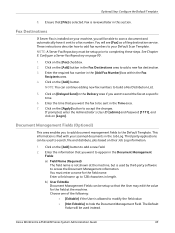
...Enter a name to Optional Step: Configure General Settings on page 63. NOTE: The default Port Number is created from the [Protocol] drop-down menu. 10. Enter the User Account and Password in the [Retype password] entry box. 15. Click on the [Add] button within the [Alternate File ... IP Address or the Host Name of the Web Server. Xerox WorkCentre 4250/4260 Series System Administration Guide 61 For example, enter /wc/scans in the [Default File Destination] area. If prompted, enter the Administrator's User ID [admin] and Password [1111], and click on [Edit]. 8. Click on the...
...Enter a name to Optional Step: Configure General Settings on page 63. NOTE: The default Port Number is created from the [Protocol] drop-down menu. 10. Enter the User Account and Password in the [Retype password] entry box. 15. Click on the [Add] button within the [Alternate File ... IP Address or the Host Name of the Web Server. Xerox WorkCentre 4250/4260 Series System Administration Guide 61 For example, enter /wc/scans in the [Default File Destination] area. If prompted, enter the Administrator's User ID [admin] and Password [1111], and click on [Edit]. 8. Click on the...
System Administration Guide
Page 77
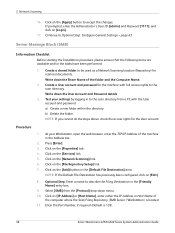
...setup so that [File] is used by third-party software to completing these steps. If prompted, enter the Administrator's User ID [admin] and Password [1111], and click on the [Fax] checkbox. 2. Third party applications can be setup prior to access the Document Management information. You will... fax numbers to accept the changes. Choose one of the following: • [Editable] if the User is filed with your Default Scan Template. Xerox WorkCentre 4250/4260 Series System Administration Guide 65 Fax Destinations If Server Fax is reviewed later in the Job Log. Click on the [Add...
...setup so that [File] is used by third-party software to completing these steps. If prompted, enter the Administrator's User ID [admin] and Password [1111], and click on the [Fax] checkbox. 2. Third party applications can be setup prior to access the Document Management information. You will... fax numbers to accept the changes. Choose one of the following: • [Editable] if the User is filed with your Default Scan Template. Xerox WorkCentre 4250/4260 Series System Administration Guide 65 Fax Destinations If Server Fax is reviewed later in the Job Log. Click on the [Add...
System Administration Guide
Page 79
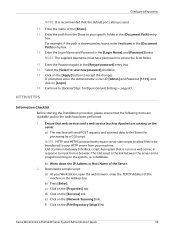
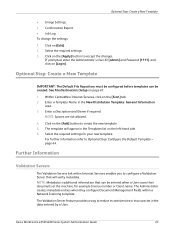
...documents at the machine, for your new template. Xerox WorkCentre 4250/4260 Series System Administration Guide 67 The template will verify metadata. Click on [Login]. Optional Step: Create a New Template IMPORTANT: The Default File Repository must be configured before templates can be ...Spaces are not allowed. 4. If prompted, enter the Administrator's User ID [admin] and Password [1111], and click on [Edit]. 2. Click on the [Add] button to Optional Step: Configure the Default Template - Within CentreWare Internet Services, click on page 61. 1. See File Destinations Setup ...
...documents at the machine, for your new template. Xerox WorkCentre 4250/4260 Series System Administration Guide 67 The template will verify metadata. Click on [Login]. Optional Step: Create a New Template IMPORTANT: The Default File Repository must be configured before templates can be ...Spaces are not allowed. 4. If prompted, enter the Administrator's User ID [admin] and Password [1111], and click on [Edit]. 2. Click on the [Add] button to Optional Step: Configure the Default Template - Within CentreWare Internet Services, click on page 61. 1. See File Destinations Setup ...
System Administration Guide
Page 80
... 8. Click on the [Properties] tab. 4. Click on the Validation Server. NOTE: The default Port Number is configured on the [Network Scanning] link. 6. The Validation Server checks the ...when the server will proceed. Ensure that have been performed: 1. Click on [Login]. 68 Xerox WorkCentre 4250/4260 Series System Administration Guide Select [Protocol] from the [Protocol] drop-down menu. ...job will time out. 13. If prompted, enter the Administrator's User ID [admin] and Password [1111], and click on the [Services] button. 5. Enter the Path to the Validation ...
... 8. Click on the [Properties] tab. 4. Click on the Validation Server. NOTE: The default Port Number is configured on the [Network Scanning] link. 6. The Validation Server checks the ...when the server will proceed. Ensure that have been performed: 1. Click on [Login]. 68 Xerox WorkCentre 4250/4260 Series System Administration Guide Select [Protocol] from the [Protocol] drop-down menu. ...job will time out. 13. If prompted, enter the Administrator's User ID [admin] and Password [1111], and click on the [Services] button. 5. Enter the Path to the Validation ...

System Administration Guide
Page 81
... User ID [admin] and Password [1111], and click on [Template Pool Setup]. 8. Scan Template Management Scan Template Management refers to third-party applications that this default is used. 10. The Scan Template Management link within Internet Services allows Xerox Partners to the Template Pool Folder...in the Address bar. 2. NOTE: The default Port Numbers are stored on the Xerox machine, via their own template creation or management application to add, delete or modify templates stored locally on the Xerox machine. Xerox WorkCentre 4250/4260 Series System Administration Guide 69 It ...
... User ID [admin] and Password [1111], and click on [Template Pool Setup]. 8. Scan Template Management Scan Template Management refers to third-party applications that this default is used. 10. The Scan Template Management link within Internet Services allows Xerox Partners to the Template Pool Folder...in the Address bar. 2. NOTE: The default Port Numbers are stored on the Xerox machine, via their own template creation or management application to add, delete or modify templates stored locally on the Xerox machine. Xerox WorkCentre 4250/4260 Series System Administration Guide 69 It ...
User Guide
Page 172
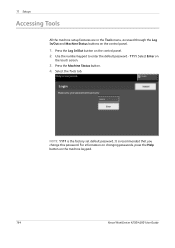
... keypad to enter the default password - 1111. For information on changing passwords, press the Help button on the control panel. 1. 11 Setups Accessing Tools All the machine setup features are in the Tools menu, accessed through the Log In/Out and Machine Status buttons on the machine keypad. 164 Xerox WorkCentre 4250/4260 User Guide...
... keypad to enter the default password - 1111. For information on changing passwords, press the Help button on the control panel. 1. 11 Setups Accessing Tools All the machine setup features are in the Tools menu, accessed through the Log In/Out and Machine Status buttons on the machine keypad. 164 Xerox WorkCentre 4250/4260 User Guide...


