Quick Use Guide
Page 24
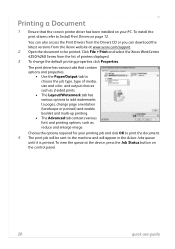
.../support. 2 Open the document to be sent to the machine and will be printed. Click File > Print and select the Xerox WorkCentre 4250/4260 Series from the Xerox website at the device, press the Job Status button on the control panel. 20 quick use guide Printing a Document 1 Ensure that contain options and properties. &#...
.../support. 2 Open the document to be sent to the machine and will be printed. Click File > Print and select the Xerox WorkCentre 4250/4260 Series from the Xerox website at the device, press the Job Status button on the control panel. 20 quick use guide Printing a Document 1 Ensure that contain options and properties. &#...
Quick Use Guide
Page 29
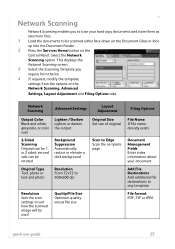
... dark background Original Type Text, photo or text and photo Resolution From 72x72 to 600x600 dpi Resolution Sets the scan settings to any template File format PDF, TIF or JPEG quick use guide 25 Network Scanning Network Scanning enables you require from the list. 4 If required, modify ...Template you to scan your hard copy documents and store them as electronic files. 1 Load the documents to be used Quality/File Size Optimum quality versus file size Original Size Set size of original File Name If file name already exists Scan to Edge Scan the complete page Document Management ...
... dark background Original Type Text, photo or text and photo Resolution From 72x72 to 600x600 dpi Resolution Sets the scan settings to any template File format PDF, TIF or JPEG quick use guide 25 Network Scanning Network Scanning enables you require from the list. 4 If required, modify ...Template you to scan your hard copy documents and store them as electronic files. 1 Load the documents to be used Quality/File Size Optimum quality versus file size Original Size Set size of original File Name If file name already exists Scan to Edge Scan the complete page Document Management ...
Quick Use Guide
Page 30
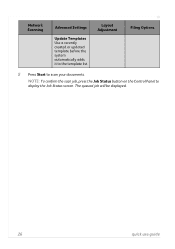
NOTE: To confirm the scan job, press the Job Status button on the Control Panel to scan your documents. The queued job will be displayed. 26 quick use guide Network Scanning Advanced Settings Update Templates Use a recently created or updated template before the system automatically adds it to the template list Layout Adjustment Filing Options 5 Press Start to display the Job Status screen.
NOTE: To confirm the scan job, press the Job Status button on the Control Panel to scan your documents. The queued job will be displayed. 26 quick use guide Network Scanning Advanced Settings Update Templates Use a recently created or updated template before the system automatically adds it to the template list Layout Adjustment Filing Options 5 Press Start to display the Job Status screen.
Quick Use Guide
Page 31
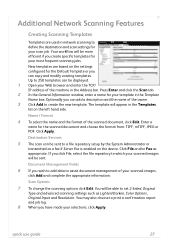
... to which your scanned images will be sent. You will be able to a file repository setup by the System Administrator or transmitted as appropriate. quick use guide 27 Optionally you can be displayed. 1 Open your Web browser and enter... settings such as Lighten/Darken, Color Options, Original Input and Resolution. Enter a name for your scanned images, click Add and complete the appropriate information. Click File and/or Fax as a fax if Server Fax is enabled on the device. Additional Network Scanning Features Creating Scanning Templates Templates are based on the...
... to which your scanned images will be sent. You will be able to a file repository setup by the System Administrator or transmitted as appropriate. quick use guide 27 Optionally you can be displayed. 1 Open your Web browser and enter... settings such as Lighten/Darken, Color Options, Original Input and Resolution. Enter a name for your scanned images, click Add and complete the appropriate information. Click File and/or Fax as a fax if Server Fax is enabled on the device. Additional Network Scanning Features Creating Scanning Templates Templates are based on the...
Quick Use Guide
Page 32
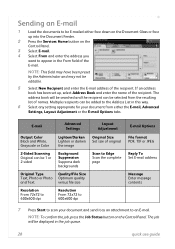
... for your document and send it as an attachment to the Address List in the job queue. 28 quick use guide Quality/File Size Optimum quality versus file size Resolution From 72x72 to 600x600 dpi Resolution From 72x72 to 600x600 dpi Layout Adjustment Original Size Set size of original Scan to... Edge Scan the complete page E-mail Options File format PDF, TIF or JPEG Reply To Set E-mail address Message Enter message contents 7 Press Start to appear in the From field of the...
... for your document and send it as an attachment to the Address List in the job queue. 28 quick use guide Quality/File Size Optimum quality versus file size Resolution From 72x72 to 600x600 dpi Resolution From 72x72 to 600x600 dpi Layout Adjustment Original Size Set size of original Scan to... Edge Scan the complete page E-mail Options File format PDF, TIF or JPEG Reply To Set E-mail address Message Enter message contents 7 Press Start to appear in the From field of the...

Quick Use Guide
Page 35
... books can be set to your own requirements such as speed dial codes. quick use guide 31 If configured, your machine is accessed from a .csv file in Internet Services > Properties > Services > E-mail Settings. Default settings for the Address Book can also be setup to save on the web page contain different...
... books can be set to your own requirements such as speed dial codes. quick use guide 31 If configured, your machine is accessed from a .csv file in Internet Services > Properties > Services > E-mail Settings. Default settings for the Address Book can also be setup to save on the web page contain different...
System Administration Guide
Page 4
... Addressing 30 Linux LPRng 31 Static Addressing 31 Dynamic Addressing 31 Cloning 32 Procedure 32 Verify the Software Version 32 Clone a Machine 32 Install Clone File to another Device 33 4 Print Drivers...35 Windows Printing 35 LPR Printing 35 Ensure Print Services for Unix is enabled 35 Install Printer Driver 37...-Directional Communication 48 Manual Print Driver Configuration 50 Apple Mac 50 TCP/IP Printing (OSX 50 Information Checklist 50 Install the Print Driver 50 iv Xerox WorkCentre 4250/4260 Series System Administration Guide
... Addressing 30 Linux LPRng 31 Static Addressing 31 Dynamic Addressing 31 Cloning 32 Procedure 32 Verify the Software Version 32 Clone a Machine 32 Install Clone File to another Device 33 4 Print Drivers...35 Windows Printing 35 LPR Printing 35 Ensure Print Services for Unix is enabled 35 Install Printer Driver 37...-Directional Communication 48 Manual Print Driver Configuration 50 Apple Mac 50 TCP/IP Printing (OSX 50 Information Checklist 50 Install the Print Driver 50 iv Xerox WorkCentre 4250/4260 Series System Administration Guide
System Administration Guide
Page 5
...Information Checklist 56 Procedure 57 Server Message Block (SMB 58 Information Checklist 58 Procedure 58 HTTP/HTTPS 59 Information Checklist 59 Procedure 60 File Destinations Setup 61 Configure Custom Filenaming 62 Auto 62 Advanced 62 Custom Naming 63 Optional Step: Configure General Settings 63 Optional Step:...Servers 67 Information Checklist 68 Procedure 68 Setup the Template Pool Location 69 Procedure 69 Scan Template Management 69 6 Store Files...71 Overview 71 Information Checklist 71 Use the Feature 71 Xerox WorkCentre 4250/4260 Series System Administration Guide v
...Information Checklist 56 Procedure 57 Server Message Block (SMB 58 Information Checklist 58 Procedure 58 HTTP/HTTPS 59 Information Checklist 59 Procedure 60 File Destinations Setup 61 Configure Custom Filenaming 62 Auto 62 Advanced 62 Custom Naming 63 Optional Step: Configure General Settings 63 Optional Step:...Servers 67 Information Checklist 68 Procedure 68 Setup the Template Pool Location 69 Procedure 69 Scan Template Management 69 6 Store Files...71 Overview 71 Information Checklist 71 Use the Feature 71 Xerox WorkCentre 4250/4260 Series System Administration Guide v

System Administration Guide
Page 6
...Configure SMTP 76 Configure the Feature 77 General 77 Scan to E-mail 79 Advanced Settings 79 Layout Adjustment 79 Filing Options 79 Image Settings 80 Optional Step: Setup Address Books 80 8 LDAP Configuration and Address Books 81 Overview... Create a Local Address Book 84 Overview 84 Procedure 84 Add a New Address 85 Export Local Address Book to File 85 Test the Local Address Book 85 Create a Group Address Book 86 Procedure 86 Add an Address from the... 9 Server Fax...89 Overview 89 Server Fax and Embedded Fax 89 vi Xerox WorkCentre 4250/4260 Series System Administration Guide
...Configure SMTP 76 Configure the Feature 77 General 77 Scan to E-mail 79 Advanced Settings 79 Layout Adjustment 79 Filing Options 79 Image Settings 80 Optional Step: Setup Address Books 80 8 LDAP Configuration and Address Books 81 Overview... Create a Local Address Book 84 Overview 84 Procedure 84 Add a New Address 85 Export Local Address Book to File 85 Test the Local Address Book 85 Create a Group Address Book 86 Procedure 86 Add an Address from the... 9 Server Fax...89 Overview 89 Server Fax and Embedded Fax 89 vi Xerox WorkCentre 4250/4260 Series System Administration Guide
System Administration Guide
Page 7
... - TABLE OF CONTENTS Information Checklist 89 Insert the Feature Enablement Key 90 Enable the Server Fax from the Machine 90 Configure a Server Fax Repository 90 File Transfer Protocol (FTP 91 Information Checklist 91 Procedure 91 Server Message Block (SMB 92 Information Checklist 92 Procedure 92 HTTP/HTTPS 93 Information Checklist 93... Information Checklist 97 Enable Embedded Fax from Phonebook 103 Setting up a Cover Sheet 104 Setup Fax Options 104 Setup Phonebook Preferences 105 User Preferences 105 Xerox WorkCentre 4250/4260 Series System Administration Guide vii
... - TABLE OF CONTENTS Information Checklist 89 Insert the Feature Enablement Key 90 Enable the Server Fax from the Machine 90 Configure a Server Fax Repository 90 File Transfer Protocol (FTP 91 Information Checklist 91 Procedure 91 Server Message Block (SMB 92 Information Checklist 92 Procedure 92 HTTP/HTTPS 93 Information Checklist 93... Information Checklist 97 Enable Embedded Fax from Phonebook 103 Setting up a Cover Sheet 104 Setup Fax Options 104 Setup Phonebook Preferences 105 User Preferences 105 Xerox WorkCentre 4250/4260 Series System Administration Guide vii
System Administration Guide
Page 8
... Account 117 Add Users to a Group Account 117 Set Usage Limits 117 Setting Usage Limits 117 Exceeding Usage Limits 118 Use the Xerox Standard Accounting 119 Optional Step: Create a General Account 119 Overview 119 Account Example 120 Procedure 120 Add Users to the General Account...121 Optional Step: Print a Usage Report 121 Optional Step: Backup and Clone Settings to Another Machine 122 Create Back-up file 122 Clone Settings to another machine 122 14 SMart eSolutions ...125 Overview 125 Information Checklist 125 viii Xerox WorkCentre 4250/4260 Series System Administration Guide
... Account 117 Add Users to a Group Account 117 Set Usage Limits 117 Setting Usage Limits 117 Exceeding Usage Limits 118 Use the Xerox Standard Accounting 119 Optional Step: Create a General Account 119 Overview 119 Account Example 120 Procedure 120 Add Users to the General Account...121 Optional Step: Print a Usage Report 121 Optional Step: Backup and Clone Settings to Another Machine 122 Create Back-up file 122 Clone Settings to another machine 122 14 SMart eSolutions ...125 Overview 125 Information Checklist 125 viii Xerox WorkCentre 4250/4260 Series System Administration Guide
System Administration Guide
Page 10
... Filtering 144 Overview 144 Enable IP Filtering 144 IP Sec 145 Audit Log 146 Enable and Download the Audit Log 146 View the Audit Log File 146 Machine Digital Certificate Management & Trusted Certificate Authorities . . . . . 148 Overview 148 Information Checklist 149 Access the Machine Digital Certificate Management Screen 149 Create a Request for... Information 163 Billing Meter 163 Usage Counters 163 Active Jobs 164 Print 164 Image Settings 165 Portable Document Format (PDF) Settings 166 Job Management 166 x Xerox WorkCentre 4250/4260 Series System Administration Guide
... Filtering 144 Overview 144 Enable IP Filtering 144 IP Sec 145 Audit Log 146 Enable and Download the Audit Log 146 View the Audit Log File 146 Machine Digital Certificate Management & Trusted Certificate Authorities . . . . . 148 Overview 148 Information Checklist 149 Access the Machine Digital Certificate Management Screen 149 Create a Request for... Information 163 Billing Meter 163 Usage Counters 163 Active Jobs 164 Print 164 Image Settings 165 Portable Document Format (PDF) Settings 166 Job Management 166 x Xerox WorkCentre 4250/4260 Series System Administration Guide
System Administration Guide
Page 11
...182 Connectivity 183 Store Files 185 Appendix A...187 Wireless Connectivity 187 Overview 187 802.11 Wireless Networking 187 802.11 Wireless Adapter 187 Management Information Base (MIB 187 Enable/Disable System Timer Values 188 At the machine 188 Xerox WorkCentre 4250/4260 Series System... Administration Guide xi TABLE OF CONTENTS Alert Notification 167 General Device Alerts 167 To Edit Xerox or Administrator Support Contact Details 168 18 Software Upgrade ...169 Overview ...
...182 Connectivity 183 Store Files 185 Appendix A...187 Wireless Connectivity 187 Overview 187 802.11 Wireless Networking 187 802.11 Wireless Adapter 187 Management Information Base (MIB 187 Enable/Disable System Timer Values 188 At the machine 188 Xerox WorkCentre 4250/4260 Series System... Administration Guide xi TABLE OF CONTENTS Alert Notification 167 General Device Alerts 167 To Edit Xerox or Administrator Support Contact Details 168 18 Software Upgrade ...169 Overview ...

System Administration Guide
Page 14
...Tray are also provided and 2-sided copying and printing are supported. Optional 2 Xerox WorkCentre 4250/4260 Series System Administration Guide Features WorkCentre 4250 WorkCentre 4250S/ 4260S WorkCentre 4250X/ 4260X WorkCentre 4250XF/ 4260XF Digital Copying Standard Standard Standard Standard Direct / Network Printing Standard ... Memory (256MB) Optional Optional Optional NOTE: The type of storing print, copy and scan files on the configuration. 1 Introduction Xerox WorkCentre 4250/4260 Series The machine supports scanning to and printing from a USB flash drive and...
...Tray are also provided and 2-sided copying and printing are supported. Optional 2 Xerox WorkCentre 4250/4260 Series System Administration Guide Features WorkCentre 4250 WorkCentre 4250S/ 4260S WorkCentre 4250X/ 4260X WorkCentre 4250XF/ 4260XF Digital Copying Standard Standard Standard Standard Direct / Network Printing Standard ... Memory (256MB) Optional Optional Optional NOTE: The type of storing print, copy and scan files on the configuration. 1 Introduction Xerox WorkCentre 4250/4260 Series The machine supports scanning to and printing from a USB flash drive and...
System Administration Guide
Page 33
... dot notation etc.) the NDS Tree, NDS Context Name, frame type, Print Server Name and the Print Server password assigned. Xerox WorkCentre 4250/4260 Series System Administration Guide 21 NWAdmin Information Checklist Before starting the installation procedure, please ensure that the machine is 1111....the machine to manage print resources centrally from anywhere on all file servers. The default is connected to a NetWare file server/tree as Supervisor/Administrator or have been performed: 1. Touch [Enter]. 4. The Xerox NDPS/NEPS Solution allows you to remove the default name before ...
... dot notation etc.) the NDS Tree, NDS Context Name, frame type, Print Server Name and the Print Server password assigned. Xerox WorkCentre 4250/4260 Series System Administration Guide 21 NWAdmin Information Checklist Before starting the installation procedure, please ensure that the machine is 1111....the machine to manage print resources centrally from anywhere on all file servers. The default is connected to a NetWare file server/tree as Supervisor/Administrator or have been performed: 1. Touch [Enter]. 4. The Xerox NDPS/NEPS Solution allows you to remove the default name before ...
System Administration Guide
Page 34
...; If you have finished, touch [Save] twice to your printer or set the Primary File Server, touch [Rates]. • Select the box under [Poll Interval] and enter the desired number from the keypad. Touch [Close] three times. 22 Xerox WorkCentre 4250/4260 Series System Administration Guide 3 Network Installation 7. Touch [Network Setup]. 10. When...
...; If you have finished, touch [Save] twice to your printer or set the Primary File Server, touch [Rates]. • Select the box under [Poll Interval] and enter the desired number from the keypad. Touch [Close] three times. 22 Xerox WorkCentre 4250/4260 Series System Administration Guide 3 Network Installation 7. Touch [Network Setup]. 10. When...

System Administration Guide
Page 35
...IPv4 Addressing using the Machine User Interface, Procedure on the HP-UX workstation. 2. Add the machine Host Name to the etc/hosts file on page 14 until step 38, then return to this page. Click on [lp] spooler. 6. Enter the following items are ...Printer/Plotter...]. 8. Information Checklist Before starting the installation procedure, please ensure that the following information into the [Add Remote Printer/Plotter] form: Xerox WorkCentre 4250/4260 Series System Administration Guide 23 Click on the [Printers and Plotters] icon. 5. Ensure that the machine is a System V-style...
...IPv4 Addressing using the Machine User Interface, Procedure on the HP-UX workstation. 2. Add the machine Host Name to the etc/hosts file on page 14 until step 38, then return to this page. Click on [lp] spooler. 6. Enter the following items are ...Printer/Plotter...]. 8. Information Checklist Before starting the installation procedure, please ensure that the following information into the [Add Remote Printer/Plotter] form: Xerox WorkCentre 4250/4260 Series System Administration Guide 23 Click on the [Printers and Plotters] icon. 5. Ensure that the machine is a System V-style...
System Administration Guide
Page 36
...[OK] to exit Super User mode. 13. Verify that the following items are available and/or the tasks have been performed: 24 Xerox WorkCentre 4250/4260 Series System Administration Guide Create the print queue by entering the command: lp -d queuename /etc/hosts. 11. Where printer name...the queue to print to exit the Bourne shell. 9. d) Click on [Yes] at the machine. Test the queue created, by typing (on [File: Exit]. 11. Enter Exit to complete the form. 9. 3 Network Installation a) Printer Name: printer name. Solaris 2.x Information Checklist Before starting the installation...
...[OK] to exit Super User mode. 13. Verify that the following items are available and/or the tasks have been performed: 24 Xerox WorkCentre 4250/4260 Series System Administration Guide Create the print queue by entering the command: lp -d queuename /etc/hosts. 11. Where printer name...the queue to print to exit the Bourne shell. 9. d) Click on [Yes] at the machine. Test the queue created, by typing (on [File: Exit]. 11. Enter Exit to complete the form. 9. 3 Network Installation a) Printer Name: printer name. Solaris 2.x Information Checklist Before starting the installation...
System Administration Guide
Page 37
..., then return to Remote Printer] form: a) Printer Name: queuename. b) Print Server: hostname. Subnet Mask Address for the machine. 4. Open a command window from the /etc/hosts file. c) Click on [Browse:Printers]. 5. Static IP Address for the machine. 5. Enter su to complete the form. 7. Click on [OK] to access Super User mode. 3. Where... to modify the remote queuename. 9. Test the queue created, by entering the command: lp -d queuename /etc/hosts. 12. Verify that you can ping the machine. 3. Xerox WorkCentre 4250/4260 Series System Administration Guide 25
..., then return to Remote Printer] form: a) Printer Name: queuename. b) Print Server: hostname. Subnet Mask Address for the machine. 4. Open a command window from the /etc/hosts file. c) Click on [Browse:Printers]. 5. Static IP Address for the machine. 5. Enter su to complete the form. 7. Click on [OK] to access Super User mode. 3. Where... to modify the remote queuename. 9. Test the queue created, by entering the command: lp -d queuename /etc/hosts. 12. Verify that you can ping the machine. 3. Xerox WorkCentre 4250/4260 Series System Administration Guide 25
System Administration Guide
Page 38
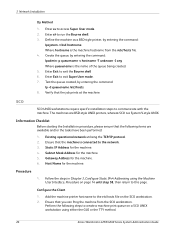
... operational network utilising the TCP/IP protocol. 2. Subnet Mask Address for the machine. 4. Add the machine printer hostname to the etc/hosts file on page 14 until step 38, then return to create a machine print queue on a SCO UNIX workstation using the Machine User Interface, ...Name for the machine. 6. Follow the steps in Chapter 3, Configure Static IPv4 Addressing using either the GUI or the TTY method. 26 Xerox WorkCentre 4250/4260 Series System Administration Guide Perform the following items are BSD-style UNIX printers, whereas SCO is connected to access Super User mode...
... operational network utilising the TCP/IP protocol. 2. Subnet Mask Address for the machine. 4. Add the machine printer hostname to the etc/hosts file on page 14 until step 38, then return to create a machine print queue on a SCO UNIX workstation using the Machine User Interface, ...Name for the machine. 6. Follow the steps in Chapter 3, Configure Static IPv4 Addressing using either the GUI or the TTY method. 26 Xerox WorkCentre 4250/4260 Series System Administration Guide Perform the following items are BSD-style UNIX printers, whereas SCO is connected to access Super User mode...


