Quick Use Guide
Page 5
...Xerox WorkCentre 4250/4260 Series Quick Use Guide Thank you will successfully: Connect the WorkCentre 4250/4260 Series Printer to a network Set-up the WorkCentre 4250/4260 Series Printer Install optional features Operate the WorkCentre 4250/4260 Series Printer Contents Install the WorkCentre 4250/4260 Series 3 Switch On the Machine 5 Your WorkCentre... 16 Making Copies ...18 Additional Copy Features 19 Printing a Document 20 Sending a Fax ...22 Network Scanning 25 Sending an E-mail 28 Enhance your WorkCentre's productivity 30 Troubleshooting...33 Help ...35 Greenwich Mean Time Offset 37...
...Xerox WorkCentre 4250/4260 Series Quick Use Guide Thank you will successfully: Connect the WorkCentre 4250/4260 Series Printer to a network Set-up the WorkCentre 4250/4260 Series Printer Install optional features Operate the WorkCentre 4250/4260 Series Printer Contents Install the WorkCentre 4250/4260 Series 3 Switch On the Machine 5 Your WorkCentre... 16 Making Copies ...18 Additional Copy Features 19 Printing a Document 20 Sending a Fax ...22 Network Scanning 25 Sending an E-mail 28 Enhance your WorkCentre's productivity 30 Troubleshooting...33 Help ...35 Greenwich Mean Time Offset 37...
Quick Use Guide
Page 24
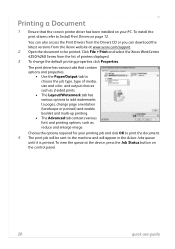
To install the print drivers refer to Install Print Drivers on page 12. To view the queue at www.xerox.com/support. 2 Open the document to be sent to the machine and will be printed. Choose the options required for your PC. You can also ... appear in the Active Jobs queue until it is printed. Click File > Print and select the Xerox WorkCentre 4250/4260 Series from the Xerox website at the device, press the Job Status button on the control panel. 20 quick use guide Printing a Document 1 Ensure that contain options and properties. • Use the Paper/Output...
To install the print drivers refer to Install Print Drivers on page 12. To view the queue at www.xerox.com/support. 2 Open the document to be sent to the machine and will be printed. Choose the options required for your PC. You can also ... appear in the Active Jobs queue until it is printed. Click File > Print and select the Xerox WorkCentre 4250/4260 Series from the Xerox website at the device, press the Job Status button on the control panel. 20 quick use guide Printing a Document 1 Ensure that contain options and properties. • Use the Paper/Output...
Quick Use Guide
Page 37
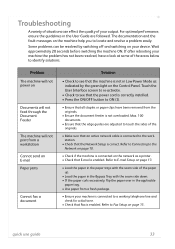
..., flip the paper over in the applicable paper tray. • Use paper from the originals. • Ensure the document feeder is not overloaded. Wait approximately 20 seconds before switching the machine ON. Refer to Fax Setup on the network as indicated by switching off and switching on the machine help you...
..., flip the paper over in the applicable paper tray. • Use paper from the originals. • Ensure the document feeder is not overloaded. Wait approximately 20 seconds before switching the machine ON. Refer to Fax Setup on the network as indicated by switching off and switching on the machine help you...
System Administration Guide
Page 3
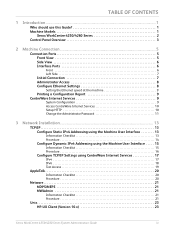
TABLE OF CONTENTS 1 Introduction ...1 Who should use this Guide 1 Machine Models 1 Xerox WorkCentre 4250/4260 Series 2 Control Panel Overview 3 2 Machine Connection ...5 Connection Ports 5 Front View 5 Side View 6 Interface Ports 6 Front 6 Left Side 7 Initial ...Settings using CentreWare Internet Services 17 IPv4 17 IPv6 18 Test Access 19 AppleTalk 20 Information Checklist 20 Procedure 20 Netware 21 NDPS/NEPS 21 NWAdmin 21 Information Checklist 21 Procedure 21 Unix 23 HP-UX Client (Version 10.x 23 Xerox WorkCentre 4250/4260 Series System Administration Guide iii
TABLE OF CONTENTS 1 Introduction ...1 Who should use this Guide 1 Machine Models 1 Xerox WorkCentre 4250/4260 Series 2 Control Panel Overview 3 2 Machine Connection ...5 Connection Ports 5 Front View 5 Side View 6 Interface Ports 6 Front 6 Left Side 7 Initial ...Settings using CentreWare Internet Services 17 IPv4 17 IPv6 18 Test Access 19 AppleTalk 20 Information Checklist 20 Procedure 20 Netware 21 NDPS/NEPS 21 NWAdmin 21 Information Checklist 21 Procedure 21 Unix 23 HP-UX Client (Version 10.x 23 Xerox WorkCentre 4250/4260 Series System Administration Guide iii
System Administration Guide
Page 25
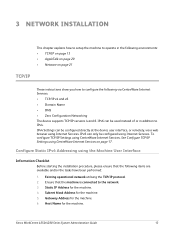
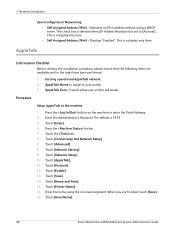
...Configuration Networking The device supports TCP/IP versions 4 and 6. Configure Static IPv4 Addressing using Internet Services. Host Name for the machine. 6. Xerox WorkCentre 4250/4260 Series System Administration Guide 13 Static IP Address for the machine. 5. IPv4 Settings can only be used instead of or in ...the following environments: • TCP/IP on page 13 • AppleTalk on page 20 • Netware on page 17. Subnet Mask Address for the machine. 4. 3 Network Installation This chapter explains how to setup the machine...
...Configuration Networking The device supports TCP/IP versions 4 and 6. Configure Static IPv4 Addressing using Internet Services. Host Name for the machine. 6. Xerox WorkCentre 4250/4260 Series System Administration Guide 13 Static IP Address for the machine. 5. IPv4 Settings can only be used instead of or in ...the following environments: • TCP/IP on page 13 • AppleTalk on page 20 • Netware on page 17. Subnet Mask Address for the machine. 4. 3 Network Installation This chapter explains how to setup the machine...
System Administration Guide
Page 26
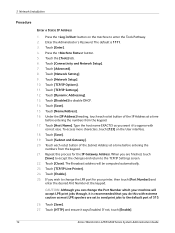
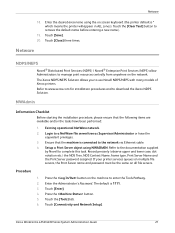
...Number] and enter the desired Port Number at a time before entering the numbers from the keypad. 17. If not, touch [Enable]. 14 Xerox WorkCentre 4250/4260 Series System Administration Guide Touch [Connectivity and Network Setup]. 7. Touch [Advanced]. 8. The Broadcast address will accept LPR print jobs through...at the keypad. Touch [Save]. 19. Touch [TCP/IP-Line Printer]. 24. Enter the Administrator's Password. Touch [Subnet and Gateway]. 20. Touch [Save]. 15. Type the host name EXACTLY as most LPR spoolers are finished, touch [Save] to accept the changes and return...
...Number] and enter the desired Port Number at a time before entering the numbers from the keypad. 17. If not, touch [Enable]. 14 Xerox WorkCentre 4250/4260 Series System Administration Guide Touch [Connectivity and Network Setup]. 7. Touch [Advanced]. 8. The Broadcast address will accept LPR print jobs through...at the keypad. Touch [Save]. 19. Touch [TCP/IP-Line Printer]. 24. Enter the Administrator's Password. Touch [Subnet and Gateway]. 20. Touch [Save]. 15. Type the host name EXACTLY as most LPR spoolers are finished, touch [Save] to accept the changes and return...
System Administration Guide
Page 28
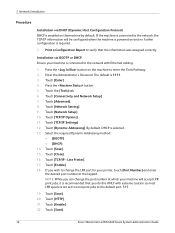
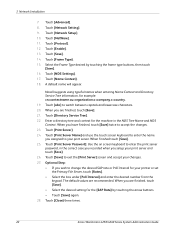
...the machine by default. Touch the [Tools] tab. 6. Touch [Connectivity and Network Setup]. 7. Touch [TCP/IP Options]. 11. Touch [Save]. 20. Touch [Network Setup]. 10. Touch [Enable]. 18. If you wish to the default port, 515. 19. Press the button. 5. By default... Setting]. 9. Touch [Close]. 16. Touch [TCP/IP Settings]. 12. Touch [Dynamic Addressing]. Touch [HTTP]. 21. Touch [Save]. 16 Xerox WorkCentre 4250/4260 Series System Administration Guide The default is selected. 13. Touch [Save]. 15. 3 Network Installation Procedure Installation via BOOTP or DHCP Ensure...
...the machine by default. Touch the [Tools] tab. 6. Touch [Connectivity and Network Setup]. 7. Touch [TCP/IP Options]. 11. Touch [Save]. 20. Touch [Network Setup]. 10. Touch [Enable]. 18. If you wish to the default port, 515. 19. Press the button. 5. By default... Setting]. 9. Touch [Close]. 16. Touch [TCP/IP Settings]. 12. Touch [Dynamic Addressing]. Touch [HTTP]. 21. Touch [Save]. 16 Xerox WorkCentre 4250/4260 Series System Administration Guide The default is selected. 13. Touch [Save]. 15. 3 Network Installation Procedure Installation via BOOTP or DHCP Ensure...
System Administration Guide
Page 32
... [Protocol]. 12. Touch [Name and Area]. 15. Touch [Printer Name]. 16. When you are available and/or the tasks have been performed: 1. Touch [Area Name]. 20 Xerox WorkCentre 4250/4260 Series System Administration Guide
... [Protocol]. 12. Touch [Name and Area]. 15. Touch [Printer Name]. 16. When you are available and/or the tasks have been performed: 1. Touch [Area Name]. 20 Xerox WorkCentre 4250/4260 Series System Administration Guide
System Administration Guide
Page 33
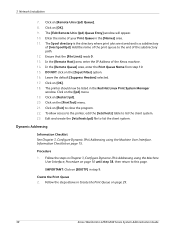
... from anywhere on screen keyboard (the printer default is * which means the printer will appear in ALL zones). Procedure 1. Touch [Enter]. 4. Xerox WorkCentre 4250/4260 Series System Administration Guide 21 Touch [Save]. 20. Netware NDPS/NEPS Novell® Distributed Print Services (NDPS) / Novell® Enterprise Print Services (NEPS) allow Administrators to a NetWare file...
... from anywhere on screen keyboard (the printer default is * which means the printer will appear in ALL zones). Procedure 1. Touch [Enter]. 4. Xerox WorkCentre 4250/4260 Series System Administration Guide 21 Touch [Save]. 20. Netware NDPS/NEPS Novell® Distributed Print Services (NDPS) / Novell® Enterprise Print Services (NEPS) allow Administrators to a NetWare file...
System Administration Guide
Page 34
... Server]. 24. When finished touch [Save]. 25. The default values are finished, touch [Save]. 21. Touch [Close] three times. 22 Xerox WorkCentre 4250/4260 Series System Administration Guide Touch [Enable]. 13. When you assigned to exit the [Print Server] screen and accept your print server. Touch...• Select the desired setting for the machine in the correct case you recorded when you wish to switch between capitals and lowercase characters. 20. Select the Frame Type desired by touching the arrow buttons. • Touch [Save] again. 28. Touch [Name Context]. 18. Novell...
... Server]. 24. When finished touch [Save]. 25. The default values are finished, touch [Save]. 21. Touch [Close] three times. 22 Xerox WorkCentre 4250/4260 Series System Administration Guide Touch [Enable]. 13. When you assigned to exit the [Print Server] screen and accept your print server. Touch...• Select the desired setting for the machine in the correct case you recorded when you wish to switch between capitals and lowercase characters. 20. Select the Frame Type desired by touching the arrow buttons. • Touch [Save] again. 28. Touch [Name Context]. 18. Novell...
System Administration Guide
Page 42
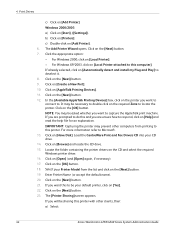
...in the Red Hat Linux Print System Manager window. The Spool directory is the directory where print jobs are stored and is a subdirectory of the Xerox machine. 14. In the [Remote Host] area, enter the IP Address of [/var/spool/lpd]. Click on [Remote Unix (lpd) Queue]..... 10. Click on [OK]. 18. IMPORTANT: Click on [BOOTP] in Create the Print Queue on page 29. 30 Xerox WorkCentre 4250/4260 Series System Administration Guide Click on [Restart lpd]. 20. Click on [OK]. 9. Click on the [lpd] menu. 19. Dynamic Addressing Information Checklist See Chapter 3, Configure Dynamic...
...in the Red Hat Linux Print System Manager window. The Spool directory is the directory where print jobs are stored and is a subdirectory of the Xerox machine. 14. In the [Remote Host] area, enter the IP Address of [/var/spool/lpd]. Click on [Remote Unix (lpd) Queue]..... 10. Click on [OK]. 18. IMPORTANT: Click on [BOOTP] in Create the Print Queue on page 29. 30 Xerox WorkCentre 4250/4260 Series System Administration Guide Click on [Restart lpd]. 20. Click on [OK]. 9. Click on the [lpd] menu. 19. Dynamic Addressing Information Checklist See Chapter 3, Configure Dynamic...
System Administration Guide
Page 50
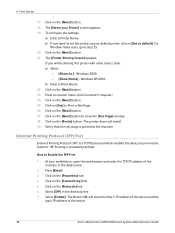
... default]. IPP Printing is printed at the machine. At your workstation, open the web browser and enter the TCP/IP address of the device. 38 Xerox WorkCentre 4250/4260 Series System Administration Guide Click on the [Next] button. 21. Click on the [Finish] button. Verify that the test page is enabled by... the device and the ipp:// IP address of the machine in the directory tree. 7. 4 Print Drivers 17. Click on the [Next] button.to step 25. 20.
... default]. IPP Printing is printed at the machine. At your workstation, open the web browser and enter the TCP/IP address of the device. 38 Xerox WorkCentre 4250/4260 Series System Administration Guide Click on the [Next] button. 21. Click on the [Finish] button. Verify that the test page is enabled by... the device and the ipp:// IP address of the machine in the directory tree. 7. 4 Print Drivers 17. Click on the [Next] button.to step 25. 20.
System Administration Guide
Page 54
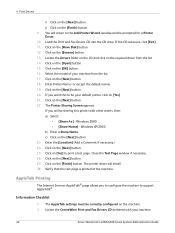
...the [Finish] button. 9. Click on the [Finish] button. Enter the [Location] (Add a Comment if necessary.) 24. Click on the [Next] button. 20. Verify that the test page is printed at the machine. Information Checklist 1. If you will be your default printer, click on [Yes]. 21. Close the...button. 13. Click on the [Have Disk] button. 12. Click on the [Next] button. 18. Select the model of your machine. 42 Xerox WorkCentre 4250/4260 Series System Administration Guide Click on the [OK] button. 16. Enter Printer Name (or accept the default name). 19. Click on the ...
...the [Finish] button. 9. Click on the [Finish] button. Enter the [Location] (Add a Comment if necessary.) 24. Click on the [Next] button. 20. Verify that the test page is printed at the machine. Information Checklist 1. If you will be your default printer, click on [Yes]. 21. Close the...button. 13. Click on the [Have Disk] button. 12. Click on the [Next] button. 18. Select the model of your machine. 42 Xerox WorkCentre 4250/4260 Series System Administration Guide Click on the [OK] button. 16. Enter Printer Name (or accept the default name). 19. Click on the ...
System Administration Guide
Page 56
...] button. 19. Locate the folder containing the printer drivers on [AppleTalk Printing Devices]. 11. Enter Printer Name (or accept the default name). 20. Click on the CD and select the required Windows printer driver. 16. Click on [Browse] and locate the CD drive. 15. For more...your CD drive. 14. Click on [Printers]. Click on the [OK] button. 18. NOTE: You may prevent other clients, then: a) Select: 44 Xerox WorkCentre 4250/4260 Series System Administration Guide Click on the [Next] button. 21. The [Printer Sharing] screen appears. Click the appropriate option: • For ...
...] button. 19. Locate the folder containing the printer drivers on [AppleTalk Printing Devices]. 11. Enter Printer Name (or accept the default name). 20. Click on the CD and select the required Windows printer driver. 16. Click on [Browse] and locate the CD drive. 15. For more...your CD drive. 14. Click on [Printers]. Click on the [OK] button. 18. NOTE: You may prevent other clients, then: a) Select: 44 Xerox WorkCentre 4250/4260 Series System Administration Guide Click on the [Next] button. 21. The [Printer Sharing] screen appears. Click the appropriate option: • For ...

System Administration Guide
Page 64
...] from the Printer Model list. 25. Click on : • [Add]. Click on [Show Info]. 28. Select the Printer and click on [Xerox] from the next menu. 22. Click on [Printer Setup Utility] on the Dock and go to [Installed]. 30. NOTE: If you want to... Utility]. 6. Double-click on your machine. Click on [Installable Options]. 29. or • [Printers] menu then [Add Printer]. 20. Click on [Installable Options]. 52 Xerox WorkCentre 4250/4260 Series System Administration Guide Click on [Utilities]. 5. Double-click on [Apply Changes]. 31. Select the options as installed on ...
...] from the Printer Model list. 25. Click on : • [Add]. Click on [Show Info]. 28. Select the Printer and click on [Xerox] from the next menu. 22. Click on [Printer Setup Utility] on the Dock and go to [Installed]. 30. NOTE: If you want to... Utility]. 6. Double-click on your machine. Click on [Installable Options]. 29. or • [Printers] menu then [Add Printer]. 20. Click on [Installable Options]. 52 Xerox WorkCentre 4250/4260 Series System Administration Guide Click on [Utilities]. 5. Double-click on [Apply Changes]. 31. Select the options as installed on ...

System Administration Guide
Page 116
... the use of the receiving fax machine. Enter the information that you want to show on the maximum capabilities of 4800 bps is restricted. 104 Xerox WorkCentre 4250/4260 Series System Administration Guide Click on [OK]. 27. Click on [Blend] to errors. Click on the [Cover Sheet Image] menu and...click on [Choose File], then browse to adjust the scale, position and preview options of the graphic. 28. Click on the [Cover Sheet] tab. 20. Click on [Print a Cover Sheet] from the [Send Speed] drop-down menu. 32. This is the fastest transmission rate and is less susceptible ...
... the use of the receiving fax machine. Enter the information that you want to show on the maximum capabilities of 4800 bps is restricted. 104 Xerox WorkCentre 4250/4260 Series System Administration Guide Click on [OK]. 27. Click on [Blend] to errors. Click on the [Cover Sheet Image] menu and...click on [Choose File], then browse to adjust the scale, position and preview options of the graphic. 28. Click on the [Cover Sheet] tab. 20. Click on [Print a Cover Sheet] from the [Send Speed] drop-down menu. 32. This is the fastest transmission rate and is less susceptible ...

System Administration Guide
Page 121
...ID] and enter a default User ID. 16. Select one character into the User and Account ID fields. 13. Touch [Save]. Xerox WorkCentre 4250/4260 Series System Administration Guide 109 Touch [Accounting Enablement]. 7. Touch [Network Accounting Setup]. 11. The Account ID are instituted. ...Touch [Network Accounting validation setups]. 15. Touch [Save]. 19. Touch [Network Accounting Login Display Mode]. 20. Users will be required to show on a particular machine before Authentication controls are alphanumeric strings between 1 and 32 characters in length...
...ID] and enter a default User ID. 16. Select one character into the User and Account ID fields. 13. Touch [Save]. Xerox WorkCentre 4250/4260 Series System Administration Guide 109 Touch [Accounting Enablement]. 7. Touch [Network Accounting Setup]. 11. The Account ID are instituted. ...Touch [Network Accounting validation setups]. 15. Touch [Save]. 19. Touch [Network Accounting Login Display Mode]. 20. Users will be required to show on a particular machine before Authentication controls are alphanumeric strings between 1 and 32 characters in length...
System Administration Guide
Page 159
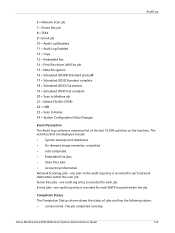
... On demand image overwrites completed. • Jobs completed. • Embedded Fax jobs. • Store Files jobs. • Accounting information. the job completed correctly. Xerox WorkCentre 4250/4260 Series System Administration Guide 147 Audit Log 6 = Network Scan job 7 = Server Fax job 8 = IFAX 9 = Email job 10 = Audit Log ... 16 = Scheduled ODIOD Standard started# 17 = Scheduled ODIO Standard complete 18 = Scheduled ODIO Full started 19 = Scheduled ODIO Full complete 20 = Scan to Mailbox job 21 = Delete File/Dir (CPSR) 22 = USB 23 = Scan to file audit log entry is recorded for each...
... On demand image overwrites completed. • Jobs completed. • Embedded Fax jobs. • Store Files jobs. • Accounting information. the job completed correctly. Xerox WorkCentre 4250/4260 Series System Administration Guide 147 Audit Log 6 = Network Scan job 7 = Server Fax job 8 = IFAX 9 = Email job 10 = Audit Log ... 16 = Scheduled ODIOD Standard started# 17 = Scheduled ODIO Standard complete 18 = Scheduled ODIO Full started 19 = Scheduled ODIO Full complete 20 = Scan to Mailbox job 21 = Delete File/Dir (CPSR) 22 = USB 23 = Scan to file audit log entry is recorded for each...

System Administration Guide
Page 201
Enable/Disable System Timer Values 18. Xerox WorkCentre 4250/4260 Series System Administration Guide 189 Touch [Confirm] to the Timers menu. 20. Press the button. 21. Select the timer value for hours (0 - 120 Hours) and for minutes (0 - 59 minutes) by touching the UP and DOWN arrow. 19. Touch [Save] to return to exit the Tools Pathway.
Enable/Disable System Timer Values 18. Xerox WorkCentre 4250/4260 Series System Administration Guide 189 Touch [Confirm] to the Timers menu. 20. Press the button. 21. Select the timer value for hours (0 - 120 Hours) and for minutes (0 - 59 minutes) by touching the UP and DOWN arrow. 19. Touch [Save] to return to exit the Tools Pathway.
System Administration Guide
Page 203
... Advanced Settings 79 Alert Notification 167 Alerts 161 general device 167 Apple Mac 50 TCP/IP install print driver 50 TCP/IP (OSX ) 50 AppleTalk 7, 20 Audit Log 146 download 146 enable 146 file 146 INDEX Audit Log File completion status 147 entry data 148 event description 147 event ID 146... last billing meter read 163 overview 159 portable document format (PDF) 166 print 164 support 167 trays 162 usage counters 163 Clone 32 file 33 Xerox WorkCentre 4250/4260 Series System Administration Guide 191
... Advanced Settings 79 Alert Notification 167 Alerts 161 general device 167 Apple Mac 50 TCP/IP install print driver 50 TCP/IP (OSX ) 50 AppleTalk 7, 20 Audit Log 146 download 146 enable 146 file 146 INDEX Audit Log File completion status 147 entry data 148 event description 147 event ID 146... last billing meter read 163 overview 159 portable document format (PDF) 166 print 164 support 167 trays 162 usage counters 163 Clone 32 file 33 Xerox WorkCentre 4250/4260 Series System Administration Guide 191
