Quick Use Guide
Page 8
4 In addition you will have: • Power Cord • User Documentation CD • System Administration CD • Print Driver CD (Not supplied with the WorkCentre 4250 copier only machine) • Nuance CD (Not supplied with the WorkCentre 4250 copier only machine) • Quick Use Guide (this book) • Toner Cartridge • Control Panel Labels • Product Enablement Key • Telephone Cable (WorkCentre 4250/4260 Series 'X' and 'XF' machine with Fax only). 4 quick use guide
4 In addition you will have: • Power Cord • User Documentation CD • System Administration CD • Print Driver CD (Not supplied with the WorkCentre 4250 copier only machine) • Nuance CD (Not supplied with the WorkCentre 4250 copier only machine) • Quick Use Guide (this book) • Toner Cartridge • Control Panel Labels • Product Enablement Key • Telephone Cable (WorkCentre 4250/4260 Series 'X' and 'XF' machine with Fax only). 4 quick use guide
Quick Use Guide
Page 11
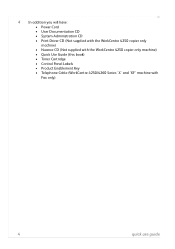
... front cover. 7 6 quick use guide 7 The Serial Number is used for scanning single documents, bound documents etc. 4 4 Bypass Tray: Used for scanning multiple documents. Your WorkCentre 4250/4260 1 Control Panel: Touch Screen and Numeric Keypad 2 3 1 3 Output Tray: Collects output 5 5 Paper Trays: Tray 2 and HCF are standard on the...
... front cover. 7 6 quick use guide 7 The Serial Number is used for scanning single documents, bound documents etc. 4 4 Bypass Tray: Used for scanning multiple documents. Your WorkCentre 4250/4260 1 Control Panel: Touch Screen and Numeric Keypad 2 3 1 3 Output Tray: Collects output 5 5 Paper Trays: Tray 2 and HCF are standard on the...
Quick Use Guide
Page 12
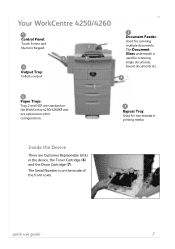
Use to enable selection of features. Control Panel Overview Job Status Services Services Home Help Log In/Out Interrupt Printing Clear All Power Machine Status Language Display and Touch Screen Numeric Keypad Cancel ...
Use to enable selection of features. Control Panel Overview Job Status Services Services Home Help Log In/Out Interrupt Printing Clear All Power Machine Status Language Display and Touch Screen Numeric Keypad Cancel ...
Quick Use Guide
Page 15
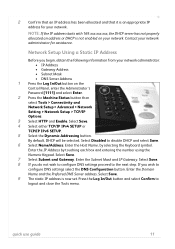
... on your network administrator: • IP Address • Gateway Address • Subnet Mask • DNS Server Address 1 Press the Log In/Out button on the Control Panel, enter the Administrator's Password [1111] and select Enter. 2 Press the Machine Status button then select Tools > Connectivity and Network Setup > Advanced > Network Setting > Network Setup...
... on your network administrator: • IP Address • Gateway Address • Subnet Mask • DNS Server Address 1 Press the Log In/Out button on the Control Panel, enter the Administrator's Password [1111] and select Enter. 2 Press the Machine Status button then select Tools > Connectivity and Network Setup > Advanced > Network Setting > Network Setup...
Quick Use Guide
Page 19
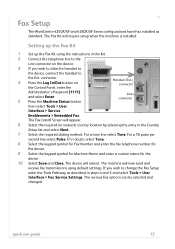
... you wish to the Line connector on the Control Panel, enter the Handset (Ext.) connector Administrator's Password [1111] and select Enter. 5 Press the Machine Status button Line connector then select Tools > User Interface > Service Enablements > Embedded Fax. Fax Setup The WorkCentre 4250X/XF and 4260X/XF Series configurations have Fax installed as described in...
... you wish to the Line connector on the Control Panel, enter the Handset (Ext.) connector Administrator's Password [1111] and select Enter. 5 Press the Machine Status button Line connector then select Tools > User Interface > Service Enablements > Embedded Fax. Fax Setup The WorkCentre 4250X/XF and 4260X/XF Series configurations have Fax installed as described in...
Quick Use Guide
Page 20
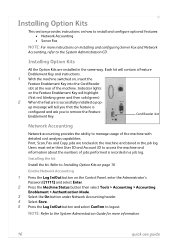
... slot Network Accounting Network accounting provides the ability to remove the Feature Enablement Key. Enable Network Accounting 1 Press the Log In/Out button on the Control Panel, enter the Administrator's Password [1111] and select Enter. 2 Press the Machine Status button then select Tools > Accounting > Accounting Enablement > Authentication Mode. 3 Select the On button...
... slot Network Accounting Network accounting provides the ability to remove the Feature Enablement Key. Enable Network Accounting 1 Press the Log In/Out button on the Control Panel, enter the Administrator's Password [1111] and select Enter. 2 Press the Machine Status button then select Tools > Accounting > Accounting Enablement > Authentication Mode. 3 Select the On button...
Quick Use Guide
Page 21
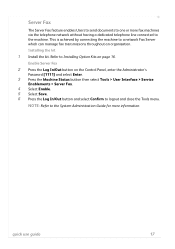
... page 16. Server Fax The Server Fax feature enables Users to send documents to one or more information. Refer to Installing Option Kits on the Control Panel, enter the Administrator's Password [1111] and select Enter. 3 Press the Machine Status button then select Tools > User Interface > Service Enablements > Server Fax. 4 Select Enable. 5 Select...
... page 16. Server Fax The Server Fax feature enables Users to send documents to one or more information. Refer to Installing Option Kits on the Control Panel, enter the Administrator's Password [1111] and select Enter. 3 Press the Machine Status button then select Tools > User Interface > Service Enablements > Server Fax. 4 Select Enable. 5 Select...
Quick Use Guide
Page 22
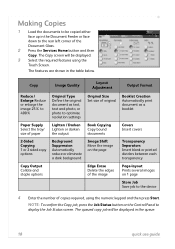
... either face up in the Document Feeder or face down to the rear left corner of the image Page-layout Prints several images on the Control Panel to display the Job Status screen. NOTE: To confirm the Copy job, press the Job Status button on 1 page Store Job Save job to optimise...
... either face up in the Document Feeder or face down to the rear left corner of the image Page-layout Prints several images on the Control Panel to display the Job Status screen. NOTE: To confirm the Copy job, press the Job Status button on 1 page Store Job Save job to optimise...
Quick Use Guide
Page 24
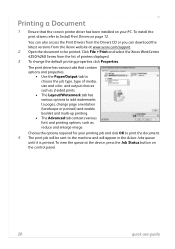
... will appear in the Active Jobs queue until it is printed. Click File > Print and select the Xerox WorkCentre 4250/4260 Series from the Xerox website at the device, press the Job Status button on the control panel. 20 quick use guide Choose the options required for your PC. The print driver has various tabs... latest versions from the list of media, size and color, and output choices such as reduce and enlarge image. To view the queue at www.xerox.com/support. 2 Open the document to pages, change the default printing properties click Properties.
... will appear in the Active Jobs queue until it is printed. Click File > Print and select the Xerox WorkCentre 4250/4260 Series from the Xerox website at the device, press the Job Status button on the control panel. 20 quick use guide Choose the options required for your PC. The print driver has various tabs... latest versions from the list of media, size and color, and output choices such as reduce and enlarge image. To view the queue at www.xerox.com/support. 2 Open the document to pages, change the default printing properties click Properties.

Quick Use Guide
Page 27
Fax Image Quality Layout Adjustment Fax Options Mailboxes Send a fax to a local or remote mailbox Fax Sending Features Specify the line rate used at the start of the fax transmission Fax Reports Select the fax confirmation or error report 4 Press Start to display the Job Status screen. The queued job will be displayed. quick use guide 23 NOTE: To confirm the Fax job, press the Job Status button on the Control Panel to transmit your fax.
Fax Image Quality Layout Adjustment Fax Options Mailboxes Send a fax to a local or remote mailbox Fax Sending Features Specify the line rate used at the start of the fax transmission Fax Reports Select the fax confirmation or error report 4 Press Start to display the Job Status screen. The queued job will be displayed. quick use guide 23 NOTE: To confirm the Fax job, press the Job Status button on the Control Panel to transmit your fax.
Quick Use Guide
Page 29
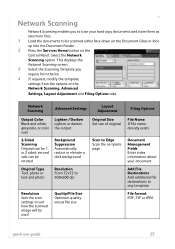
... and Filing Options tabs. Network Scanning Network Scanning enables you require from the list. 4 If required, modify the template settings from the options on the Control Panel. Network Scanning Advanced Settings Layout Adjustment Filing Options Output Color Black and white, grayscale, or color scan Lighten / Darken Lighten or darken the output 2-Sided...
... and Filing Options tabs. Network Scanning Network Scanning enables you require from the list. 4 If required, modify the template settings from the options on the Control Panel. Network Scanning Advanced Settings Layout Adjustment Filing Options Output Color Black and white, grayscale, or color scan Lighten / Darken Lighten or darken the output 2-Sided...
Quick Use Guide
Page 30
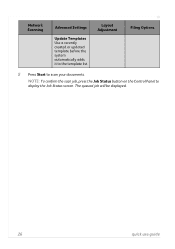
NOTE: To confirm the scan job, press the Job Status button on the Control Panel to scan your documents. Network Scanning Advanced Settings Update Templates Use a recently created or updated template before the system automatically adds it to the template list Layout Adjustment Filing Options 5 Press Start to display the Job Status screen. The queued job will be displayed. 26 quick use guide
NOTE: To confirm the scan job, press the Job Status button on the Control Panel to scan your documents. Network Scanning Advanced Settings Update Templates Use a recently created or updated template before the system automatically adds it to the template list Layout Adjustment Filing Options 5 Press Start to display the Job Status screen. The queued job will be displayed. 26 quick use guide
Quick Use Guide
Page 32
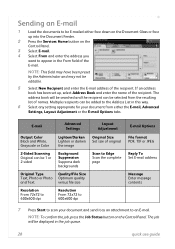
... enter the name of the E-mail. If an address book has been set up into the Document Feeder. 2 Press the Services Home button on the Control Panel. The address book will be displayed in this way. 6 Select any setting appropriate for your document and send it as an attachment to an E-mail... E-mailed either the E-mail, Advanced Settings, Layout Adjustment or the E-mail Options tabs. NOTE: To confirm the job, press the Job Status button on the Control Panel. 3 Select E-mail. 4 Select From and enter the address you want to appear in the From field of the recipient.
... enter the name of the E-mail. If an address book has been set up into the Document Feeder. 2 Press the Services Home button on the Control Panel. The address book will be displayed in this way. 6 Select any setting appropriate for your document and send it as an attachment to an E-mail... E-mailed either the E-mail, Advanced Settings, Layout Adjustment or the E-mail Options tabs. NOTE: To confirm the job, press the Job Status button on the Control Panel. 3 Select E-mail. 4 Select From and enter the address you want to appear in the From field of the recipient.
Quick Use Guide
Page 36
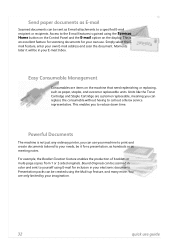
... will be in color and sent to call out a Xerox service representative. This enables you can use your machine to print and create documents tailored to reduce down time. Presentation packs can be created using the Services Home button on the Control Panel and the E-mail option on the machine that need replenishing...
... will be in color and sent to call out a Xerox service representative. This enables you can use your machine to print and create documents tailored to reduce down time. Presentation packs can be created using the Services Home button on the Control Panel and the E-mail option on the machine that need replenishing...
Quick Use Guide
Page 37
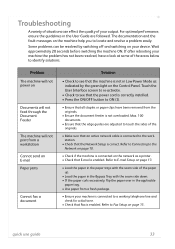
... is correctly installed. • Press the ON/OFF button to identify solutions. Troubleshooting A variety of situations can be resolved by the green light on the Control Panel.
... is correctly installed. • Press the ON/OFF button to identify solutions. Troubleshooting A variety of situations can be resolved by the green light on the Control Panel.
System Administration Guide
Page 3
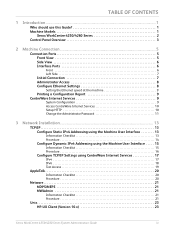
TABLE OF CONTENTS 1 Introduction ...1 Who should use this Guide 1 Machine Models 1 Xerox WorkCentre 4250/4260 Series 2 Control Panel Overview 3 2 Machine Connection ...5 Connection Ports 5 Front View 5 Side View 6 Interface Ports 6 Front 6 Left Side 7 Initial Connection 7 Administrator Access 8 Configure Ethernet Settings 8 Setting the Ethernet speed ... Information Checklist 20 Procedure 20 Netware 21 NDPS/NEPS 21 NWAdmin 21 Information Checklist 21 Procedure 21 Unix 23 HP-UX Client (Version 10.x 23 Xerox WorkCentre 4250/4260 Series System Administration Guide iii
TABLE OF CONTENTS 1 Introduction ...1 Who should use this Guide 1 Machine Models 1 Xerox WorkCentre 4250/4260 Series 2 Control Panel Overview 3 2 Machine Connection ...5 Connection Ports 5 Front View 5 Side View 6 Interface Ports 6 Front 6 Left Side 7 Initial Connection 7 Administrator Access 8 Configure Ethernet Settings 8 Setting the Ethernet speed ... Information Checklist 20 Procedure 20 Netware 21 NDPS/NEPS 21 NWAdmin 21 Information Checklist 21 Procedure 21 Unix 23 HP-UX Client (Version 10.x 23 Xerox WorkCentre 4250/4260 Series System Administration Guide iii

System Administration Guide
Page 15
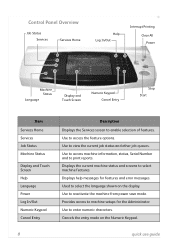
Control Panel Overview Control Panel Overview Job Status Services Services Display and Home Touch Screen Log In/Out Interrupt Help Printing Power Clear All Stop Start Language Machine Status Dial Pause Cancel Entry Numeric Keypad Xerox WorkCentre 4250/4260 Series System Administration Guide 3
Control Panel Overview Control Panel Overview Job Status Services Services Display and Home Touch Screen Log In/Out Interrupt Help Printing Power Clear All Stop Start Language Machine Status Dial Pause Cancel Entry Numeric Keypad Xerox WorkCentre 4250/4260 Series System Administration Guide 3
System Administration Guide
Page 20
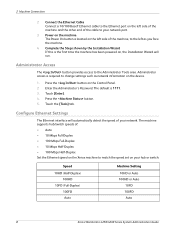
... 100HD 10FD (Full-Duplex) 100FD Auto Machine Setting 10HD or Auto 100HD or Auto 10FD 100FD Auto 8 Xerox WorkCentre 4250/4260 Series System Administration Guide The default is required to change settings such as you face the machine. ... • 10 Mbps Half-Duplex • 100 Mbps Half-Duplex Set the Ethernet speed on the Xerox machine to match the speed set on the left as network information on , the Installation Wizard will ...the Steps shown by the Installation Wizard If this is located on the Control Panel. 2. 2 Machine Connection 2. Administrator access is 1111. 3.
... 100HD 10FD (Full-Duplex) 100FD Auto Machine Setting 10HD or Auto 100HD or Auto 10FD 100FD Auto 8 Xerox WorkCentre 4250/4260 Series System Administration Guide The default is required to change settings such as you face the machine. ... • 10 Mbps Half-Duplex • 100 Mbps Half-Duplex Set the Ethernet speed on the Xerox machine to match the speed set on the left as network information on , the Installation Wizard will ...the Steps shown by the Installation Wizard If this is located on the Control Panel. 2. 2 Machine Connection 2. Administrator access is 1111. 3.

System Administration Guide
Page 21
Touch [Enter]. 4. Touch [Advanced]. 8. Touch the [Information Pages] tab. 3. Internet Services allows Administrators to be set on the Control Panel. 2. System Configuration To use CentreWare Internet Services, you need to change network and system settings on Xerox WorkCentre 4250/4260 Series System Administration Guide 9 See Configure Static IPv4 Addressing using the Machine User Interface on...
Touch [Enter]. 4. Touch [Advanced]. 8. Touch the [Information Pages] tab. 3. Internet Services allows Administrators to be set on the Control Panel. 2. System Configuration To use CentreWare Internet Services, you need to change network and system settings on Xerox WorkCentre 4250/4260 Series System Administration Guide 9 See Configure Static IPv4 Addressing using the Machine User Interface on...

System Administration Guide
Page 47
If the CD autoruns, click on [Add or Remove Programs]. 6. Double-click on [Exit]. 2. Xerox WorkCentre 4250/4260 Series System Administration Guide 35 Click on [Add/Remove Windows Components] in the left hand column. Verify that are covered: • LPR ...page 50 • TCP/IP Printing (OSX) on [Start]. 4. From your Workstation, load the CentreWare Print and Fax Drivers CD into your computer. Click on [Control Panel]. 5. 4 Print Drivers This chapter explains how to your Apple Mac Print Driver on page 52 • UNIX on page 53 • Print Driver Options: Enable...
If the CD autoruns, click on [Add or Remove Programs]. 6. Double-click on [Exit]. 2. Xerox WorkCentre 4250/4260 Series System Administration Guide 35 Click on [Add/Remove Windows Components] in the left hand column. Verify that are covered: • LPR ...page 50 • TCP/IP Printing (OSX) on [Start]. 4. From your Workstation, load the CentreWare Print and Fax Drivers CD into your computer. Click on [Control Panel]. 5. 4 Print Drivers This chapter explains how to your Apple Mac Print Driver on page 52 • UNIX on page 53 • Print Driver Options: Enable...


