Quick Use Guide
Page 5
..., you for choosing the WorkCentre 4250/4260 Series. Xerox WorkCentre 4250/4260 Series Quick Use Guide Thank you will successfully: Connect the WorkCentre 4250/4260 Series Printer to a network Set-up the WorkCentre 4250/4260 Series Printer Install optional features Operate the WorkCentre 4250/4260 Series Printer Contents Install the WorkCentre 4250/4260 Series 3 Switch On the Machine 5 Your WorkCentre 4250/4260 7 Connecting to the Network...
..., you for choosing the WorkCentre 4250/4260 Series. Xerox WorkCentre 4250/4260 Series Quick Use Guide Thank you will successfully: Connect the WorkCentre 4250/4260 Series Printer to a network Set-up the WorkCentre 4250/4260 Series Printer Install optional features Operate the WorkCentre 4250/4260 Series Printer Contents Install the WorkCentre 4250/4260 Series 3 Switch On the Machine 5 Your WorkCentre 4250/4260 7 Connecting to the Network...

Quick Use Guide
Page 9
... on for the first time. Select your chosen language and then select Save. 6 The Installation Wizard screen will be displayed. Select Next. 7 The Product Enablement Settings screen will be configured. NOTE: When the Green LED light stops blinking and remains on continuously (about 10 seconds), the configuration is switched on the...
... on for the first time. Select your chosen language and then select Save. 6 The Installation Wizard screen will be displayed. Select Next. 7 The Product Enablement Settings screen will be configured. NOTE: When the Green LED light stops blinking and remains on continuously (about 10 seconds), the configuration is switched on the...

Quick Use Guide
Page 10
... the information. 11 The next 4 screens will display a Machine Self Test In Progress screen while the machine applies the configuration settings. Select Finish to set the Date Format, Date, Clock Format and Time. 9 The Default Paper Size screen is displayed. This indicates that you do... not have successfully completed the System Settings portion of the Xerox Installation Wizard. If this is displayed.Refer to use guide NOTE: In some locations a popup screen will display the Basic Copying ...
... the information. 11 The next 4 screens will display a Machine Self Test In Progress screen while the machine applies the configuration settings. Select Finish to set the Date Format, Date, Clock Format and Time. 9 The Default Paper Size screen is displayed. This indicates that you do... not have successfully completed the System Settings portion of the Xerox Installation Wizard. If this is displayed.Refer to use guide NOTE: In some locations a popup screen will display the Basic Copying ...
Quick Use Guide
Page 13
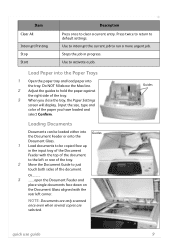
...above the Max line. 2 Adjust the guides to hold the paper against the right side of the paper you close the tray, the Paper Settings screen will display. Loading Documents Documents can be loaded either into the tray. NOTE: Documents are only scanned once even when several copies are ...selected. Use to interrupt the current job to default settings. Load Paper into the Paper Trays 1 Open the paper tray and load paper into Guides the Document Feeder or onto the Document Glass. 1 Load...
...above the Max line. 2 Adjust the guides to hold the paper against the right side of the paper you close the tray, the Paper Settings screen will display. Loading Documents Documents can be loaded either into the tray. NOTE: Documents are only scanned once even when several copies are ...selected. Use to interrupt the current job to default settings. Load Paper into the Paper Trays 1 Open the paper tray and load paper into Guides the Document Feeder or onto the Document Glass. 1 Load...
Quick Use Guide
Page 14
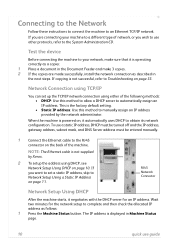
...operating correctly as a copier. 1 Place a document in Machine Status page. 10 quick use other protocols, refer to manually assign an IP address provided by Xerox. 2 To setup the address using either of the following methods: • DHCP: Use this method to the System Administration CD. To use a static ...to automatically assign an IP address. This is not successful, refer to an Ethernet TCP/IP network. Network Connection using TCP/IP You can set a static IP address, skip to Network Setup Using a Static IP Address on , it is powered on page 11. If copying is the ...
...operating correctly as a copier. 1 Place a document in Machine Status page. 10 quick use other protocols, refer to manually assign an IP address provided by Xerox. 2 To setup the address using either of the following methods: • DHCP: Use this method to the System Administration CD. To use a static ...to automatically assign an IP address. This is not successful, refer to an Ethernet TCP/IP network. Network Connection using TCP/IP You can set a static IP address, skip to Network Setup Using a Static IP Address on , it is powered on page 11. If copying is the ...
Quick Use Guide
Page 15
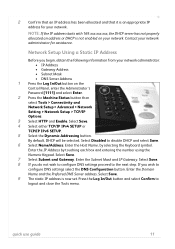
...Address by selecting the Keyboard symbol. Select Save. 7 Select Subnet and Gateway. Select Save. 8 If you do not wish to configure DNS settings proceed to disable DHCP and select Save. 6 Select Name/Address. Contact your network. By default, DHCP will be selected. Select Disabled to... the Administrator's Password [1111] and select Enter. 2 Press the Machine Status button then select Tools > Connectivity and Network Setup > Advanced > Network Setting > Network Setup > TCP/IP Options. 3 Select HTTP and Enable. Enter the Subnet Mask and IP Gateway. Select Save. 9 The static IP address...
...Address by selecting the Keyboard symbol. Select Save. 7 Select Subnet and Gateway. Select Save. 8 If you do not wish to configure DNS settings proceed to disable DHCP and select Save. 6 Select Name/Address. Contact your network. By default, DHCP will be selected. Select Disabled to... the Administrator's Password [1111] and select Enter. 2 Press the Machine Status button then select Tools > Connectivity and Network Setup > Advanced > Network Setting > Network Setup > TCP/IP Options. 3 Select HTTP and Enable. Enter the Subnet Mask and IP Gateway. Select Save. 9 The static IP address...
Quick Use Guide
Page 17
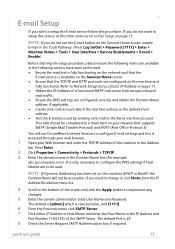
...If you do not see the E-mail button on your Web browser and enter the TCP/IP address of the SMTP Server. Refer to the Xerox machine account. The default is [admin] which the machine will use CentreWare Internet Services to setup this service at a mail client on the ...SMTP mail server that the E-mail service is 25. 8 Check the Server Requires SMTP Authentication box if required. NOTE: If Dynamic Addressing has been set on page 15. Before starting the setup procedure, please ensure the following items are available or the following actions have been performed: • Ensure the...
...If you do not see the E-mail button on your Web browser and enter the TCP/IP address of the SMTP Server. Refer to the Xerox machine account. The default is [admin] which the machine will use CentreWare Internet Services to setup this service at a mail client on the ...SMTP mail server that the E-mail service is 25. 8 Check the Server Requires SMTP Authentication box if required. NOTE: If Dynamic Addressing has been set on page 15. Before starting the setup procedure, please ensure the following items are available or the following actions have been performed: • Ensure the...
Quick Use Guide
Page 18
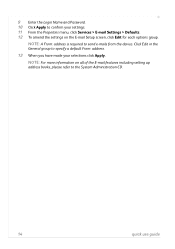
NOTE: For more information on the E-mail Setup screen, click Edit for each options group. NOTE: A From: address is required to the System Administration CD. 14 quick use guide 9 Enter the Login Name and Password. 10 Click Apply to specify a default From: address. 13 When you have made your settings. 11 From the Properties menu, click Services > E-mail Settings > Defaults. 12 To amend the settings on all of the E-mail features including setting up address books, please refer to send e-mails from the device. Click Edit in the General group to confirm your selections click Apply.
NOTE: For more information on the E-mail Setup screen, click Edit for each options group. NOTE: A From: address is required to the System Administration CD. 14 quick use guide 9 Enter the Login Name and Password. 10 Click Apply to specify a default From: address. 13 When you have made your settings. 11 From the Properties menu, click Services > E-mail Settings > Defaults. 12 To amend the settings on all of the E-mail features including setting up address books, please refer to send e-mails from the device. Click Edit in the General group to confirm your selections click Apply.
Quick Use Guide
Page 19
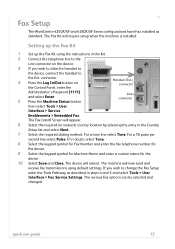
... Fax. If in the Kit. 2 Connect the telephone line to change the Fax Setup enter the Tools Pathway as standard. Fax Setup The WorkCentre 4250X/XF and 4260X/XF Series configurations have Fax installed as described in steps 4 and 5 and select Tools > User Interface > Fax Service... Settings. The Fax Kit will reboot. Setting up the Fax Kit 1 Set up the Fax Kit using default settings. The device will require setup when the machine is installed. The various Fax options can be selected ...
... Fax. If in the Kit. 2 Connect the telephone line to change the Fax Setup enter the Tools Pathway as standard. Fax Setup The WorkCentre 4250X/XF and 4260X/XF Series configurations have Fax installed as described in steps 4 and 5 and select Tools > User Interface > Fax Service... Settings. The Fax Kit will reboot. Setting up the Fax Kit 1 Set up the Fax Kit using default settings. The device will require setup when the machine is installed. The various Fax options can be selected ...
Quick Use Guide
Page 22
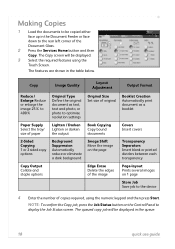
... Reduce or enlarge the image 25% to 400% Original Type Define the original document as text, text and photo, or photo to optimise resolution settings Original Size Set size of original Booklet Creation Automatically print document as a booklet Paper Supply Select the tray/ size of paper Lighten / Darken Lighten or darken the...
... Reduce or enlarge the image 25% to 400% Original Type Define the original document as text, text and photo, or photo to optimise resolution settings Original Size Set size of original Booklet Creation Automatically print document as a booklet Paper Supply Select the tray/ size of paper Lighten / Darken Lighten or darken the...

Quick Use Guide
Page 23
.... It is used for creating handouts, storyboards or documents used to copy two or more documents, in the correct sequence. Creating booklets A sequential set of the original being scanned. Additional Copy Features Reduce / Enlarge Originals can be reduced or enlarged between 25% and 400%. To use this option...on the selected paper. You can enhance the copy quality of the preset reduce/enlarge ratios or select More to access custom settings. To use guide 19 Select any one side of a sheet of the output. Multiple images This feature is ideal for archival purposes.
.... It is used for creating handouts, storyboards or documents used to copy two or more documents, in the correct sequence. Creating booklets A sequential set of the original being scanned. Additional Copy Features Reduce / Enlarge Originals can be reduced or enlarged between 25% and 400%. To use this option...on the selected paper. You can enhance the copy quality of the preset reduce/enlarge ratios or select More to access custom settings. To use guide 19 Select any one side of a sheet of the output. Multiple images This feature is ideal for archival purposes.
Quick Use Guide
Page 25
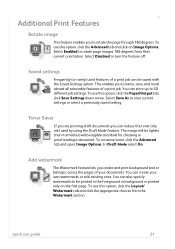
...tab and click the appropriate choices from their current orientation. The image will be lighter than normal but will be saved with the Saved Settings option. To use this option, click the Advanced tab and click on the first page. Select Save As to name, save current...guide 21 You can also specify watermarks to turn the feature off. quick use this option, click the Paper/Output tab, click Save Settings down arrow. Saved settings Frequently (or rarely) used by using the Draft Mode feature. Additional Print Features Rotate image This feature enables you can reduce the toner...
...tab and click the appropriate choices from their current orientation. The image will be lighter than normal but will be saved with the Saved Settings option. To use this option, click the Advanced tab and click on the first page. Select Save As to name, save current...guide 21 You can also specify watermarks to turn the feature off. quick use this option, click the Paper/Output tab, click Save Settings down arrow. Saved settings Frequently (or rarely) used by using the Draft Mode feature. Additional Print Features Rotate image This feature enables you can reduce the toner...
Quick Use Guide
Page 26
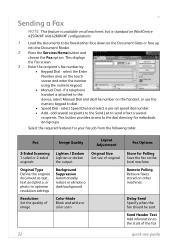
... Define the original document as text, text and photo, or photo to optimise resolution settings Resolution Set the quality of image Image Quality Layout Adjustment Lighten / Darken Lighten or darken the output Original Size Set size of the fax 22 quick use the numeric keypad to dial. • Speed...face up into the Document Feeder. 2 Press the Services Home button and choose the Fax option. if a telephone handset is standard on WorkCentre 4250X/XF and 4260X/XF configurations. 1 Load the documents to be sent Send Header Text Add information to the start of original Background ...
... Define the original document as text, text and photo, or photo to optimise resolution settings Resolution Set the quality of image Image Quality Layout Adjustment Lighten / Darken Lighten or darken the output Original Size Set size of the fax 22 quick use the numeric keypad to dial. • Speed...face up into the Document Feeder. 2 Press the Services Home button and choose the Fax option. if a telephone handset is standard on WorkCentre 4250X/XF and 4260X/XF configurations. 1 Load the documents to be sent Send Header Text Add information to the start of original Background ...

Quick Use Guide
Page 28
Entries stored here will be set up an Address Book Use this feature to store destination names and fax numbers in your device. Dialing Groups can be printed. Select the desired ... at the receiving fax terminal. Select the Fax tab and then Address Book. Select Fax Options > Delayed Send. To use guide Enter Individual fax details. Set up comprising several Individual entries.
Entries stored here will be set up an Address Book Use this feature to store destination names and fax numbers in your device. Dialing Groups can be printed. Select the desired ... at the receiving fax terminal. Select the Fax tab and then Address Book. Select Fax Options > Delayed Send. To use guide Enter Individual fax details. Set up comprising several Individual entries.
Quick Use Guide
Page 29
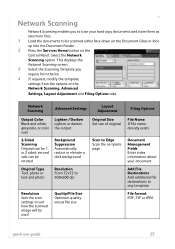
...and store them as electronic files. 1 Load the documents to be used Quality/File Size Optimum quality versus file size Original Size Set size of original File Name If file name already exists Scan to Edge Scan the complete page Document Management Fields Enter index information ...Suppression Automatically reduce or elimate a dark background Original Type Text, photo or text and photo Resolution From 72x72 to 600x600 dpi Resolution Sets the scan settings to any template File format PDF, TIF or JPEG quick use guide 25 Network Scanning Network Scanning enables you require from the list...
...and store them as electronic files. 1 Load the documents to be used Quality/File Size Optimum quality versus file size Original Size Set size of original File Name If file name already exists Scan to Edge Scan the complete page Document Management Fields Enter index information ...Suppression Automatically reduce or elimate a dark background Original Type Text, photo or text and photo Resolution From 72x72 to 600x600 dpi Resolution Sets the scan settings to any template File format PDF, TIF or JPEG quick use guide 25 Network Scanning Network Scanning enables you require from the list...
Quick Use Guide
Page 30
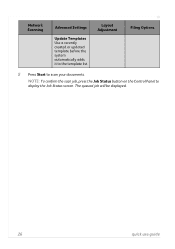
Network Scanning Advanced Settings Update Templates Use a recently created or updated template before the system automatically adds it to the template list Layout Adjustment Filing Options 5 Press Start to display the Job Status screen. NOTE: To confirm the scan job, press the Job Status button on the Control Panel to scan your documents. The queued job will be displayed. 26 quick use guide
Network Scanning Advanced Settings Update Templates Use a recently created or updated template before the system automatically adds it to the template list Layout Adjustment Filing Options 5 Press Start to display the Job Status screen. NOTE: To confirm the scan job, press the Job Status button on the Control Panel to scan your documents. The queued job will be displayed. 26 quick use guide
Quick Use Guide
Page 31
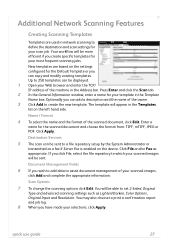
...repository setup by the System Administrator or transmitted as appropriate. Additional Network Scanning Features Creating Scanning Templates Templates are based on the settings configured for the Default Template or you can copy and modify existing templates. Scan Options 7 To change the scanning options click... information. Optionally you create specific templates for your selections, click Apply. Click Apply. Up to define the destination and scan settings for the scanned document and choose the format from: TIFF, mTIFF, JPEG or PDF. The template will be more efficient ...
...repository setup by the System Administrator or transmitted as appropriate. Additional Network Scanning Features Creating Scanning Templates Templates are based on the settings configured for the Default Template or you can copy and modify existing templates. Scan Options 7 To change the scanning options click... information. Optionally you create specific templates for your selections, click Apply. Click Apply. Up to define the destination and scan settings for the scanned document and choose the format from: TIFF, mTIFF, JPEG or PDF. The template will be more efficient ...
Quick Use Guide
Page 32
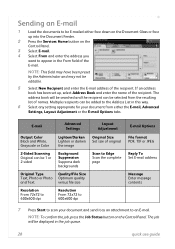
...Background Suppression Suppress dark backgrounds Original Type Text, Photo or Photo and Text. E-mail Advanced Settings Output Color Black and White, Grayscale or Color Lighten/Darken Lighten or darken the image 2-...scan your document from the resulting list of the recipient. If an address book has been set up into the Document Feeder. 2 Press the Services Home button on the Control Panel. The...be searched and the recipient can be added to the Address List in this way. 6 Select any setting appropriate for your document and send it as an attachment to an E-mail. Sending an E-mail ...
...Background Suppression Suppress dark backgrounds Original Type Text, Photo or Photo and Text. E-mail Advanced Settings Output Color Black and White, Grayscale or Color Lighten/Darken Lighten or darken the image 2-...scan your document from the resulting list of the recipient. If an address book has been set up into the Document Feeder. 2 Press the Services Home button on the Control Panel. The...be searched and the recipient can be added to the Address List in this way. 6 Select any setting appropriate for your document and send it as an attachment to an E-mail. Sending an E-mail ...

Quick Use Guide
Page 35
...in queue and Administrator setups. quick use guide 31 On-line Address Book The Address Book comes in Internet Services > Properties > Services > E-mail Settings. As a user, you have built up to program the Address Book with this feature to the machine can be either the Machine Status, Job...accessed from the comfort of frequent fax or mail recipients. Customize your device The machine can be setup to reflect your own desktop. Default settings for the Address Book can even send a print-ready job over the Internet with recipients' details like E-mail address or fax numbers. ...
...in queue and Administrator setups. quick use guide 31 On-line Address Book The Address Book comes in Internet Services > Properties > Services > E-mail Settings. As a user, you have built up to program the Address Book with this feature to the machine can be either the Machine Status, Job...accessed from the comfort of frequent fax or mail recipients. Customize your device The machine can be setup to reflect your own desktop. Default settings for the Address Book can even send a print-ready job over the Internet with recipients' details like E-mail address or fax numbers. ...
System Administration Guide
Page 3
TABLE OF CONTENTS 1 Introduction ...1 Who should use this Guide 1 Machine Models 1 Xerox WorkCentre 4250/4260 Series 2 Control Panel Overview 3 2 Machine Connection ...5 Connection Ports 5 Front View 5 Side View 6 Interface Ports 6 Front 6 Left Side 7 Initial Connection 7 Administrator Access 8 Configure Ethernet Settings 8 Setting the Ethernet speed at the machine 9 Printing a Configuration Report 9 CentreWare Internet Services 9 System Configuration 9 Access CentreWare...
TABLE OF CONTENTS 1 Introduction ...1 Who should use this Guide 1 Machine Models 1 Xerox WorkCentre 4250/4260 Series 2 Control Panel Overview 3 2 Machine Connection ...5 Connection Ports 5 Front View 5 Side View 6 Interface Ports 6 Front 6 Left Side 7 Initial Connection 7 Administrator Access 8 Configure Ethernet Settings 8 Setting the Ethernet speed at the machine 9 Printing a Configuration Report 9 CentreWare Internet Services 9 System Configuration 9 Access CentreWare...


