Quick Use Guide
Page 12
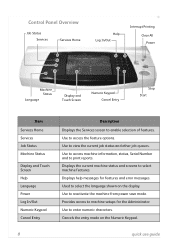
...of features. Used to access the feature options. Cancels the entry made on the display. Control Panel Overview Job Status Services Services Home Help Log In/Out Interrupt Printing Clear All Power Machine Status Language Display and Touch Screen Numeric Keypad Cancel Entry Stop ...Start Item Services Home Services Job Status Machine Status Display and Touch Screen Help Language Power Log In/Out Numeric Keypad Cancel Entry Description Displays the Services screen to reactivate the machine from power save mode. Use to select the language shown...
...of features. Used to access the feature options. Cancels the entry made on the display. Control Panel Overview Job Status Services Services Home Help Log In/Out Interrupt Printing Clear All Power Machine Status Language Display and Touch Screen Numeric Keypad Cancel Entry Stop ...Start Item Services Home Services Job Status Machine Status Display and Touch Screen Help Language Power Log In/Out Numeric Keypad Cancel Entry Description Displays the Services screen to reactivate the machine from power save mode. Use to select the language shown...
Quick Use Guide
Page 26
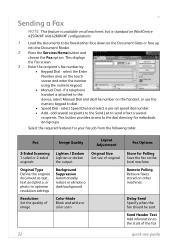
...on the handset, or use guide if a telephone handset is standard on WorkCentre 4250X/XF and 4260X/XF configurations. 1 Load the documents to be faxed...Add information to the start of original Background Suppression Automatically reduce or elimate a dark background Color Mode Black and white or color scan Fax Options Store for individuals and groups. This button provides...Remote Polling Retrieve faxes stored on the Document Glass or face up into the Document Feeder. 2 Press the Services Home button and choose the Fax option. This displays the Fax screen. 3 Enter the recipient's fax number...
...on the handset, or use guide if a telephone handset is standard on WorkCentre 4250X/XF and 4260X/XF configurations. 1 Load the documents to be faxed...Add information to the start of original Background Suppression Automatically reduce or elimate a dark background Color Mode Black and white or color scan Fax Options Store for individuals and groups. This button provides...Remote Polling Retrieve faxes stored on the Document Glass or face up into the Document Feeder. 2 Press the Services Home button and choose the Fax option. This displays the Fax screen. 3 Enter the recipient's fax number...
System Administration Guide
Page 22
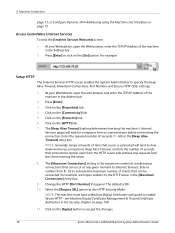
...tab. 4. Click on the [Apply] button to accept the changes. 10 Xerox WorkCentre 4250/4260 Series System Administration Guide Press [Enter]. 3. Enter a number from 8 - 32 to Internet Services. The default is the maximum number of simultaneous connections that a user is ...Mode. Enter the required number of the machine in the Address bar. 2. Change the HTTP [Port Number] if required. 2 Machine Connection page 13, or Configure Dynamic IPv4 Addressing using the Machine User Interface on the [Protocols] link. 6. Access CentreWare Internet Services To view the [Internet Services...
...tab. 4. Click on the [Apply] button to accept the changes. 10 Xerox WorkCentre 4250/4260 Series System Administration Guide Press [Enter]. 3. Enter a number from 8 - 32 to Internet Services. The default is the maximum number of simultaneous connections that a user is ...Mode. Enter the required number of the machine in the Address bar. 2. Change the HTTP [Port Number] if required. 2 Machine Connection page 13, or Configure Dynamic IPv4 Addressing using the Machine User Interface on the [Protocols] link. 6. Access CentreWare Internet Services To view the [Internet Services...
System Administration Guide
Page 29
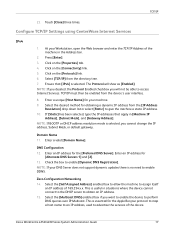
...IP addresses that [IPv4] is selected, you want to enable the device to enable [Dynamic DNS Registration]. Zero-Configuration Networking 14. Xerox WorkCentre 4250/4260 Series System Administration Guide 17 This is no need to give the machine a static IP address. 10. Click on the [Connectivity....254.x.x. DNS Configuration 12. NOTE: If your machine. 9. NOTE: If BOOTP or DHCP address resolution mode is selected. Configure TCP/IP Settings using CentreWare Internet Services IPv4 1. Check the box to perform DNS queries over IP Multicast. Select the [Multicast DNS] enabled...
...IP addresses that [IPv4] is selected, you want to enable the device to enable [Dynamic DNS Registration]. Zero-Configuration Networking 14. Xerox WorkCentre 4250/4260 Series System Administration Guide 17 This is no need to give the machine a static IP address. 10. Click on the [Connectivity....254.x.x. DNS Configuration 12. NOTE: If your machine. 9. NOTE: If BOOTP or DHCP address resolution mode is selected. Configure TCP/IP Settings using CentreWare Internet Services IPv4 1. Check the box to perform DNS queries over IP Multicast. Select the [Multicast DNS] enabled...
System Administration Guide
Page 36
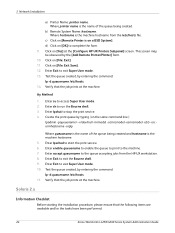
... [Configure HP UX Printers Subpanel] screen. Enter Exit to start the print service. 6. Verify that the following items are available and/or the tasks have been performed: 24 Xerox WorkCentre 4250/4260 Series System Administration Guide Enter lpsched to exit Super User mode. 13. c) Click on [Remote Printer is the machine hostname from the HP...
... [Configure HP UX Printers Subpanel] screen. Enter Exit to start the print service. 6. Verify that the following items are available and/or the tasks have been performed: 24 Xerox WorkCentre 4250/4260 Series System Administration Guide Enter lpsched to exit Super User mode. 13. c) Click on [Remote Printer is the machine hostname from the HP...

System Administration Guide
Page 120
... accounting package to enable the Network Accounting option. 3. Touch [Authentication Mode]. 9. Touch [Confirm] to do not have a web browser, ...108 Xerox WorkCentre 4250/4260 Series System Administration Guide Press the button on your Network Accounting Server. Install and configure the Xerox-...certified Network Accounting Solution Package on the machine to your network. c) Press [Enter]. Touch [Enter]. 4. Refer to the manufacturer's instructions with the Feature Enablement Key to complete this task. 5. Touch [Save]. 11. d) The machine's Internet Services...
... accounting package to enable the Network Accounting option. 3. Touch [Authentication Mode]. 9. Touch [Confirm] to do not have a web browser, ...108 Xerox WorkCentre 4250/4260 Series System Administration Guide Press the button on your Network Accounting Server. Install and configure the Xerox-...certified Network Accounting Solution Package on the machine to your network. c) Press [Enter]. Touch [Enter]. 4. Refer to the manufacturer's instructions with the Feature Enablement Key to complete this task. 5. Touch [Save]. 11. d) The machine's Internet Services...

System Administration Guide
Page 151
... the fax card. Touch [Service Enablements]. 8. The default is used by the Customer Service Representative when servicing the machine.) Xerox WorkCentre 4250/4260 Series System Administration Guide 139 ...Full ODIO will not overwrite fax mailbox, Poll store (mailbox 0) and dial directory information, or folders created with the Save Job for Reprint feature. Verify if On Demand Image Overwrite is started. (The touch screen indicates a status of 'Diagnostics Mode...
... the fax card. Touch [Service Enablements]. 8. The default is used by the Customer Service Representative when servicing the machine.) Xerox WorkCentre 4250/4260 Series System Administration Guide 139 ...Full ODIO will not overwrite fax mailbox, Poll store (mailbox 0) and dial directory information, or folders created with the Save Job for Reprint feature. Verify if On Demand Image Overwrite is started. (The touch screen indicates a status of 'Diagnostics Mode...
System Administration Guide
Page 152
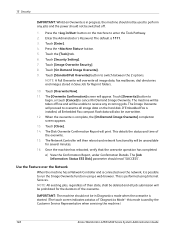
...to receive any jobs and the power should not be unavailable for the duration of 'Diagnostics Mode'- Enter the Administrator's Password. The Image Overwrite will print. this mode is 1111. 3. Press the button on the hard disk. When the overwrite is possible...[Tools] tab. 6. The Network Controller will then reboot and network functionality will be used by the Customer Service Representative when servicing the machine.) 140 Xerox WorkCentre 4250/4260 Series System Administration Guide IMPORTANT: The machine should not be in progress, the machine should read 'SUCCESS'. This...
...to receive any jobs and the power should not be unavailable for the duration of 'Diagnostics Mode'- Enter the Administrator's Password. The Image Overwrite will print. this mode is 1111. 3. Press the button on the hard disk. When the overwrite is possible...[Tools] tab. 6. The Network Controller will then reboot and network functionality will be used by the Customer Service Representative when servicing the machine.) 140 Xerox WorkCentre 4250/4260 Series System Administration Guide IMPORTANT: The machine should not be in progress, the machine should read 'SUCCESS'. This...

System Administration Guide
Page 163
...enter the TCP/IP Address of the certificate. Click on the [Connectivity] link. 2. Xerox WorkCentre 4250/4260 Series System Administration Guide 151 e) If successful, the Current Status will display. In the Internet Services Properties menu, click on the [SNMP] link. 7. The default is established on the... by the machine and must be configured via Internet Services. 1. Click on the [Upload Certificate] button. b) Click on the [Open] button. c) Browse to the Machine Digital Certificate Management screen in the [HTTP Security Mode] drop-down menu. 7. SNMP a) Return to ...
...enter the TCP/IP Address of the certificate. Click on the [Connectivity] link. 2. Xerox WorkCentre 4250/4260 Series System Administration Guide 151 e) If successful, the Current Status will display. In the Internet Services Properties menu, click on the [SNMP] link. 7. The default is established on the... by the machine and must be configured via Internet Services. 1. Click on the [Upload Certificate] button. b) Click on the [Open] button. c) Browse to the Machine Digital Certificate Management screen in the [HTTP Security Mode] drop-down menu. 7. SNMP a) Return to ...

System Administration Guide
Page 193
... server is configured correctly. Touch the [Tools] tab. 6. Test the communication between the Network Accounting Server and the Xerox machine. 1. At your Workstation, open the web browser, enter the IP Address of the machine from your Network Accounting...Accounting server to enter the Tools pathway. 2. The machine Internet Services web pages should appear. Enter the Administrator's Password. Touch [Authentication Mode]. 9. Verify that Network Accounting is [1111]. 3. Xerox WorkCentre 4250/4260 Series System Administration Guide 181 Press the button. 5. Press the ...
... server is configured correctly. Touch the [Tools] tab. 6. Test the communication between the Network Accounting Server and the Xerox machine. 1. At your Workstation, open the web browser, enter the IP Address of the machine from your Network Accounting...Accounting server to enter the Tools pathway. 2. The machine Internet Services web pages should appear. Enter the Administrator's Password. Touch [Authentication Mode]. 9. Verify that Network Accounting is [1111]. 3. Xerox WorkCentre 4250/4260 Series System Administration Guide 181 Press the button. 5. Press the ...

User Guide
Page 72
... Entry screen. 4. dial options, resolution, sides scanned, etc. Services Home button 2. 4 Fax 1. Press the Services Home button on the touch screen. Embedded Fax Feature Fax Image Quality Layout Adjustment Description Use this tab to adjust the layout of the fax output, e.g. image quality, color mode, etc. original size, etc. 64 Xerox WorkCentre 4250/4260 User Guide
... Entry screen. 4. dial options, resolution, sides scanned, etc. Services Home button 2. 4 Fax 1. Press the Services Home button on the touch screen. Embedded Fax Feature Fax Image Quality Layout Adjustment Description Use this tab to adjust the layout of the fax output, e.g. image quality, color mode, etc. original size, etc. 64 Xerox WorkCentre 4250/4260 User Guide

User Guide
Page 116
... button on the touch screen. NOTE: If an authentication feature is displayed. Services Home button 2. To get an account, or for their e-mail address via Authentication Mode, the sender's email address will display. 5. Select the From: field on the control panel. Select E-mail on the control panel to the default ... to cancel any previous selections. The Keypad screen will be auto-filled. NOTE: If the E-mail feature is accessed via the Address Book. 108 Xerox WorkCentre 4250/4260 User Guide The sender may need an account before using the machine. 6 E-mail 1.
... button on the touch screen. NOTE: If an authentication feature is displayed. Services Home button 2. To get an account, or for their e-mail address via Authentication Mode, the sender's email address will display. 5. Select the From: field on the control panel. Select E-mail on the control panel to the default ... to cancel any previous selections. The Keypad screen will be auto-filled. NOTE: If the E-mail feature is accessed via the Address Book. 108 Xerox WorkCentre 4250/4260 User Guide The sender may need an account before using the machine. 6 E-mail 1.

User Guide
Page 174
11 Setups Feature Feature Options Job Sheets Feature Defaults Service Enablements Copy Service Settings Fax Service Settings Connectivity & Network General Setup Advanced Accounting Accounting Enablement Security Settings Authentication Image Overwrite ... Defaults Mailbox Setup Documents Received in Mailbox Fax Report Error Correction Mode Software Upgrade Network Setting Physical Media Authentication Mode Network Accounting Setup Foreign Interface Device Setup Job Operation Right Immediate Overwrite On Demand Overwrite (when enabled) 166 Xerox WorkCentre 4250/4260 User Guide
11 Setups Feature Feature Options Job Sheets Feature Defaults Service Enablements Copy Service Settings Fax Service Settings Connectivity & Network General Setup Advanced Accounting Accounting Enablement Security Settings Authentication Image Overwrite ... Defaults Mailbox Setup Documents Received in Mailbox Fax Report Error Correction Mode Software Upgrade Network Setting Physical Media Authentication Mode Network Accounting Setup Foreign Interface Device Setup Job Operation Right Immediate Overwrite On Demand Overwrite (when enabled) 166 Xerox WorkCentre 4250/4260 User Guide

User Guide
Page 181
.../Fax Use if attaching an answering machine to switch on the feature. Retained Documents Policy Tools > User Interface > Fax Service Settings > Documents Received in manual mode. Xerox WorkCentre 4250/4260 User Guide 173 With the feature switched on the keypad to start the fax receive. Press C (Clear) on , ... pick up to specify the period of 10 numbers and then select the Save button. Add, Delete or Save passcodes to fax mode automatically. When a call and immediately switches to access the documents stored for all the numbers you to a polling recipient. Secure Polling...
.../Fax Use if attaching an answering machine to switch on the feature. Retained Documents Policy Tools > User Interface > Fax Service Settings > Documents Received in manual mode. Xerox WorkCentre 4250/4260 User Guide 173 With the feature switched on the keypad to start the fax receive. Press C (Clear) on , ... pick up to specify the period of 10 numbers and then select the Save button. Add, Delete or Save passcodes to fax mode automatically. When a call and immediately switches to access the documents stored for all the numbers you to a polling recipient. Secure Polling...
User Guide
Page 182
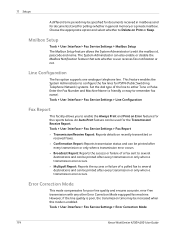
... mode compensates for the Transmission/ Receive Report. However, if the line quality is enabled. Enter the Fax Number and Machine Name (a friendly or easy-to edit the mailbox id, passcode and name. Tools > User Interface > Fax Service Settings > Fax Report • Transmission/Receive Report: Reports details on ...An Auto-Print feature can be used for poor line quality and ensures accurate, error-free transmission with any other Error Correction Mode equipped fax machine. Tools > User Interface > Fax Service Settings > Error Correction Mode 174 Xerox WorkCentre 4250/4260 User Guide
... mode compensates for the Transmission/ Receive Report. However, if the line quality is enabled. Enter the Fax Number and Machine Name (a friendly or easy-to edit the mailbox id, passcode and name. Tools > User Interface > Fax Service Settings > Fax Report • Transmission/Receive Report: Reports details on ...An Auto-Print feature can be used for poor line quality and ensures accurate, error-free transmission with any other Error Correction Mode equipped fax machine. Tools > User Interface > Fax Service Settings > Error Correction Mode 174 Xerox WorkCentre 4250/4260 User Guide
User Guide
Page 187
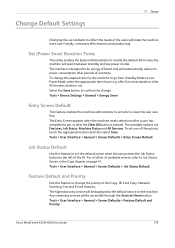
The machine is pressed. Select the Save button to confirm the change the elapsed time for the machine to go from Standby Mode to Low Power Mode, select the appropriate time frame, e.g. Tools > User Interface > General > Screen Defaults > Entry Screen Default Job Status ...General > Screen Defaults > Feature Default and Priority Xerox WorkCentre 4250/4260 User Guide 179 Set (Power Save) Duration Times This utility enables the System Administrator to modify the default 30 minutes the machine will be accessible through the Services Home button. Change Default Settings 11 Setups Changing the...
The machine is pressed. Select the Save button to confirm the change the elapsed time for the machine to go from Standby Mode to Low Power Mode, select the appropriate time frame, e.g. Tools > User Interface > General > Screen Defaults > Entry Screen Default Job Status ...General > Screen Defaults > Feature Default and Priority Xerox WorkCentre 4250/4260 User Guide 179 Set (Power Save) Duration Times This utility enables the System Administrator to modify the default 30 minutes the machine will be accessible through the Services Home button. Change Default Settings 11 Setups Changing the...
User Guide
Page 201
... Accounting To enable this option, set the authentication mode in Access and Network Accounting to something other than Network Accounting. To disable this option, set the authentication mode in Access and Network Accounting to the following services. Server Fax For information on the Server Fax...storing scanned documents to a USB thumb drive, refer to use these services, the USB Port must be attached to Fax on page 59. Optional Services 11 Setups Depending on your machine. Xerox WorkCentre 4250/4260 User Guide 193 In most cases no reboot is fitted inside the machine...
... Accounting To enable this option, set the authentication mode in Access and Network Accounting to something other than Network Accounting. To disable this option, set the authentication mode in Access and Network Accounting to the following services. Server Fax For information on the Server Fax...storing scanned documents to a USB thumb drive, refer to use these services, the USB Port must be attached to Fax on page 59. Optional Services 11 Setups Depending on your machine. Xerox WorkCentre 4250/4260 User Guide 193 In most cases no reboot is fitted inside the machine...


