Use and Care Guide
Page 7
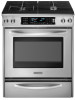
If you do not hear the igniter click, turn knob counterclockwise to Lite will include a TripleTier® Burner LP Gas Conversion Kit and a kit for use LP Gas, an LP Gas Conversion Kit is ideal for cooking large quantities of the pan. Models with the TripleTier® Flame Burner will produce a ...knob. Hold a lit match near a burner and turn knob counterclockwise to follow these instructions can result in use or (on making this conversion. All surface burners will become hot. Push in and turn knob to use with Natural gas. HIGH POWER SETTING RECOMMENDED USE HI s ...
If you do not hear the igniter click, turn knob counterclockwise to Lite will include a TripleTier® Burner LP Gas Conversion Kit and a kit for use LP Gas, an LP Gas Conversion Kit is ideal for cooking large quantities of the pan. Models with the TripleTier® Flame Burner will produce a ...knob. Hold a lit match near a burner and turn knob counterclockwise to follow these instructions can result in use or (on making this conversion. All surface burners will become hot. Push in and turn knob to use with Natural gas. HIGH POWER SETTING RECOMMENDED USE HI s ...
Installation Instructions
Page 2
... 13 Make Gas Connection 16 Electronic Ignition System 17 Replace Oven Racks and Warming Drawer 18 Complete Installation 18 GAS CONVERSIONS 19 LP Gas Conversion 19 Natural Gas Conversion 21 ANTI-TIP BRACKET TEMPLATE 39 TABLE DES MATIÈRES SÉCURITÉ DE LA CUISINIÈRE...33 Réinstallation des grilles du four et du tiroir-réchaud 34 Achever l'installation 34 CONVERSIONS POUR CHANGEMENT DE GAZ 34 Conversion pour l'alimentation au propane 34 Conversion pour l'alimentation au gaz naturel 37 GABARIT POUR LA BRIDE ANTIBASCULEMENT 39 RANGE SAFETY Your safety and...
... 13 Make Gas Connection 16 Electronic Ignition System 17 Replace Oven Racks and Warming Drawer 18 Complete Installation 18 GAS CONVERSIONS 19 LP Gas Conversion 19 Natural Gas Conversion 21 ANTI-TIP BRACKET TEMPLATE 39 TABLE DES MATIÈRES SÉCURITÉ DE LA CUISINIÈRE...33 Réinstallation des grilles du four et du tiroir-réchaud 34 Achever l'installation 34 CONVERSIONS POUR CHANGEMENT DE GAZ 34 Conversion pour l'alimentation au propane 34 Conversion pour l'alimentation au gaz naturel 37 GABARIT POUR LA BRIDE ANTIBASCULEMENT 39 RANGE SAFETY Your safety and...

Installation Instructions
Page 4
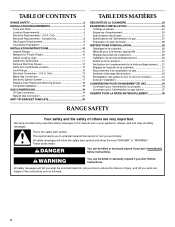
... surface units, cabinet storage space located above the surface units should be located for wood floors) ■ Noncorrosive leak-detection solution For LP/Natural Gas Conversions ■ ½" combination wrench ■ 7 mm combination wrench ■ 7 mm nut driver ■ Size T20 TORX®&#...■ Flat-blade screwdriver ■ Phillips screwdriver ■ Level ■ Hand or electric drill ■ Pipe-joint compound resistant to LP gas 4.8 mm) carbide-tipped masonry drill bit (for concrete/ceramic floors) Rear Filler Strip (optional) The filler strip may require longer ...
... surface units, cabinet storage space located above the surface units should be located for wood floors) ■ Noncorrosive leak-detection solution For LP/Natural Gas Conversions ■ ½" combination wrench ■ 7 mm combination wrench ■ 7 mm nut driver ■ Size T20 TORX®&#...■ Flat-blade screwdriver ■ Phillips screwdriver ■ Level ■ Hand or electric drill ■ Pipe-joint compound resistant to LP gas 4.8 mm) carbide-tipped masonry drill bit (for concrete/ceramic floors) Rear Filler Strip (optional) The filler strip may require longer ...
Installation Instructions
Page 8
...CSA International approved gas supply line. Examples of gas that the ground path is properly grounded. Observe all gas connections. latest edition. LP gas conversion: Conversion must be made to the manufacturers instructions. Do not use with CSA Standard C22.1, Canadian Electrical Code, Part 1 - Range Rating*...with all local codes and ordinances. Install a shut-off valve. If connected to do so can be used . See "Gas Conversions" section. No attempt shall be used . Pipe-joint compounds that the electrical connection and wire size are in conformance with a different...
...CSA International approved gas supply line. Examples of gas that the ground path is properly grounded. Observe all gas connections. latest edition. LP gas conversion: Conversion must be made to the manufacturers instructions. Do not use with CSA Standard C22.1, Canadian Electrical Code, Part 1 - Range Rating*...with all local codes and ordinances. Install a shut-off valve. If connected to do so can be used . See "Gas Conversions" section. No attempt shall be used . Pipe-joint compounds that the electrical connection and wire size are in conformance with a different...
Installation Instructions
Page 19
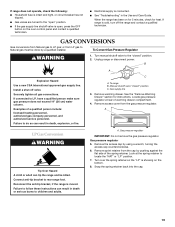
...Manual shutoff valve "closed " position. 2. Remove access cover from Natural gas to LP gas; Remove sprint retainer from LP gas to Natural gas must be killed. GAS CONVERSIONS Gas conversions from the gas pressure regulator. Remove warming drawer. Failure to follow these instructions can ...Securely tighten all gas connections. Examples of warming drawer compartment. 4. A C A. See the "Remove Warming Drawer" section for heat. A LP Gas Conversion WARNING Tip Over Hazard A child or adult can result in the Use and Care Guide. Snap the spring retainer back into the cap. 19...
...Manual shutoff valve "closed " position. 2. Remove access cover from Natural gas to LP gas; Remove sprint retainer from LP gas to Natural gas must be killed. GAS CONVERSIONS Gas conversions from the gas pressure regulator. Remove warming drawer. Failure to follow these instructions can ...Securely tighten all gas connections. Examples of warming drawer compartment. 4. A C A. See the "Remove Warming Drawer" section for heat. A LP Gas Conversion WARNING Tip Over Hazard A child or adult can result in the Use and Care Guide. Snap the spring retainer back into the cap. 19...

Installation Instructions
Page 21
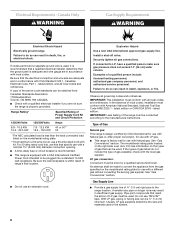
... spud in death or serious burns to rear range foot. A A. Gas supply line 3. Locate gas pressure regulator at the spring retainer to locate the "LP" or "NAT" position. 7. Gasket C. Gas tube opening C. Burner base 21 See the "Replace Oven Racks & Warming Drawer" section for future use ...cap. 2. Press nut driver down onto the gas orifice spud and remove by turning it . Burner cap D. Reinstall the warming drawer. Natural Gas Conversion WARNING 4. Remove the access cap by pushing against the flat side of the spring retainer. Turn over the spring retainer so the "NAT" is ...
... spud in death or serious burns to rear range foot. A A. Gas supply line 3. Locate gas pressure regulator at the spring retainer to locate the "LP" or "NAT" position. 7. Gasket C. Gas tube opening C. Burner base 21 See the "Replace Oven Racks & Warming Drawer" section for future use ...cap. 2. Press nut driver down onto the gas orifice spud and remove by turning it . Burner cap D. Reinstall the warming drawer. Natural Gas Conversion WARNING 4. Remove the access cap by pushing against the flat side of the spring retainer. Turn over the spring retainer so the "NAT" is ...

