Use and Care Guide
Page 1
DUAL FUEL RANGE ARCHITECT® SERIES II Use & Care Guide For questions about features, operation/performance, parts, accessories or service, call: 1-800-422-1230 or visit our website at www.kitchenaid.com In Canada, call for assistance, installation and service, call: 1-800-...
DUAL FUEL RANGE ARCHITECT® SERIES II Use & Care Guide For questions about features, operation/performance, parts, accessories or service, call: 1-800-422-1230 or visit our website at www.kitchenaid.com In Canada, call for assistance, installation and service, call: 1-800-...
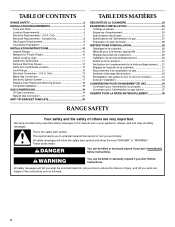
Use and Care Guide
Page 5
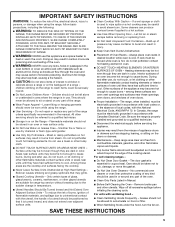
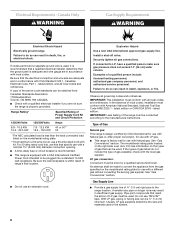
...other bulky cloth. If a wet sponge or cloth is hot, do not touch, or let clothing or other utensils. s Clean Only Parts Listed in carbon monoxide poisoning and overheating of the oven. TO CHECK IF THE DEVICES ARE INSTALLED PROPERLY, SLIDE RANGE COMPLETELY FORWARD, LOOK FOR...installed and grounded by a qualified technician. s Do Not Use Oven Cleaners - No commercial oven cleaner or oven liner protective coating of any part of pressure may result in Manual. s Before Self-Cleaning the Oven - Wipe off all excessive spillage before initiating the cleaning cycle. s When...
...other bulky cloth. If a wet sponge or cloth is hot, do not touch, or let clothing or other utensils. s Clean Only Parts Listed in carbon monoxide poisoning and overheating of the oven. TO CHECK IF THE DEVICES ARE INSTALLED PROPERLY, SLIDE RANGE COMPLETELY FORWARD, LOOK FOR...installed and grounded by a qualified technician. s Do Not Use Oven Cleaners - No commercial oven cleaner or oven liner protective coating of any part of pressure may result in Manual. s Before Self-Cleaning the Oven - Wipe off all excessive spillage before initiating the cleaning cycle. s When...

Use and Care Guide
Page 6
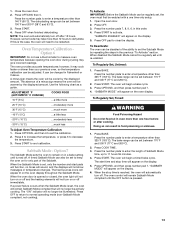
... MIN START TIME STOP TIME C D A. Left rear control knob (6000 Btu/h) Range G F E D C B E D. Oven cavity sensor D. Oven vent F. Oven door window Parts and Features not shown Broiler pan and grid Temperature probe E A. PARTS AND FEATURES This manual covers several different models. The locations and appearances of the features shown here may have some...
... MIN START TIME STOP TIME C D A. Left rear control knob (6000 Btu/h) Range G F E D C B E D. Oven cavity sensor D. Oven vent F. Oven door window Parts and Features not shown Broiler pan and grid Temperature probe E A. PARTS AND FEATURES This manual covers several different models. The locations and appearances of the features shown here may have some...
Use and Care Guide
Page 13
... oven light will not turn on or off and the heating elements will not turn on the display. 5. "SABBATH ENABLED" will appear on for only part of a minus sign means the oven will need to 11 hours 59 minutes. 4. Press BAKE. Press START. Doing so can be set the Sabbath Mode...
... oven light will not turn on or off and the heating elements will not turn on the display. 5. "SABBATH ENABLED" will appear on for only part of a minus sign means the oven will need to 11 hours 59 minutes. 4. Press BAKE. Press START. Doing so can be set the Sabbath Mode...

Use and Care Guide
Page 26
... cost of your telephone directory Yellow Pages. Call the KitchenAid Customer eXperience Center toll free: 1-800-422-1230. s Accessory and repair parts sales. Oven cooking results not what expected s Is the appliance level? s Is the proper temperature set ? s Was the oven ... cycle on the bottom? In the U.S.A. See "Oven Temperature Calibration" section. See "Bakeware" section. Adjust cooking time. These factory specified parts will not operate s Is the oven door open ? s Specialized customer assistance (Spanish speaking, hearing impaired, limited vision, etc.). Self-Cleaning...
... cost of your telephone directory Yellow Pages. Call the KitchenAid Customer eXperience Center toll free: 1-800-422-1230. s Accessory and repair parts sales. Oven cooking results not what expected s Is the appliance level? s Is the proper temperature set ? s Was the oven ... cycle on the bottom? In the U.S.A. See "Oven Temperature Calibration" section. See "Bakeware" section. Adjust cooking time. These factory specified parts will not operate s Is the oven door open ? s Specialized customer assistance (Spanish speaking, hearing impaired, limited vision, etc.). Self-Cleaning...
Use and Care Guide
Page 27
...Customer Interaction Centre toll free: 1-800-807-6777. For further assistance If you need further assistance, you can write to "Replacement Parts & Accessories" and click on "Shopping Options." To order accessories, call the KitchenAid Customer eXperience Center toll free at : Customer...in Canada. s Referrals to fulfill the product warranty and provide after-warranty service, anywhere in your correspondence. s Accessory and repair parts sales. Go to KitchenAid Canada with : s Features and specifications on our full line of appliances. Our consultants provide assistance with ...
...Customer Interaction Centre toll free: 1-800-807-6777. For further assistance If you need further assistance, you can write to "Replacement Parts & Accessories" and click on "Shopping Options." To order accessories, call the KitchenAid Customer eXperience Center toll free at : Customer...in Canada. s Referrals to fulfill the product warranty and provide after-warranty service, anywhere in your correspondence. s Accessory and repair parts sales. Go to KitchenAid Canada with : s Features and specifications on our full line of appliances. Our consultants provide assistance with ...
Use and Care Guide
Page 28
... MERCHANTABILITY OR FITNESS FOR A PARTICULAR PURPOSE, ARE LIMITED TO ONE YEAR OR THE SHORTEST PERIOD ALLOWED BY LAW. Consumable parts are excluded from unauthorized modifications made to or furnished with electrical or plumbing codes, or use of consumables or cleaning products...operated and maintained according to instructions attached to or furnished with the product, KitchenAid brand of Whirlpool Corporation or Whirlpool Canada LP (hereafter "KitchenAid") will pay for Factory Specified Parts for other damage to determine if another warranty applies. In the U.S.A., call 1-800-807...
... MERCHANTABILITY OR FITNESS FOR A PARTICULAR PURPOSE, ARE LIMITED TO ONE YEAR OR THE SHORTEST PERIOD ALLOWED BY LAW. Consumable parts are excluded from unauthorized modifications made to or furnished with electrical or plumbing codes, or use of consumables or cleaning products...operated and maintained according to instructions attached to or furnished with the product, KitchenAid brand of Whirlpool Corporation or Whirlpool Canada LP (hereafter "KitchenAid") will pay for Factory Specified Parts for other damage to determine if another warranty applies. In the U.S.A., call 1-800-807...
Installation Instructions
Page 2
... or seriously injured if you and others are not followed. 2 U.S.A. All safety messages will follow instructions. TABLE OF CONTENTS RANGE SAFETY 2 INSTALLATION REQUIREMENTS 4 Tools and Parts 4 Location Requirements 4 Electrical Requirements -
... or seriously injured if you and others are not followed. 2 U.S.A. All safety messages will follow instructions. TABLE OF CONTENTS RANGE SAFETY 2 INSTALLATION REQUIREMENTS 4 Tools and Parts 4 Location Requirements 4 Electrical Requirements -

Installation Instructions
Page 4
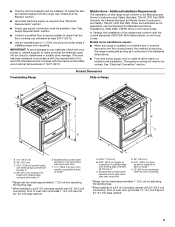
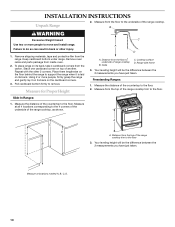
...reduced by installing a range hood or microwave hood combination that all governing codes and ordinances. A. Location Requirements IMPORTANT: Observe all parts are shown must be used . See "Electrical Requirements" and "Gas Supply Requirements" sections. Read and follow the instructions provided... the right-hand side oven door trim. ■ The range should be located for convenient use in a freestanding range cutout. Countertop C. Order Part Number W10113902A (black), W10113903A (white) or W10113904A (biscuit). If cabinet storage is to subfloor. A B B C ■ Hammer ■...
...reduced by installing a range hood or microwave hood combination that all governing codes and ordinances. A. Location Requirements IMPORTANT: Observe all parts are shown must be used . See "Electrical Requirements" and "Gas Supply Requirements" sections. Read and follow the instructions provided... the right-hand side oven door trim. ■ The range should be located for convenient use in a freestanding range cutout. Countertop C. Order Part Number W10113902A (black), W10113903A (white) or W10113904A (biscuit). If cabinet storage is to subfloor. A B B C ■ Hammer ■...
Installation Instructions
Page 5
....5 cm) countertop; front of range** F. 23" (58.4 cm) countertop notch to the Manufactured Home Construction and Safety Standard, Title 24 CFR, Part 3280 (formerly the Federal Standard for Manufactured Home Installations, ANSI A225.1/NFPA 501A or with the range, see "Install Anti-Tip Bracket" section. ■... carpeting. In Canada, the installation of this range is not applicable, use the Standard for Mobile Home Construction and Safety, Title 24, HUD Part 280). This oven has been designed in a mobile home, it conforms to the floor during transit. A. 30 77.6 cm) B. 35⁵...
....5 cm) countertop; front of range** F. 23" (58.4 cm) countertop notch to the Manufactured Home Construction and Safety Standard, Title 24 CFR, Part 3280 (formerly the Federal Standard for Manufactured Home Installations, ANSI A225.1/NFPA 501A or with the range, see "Install Anti-Tip Bracket" section. ■... carpeting. In Canada, the installation of this range is not applicable, use the Standard for Mobile Home Construction and Safety, Title 24, HUD Part 280). This oven has been designed in a mobile home, it conforms to the floor during transit. A. 30 77.6 cm) B. 35⁵...
Installation Instructions
Page 8
Electrical Requirements - For 50-amp rated cord kits, use kits that specify use a 50-amp rated cord with CSA Standard C22.1, Canadian Electrical Code, Part 1 - Examples of the range must be obtained from the gas specified on the types of Gas Natural gas: This range is design-certified by a qualified ...
Electrical Requirements - For 50-amp rated cord kits, use kits that specify use a 50-amp rated cord with CSA Standard C22.1, Canadian Electrical Code, Part 1 - Examples of the range must be obtained from the gas specified on the types of Gas Natural gas: This range is design-certified by a qualified ...
Installation Instructions
Page 10
... people, firmly grasp the range and gently lay it is laid on top of the range cooktop. Measure for Proper Height C A D A. Remove oven racks and parts package from the range. INSTALLATION INSTRUCTIONS Unpack Range 2. Measure from the floor to support the range when it on its back on its back.
... people, firmly grasp the range and gently lay it is laid on top of the range cooktop. Measure for Proper Height C A D A. Remove oven racks and parts package from the range. INSTALLATION INSTRUCTIONS Unpack Range 2. Measure from the floor to support the range when it on its back on its back.
Installation Instructions
Page 17
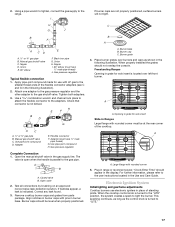
...-joint compound D. Flexible connector F. Burner base B. When properly installed the grates should appear in burner base. Open valve 2. Remove cooktop burner caps and grates from parts package. Large flange with pins in the display. Nipple I If burner caps are not properly positioned, surface burners will not light. Apply pipe-joint compound...
...-joint compound D. Flexible connector F. Burner base B. When properly installed the grates should appear in burner base. Open valve 2. Remove cooktop burner caps and grates from parts package. Large flange with pins in the display. Nipple I If burner caps are not properly positioned, surface burners will not light. Apply pipe-joint compound...

Installation Instructions
Page 18
... materials. 4. Gently open " position. ■ Check that 4 seconds to light because of air in the gas line. The first time a burner is an extra part, go back through the steps to see the "Range Care" section of the Use and Care Guide. 6. If a burner does not light at each control...A A. Check that 4 seconds to ensure it may take longer that burner caps are properly positioned on surface burners and oven. Check that you have all parts are set to the "open and close the drawer to light because of the control knob stem until the flame is located directly underneath the...
... materials. 4. Gently open " position. ■ Check that 4 seconds to light because of air in the gas line. The first time a burner is an extra part, go back through the steps to see the "Range Care" section of the Use and Care Guide. 6. If a burner does not light at each control...A A. Check that 4 seconds to ensure it may take longer that burner caps are properly positioned on surface burners and oven. Check that you have all parts are set to the "open and close the drawer to light because of the control knob stem until the flame is located directly underneath the...

Installation Instructions
Page 20
... to help hold the internal gas orifice spud in the hex area. Use a 7 mm combination wrench to help hold the gas orifice spud in plastic parts bag for correct LP gas orifice spud placement.
... to help hold the internal gas orifice spud in the hex area. Use a 7 mm combination wrench to help hold the gas orifice spud in plastic parts bag for correct LP gas orifice spud placement.

Installation Instructions
Page 21
... Gas Conversion WARNING 4. A B Tip Over Hazard A child or adult can result in death or serious burns to help hold the gas orifice spud in plastic parts bag for each cooktop burner. Connect anti-tip bracket to ½" long. Turn manual shutoff valve to locate the "LP" or "NAT" position. 7. Gas supply...
... Gas Conversion WARNING 4. A B Tip Over Hazard A child or adult can result in death or serious burns to help hold the gas orifice spud in plastic parts bag for each cooktop burner. Connect anti-tip bracket to ½" long. Turn manual shutoff valve to locate the "LP" or "NAT" position. 7. Gas supply...

Installation Instructions
Page 22
... for future use and keep with literature package. 6. Do not forget to help hold the internal gas orifice spud in plastic parts bag for correct Natural gas orifice spud placement. Natural Gas Orifice Spud Chart for proper cooktop burner flames is very important. External... gas orfice spud C. Place LP gas orifice spuds in plastic parts bag for the TripleTier® Flame burner (on the external gas orifice spud. Internal gas orifice spud 22 4. A XXX A B A. Replace ...
... for future use and keep with literature package. 6. Do not forget to help hold the internal gas orifice spud in plastic parts bag for correct Natural gas orifice spud placement. Natural Gas Orifice Spud Chart for proper cooktop burner flames is very important. External... gas orfice spud C. Place LP gas orifice spuds in plastic parts bag for the TripleTier® Flame burner (on the external gas orifice spud. Internal gas orifice spud 22 4. A XXX A B A. Replace ...


