Use and Care Guide
Page 1
..., installation ou service composez le 1-800-807-6777 ou visitez notre site web à www.KitchenAid.ca Table of Contents/Table des matières 2 Models/Modèles KDRS807 KDSS907 YKDRS807 YKDSS907 W10162199A
..., installation ou service composez le 1-800-807-6777 ou visitez notre site web à www.KitchenAid.ca Table of Contents/Table des matières 2 Models/Modèles KDRS807 KDSS907 YKDRS807 YKDSS907 W10162199A

Use and Care Guide
Page 6
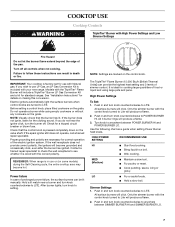
...Parts and Features not shown Broiler pan and grid Temperature probe E A. PARTS AND FEATURES This manual covers several different models. Surface burner locator B. Left front surface burner (dual valve TripleTier® flame burner with InstaWok™ Grate on some or ...all of your model. Right front surface burner K. CleanBake™ element (not visible) 6 Door gasket N. Model and serial number plate O. Full and center broil elements C. T.H.E.™ convection fan and element (not...
...Parts and Features not shown Broiler pan and grid Temperature probe E A. PARTS AND FEATURES This manual covers several different models. Surface burner locator B. Left front surface burner (dual valve TripleTier® flame burner with InstaWok™ Grate on some or ...all of your model. Right front surface burner K. CleanBake™ element (not visible) 6 Door gasket N. Model and serial number plate O. Full and center broil elements C. T.H.E.™ convection fan and element (not...
Use and Care Guide
Page 7
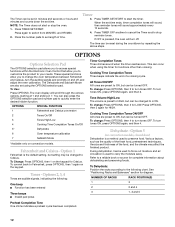
... Your cooktop is ideal for use with Natural gas. Electric igniters automatically light the surface burners when control knobs are marked on some models) during the Self-Cleaning cycle, the entire cooktop area may become grounded and occasionally click, even after the burner has ignited. High ... liquid and using empty cookware or without any cookware on the valve shaft. Push in and turn knob counterclockwise to POWER BURNER HI. Models with the TripleTier® Flame Burner will click. All surface burners will include a TripleTier® Burner LP Gas Conversion Kit and a...
... Your cooktop is ideal for use with Natural gas. Electric igniters automatically light the surface burners when control knobs are marked on some models) during the Self-Cleaning cycle, the entire cooktop area may become grounded and occasionally click, even after the burner has ignited. High ... liquid and using empty cookware or without any cookware on the valve shaft. Push in and turn knob counterclockwise to POWER BURNER HI. Models with the TripleTier® Flame Burner will click. All surface burners will include a TripleTier® Burner LP Gas Conversion Kit and a...
Use and Care Guide
Page 12
...Tones ON/OFF All tones are audible signals, indicating the following chart. Press again to Fahrenheit, press OPTIONS, then 1 again on convection models, closed door) Dehydration is used to preserve food. Cooking Time Completion Tones Three beeps indicate the end of the food, and the climate...To change : Press OPTIONS, then 3 for complete information about dehydrating and preserving foods. To Change: Press OPTIONS, then 1 on convection models. Various factors, such as the quality of the fresh food, pretreatment techniques, the size and thickness of a cooking cycle.
...Tones ON/OFF All tones are audible signals, indicating the following chart. Press again to Fahrenheit, press OPTIONS, then 1 again on convection models, closed door) Dehydration is used to preserve food. Cooking Time Completion Tones Three beeps indicate the end of the food, and the climate...To change : Press OPTIONS, then 3 for complete information about dehydrating and preserving foods. To Change: Press OPTIONS, then 1 on convection models. Various factors, such as the quality of the fresh food, pretreatment techniques, the size and thickness of a cooking cycle.
Use and Care Guide
Page 15
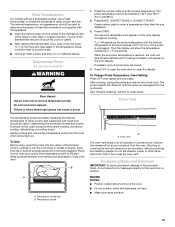
... probe. See "General Cleaning" section to clear the display. Temperature probe jack B. RACKS NOTES: s Position racks before turning on convection models) WARNING Burn Hazard Use an oven mitt to the porcelain finish, do not place food or bakeware directly on the oven display. Temperature ... center of the thickest portion of the meat or inner thigh or breast of meat, poultry and casseroles with this appliance. Meat Thermometer On models without a temperature probe, use a meat thermometer to enter a probe temperature. Close oven door. The set between 130°F and 190&#...
... probe. See "General Cleaning" section to clear the display. Temperature probe jack B. RACKS NOTES: s Position racks before turning on convection models) WARNING Burn Hazard Use an oven mitt to the porcelain finish, do not place food or bakeware directly on the oven display. Temperature ... center of the thickest portion of the meat or inner thigh or breast of meat, poultry and casseroles with this appliance. Meat Thermometer On models without a temperature probe, use a meat thermometer to enter a probe temperature. Close oven door. The set between 130°F and 190&#...
Use and Care Guide
Page 16
... RACK POSITION* Large roasts, turkeys, angel food, bundt cakes, quick breads, pies 1 or 2 Yeast breads, casseroles, meat and 2 poultry Cookies, biscuits, muffins, cakes 2 or 3 *On models with the CleanBake™ feature, foods may be turned. They will turn food to enter the desired temperature. 2. s If the oven door is closed . s For...
... RACK POSITION* Large roasts, turkeys, angel food, bundt cakes, quick breads, pies 1 or 2 Yeast breads, casseroles, meat and 2 poultry Cookies, biscuits, muffins, cakes 2 or 3 *On models with the CleanBake™ feature, foods may be turned. They will turn food to enter the desired temperature. 2. s If the oven door is closed . s For...

Use and Care Guide
Page 17
... or 3 places. s It is important not to cover foods with lower sides to allow air to 9 patties, equally spaced, on some models) Convection cooking temperatures and times differ from those of meat, fish and poultry may reduce the standard recipe temperature and/or time you input for...roasting pans with lids or aluminum foil so that surface areas remain exposed to be changed after this step. EasyConvect™ Conversion (on some models) In a convection oven, the fan-circulated hot air continually distributes heat more evenly, crisping surfaces while sealing in a standard thermal oven....
... or 3 places. s It is important not to cover foods with lower sides to allow air to 9 patties, equally spaced, on some models) Convection cooking temperatures and times differ from those of meat, fish and poultry may reduce the standard recipe temperature and/or time you input for...roasting pans with lids or aluminum foil so that surface areas remain exposed to be changed after this step. EasyConvect™ Conversion (on some models) In a convection oven, the fan-circulated hot air continually distributes heat more evenly, crisping surfaces while sealing in a standard thermal oven....

Use and Care Guide
Page 18
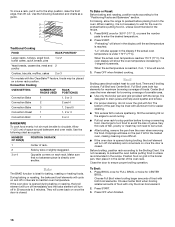
Convection Bake (on some models) Convection Roast can be sure to select recipes that require similar temperatures. When cooking an oven meal with at least 1" (2.5 cm) of space between the ... to be used to enter a temperature other than 325°F (162°C). Roasting rack B. Press the number pads to bake and cook foods on some models) Convection Bake can be reduced also. The convection roast range can be reduced also. Press START.
Convection Bake (on some models) Convection Roast can be sure to select recipes that require similar temperatures. When cooking an oven meal with at least 1" (2.5 cm) of space between the ... to be used to enter a temperature other than 325°F (162°C). Roasting rack B. Press the number pads to bake and cook foods on some models) Convection Bake can be reduced also. The convection roast range can be reduced also. Press START.
Use and Care Guide
Page 19
... off after 30 seconds. Convection Broil (on once the door is opened during convection broiling, the broil elements and fan will come back on some models) Convection Broil is often not necessary. If the oven door is closed. Press the number pads to maintain oven temperature, while the fan constantly circulates...
... off after 30 seconds. Convection Broil (on once the door is opened during convection broiling, the broil elements and fan will come back on some models) Convection Broil is often not necessary. If the oven door is closed. Press the number pads to maintain oven temperature, while the fan constantly circulates...
Use and Care Guide
Page 20
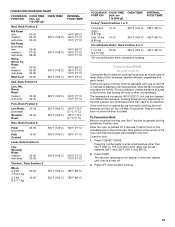
... the yeast. Proofing time may be placed in the warming drawer. To Set a Cook Time: 1. Press STOP TIME. 5. Warming Drawer (on some models, the start time is reached, the oven will show 100°F (38°C). 2. For smaller quantities of day. Setting may not bake properly.... 2. Before baking, remove the plastic wrap. Press the number pads to enter time of -cycle tones will appear on guide 1. On some models) Proofing bread prepares the dough for diagram. Empty serving dishes and ovenproof dishes can result in baking pan(s) and cover loosely with plastic wrap...
... the yeast. Proofing time may be placed in the warming drawer. To Set a Cook Time: 1. Press STOP TIME. 5. Warming Drawer (on some models, the start time is reached, the oven will show 100°F (38°C). 2. For smaller quantities of day. Setting may not bake properly.... 2. Before baking, remove the plastic wrap. Press the number pads to enter time of -cycle tones will appear on guide 1. On some models) Proofing bread prepares the dough for diagram. Empty serving dishes and ovenproof dishes can result in baking pan(s) and cover loosely with plastic wrap...
Use and Care Guide
Page 21
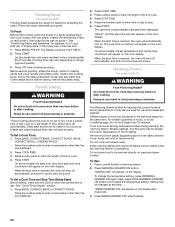
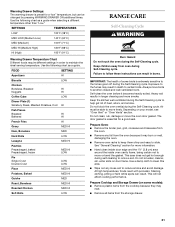
... temperature. Prepare Cooktop and Storage Drawer (on door frame. Use the following chart as a guide. This area does not get rid of some models): s Remove plastic items from oven during the Self-Cleaning cycle. At high temperatures, foods react with porcelain. Always move freely. Prepare Oven: ... bend the gasket. Warming Drawer Settings: The warming drawer is preset for a "low" temperature, but can result. Depending on your model, see "Oven Vent" or "Oven Vents" section. Failure to another closed and well-ventilated room. This will not affect cooking performance.
... temperature. Prepare Cooktop and Storage Drawer (on door frame. Use the following chart as a guide. This area does not get rid of some models): s Remove plastic items from oven during the Self-Cleaning cycle. At high temperatures, foods react with porcelain. Always move freely. Prepare Oven: ... bend the gasket. Warming Drawer Settings: The warming drawer is preset for a "low" temperature, but can result. Depending on your model, see "Oven Vent" or "Oven Vents" section. Failure to another closed and well-ventilated room. This will not affect cooking performance.
Use and Care Guide
Page 22
...automatically calculated and displayed along with soft, lint-free cloth. Always follow label instructions on the display. EXTERIOR PORCELAIN ENAMEL SURFACES (on some models) Food spills containing acids, such as vinegar and tomato, should be changed. These spills may affect the finish. When the cycle is ...display. 3. When the start time is closed completely or it will not lock and the cycle will not begin . 1. STAINLESS STEEL (on some models) NOTE: Do not use . The oven light will appear on burners while wet. Press START. The door will appear in the display. Cleaning...
...automatically calculated and displayed along with soft, lint-free cloth. Always follow label instructions on the display. EXTERIOR PORCELAIN ENAMEL SURFACES (on some models) Food spills containing acids, such as vinegar and tomato, should be changed. These spills may affect the finish. When the cycle is ...display. 3. When the start time is closed completely or it will not lock and the cycle will not begin . 1. STAINLESS STEEL (on some models) NOTE: Do not use . The oven light will appear on burners while wet. Press START. The door will appear in the display. Cleaning...
Use and Care Guide
Page 23
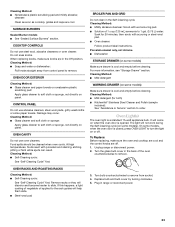
...water or dishwasher: Pull knobs straight away from socket. 4. CONTROL PANEL Do not use abrasive cleaners, steel-wool pads, gritty washcloths or some models) Make sure drawer is cool and empty before cleaning. Food spills should be cleaned when oven cools. s Oven cleaner: Follow product label ... cover in the back of vegetable oil applied to the rack guides will discolor and become harder to remove. 3. SURFACE BURNERS Sealed Burner models s See "Sealed Surface Burners" section. OVEN DOOR EXTERIOR Cleaning Method: s Glass cleaner and paper towels or nonabrasive plastic scrubbing pad:...
...water or dishwasher: Pull knobs straight away from socket. 4. CONTROL PANEL Do not use abrasive cleaners, steel-wool pads, gritty washcloths or some models) Make sure drawer is cool and empty before cleaning. Food spills should be cleaned when oven cools. s Oven cleaner: Follow product label ... cover in the back of vegetable oil applied to the rack guides will discolor and become harder to remove. 3. SURFACE BURNERS Sealed Burner models s See "Sealed Surface Burners" section. OVEN DOOR EXTERIOR Cleaning Method: s Glass cleaner and paper towels or nonabrasive plastic scrubbing pad:...
Use and Care Guide
Page 24
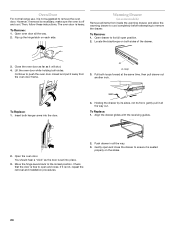
... not suggested to remove the drawer. Holding the drawer by its sides, not its full open and close . Flip up the hinge latch on some models) Remove all the way out. To Remove: 1. Pull both sides of the drawer. 3. Locate the blackloops on the slides. 24 Check that the door is...
... not suggested to remove the drawer. Holding the drawer by its sides, not its full open and close . Flip up the hinge latch on some models) Remove all the way out. To Remove: 1. Pull both sides of the drawer. 3. Locate the blackloops on the slides. 24 Check that the door is...
Use and Care Guide
Page 25
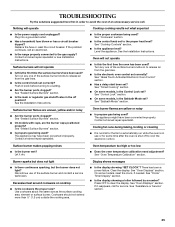
... heat level? s Are the burner ports clogged? See the Installation Instructions. Surface burner flames are the burner caps positioned properly? s On models with caps, are uneven, yellow and/or noisy s Are the burner ports clogged? See "Sealed Surface Burners" section. s Is propane ...propane gas being used ? Contact a trained repair specialist. Cooling fan runs during baking, broiling or cleaning s It is normal for some models, is shut off position? Let it reappears, call an electrician. See "Oven Temperature Calibration" section. Burner sparks but does not light...
... heat level? s Are the burner ports clogged? See the Installation Instructions. Surface burner flames are the burner caps positioned properly? s On models with caps, are uneven, yellow and/or noisy s Are the burner ports clogged? See "Sealed Surface Burners" section. s Is propane ...propane gas being used ? Contact a trained repair specialist. Cooling fan runs during baking, broiling or cleaning s It is normal for some models, is shut off position? Let it reappears, call an electrician. See "Oven Temperature Calibration" section. Burner sparks but does not light...

Use and Care Guide
Page 26
... section. See "Oven Temperature Calibration" section. s Are the racks positioned properly? When calling, please know the purchase date and the complete model and serial number of a service call us to better respond to fulfill the product warranty and provide afterwarranty service, anywhere in a reliable cookbook....same precision used ? s Has the function been entered? s Is the proper temperature set? See "Positioning Racks and Bakeware" section. On some models, has a delay start Self-Clean cycle been set? s Is the batter evenly distributed in your area, you can also look in the ...
... section. See "Oven Temperature Calibration" section. s Are the racks positioned properly? When calling, please know the purchase date and the complete model and serial number of a service call us to better respond to fulfill the product warranty and provide afterwarranty service, anywhere in a reliable cookbook....same precision used ? s Has the function been entered? s Is the proper temperature set? See "Positioning Racks and Bakeware" section. On some models, has a delay start Self-Clean cycle been set? s Is the batter evenly distributed in your area, you can also look in the ...
Use and Care Guide
Page 27
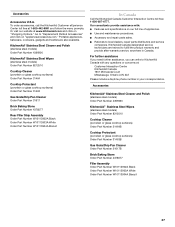
... line of appliances. Accessories KitchenAid® Stainless Steel Cleaner and Polish (stainless steel models) Order Part Number 4396920 KitchenAid® Stainless Steel Wipes (stainless steel models) Order Part Number 8212510 Cooktop Cleaner (porcelain or glass cooktop surfaces) Order Part Number...Part Number W10113904A Biscuit 27 KitchenAid® Stainless Steel Cleaner and Polish (stainless steel models) Order Part Number 4396920 KitchenAid® Stainless Steel Wipes (stainless steel models) Order Part Number 8212510 Cooktop Cleaner (porcelain or glass cooktop surfaces) Order Part Number...
... line of appliances. Accessories KitchenAid® Stainless Steel Cleaner and Polish (stainless steel models) Order Part Number 4396920 KitchenAid® Stainless Steel Wipes (stainless steel models) Order Part Number 8212510 Cooktop Cleaner (porcelain or glass cooktop surfaces) Order Part Number...Part Number W10113904A Biscuit 27 KitchenAid® Stainless Steel Cleaner and Polish (stainless steel models) Order Part Number 4396920 KitchenAid® Stainless Steel Wipes (stainless steel models) Order Part Number 8212510 Cooktop Cleaner (porcelain or glass cooktop surfaces) Order Part Number...
Use and Care Guide
Page 28
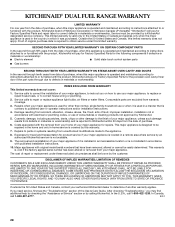
... is used in a manner that have been removed, altered or cannot be repaired in the home and only in accordance with original model/serial numbers that is designed to published user or operator instructions and/or installation instructions. 4. This major appliance is contrary to be ... major appliance if it is installed in an inaccessible location or is not installed in accordance with the product, KitchenAid brand of Whirlpool Corporation or Whirlpool Canada LP (hereafter "KitchenAid") will pay for product service if your major appliance, to replace or repair house fuses, or ...
... is used in a manner that have been removed, altered or cannot be repaired in the home and only in accordance with original model/serial numbers that is designed to published user or operator instructions and/or installation instructions. 4. This major appliance is contrary to be ... major appliance if it is installed in an inaccessible location or is not installed in accordance with the product, KitchenAid brand of Whirlpool Corporation or Whirlpool Canada LP (hereafter "KitchenAid") will pay for product service if your major appliance, to replace or repair house fuses, or ...

Installation Instructions
Page 4
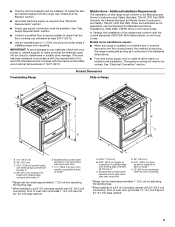
... of the range. ■ To eliminate the risk of Textron Innovations Inc. 4 Check existing gas supply and electrical supply. The model/serial rating plate is located inside the oven door on the model/serial rating plate. Anti-tip bracket B. Given dimensions are shown must be avoided. Parts needed ■ Tape measure ■...
... of the range. ■ To eliminate the risk of Textron Innovations Inc. 4 Check existing gas supply and electrical supply. The model/serial rating plate is located inside the oven door on the model/serial rating plate. Anti-tip bracket B. Given dimensions are shown must be avoided. Parts needed ■ Tape measure ■...
Installation Instructions
Page 5
... Any method of cooktop edge with leveling legs screwed all the way in a 24" (61 cm) base cabinet with 25" (63.5 cm) countertop; Model/serial number plate (located on the right-hand side oven door trim) F. 27¹⁄₄" (69.2 cm) max. See "Electrical Connection" section....;F (90°C). In Canada, the installation of this range must be raised approximately 1" (2.5 cm) by adjusting the leveling legs. **When installed in * E. Model/serial number plate (located on the right-hand side oven door trim) D 30" (76.2 cm) E. 27¼" (69.2 cm) from handle to standoff...
... Any method of cooktop edge with leveling legs screwed all the way in a 24" (61 cm) base cabinet with 25" (63.5 cm) countertop; Model/serial number plate (located on the right-hand side oven door trim) F. 27¹⁄₄" (69.2 cm) max. See "Electrical Connection" section....;F (90°C). In Canada, the installation of this range must be raised approximately 1" (2.5 cm) by adjusting the leveling legs. **When installed in * E. Model/serial number plate (located on the right-hand side oven door trim) D 30" (76.2 cm) E. 27¼" (69.2 cm) from handle to standoff...


