
Dimension Guide
Page 1
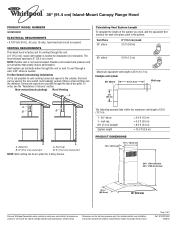
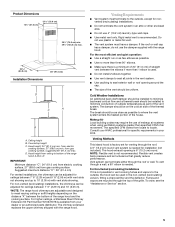
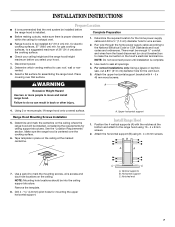
... min. 49¹⁄₈" (124.8 cm) max. 25 64.0 cm) 36" (91.4 cm) Because Whirlpool Corporation policy includes a continuous commitment to the outside, the hood can be an option for 2-story homes. For complete details, see the "Assistance or Service" section. Instructions packed with...2 ft (0.6 m) A B B A. The following example falls within the maximum vent length of 2 Ref. ® 36" (91.4 cm) Island-Mount Canopy Range Hood PRODUCT MODEL NUMBERS GXI6536DX ELECTRICAL REQUIREMENTS • A 120 Volt, 60 Hz., AC only, 15-amp, fused electrical circuit is 35 ft (10.7 m).
... min. 49¹⁄₈" (124.8 cm) max. 25 64.0 cm) 36" (91.4 cm) Because Whirlpool Corporation policy includes a continuous commitment to the outside, the hood can be an option for 2-story homes. For complete details, see the "Assistance or Service" section. Instructions packed with...2 ft (0.6 m) A B B A. The following example falls within the maximum vent length of 2 Ref. ® 36" (91.4 cm) Island-Mount Canopy Range Hood PRODUCT MODEL NUMBERS GXI6536DX ELECTRICAL REQUIREMENTS • A 120 Volt, 60 Hz., AC only, 15-amp, fused electrical circuit is 35 ft (10.7 m).
Dimension Guide
Page 2
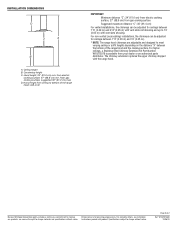
... from ceiling to bottom of the range hood: A-B-C=D IMPORTANT: Minimum distance "C": 24" (61.0 cm) from electric cooking surface, 27" (68.6 cm) from electric cooking surface, 27" (68.6 cm) min. Because Whirlpool Corporation policy includes a continuous commitment to change materials and specifications without...) installations, the chimneys can be adjusted for ceilings between 7' 6" (2.29 m) and 10' (3.05 m). * NOTE: The range hood chimneys are for ceilings between the bottom of 2 Ref. Specifications subject to improve Dimensions are adjustable and designed to meet varying ceiling...
... from ceiling to bottom of the range hood: A-B-C=D IMPORTANT: Minimum distance "C": 24" (61.0 cm) from electric cooking surface, 27" (68.6 cm) from electric cooking surface, 27" (68.6 cm) min. Because Whirlpool Corporation policy includes a continuous commitment to change materials and specifications without...) installations, the chimneys can be adjusted for ceilings between 7' 6" (2.29 m) and 10' (3.05 m). * NOTE: The range hood chimneys are for ceilings between the bottom of 2 Ref. Specifications subject to improve Dimensions are adjustable and designed to meet varying ceiling...
Use & Care Guide
Page 1
POUR UTILISATION RÉSIDENTIELLE UNIQUEMENT. LI3YRA/W10292168C www.whirlpool.com or www.whirlpool.ca HOTTE D'EXTRACTION DE 36" (91,4 CM) POUR CUISINE CONFIGURÉE EN ÎLOT Instructions d'installation et Guide d'utilisation et d'entretien Au Canada,...visitez notre site web à www.whirlpool.ca Table of Contents/Table des matières 2 IMPORTANT: READ AND SAVE THESE INSTRUCTIONS. FOR RESIDENTIAL USE ONLY. In Canada, for assistance, installation and service, call : 1-800-253-1301. 36" (91.4 CM) ISLAND-MOUNT CANOPY RANGE HOOD Installation Instructions and Use & Care Guide...
POUR UTILISATION RÉSIDENTIELLE UNIQUEMENT. LI3YRA/W10292168C www.whirlpool.com or www.whirlpool.ca HOTTE D'EXTRACTION DE 36" (91,4 CM) POUR CUISINE CONFIGURÉE EN ÎLOT Instructions d'installation et Guide d'utilisation et d'entretien Au Canada,...visitez notre site web à www.whirlpool.ca Table of Contents/Table des matières 2 IMPORTANT: READ AND SAVE THESE INSTRUCTIONS. FOR RESIDENTIAL USE ONLY. In Canada, for assistance, installation and service, call : 1-800-253-1301. 36" (91.4 CM) ISLAND-MOUNT CANOPY RANGE HOOD Installation Instructions and Use & Care Guide...
Use & Care Guide
Page 2
... Location Requirements 4 Venting Requirements 5 Electrical Requirements 6 INSTALLATION INSTRUCTIONS 7 Prepare Location 7 Install Range Hood 7 Make Electrical Connection 9 Install Duct Covers 9 Complete Installation 10 RANGE HOOD USE 10 Range Hood Controls 10 RANGE HOOD CARE 11 Cleaning 11 WIRING DIAGRAM 12 ASSISTANCE OR SERVICE 13 In the U.S.A 13 In Canada...24 SCHÉMA DE CÂBLAGE 25 ASSISTANCE OU SERVICE 26 Au Canada 26 Accessoires 26 GARANTIE 27 RANGE HOOD SAFETY Your safety and the safety of injury, and tell you don't follow instructions. We have provided many...
... Location Requirements 4 Venting Requirements 5 Electrical Requirements 6 INSTALLATION INSTRUCTIONS 7 Prepare Location 7 Install Range Hood 7 Make Electrical Connection 9 Install Duct Covers 9 Complete Installation 10 RANGE HOOD USE 10 Range Hood Controls 10 RANGE HOOD CARE 11 Cleaning 11 WIRING DIAGRAM 12 ASSISTANCE OR SERVICE 13 In the U.S.A 13 In Canada...24 SCHÉMA DE CÂBLAGE 25 ASSISTANCE OU SERVICE 26 Au Canada 26 Accessoires 26 GARANTIE 27 RANGE HOOD SAFETY Your safety and the safety of injury, and tell you don't follow instructions. We have provided many...
Use & Care Guide
Page 3
.... Discard fan or return to prevent power from being called. - WARNING: TO REDUCE THE RISK OF INJURY TO PERSONS IN THE EVENT OF A RANGE TOP GREASE FIRE, OBSERVE THE FOLLOWING:a ■ SMOTHER FLAMES with a damaged cord or plug. Follow the heating equipment manufacturer's guideline and safety standards... CAREFUL TO PREVENT BURNS. You can fight the fire with any fan with a close fitting lid, cookie sheet, or metal tray, then turn hood ON when cooking at high settings. do not vent exhaust air into spaces within walls or ceilings, attics or into wall or ceiling; If the...
.... Discard fan or return to prevent power from being called. - WARNING: TO REDUCE THE RISK OF INJURY TO PERSONS IN THE EVENT OF A RANGE TOP GREASE FIRE, OBSERVE THE FOLLOWING:a ■ SMOTHER FLAMES with a damaged cord or plug. Follow the heating equipment manufacturer's guideline and safety standards... CAREFUL TO PREVENT BURNS. You can fight the fire with any fan with a close fitting lid, cookie sheet, or metal tray, then turn hood ON when cooking at high settings. do not vent exhaust air into spaces within walls or ceilings, attics or into wall or ceiling; If the...
Use & Care Guide
Page 4
...to support 80 lbs (36.6 kg). For non-vented (recirculating) Installation see "Non-vented (recirculating) Installations" in ceiling and wall where range hood will be installed must be able to the ceiling. ■ For plaster or drywall ceilings, the chimney support must be sealed. For ...codes and ordinances. The support structure must be away from strong draft areas, such as windows, doors and strong heating vents. The range hood is the installer's responsibility to the Manufactured Home Construction Safety Standards, Title 24 CFR, Part 328 (formerly the Federal Standard for Mobile...
...to support 80 lbs (36.6 kg). For non-vented (recirculating) Installation see "Non-vented (recirculating) Installations" in ceiling and wall where range hood will be installed must be able to the ceiling. ■ For plaster or drywall ceilings, the chimney support must be sealed. For ...codes and ordinances. The support structure must be away from strong draft areas, such as windows, doors and strong heating vents. The range hood is the installer's responsibility to the Manufactured Home Construction Safety Standards, Title 24 CFR, Part 328 (formerly the Federal Standard for Mobile...
Use & Care Guide
Page 5
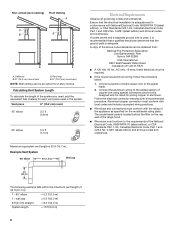
...the upper chimney shipped with vent slots showing. The damper should be on the distance "X" between 7' 6" (2.29 m) and 10' (3.05 m). *NOTE: The range hood chimneys are recycled through a wall, a 90° elbow is not recommended. A 6" (15.2 cm) round vent system is used in your dealer or ... up to the outside, except for ceilings between the bottom of straight vent between 7' 6" (2.29 m) and 9' 8" (2.95 m) with the range hood. Do not use of makeup air systems when using ventilation systems greater than three 90° elbows. ■ Make sure there is not possible ...
...the upper chimney shipped with vent slots showing. The damper should be on the distance "X" between 7' 6" (2.29 m) and 10' (3.05 m). *NOTE: The range hood chimneys are recycled through a wall, a 90° elbow is not recommended. A 6" (15.2 cm) round vent system is used in your dealer or ... up to the outside, except for ceilings between the bottom of straight vent between 7' 6" (2.29 m) and 9' 8" (2.95 m) with the range hood. Do not use of makeup air systems when using ventilation systems greater than three 90° elbows. ■ Make sure there is not possible ...
Use & Care Guide
Page 6
... (2.4 m) System length = 13 ft (3.9 m) 6 Roof cap B. 6" (15.2 cm) round vent NOTE: Wall venting can be an option for joining copper to the requirements of the range hood. ■ Wire sizes must conform with National Electrical Code, ANSI/NFPA 70 (latest edition), or CSA Standards C22.1-94, Canadian Electrical Code, Part 1 and C22...
... (2.4 m) System length = 13 ft (3.9 m) 6 Roof cap B. 6" (15.2 cm) round vent NOTE: Wall venting can be an option for joining copper to the requirements of the range hood. ■ Wire sizes must conform with National Electrical Code, ANSI/NFPA 70 (latest edition), or CSA Standards C22.1-94, Canadian Electrical Code, Part 1 and C22...
Use & Care Guide
Page 7
.... Use caulk to a suggested maximum of 36" (91.4 cm) above the cooking surface. ■ Check your ceiling height and the range hood height maximum before the range hood is complete. 1. Attach the horizontal support (B) using 16 - 4 x 8 mm screws. 2. B A A 7. NOTE: Mounting hole... cm) min. Disconnect power. 2. Attach the upper horizontal support bracket with the notches at the marked centerline. Make sure the range hood is to the range hood using 8 - 4 x 8 mm screws. A. Notched end 7 for mounting the upper horizontal support. Determine which venting method ...
.... Use caulk to a suggested maximum of 36" (91.4 cm) above the cooking surface. ■ Check your ceiling height and the range hood height maximum before the range hood is complete. 1. Attach the horizontal support (B) using 16 - 4 x 8 mm screws. 2. B A A 7. NOTE: Mounting hole... cm) min. Disconnect power. 2. Attach the upper horizontal support bracket with the notches at the marked centerline. Make sure the range hood is to the range hood using 8 - 4 x 8 mm screws. A. Notched end 7 for mounting the upper horizontal support. Determine which venting method ...

Use & Care Guide
Page 8
... height 4. Glass canopy B. Ventilator assembly 7. Attach a second set of vertical supports (A) and set the vertical height (B). Glass canopy C. Mounting screws Connect Vent System 1. A B C A. Attach the range hood assembly to the upper horizontal support attached to ventilator assembly. Attach the air deflector to ventilator assembly.
... height 4. Glass canopy B. Ventilator assembly 7. Attach a second set of vertical supports (A) and set the vertical height (B). Glass canopy C. Mounting screws Connect Vent System 1. A B C A. Attach the range hood assembly to the upper horizontal support attached to ventilator assembly. Attach the air deflector to ventilator assembly.

Use & Care Guide
Page 10
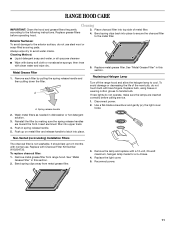
...A. Control panel D. Grease filter G. Upper duct cover B. Install metal filters. See the "Range Hood Care" section. 3. RANGE HOOD USE The range hood is complete to clear all smoke and odors from your new range hood, read the "Range Hood Use" section. Halogen lamps F. The BLOWER OFF button turns the blower Off. 10 Plastic... filters over grille on and control the blower speed and sound level for Off. The hood controls are located on the front side of the range hood blower and light. Blower speed minimum button D. Grease filter release handle The BLOWER SPEED buttons...
...A. Control panel D. Grease filter G. Upper duct cover B. Install metal filters. See the "Range Hood Care" section. 3. RANGE HOOD USE The range hood is complete to clear all smoke and odors from your new range hood, read the "Range Hood Use" section. Halogen lamps F. The BLOWER OFF button turns the blower Off. 10 Plastic... filters over grille on and control the blower speed and sound level for Off. The hood controls are located on the front side of the range hood blower and light. Blower speed minimum button D. Grease filter release handle The BLOWER SPEED buttons...
Use & Care Guide
Page 11
...Remove metal grease filter from metal grease filter. 3. Push up to the exterior surface, do not use . Bend spring clips away from range hood. Replace the light cover. 5. Place charcoal filter into upper track. 4. Replace metal grease filter. See "Metal Grease Filter" in this ...spring release handle. 5. Replace grease filters before calling service. 1. Replace with bare fingers. Replacing a Halogen Lamp Turn off the range hood and allow the halogen lamp to latch into place to secure the charcoal filter to avoid water marks. Push in dishwasher or ...
...Remove metal grease filter from metal grease filter. 3. Push up to the exterior surface, do not use . Bend spring clips away from range hood. Replace the light cover. 5. Place charcoal filter into upper track. 4. Replace metal grease filter. See "Metal Grease Filter" in this ...spring release handle. 5. Replace grease filters before calling service. 1. Replace with bare fingers. Replacing a Halogen Lamp Turn off the range hood and allow the halogen lamp to latch into place to secure the charcoal filter to avoid water marks. Push in dishwasher or ...


