
Dimension Guide
Page 1
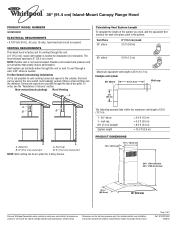
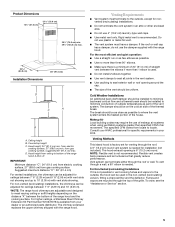
... with product. Specifications subject to change without notice. The hood exhaust opening is not recommended. For complete details, see the "Assistance or Service" section. ® 36" (91.4 cm) Island-Mount Canopy Range Hood PRODUCT MODEL NUMBERS GXI6536DX ELECTRICAL REQUIREMENTS • A 120 Volt, 60 Hz., AC... (74.0 cm) min. 49¹⁄₈" (124.8 cm) max. 25 64.0 cm) 36" (91.4 cm) Because Whirlpool Corporation policy includes a continuous commitment to the outside, the hood can terminate either through the roof. Page 1 of 35 ft (10.7 m). 1 - 90° elbow 1 -
... with product. Specifications subject to change without notice. The hood exhaust opening is not recommended. For complete details, see the "Assistance or Service" section. ® 36" (91.4 cm) Island-Mount Canopy Range Hood PRODUCT MODEL NUMBERS GXI6536DX ELECTRICAL REQUIREMENTS • A 120 Volt, 60 Hz., AC... (74.0 cm) min. 49¹⁄₈" (124.8 cm) max. 25 64.0 cm) 36" (91.4 cm) Because Whirlpool Corporation policy includes a continuous commitment to the outside, the hood can terminate either through the roof. Page 1 of 35 ft (10.7 m). 1 - 90° elbow 1 -
Dimension Guide
Page 2
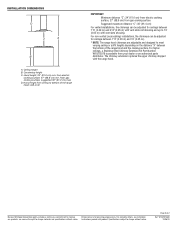
... For complete details, see Installation our products, we reserve the right to change materials and specifications without notice. Page 2 of the range hood: A-B-C=D IMPORTANT: Minimum distance "C": 24" (61.0 cm) from electric cooking surface, 27" (68.6 cm) from gas cooking surface Suggested...and up to 10' (3.05 m) with vent slots showing. Hood height: 24" (61.0 cm) min. Instructions packed with the range hood. Because Whirlpool Corporation policy includes a continuous commitment to bottom of 2 Ref. Hood height from your dealer or an authorized parts distributor. W10292168C 10...
... For complete details, see Installation our products, we reserve the right to change materials and specifications without notice. Page 2 of the range hood: A-B-C=D IMPORTANT: Minimum distance "C": 24" (61.0 cm) from electric cooking surface, 27" (68.6 cm) from gas cooking surface Suggested...and up to 10' (3.05 m) with vent slots showing. Hood height: 24" (61.0 cm) min. Instructions packed with the range hood. Because Whirlpool Corporation policy includes a continuous commitment to bottom of 2 Ref. Hood height from your dealer or an authorized parts distributor. W10292168C 10...
Use & Care Guide
Page 1
... USE ONLY. IMPORTANT : LIRE ET CONSERVER CES INSTRUCTIONS. POUR UTILISATION RÉSIDENTIELLE UNIQUEMENT. 36" (91.4 CM) ISLAND-MOUNT CANOPY RANGE HOOD Installation Instructions and Use & Care Guide For questions about features, operation/performance parts, accessories or service, call : 1-800-807-6777 or... visit our website at... LI3YRA/W10292168C www.whirlpool.com or www.whirlpool.ca HOTTE D'EXTRACTION DE 36" (91,4 CM) POUR CUISINE CONFIGURÉE EN ÎLOT Instructions d'installation et Guide d'...
... USE ONLY. IMPORTANT : LIRE ET CONSERVER CES INSTRUCTIONS. POUR UTILISATION RÉSIDENTIELLE UNIQUEMENT. 36" (91.4 CM) ISLAND-MOUNT CANOPY RANGE HOOD Installation Instructions and Use & Care Guide For questions about features, operation/performance parts, accessories or service, call : 1-800-807-6777 or... visit our website at... LI3YRA/W10292168C www.whirlpool.com or www.whirlpool.ca HOTTE D'EXTRACTION DE 36" (91,4 CM) POUR CUISINE CONFIGURÉE EN ÎLOT Instructions d'installation et Guide d'...
Use & Care Guide
Page 2
... Location Requirements 4 Venting Requirements 5 Electrical Requirements 6 INSTALLATION INSTRUCTIONS 7 Prepare Location 7 Install Range Hood 7 Make Electrical Connection 9 Install Duct Covers 9 Complete Installation 10 RANGE HOOD USE 10 Range Hood Controls 10 RANGE HOOD CARE 11 Cleaning 11 WIRING DIAGRAM 12 ASSISTANCE OR SERVICE 13 In the U.S.A 13 In Canada 13...MA DE CÂBLAGE 25 ASSISTANCE OU SERVICE 26 Au Canada 26 Accessoires 26 GARANTIE 27 RANGE HOOD SAFETY Your safety and the safety of injury, and tell you what the potential hazard is the safety alert symbol.
... Location Requirements 4 Venting Requirements 5 Electrical Requirements 6 INSTALLATION INSTRUCTIONS 7 Prepare Location 7 Install Range Hood 7 Make Electrical Connection 9 Install Duct Covers 9 Complete Installation 10 RANGE HOOD USE 10 Range Hood Controls 10 RANGE HOOD CARE 11 Cleaning 11 WIRING DIAGRAM 12 ASSISTANCE OR SERVICE 13 In the U.S.A 13 In Canada 13...MA DE CÂBLAGE 25 ASSISTANCE OU SERVICE 26 Au Canada 26 Accessoires 26 GARANTIE 27 RANGE HOOD SAFETY Your safety and the safety of injury, and tell you what the potential hazard is the safety alert symbol.
Use & Care Guide
Page 3
... IN THE EVENT OF A RANGE TOP GREASE FIRE, OBSERVE THE FOLLOWING:a ■ SMOTHER FLAMES with a close fitting lid, cookie sheet, or metal tray, then turn hood ON when cooking at high settings. Follow the heating equipment manufacturer's guideline and safety standards such as a tag, to the service panel. ■ Installation work...
... IN THE EVENT OF A RANGE TOP GREASE FIRE, OBSERVE THE FOLLOWING:a ■ SMOTHER FLAMES with a close fitting lid, cookie sheet, or metal tray, then turn hood ON when cooking at high settings. Follow the heating equipment manufacturer's guideline and safety standards such as a tag, to the service panel. ■ Installation work...
Use & Care Guide
Page 4
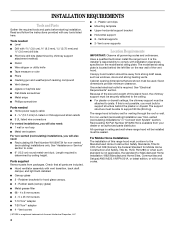
...build a support structure behind the left filter on the model/serial rating plate. Have a qualified technician install the range hood. Vertical supports ■ 2- Cabinet opening dimensions that all governing codes and ordinances. It is located behind the plaster ...reliefs ■ 3 UL listed wire connectors For vented installations, you will also need : ■ Recirculating Kit Part Number W10294734 for hood glass canopy. ■ 2 - Given dimensions provide minimum clearance. Retainer brackets for non-vented (recirculating) installations only. Plastic vent ...
...build a support structure behind the left filter on the model/serial rating plate. Have a qualified technician install the range hood. Vertical supports ■ 2- Cabinet opening dimensions that all governing codes and ordinances. It is located behind the plaster ...reliefs ■ 3 UL listed wire connectors For vented installations, you will also need : ■ Recirculating Kit Part Number W10294734 for hood glass canopy. ■ 2 - Given dimensions provide minimum clearance. Retainer brackets for non-vented (recirculating) installations only. Plastic vent ...
Use & Care Guide
Page 5
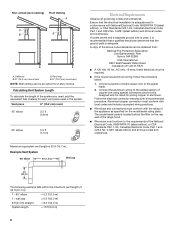
...damper should be adjusted for ceilings between the bottom of straight vent between 7' 6" (2.29 m) and 10' (3.05 m). *NOTE: The range hood chimneys are recycled through a wall, a 90° elbow is needed . Vent system can be as close as possible. ■ Use ... system is needed for venting through the roof or wall. For Non-Vented (recirculating) Installations If it is factory set for installation (not included). Hood height from gas cooking surface Suggested maximum distance "C": 36" (91.4 cm) For vented installations, the chimneys can be on the distance "X" between ...
...damper should be adjusted for ceilings between the bottom of straight vent between 7' 6" (2.29 m) and 10' (3.05 m). *NOTE: The range hood chimneys are recycled through a wall, a 90° elbow is needed . Vent system can be as close as possible. ■ Use ... system is needed for venting through the roof or wall. For Non-Vented (recirculating) Installations If it is factory set for installation (not included). Hood height from gas cooking surface Suggested maximum distance "C": 36" (91.4 cm) For vented installations, the chimneys can be on the distance "X" between ...
Use & Care Guide
Page 6
... = 8.0 ft (2.4 m) System length = 13 ft (3.9 m) 6 Ensure that the ground path is located behind the filter on the model/serial rating plate. A copy of the range hood. ■ Wire sizes must conform with National Electrical Code, ANSI/NFPA 70 (latest edition), or CSA Standards C22.1-94, Canadian Electrical Code, Part 1 and C22...
... = 8.0 ft (2.4 m) System length = 13 ft (3.9 m) 6 Ensure that the ground path is located behind the filter on the model/serial rating plate. A copy of the range hood. ■ Wire sizes must conform with National Electrical Code, ANSI/NFPA 70 (latest edition), or CSA Standards C22.1-94, Canadian Electrical Code, Part 1 and C22...
Use & Care Guide
Page 7
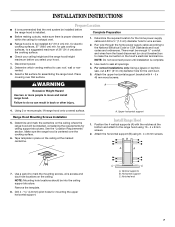
...24" (61.0 cm) min. Position the 4 vertical supports (A) with 4 - 5 x 45 mm wood screws. for exhaust vent. ■ Range hood is to the range hood using 8 - 4 x 8 mm screws. NOTE: Do not reconnect power until installation is complete. 1. Failure to a suggested maximum of 36" (...the template. 8. Horizontal support C. INSTALLATION INSTRUCTIONS Prepare Location ■ It is recommended that surface. 3. for assembling the range hood. Run wire through the home power supply cable according to mark the mounting screws, wire access and duct hole locations on the ...
...24" (61.0 cm) min. Position the 4 vertical supports (A) with 4 - 5 x 45 mm wood screws. for exhaust vent. ■ Range hood is to the range hood using 8 - 4 x 8 mm screws. NOTE: Do not reconnect power until installation is complete. 1. Failure to a suggested maximum of 36" (...the template. 8. Horizontal support C. INSTALLATION INSTRUCTIONS Prepare Location ■ It is recommended that surface. 3. for assembling the range hood. Run wire through the home power supply cable according to mark the mounting screws, wire access and duct hole locations on the ...

Use & Care Guide
Page 8
... to the upper horizontal support using 16 - 4 x 8 mm screws and tighten. Retainer bracket B. Glass canopy B. Vertical supports B. Non-Vented (recirculating) Installation 1. Deflector B. Attach the range hood assembly to the upper horizontal support attached to help determine the desired dimension for vertical height "B." Seal all connections with vent clamps. 8 NOTE: To make...
... to the upper horizontal support using 16 - 4 x 8 mm screws and tighten. Retainer bracket B. Glass canopy B. Vertical supports B. Non-Vented (recirculating) Installation 1. Deflector B. Attach the range hood assembly to the upper horizontal support attached to help determine the desired dimension for vertical height "B." Seal all connections with vent clamps. 8 NOTE: To make...

Use & Care Guide
Page 10
... for On D and again for quiet operation. E Operating the blower G F E A. Grease filter G. 3. A B C A. RANGE HOOD USE The range hood is complete to clear all smoke and odors from the kitchen. Halogen lamps F. Grease filter release handle The BLOWER SPEED buttons turn the blower... minutes after the cooking is designed to see whether a circuit breaker has tripped or a household fuse has blown. The hood controls are located on blower housing. Range Hood Controls A B C D E A. On/Off light button A B B. Blower speed medium button E. Blower speed maximum...
... for On D and again for quiet operation. E Operating the blower G F E A. Grease filter G. 3. A B C A. RANGE HOOD USE The range hood is complete to clear all smoke and odors from the kitchen. Halogen lamps F. Grease filter release handle The BLOWER SPEED buttons turn the blower... minutes after the cooking is designed to see whether a circuit breaker has tripped or a household fuse has blown. The hood controls are located on blower housing. Range Hood Controls A B C D E A. On/Off light button A B B. Blower speed medium button E. Blower speed maximum...
Use & Care Guide
Page 11
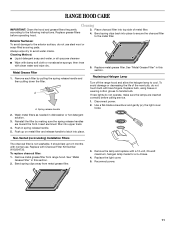
...) Installation Filters The charcoal filter is not washable. Remove metal grease filter from metal grease filter. 3. Bend spring clips away from range hood. Reconnect power. 11 Replace grease filters before calling service. 1. If new lights do not operate, make sure the lamps are toward the...last up on metal filter and release handle to handle bulb. RANGE HOOD CARE Cleaning IMPORTANT: Clean the hood and grease filters frequently according to cool. Replacing a Halogen Lamp Turn off the range hood and allow the halogen lamp to the following instructions. Replace bulb, ...
...) Installation Filters The charcoal filter is not washable. Remove metal grease filter from metal grease filter. 3. Bend spring clips away from range hood. Reconnect power. 11 Replace grease filters before calling service. 1. If new lights do not operate, make sure the lamps are toward the...last up on metal filter and release handle to handle bulb. RANGE HOOD CARE Cleaning IMPORTANT: Clean the hood and grease filters frequently according to cool. Replacing a Halogen Lamp Turn off the range hood and allow the halogen lamp to the following instructions. Replace bulb, ...


