Whirlpool UXD8630DY Support and Manuals
Get Help and Manuals for this Whirlpool item
View All Support Options Below
Free Whirlpool UXD8630DY manuals!
Problems with Whirlpool UXD8630DY?
Ask a Question
Free Whirlpool UXD8630DY manuals!
Problems with Whirlpool UXD8630DY?
Ask a Question
Popular Whirlpool UXD8630DY Manual Pages
Owners Manual - Page 3

... seriously injured if you and others are not followed. WARNING
You can happen if the instructions are very important.
We have provided many important safety messages in this manual and on your appliance. All safety messages will follow instructions. WARNING: This product contains one or more chemicals known to the State of California...
Owners Manual - Page 5
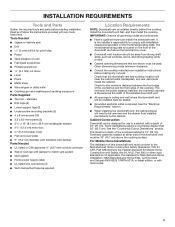
... surface. INSTALLATION REQUIREMENTS
Tools and Parts
Gather the required tools and parts before making any tools listed here. Read and follow the instructions provided with installation clearances specified on the front of the overhead cabinet is installed directly behind the cooktop. Install the downdraft vent first, and then install the cooktop. IMPORTANT: Observe all governing codes and...
Owners Manual - Page 7

To avoid mistakes, it is recommended that the cooktop and vent cutouts be drawn on your specific installation. D
E
F
B
C
G
H
A I . ½" (12.7 mm) minimum
D
C A
E
A.... See the Installation Instructions that applies to backsplash or rear wall
B. 3/4" (19.1 mm) maximum backsplash depth
C. 271/2" (69.9 cm) on 30" (76.2 cm) models 331/2" (85.9 cm) on 36" (91.4 cm) models
D. Cabinet ...
Owners Manual - Page 8
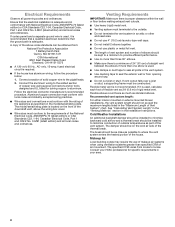
... If codes permit and a separate ground wire is used, it is adequate and in the Installation Instructions.
Recommended vent system length:
For either interior-mounted or exterior-mounted blower installations, the ...section of solid copper wire to aluminum. The model/serial/rating plate is used , calculate each foot of flexible vent as part of outside .
■■ Do not ...
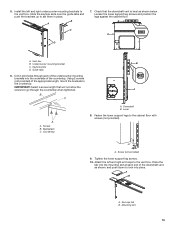
Owners Manual - Page 11
...motor box for Your Installation
When installed in the bottom of the motor box and set them aside.
For ...mounting the blower motor to the back of the vent box, go to the bottom of the vent box to the "Complete Installation" section.
11 Using 2 or more people, place the downdraft vent system on its back.
2. Remove 4 screws from the bottom of the support...
Owners Manual - Page 12

...the ¼" (6.4 mm) deep cover off the shoulder screws in the keyhole slots and set blower motor box aside.
3. Blower motor box
2. The blower motor box assembly can be... moved to the opposite side (rear) of the blower motor box. Remove 6 screws from blower motor and set the cover aside.
5. Rear Mounting - Screws (6)
A
B. Screws (7) B. Disconnect wire connection from the ...
Owners Manual - Page 14

... cover
3. Determine which direction (front or rear) the home power supply cable will enter the terminal box. Complete Installation
NOTE: The downdraft vent system is supplied with a 31/4" x 10" (8.3 cm x 25.4 cm) backdraft damper...appropriate knockout from the front or rear panel and install a 1/2" (12.7 mm) UL listed or CSA approved conduit connector.
4.
Rear of the cutout. Cabinet back
...
Owners Manual - Page 15
...guide tabs and push the brackets up to the countertop. Loosen the lower support leg screws and position the legs against the cabinet floor.
Countertop
A. A
A. Place the
tab into the mounting slot at each of the appropriate length, mount the brackets to set...bracket
B
C. Fasten the lower support legs to the vent box. A
B C
A
A. Screws B. Install the left and right end ...
Owners Manual - Page 16

... to manufacturer's instructions. Check that the circuit breaker has not tripped or a household fuse blown.
4.
B
A
A. UL listed wire connectors
D. Replace the terminal box...Replace all joints.
5. Install cooktop according to blower. Green or green and yellow ground wire
B.
Connect the green (or green/yellow) ground wire to seal all parts and panels before servicing...
Owners Manual - Page 17
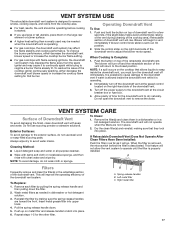
... Downdraft Vent Does Not Operate After Clean Filters Have Been Installed:
Push the filter in a hot detergent solution. Filters
Frequently...to avoid water marks.
Exterior Surfaces:
To Clean:
1.
To Replace: 1. Repeat steps 1-5 for the downdraft vent to dry naturally... downdraft vent blower speed or increase the cooktop flame setting for a few seconds. (This slight delay helps ...
Owners Manual - Page 18
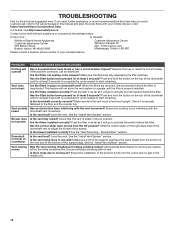
...service call an electrician. PROBLEM POSSIBLE CAUSES AND/OR SOLUTIONS
Nothing will not allow the vent system to the bottom of the support legs. Are the filters installed correctly? Push the filter in this manual and scan the code... a daytime phone number in your mobile device or visit https://www.whirlpool.com/product_help. Level the vent. Ensure the cooktop is blocking path of ...
Owners Manual - Page 19
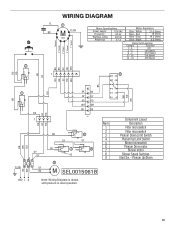
White Blue - GY
GY
N.O. COM
3
N.C.
WIRING DIAGRAM
YL
7
BR
M YL/GN
S50
Motor Specifications
Power supply
120 VAC
Frequency
60 Hz
Wattage rating
420 W
Amperage
3.7 A
Motor Resistance
Blue - COM N.C. Gray
14.3 Ohms
Blue - COM
4
N.C.
6
M SEL0015061B
Num.
1 2
3 4
5 6 7 8 9
GND L N
Note: Wiring ...
Owners Manual - Page 20
... or visit our website at www.whirlpool.ca. In the U.S.A.
Accessories
NOTE: Instructions are trained to fulfill the product warranty and provide after -warranty service anywhere in the United States.
■■ Features and specifications on our full line of service. If you need replacement parts If you need to order replacement parts, we recommend that you need further...
Owners Manual - Page 21
... is installed,
installation instructions. Removal or reinstallation of product replacement,
5.
This warranty gives you specific legal rights, and you also may not apply to Whirlpool
REMEDY UNDER THIS LIMITED
within 30 days. Please have other rights that vary from state to state or province to province. In Canada, call 1-800-253-1301. Consumable parts (i.e.
Repairs to parts...
Owners Manual - Page 44

All rights reserved. Utilisé sous licence au Canada. Used under license in Canada. Tous droits réservés.
12/16 W10342491F
®/™ ©2016 Whirlpool.
Whirlpool UXD8630DY Reviews
We have not received any reviews for Whirlpool yet.