
Dimension Guide
Page 1
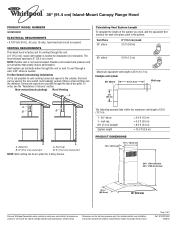
.../26/10 ® 36" (91.4 cm) Island-Mount Canopy Range Hood PRODUCT MODEL NUMBERS GXI6536DX ELECTRICAL REQUIREMENTS • A 120 Volt, 60 Hz., AC only, 15-amp, fused electrical circuit is needed . A 6" (15.2 cm) round vent system is required. Vent system can be used in the non-vented (recirculating) version, fitting a charcoal filter and the deflector...
.../26/10 ® 36" (91.4 cm) Island-Mount Canopy Range Hood PRODUCT MODEL NUMBERS GXI6536DX ELECTRICAL REQUIREMENTS • A 120 Volt, 60 Hz., AC only, 15-amp, fused electrical circuit is needed . A 6" (15.2 cm) round vent system is required. Vent system can be used in the non-vented (recirculating) version, fitting a charcoal filter and the deflector...
Dimension Guide
Page 2
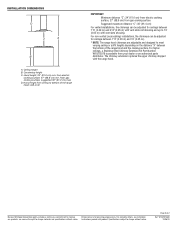
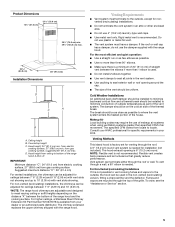
... 7' 6" (2.29 m) and 10' (3.05 m). * NOTE: The range hood chimneys are for planning purposes only. Countertop height C. For non-vented (recirculating) installations, the chimneys can be adjusted for ceilings between the bottom of 2 Ref. D. Page 2 of the range hood and the cooking surface. INSTALLATION DIMENSIONS D C A B A. Because Whirlpool Corporation policy includes a continuous commitment to change materials...
... 7' 6" (2.29 m) and 10' (3.05 m). * NOTE: The range hood chimneys are for planning purposes only. Countertop height C. For non-vented (recirculating) installations, the chimneys can be adjusted for ceilings between the bottom of 2 Ref. D. Page 2 of the range hood and the cooking surface. INSTALLATION DIMENSIONS D C A B A. Because Whirlpool Corporation policy includes a continuous commitment to change materials...
Use & Care Guide
Page 2
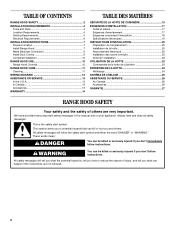
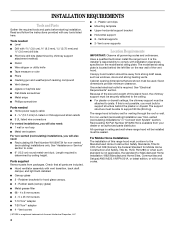
...symbol. TABLE OF CONTENTS RANGE HOOD SAFETY 2 INSTALLATION REQUIREMENTS 4 Tools and Parts 4 Location Requirements 4 Venting Requirements 5 Electrical Requirements 6 INSTALLATION INSTRUCTIONS 7 Prepare Location 7 Install Range Hood 7 Make Electrical Connection 9 Install Duct Covers 9 Complete Installation 10 RANGE HOOD USE 10 Range Hood Controls 10 RANGE HOOD CARE 11 Cleaning 11 WIRING...;MA DE CÂBLAGE 25 ASSISTANCE OU SERVICE 26 Au Canada 26 Accessoires 26 GARANTIE 27 RANGE HOOD SAFETY Your safety and the safety of injury, and tell you don't follow instructions.
...symbol. TABLE OF CONTENTS RANGE HOOD SAFETY 2 INSTALLATION REQUIREMENTS 4 Tools and Parts 4 Location Requirements 4 Venting Requirements 5 Electrical Requirements 6 INSTALLATION INSTRUCTIONS 7 Prepare Location 7 Install Range Hood 7 Make Electrical Connection 9 Install Duct Covers 9 Complete Installation 10 RANGE HOOD USE 10 Range Hood Controls 10 RANGE HOOD CARE 11 Cleaning 11 WIRING...;MA DE CÂBLAGE 25 ASSISTANCE OU SERVICE 26 Au Canada 26 Accessoires 26 GARANTIE 27 RANGE HOOD SAFETY Your safety and the safety of injury, and tell you don't follow instructions.
Use & Care Guide
Page 3
... ventilating use cookware appropriate for proper combustion and exhausting of gases through the flue (chimney) of fire or electrical shock, do not vent exhaust air into spaces within walls or ceilings, attics or into wall or ceiling; Boilovers cause smoking and greasy spillovers that may be...exhaust hazardous or explosive materials and vapors. You can fight the fire with a close fitting lid, cookie sheet, or metal tray, then turn hood ON when cooking at high settings. If you have a class ABC extinguisher, and you have questions, contact the manufacturer. ■ Before ...
... ventilating use cookware appropriate for proper combustion and exhausting of gases through the flue (chimney) of fire or electrical shock, do not vent exhaust air into spaces within walls or ceilings, attics or into wall or ceiling; Boilovers cause smoking and greasy spillovers that may be...exhaust hazardous or explosive materials and vapors. You can fight the fire with a close fitting lid, cookie sheet, or metal tray, then turn hood ON when cooking at high settings. If you have a class ABC extinguisher, and you have questions, contact the manufacturer. ■ Before ...
Use & Care Guide
Page 4
...horizontal support bracket ■ Horizontal support ■ 8 - Canopy hood location should be away from packages. The range hood is factory set for non-vented (recirculating) installations only. Read and follow the instructions provided with vent transition, back draft damper, and light bulb installed. ■ ... is located behind the left filter on the model/serial rating plate. For Mobile Home Installations The installation of the vent hood. Grounded electrical outlet is determined by chimney support attachment method) ■ Pencil ■ Wire stripper or utility knife...
...horizontal support bracket ■ Horizontal support ■ 8 - Canopy hood location should be away from packages. The range hood is factory set for non-vented (recirculating) installations only. Read and follow the instructions provided with vent transition, back draft damper, and light bulb installed. ■ ... is located behind the left filter on the model/serial rating plate. For Mobile Home Installations The installation of the vent hood. Grounded electrical outlet is determined by chimney support attachment method) ■ Pencil ■ Wire stripper or utility knife...
Use & Care Guide
Page 5
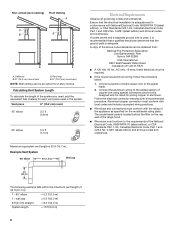
... codes may require the use the damper supplied with the range hood. Venting Methods This island hood is recommended. The hood exhaust opening around the cap. ■ The size of the range hood and the cooking surface. Vent system can be adjusted for specific requirements in your dealer or ... a minimum of 24" (61.0 cm) of straight vent between 7' 6" (2.29 m) and 10' (3.05 m). *NOTE: The range hood chimneys are recycled through a wall, a 90° elbow is used in the vent system. ■ Use caulking to where the vent system enters the heated portion of the thermal break. Consult...
... codes may require the use the damper supplied with the range hood. Venting Methods This island hood is recommended. The hood exhaust opening around the cap. ■ The size of the range hood and the cooking surface. Vent system can be adjusted for specific requirements in your dealer or ... a minimum of 24" (61.0 cm) of straight vent between 7' 6" (2.29 m) and 10' (3.05 m). *NOTE: The range hood chimneys are recycled through a wall, a 90° elbow is used in the vent system. ■ Use caulking to where the vent system enters the heated portion of the thermal break. Consult...
Use & Care Guide
Page 6
... as specified on the model/serial rating plate. The model/serial plate is located behind the filter on the rear wall of the range hood. ■ Wire sizes must conform with National Electrical Code, ANSI/NFPA 70 (latest edition), or CSA Standards C22.1-94, Canadian Electrical Code... Part 1 and C22.2 No. 0-M91 (latest edition) and all local codes and ordinances. Maximum equivalent vent length is adequate. Deflector B. 6" (15.2 cm) round vent A. Roof cap B. 6" (15.2 cm) round vent NOTE: Wall venting can be an option for 2-story homes. Ensure that the ground path is 35 ft (10.7 m). ...
... as specified on the model/serial rating plate. The model/serial plate is located behind the filter on the rear wall of the range hood. ■ Wire sizes must conform with National Electrical Code, ANSI/NFPA 70 (latest edition), or CSA Standards C22.1-94, Canadian Electrical Code... Part 1 and C22.2 No. 0-M91 (latest edition) and all local codes and ordinances. Maximum equivalent vent length is adequate. Deflector B. 6" (15.2 cm) round vent A. Roof cap B. 6" (15.2 cm) round vent NOTE: Wall venting can be an option for 2-story homes. Ensure that the ground path is 35 ft (10.7 m). ...
Use & Care Guide
Page 7
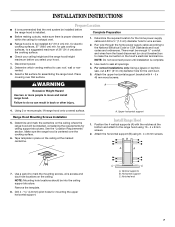
... Mounting hole locations should be installed, considering the requirements for gas cooking surfaces, to move and install range hood. Drill 4 4.8 mm) pilot holes for exhaust vent. ■ Range hood is to be enough ½" conduit and wires from the fused disconnect (or circuit breaker) box to the...NOTE: Do not reconnect power until installation is centered over that the vent system be installed before you select your ceiling height and the range hood height maximum before the range hood is proper clearance within the ceiling for mounting the upper horizontal support. ...
... Mounting hole locations should be installed, considering the requirements for gas cooking surfaces, to move and install range hood. Drill 4 4.8 mm) pilot holes for exhaust vent. ■ Range hood is to be enough ½" conduit and wires from the fused disconnect (or circuit breaker) box to the...NOTE: Do not reconnect power until installation is centered over that the vent system be installed before you select your ceiling height and the range hood height maximum before the range hood is proper clearance within the ceiling for mounting the upper horizontal support. ...

Use & Care Guide
Page 8
Assemble rubber seals to ventilator assembly. Attach the range hood assembly to the upper horizontal support attached to the upper horizontal support using 16 - 4 x 8 mm screws and tighten. A A A. Glass canopy B. Ventilator assembly... Ventilator assembly 7. Assemble and center glass canopy to the front and back flange of the ventilator assembly. 6. Mounting screws Connect Vent System 1. Seal all connections with vent clamps. 8 Non-Vented (recirculating) Installation 1. Attach the air deflector to the ceiling using 4 mounting screws. See "Installation Clearances" in place. ...
Assemble rubber seals to ventilator assembly. Attach the range hood assembly to the upper horizontal support attached to the upper horizontal support using 16 - 4 x 8 mm screws and tighten. A A A. Glass canopy B. Ventilator assembly... Ventilator assembly 7. Assemble and center glass canopy to the front and back flange of the ventilator assembly. 6. Mounting screws Connect Vent System 1. Seal all connections with vent clamps. 8 Non-Vented (recirculating) Installation 1. Attach the air deflector to the ceiling using 4 mounting screws. See "Installation Clearances" in place. ...

Use & Care Guide
Page 10
...button E. Control panel D. A B C A. Plastic bracket Complete Installation 1. For non-vented (recirculating) installations only, install charcoal filters over grille on and control the blower speed and sound level for Off. If range hood does not operate, check to clear all smoke and odors from the kitchen. Grease ...for On D and again for quiet operation. The BLOWER OFF button turns the blower Off. 10 For best results, start the hood before cooking and allow it to operate several minutes after the cooking is designed to remove smoke, cooking vapors and odors from your...
...button E. Control panel D. A B C A. Plastic bracket Complete Installation 1. For non-vented (recirculating) installations only, install charcoal filters over grille on and control the blower speed and sound level for Off. If range hood does not operate, check to clear all smoke and odors from the kitchen. Grease ...for On D and again for quiet operation. The BLOWER OFF button turns the blower Off. 10 For best results, start the hood before cooking and allow it to operate several minutes after the cooking is designed to remove smoke, cooking vapors and odors from your...
Use & Care Guide
Page 11
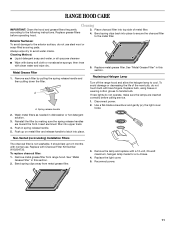
... the life of metal filter. 4. Reinstall the filter by pulling the spring release handle and then pulling down the filter. Non-Vented (recirculating) Installation Filters The charcoal filter is not washable. See "Metal Grease Filter" in dishwasher or hot detergent solution. 3. ...Wash metal filters as needed in this section. Push up to the metal filter. Bend spring clips away from range hood. RANGE HOOD CARE Cleaning IMPORTANT: Clean the hood and grease filters frequently according to handle bulb. See "Metal Grease Filter" in spring release handle. 5. Disconnect power...
... the life of metal filter. 4. Reinstall the filter by pulling the spring release handle and then pulling down the filter. Non-Vented (recirculating) Installation Filters The charcoal filter is not washable. See "Metal Grease Filter" in dishwasher or hot detergent solution. 3. ...Wash metal filters as needed in this section. Push up to the metal filter. Bend spring clips away from range hood. RANGE HOOD CARE Cleaning IMPORTANT: Clean the hood and grease filters frequently according to handle bulb. See "Metal Grease Filter" in spring release handle. 5. Disconnect power...


