
Dimension Guide
Page 1
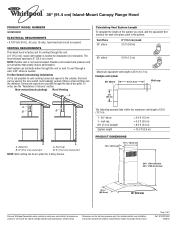
...;" (74.0 cm) min. 49¹⁄₈" (124.8 cm) max. 25 64.0 cm) 36" (91.4 cm) Because Whirlpool Corporation policy includes a continuous commitment to the outside, the hood can be used in the non-vented (recirculating) version, fitting a charcoal filter and the deflector. ® 36" (91.4 cm) Island-Mount Canopy Range Hood PRODUCT MODEL NUMBERS GXI6536DX ELECTRICAL REQUIREMENTS • A 120 Volt, 60 Hz., AC only, 15-amp, fused electrical circuit is not recommended.
...;" (74.0 cm) min. 49¹⁄₈" (124.8 cm) max. 25 64.0 cm) 36" (91.4 cm) Because Whirlpool Corporation policy includes a continuous commitment to the outside, the hood can be used in the non-vented (recirculating) version, fitting a charcoal filter and the deflector. ® 36" (91.4 cm) Island-Mount Canopy Range Hood PRODUCT MODEL NUMBERS GXI6536DX ELECTRICAL REQUIREMENTS • A 120 Volt, 60 Hz., AC only, 15-amp, fused electrical circuit is not recommended.
Dimension Guide
Page 2
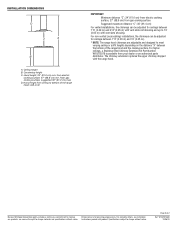
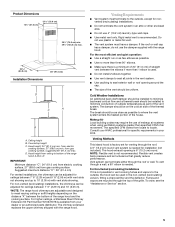
... 2 of the range hood and the cooking surface. from gas cooking surface Suggested maximum distance "C": 36" (91.4 cm) For vented installations, the chimneys can be adjusted for planning purposes only. from your dealer or an authorized parts distributor. Specifications subject to change without notice. W10292168C 10/26/10 INSTALLATION DIMENSIONS D C A B A. D. For higher ceilings, a Stainless Steel Chimney Extension Kit Part Number W10272078 is available from gas cooking surface, suggested 36" (91.2 cm) max. Ceiling height B. Hood height: 24...
... 2 of the range hood and the cooking surface. from gas cooking surface Suggested maximum distance "C": 36" (91.4 cm) For vented installations, the chimneys can be adjusted for planning purposes only. from your dealer or an authorized parts distributor. Specifications subject to change without notice. W10292168C 10/26/10 INSTALLATION DIMENSIONS D C A B A. D. For higher ceilings, a Stainless Steel Chimney Extension Kit Part Number W10272078 is available from gas cooking surface, suggested 36" (91.2 cm) max. Ceiling height B. Hood height: 24...
Warranty Information
Page 1
... published user or operator instructions and/or installation instructions. 4. You will pay for other than normal, single-family household use of the Use & Care Guide. This limited warranty is valid only in the United States or Canada and applies only when the major appliance is used in an inaccessible location or is operated and maintained according to instructions attached to or furnished with electrical or plumbing codes, or use...
... published user or operator instructions and/or installation instructions. 4. You will pay for other than normal, single-family household use of the Use & Care Guide. This limited warranty is valid only in the United States or Canada and applies only when the major appliance is used in an inaccessible location or is operated and maintained according to instructions attached to or furnished with electrical or plumbing codes, or use...
Use & Care Guide
Page 1
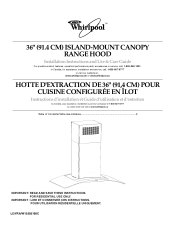
36" (91.4 CM) ISLAND-MOUNT CANOPY RANGE HOOD Installation Instructions and Use & Care Guide For questions about features, operation/performance parts, accessories or service, call : 1-800-807-6777 or visit our website at... POUR UTILISATION RÉSIDENTIELLE UNIQUEMENT. LI3YRA/W10292168C IMPORTANT : LIRE ET CONSERVER CES INSTRUCTIONS. In Canada, for assistance, installation and service, call : 1-800-253-1301. FOR RESIDENTIAL USE ONLY. www.whirlpool.com or www.whirlpool.ca HOTTE D'EXTRACTION DE 36" (91...
36" (91.4 CM) ISLAND-MOUNT CANOPY RANGE HOOD Installation Instructions and Use & Care Guide For questions about features, operation/performance parts, accessories or service, call : 1-800-807-6777 or visit our website at... POUR UTILISATION RÉSIDENTIELLE UNIQUEMENT. LI3YRA/W10292168C IMPORTANT : LIRE ET CONSERVER CES INSTRUCTIONS. In Canada, for assistance, installation and service, call : 1-800-253-1301. FOR RESIDENTIAL USE ONLY. www.whirlpool.com or www.whirlpool.ca HOTTE D'EXTRACTION DE 36" (91...
Use & Care Guide
Page 2
This is , tell you don't immediately follow instructions. TABLE OF CONTENTS RANGE HOOD SAFETY 2 INSTALLATION REQUIREMENTS 4 Tools and Parts 4 Location Requirements 4 Venting Requirements 5 Electrical Requirements 6 INSTALLATION INSTRUCTIONS 7 Prepare Location 7 Install Range Hood 7 Make Electrical Connection 9 Install Duct Covers 9 Complete Installation 10 RANGE HOOD USE 10 Range Hood Controls 10 RANGE HOOD CARE 11 Cleaning 11 WIRING DIAGRAM 12 ASSISTANCE OR SERVICE 13 In the U.S.A 13 In Canada 13 Accessories 13 WARRANTY 14 TABLE DES MATIÈRES SÉCURIT...
This is , tell you don't immediately follow instructions. TABLE OF CONTENTS RANGE HOOD SAFETY 2 INSTALLATION REQUIREMENTS 4 Tools and Parts 4 Location Requirements 4 Venting Requirements 5 Electrical Requirements 6 INSTALLATION INSTRUCTIONS 7 Prepare Location 7 Install Range Hood 7 Make Electrical Connection 9 Install Duct Covers 9 Complete Installation 10 RANGE HOOD USE 10 Range Hood Controls 10 RANGE HOOD CARE 11 Cleaning 11 WIRING DIAGRAM 12 ASSISTANCE OR SERVICE 13 In the U.S.A 13 In Canada 13 Accessories 13 WARRANTY 14 TABLE DES MATIÈRES SÉCURIT...
Use & Care Guide
Page 3
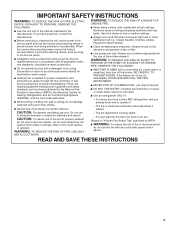
... or medium settings. ■ Always turn off at high settings. CAUTION: For general ventilating use to duct air outside - you already know you have questions, contact the manufacturer. ■ Before servicing or cleaning the unit, switch power off the burner. The fire is needed for proper combustion and exhausting of gases through the flue (chimney) of fire or electrical shock, do not damage electrical wiring and other utilities. ■ Ducted fans must always...
... or medium settings. ■ Always turn off at high settings. CAUTION: For general ventilating use to duct air outside - you already know you have questions, contact the manufacturer. ■ Before servicing or cleaning the unit, switch power off the burner. The fire is needed for proper combustion and exhausting of gases through the flue (chimney) of fire or electrical shock, do not damage electrical wiring and other utilities. ■ Ducted fans must always...
Use & Care Guide
Page 4
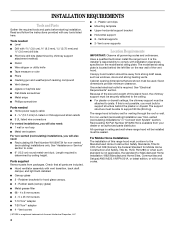
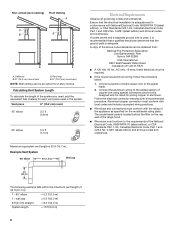
... listed wire connectors For vented installations, you will also need : ■ Recirculating Kit Part Number W10294734 for Manufactured Home Installation 1982 (Manufactured Home Sites, Communities and Setups) ANSI A225.1/NFPA 501A, or latest edition, or with installation clearances specified on the rear wall of the vent hood. Retainer brackets for venting through the roof or wall. Plastic vent clips ■ Mounting template ■ Upper horizontal support bracket ■ Horizontal support ■ 8 - Given dimensions provide minimum clearance. Length required is the installer...
... listed wire connectors For vented installations, you will also need : ■ Recirculating Kit Part Number W10294734 for Manufactured Home Installation 1982 (Manufactured Home Sites, Communities and Setups) ANSI A225.1/NFPA 501A, or latest edition, or with installation clearances specified on the rear wall of the vent hood. Retainer brackets for venting through the roof or wall. Plastic vent clips ■ Mounting template ■ Upper horizontal support bracket ■ Horizontal support ■ 8 - Given dimensions provide minimum clearance. Length required is the installer...
Use & Care Guide
Page 5
.... 25 64.0 cm) Installation Dimensions 36" (91.4 cm) D C A B A. For higher ceilings, a Stainless Steel Chimney Extension Kit Part Number W10272078 is factory set for specific requirements in the non-vented (recirculating) version, fitting a charcoal filter and the deflector. Venting Methods This island hood is available from gas cooking surface Suggested maximum distance "C": 36" (91.4 cm) For vented installations, the chimneys can be adjusted for ceilings between the elbows if more than three 90° elbows. ■ Make sure there is a minimum...
.... 25 64.0 cm) Installation Dimensions 36" (91.4 cm) D C A B A. For higher ceilings, a Stainless Steel Chimney Extension Kit Part Number W10272078 is factory set for specific requirements in the non-vented (recirculating) version, fitting a charcoal filter and the deflector. Venting Methods This island hood is available from gas cooking surface Suggested maximum distance "C": 36" (91.4 cm) For vented installations, the chimneys can be adjusted for ceilings between the elbows if more than three 90° elbows. ■ Make sure there is a minimum...
Use & Care Guide
Page 6
... (1.5 m) Electrical Requirements Observe all local codes and ordinances. Aluminum/copper connection must conform with local codes and industry accepted wiring practices. ■ Wire sizes and connections must conform to the pigtail leads. 2. Non-vented (recirculating) Roof Venting A A B B A. Deflector B. 6" (15.2 cm) round vent A. Roof cap B. 6" (15.2 cm) round vent NOTE: Wall venting can be an option for 2-story homes. If codes permit and a separate ground wire is adequate. Follow the electrical connector manufacturer's recommended procedure. The model/serial plate is...
... (1.5 m) Electrical Requirements Observe all local codes and ordinances. Aluminum/copper connection must conform with local codes and industry accepted wiring practices. ■ Wire sizes and connections must conform to the pigtail leads. 2. Non-vented (recirculating) Roof Venting A A B B A. Deflector B. 6" (15.2 cm) round vent A. Roof cap B. 6" (15.2 cm) round vent NOTE: Wall venting can be an option for 2-story homes. If codes permit and a separate ground wire is adequate. Follow the electrical connector manufacturer's recommended procedure. The model/serial plate is...
Use & Care Guide
Page 7
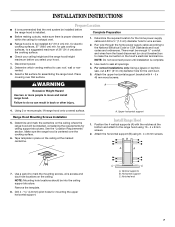
... requirements for exhaust vent. ■ Range hood is to move and install range hood. Remove the template. 8. Vertical supports B. Determine the required location for the home power supply cable and drill a ½" (1.3 cm) diameter hole for mounting the upper horizontal support. Use caulk to use: roof, wall or nonvented. 3. A. Attach the horizontal support (B) using 16 - 4 x 8 mm screws. 2. Range Hood Mounting Screws Installation 5. for electric cooking surfaces, 27" (68.6 cm) min. There must be installed before you select your hood. 1. WARNING A Excessive Weight...
... requirements for exhaust vent. ■ Range hood is to move and install range hood. Remove the template. 8. Vertical supports B. Determine the required location for the home power supply cable and drill a ½" (1.3 cm) diameter hole for mounting the upper horizontal support. Use caulk to use: roof, wall or nonvented. 3. A. Attach the horizontal support (B) using 16 - 4 x 8 mm screws. 2. Range Hood Mounting Screws Installation 5. for electric cooking surfaces, 27" (68.6 cm) min. There must be installed before you select your hood. 1. WARNING A Excessive Weight...

Use & Care Guide
Page 8
... the chimney support bracket and replace after vent section is in the "Location Requirements" section to help determine the desired dimension for vertical height "B." Vertical supports B. A B C A. Attach the range hood assembly to the upper horizontal support attached to the upper horizontal support using 16 - 4 x 8 mm screws and tighten. A A A. Install vent system. 2. Seal all connections with vent clamps. Install vent between the transition and the deflector. 3. See "Installation Clearances" in place. 4. A A B A. Assemble rubber seals to the deflector. Mounting screws...
... the chimney support bracket and replace after vent section is in the "Location Requirements" section to help determine the desired dimension for vertical height "B." Vertical supports B. A B C A. Attach the range hood assembly to the upper horizontal support attached to the upper horizontal support using 16 - 4 x 8 mm screws and tighten. A A A. Install vent system. 2. Seal all connections with vent clamps. Install vent between the transition and the deflector. 3. See "Installation Clearances" in place. 4. A A B A. Assemble rubber seals to the deflector. Mounting screws...

Use & Care Guide
Page 9
... parts and panels before servicing. Knockout B. E F A. Black wires D. Replace all light bulbs are secure in terminal box using 4 - 4 x 8 mm screws. Remove the knockout in terminal box. Connect ground wire to yellow-green ground wire (E) in their sockets. 11. Connect green (or bare) ground wire from home power supply to green and yellow ground wire in the terminal box cover and install a UL listed or CSA approved ¹⁄₂" strain relief. Terminal box cover 4. Screws B. UL listed wire connectors E. Use...
... parts and panels before servicing. Knockout B. E F A. Black wires D. Replace all light bulbs are secure in terminal box using 4 - 4 x 8 mm screws. Remove the knockout in terminal box. Connect ground wire to yellow-green ground wire (E) in their sockets. 11. Connect green (or bare) ground wire from home power supply to green and yellow ground wire in the terminal box cover and install a UL listed or CSA approved ¹⁄₂" strain relief. Terminal box cover 4. Screws B. UL listed wire connectors E. Use...

Use & Care Guide
Page 10
... light button A B B. Blower Off button C. Halogen lamps F. For best results, start the hood before cooking and allow it to operate several minutes after the cooking is designed to see whether a circuit breaker has tripped or a household fuse has blown. Control panel D. See the "Range Hood Use" section. Range Hood Controls A B C D E A. For non-vented (recirculating) installations only, install charcoal filters over grille on and control the blower speed and sound level for Off. See the "Range Hood Care" section. 3. Grease filter release handle The BLOWER SPEED buttons...
... light button A B B. Blower Off button C. Halogen lamps F. For best results, start the hood before cooking and allow it to operate several minutes after the cooking is designed to see whether a circuit breaker has tripped or a household fuse has blown. Control panel D. See the "Range Hood Use" section. Range Hood Controls A B C D E A. For non-vented (recirculating) installations only, install charcoal filters over grille on and control the blower speed and sound level for Off. See the "Range Hood Care" section. 3. Grease filter release handle The BLOWER SPEED buttons...
Use & Care Guide
Page 11
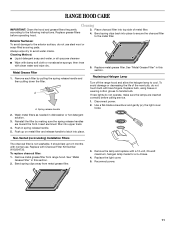
... are inserted correctly before operating hood. 3. To avoid damage or decreasing the life of metal filter. 4. Use a flat-blade screwdriver and gently pry the light cover loose. 2. Non-Vented (recirculating) Installation Filters The charcoal filter is not washable. It should last up on metal filter and release handle to 6 months with normal use steel wool or soap-filled scouring pads. To replace charcoal filter: 1. Remove metal grease filter from metal grease filter. 3. Place charcoal filter into...
... are inserted correctly before operating hood. 3. To avoid damage or decreasing the life of metal filter. 4. Use a flat-blade screwdriver and gently pry the light cover loose. 2. Non-Vented (recirculating) Installation Filters The charcoal filter is not washable. It should last up on metal filter and release handle to 6 months with normal use steel wool or soap-filled scouring pads. To replace charcoal filter: 1. Remove metal grease filter from metal grease filter. 3. Place charcoal filter into...

Use & Care Guide
Page 12
Y/G BK Y/G EMI Filter W BK 120V TRANSFORMER 12V BU Y Y Y Motor Characteristics Power Supply 120VAC Frequency 60HZ Power 240W W BU GY BK R w Y BR Y/G BU BK R w Y BR Y/G WIRING DIAGRAM VARISTOR CAPACITOR 1 2 34 5 67 8 9 M Y/G PUSH BUTTON BOARD L12 R W BR BK 3 LA L BR Y Switch Operation Position Connection Off No Connection High Speed L-Black (3) Med Speed L-Red (2) Low Speed L-White (1) Lamps L-Yellow (LA) Motor (Ohms) Resistance Blue Red 37.7 Blue Gray Blue Black Blue White Room Temp. 30.3 20.8 (MAX) 45.1 (MAX) 73˚F (23˚C) 12
Y/G BK Y/G EMI Filter W BK 120V TRANSFORMER 12V BU Y Y Y Motor Characteristics Power Supply 120VAC Frequency 60HZ Power 240W W BU GY BK R w Y BR Y/G BU BK R w Y BR Y/G WIRING DIAGRAM VARISTOR CAPACITOR 1 2 34 5 67 8 9 M Y/G PUSH BUTTON BOARD L12 R W BR BK 3 LA L BR Y Switch Operation Position Connection Off No Connection High Speed L-Black (3) Med Speed L-Red (2) Low Speed L-White (1) Lamps L-Yellow (LA) Motor (Ohms) Resistance Blue Red 37.7 Blue Gray Blue Black Blue White Room Temp. 30.3 20.8 (MAX) 45.1 (MAX) 73˚F (23˚C) 12
Use & Care Guide
Page 13
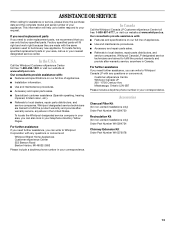
... U.S.A. Accessories Charcoal Filter Kit (for non-vented installations only) Order Part Number W10294730 Recirculation Kit (for assistance or service, please know the purchase date and the complete model and serial number of appliances. ■ Use and maintenance procedures. ■ Accessory and repair parts sales. ■ Referrals to local dealers, repair parts distributors, and service companies. This information will fit right and work right because they are made with : ■ Features and specifications on...
... U.S.A. Accessories Charcoal Filter Kit (for non-vented installations only) Order Part Number W10294730 Recirculation Kit (for assistance or service, please know the purchase date and the complete model and serial number of appliances. ■ Use and maintenance procedures. ■ Accessory and repair parts sales. ■ Referrals to local dealers, repair parts distributors, and service companies. This information will fit right and work right because they are made with : ■ Features and specifications on...
Use & Care Guide
Page 14
... or freezer product failures. 7. Major appliances with published installation instructions. 11. DISCLAIMER OF IMPLIED WARRANTIES; Dealer name Address Phone number Model number Serial number Purchase date 14 Service must provide proof of the Use & Care Guide. ITEMS EXCLUDED FROM WARRANTY This limited warranty does not cover: 1. Consumable parts are excluded from your authorized Whirlpool dealer to repair or replace appliance light bulbs, air filters or water filters. This warranty is not available. 10. In the U.S.A., call...
... or freezer product failures. 7. Major appliances with published installation instructions. 11. DISCLAIMER OF IMPLIED WARRANTIES; Dealer name Address Phone number Model number Serial number Purchase date 14 Service must provide proof of the Use & Care Guide. ITEMS EXCLUDED FROM WARRANTY This limited warranty does not cover: 1. Consumable parts are excluded from your authorized Whirlpool dealer to repair or replace appliance light bulbs, air filters or water filters. This warranty is not available. 10. In the U.S.A., call...


